iP3500 series Quick Start Guide
Page 5
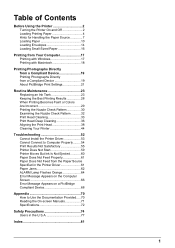
Table of Contents Before Using the Printer 2 Turning the Printer On and Off 2 Loading Printing Paper 4 Hints for Handling the Paper Source 7... Maintenance 23 Replacing an Ink Tank 23 Keeping the Best Printing Results 28 When Printing Becomes Faint or Colors Are Incorrect 29 Printing the Nozzle Check Pattern 30 Examining the Nozzle Check Pattern ...........32 Print Head Cleaning...60 Paper Does Not Feed Properly 61 Paper Does Not Feed from the Paper Source Specified in the Printer Driver 61 Paper Jams 62 ALARM Lamp Flashes Orange 64 Error Message Appears on the Computer Screen 66...
Table of Contents Before Using the Printer 2 Turning the Printer On and Off 2 Loading Printing Paper 4 Hints for Handling the Paper Source 7... Maintenance 23 Replacing an Ink Tank 23 Keeping the Best Printing Results 28 When Printing Becomes Faint or Colors Are Incorrect 29 Printing the Nozzle Check Pattern 30 Examining the Nozzle Check Pattern ...........32 Print Head Cleaning...60 Paper Does Not Feed Properly 61 Paper Does Not Feed from the Paper Source Specified in the Printer Driver 61 Paper Jams 62 ALARM Lamp Flashes Orange 64 Error Message Appears on the Computer Screen 66...
iP3500 series Quick Start Guide
Page 6
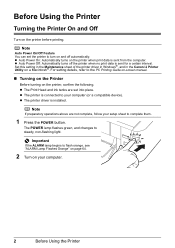
... this setting in the Maintenance sheet of the printer driver in Windows®, and in the Canon IJ Printer Utility on the printer, confirm the following. Note If preparatory operations above are set the printer to the PC Printing Guide on-screen manual. „ Turning on the Printer Before turning on a Macintosh®. Note Auto Power On/Off...
... this setting in the Maintenance sheet of the printer driver in Windows®, and in the Canon IJ Printer Utility on the printer, confirm the following. Note If preparatory operations above are set the printer to the PC Printing Guide on-screen manual. „ Turning on the Printer Before turning on a Macintosh®. Note Auto Power On/Off...
iP3500 series Quick Start Guide
Page 7
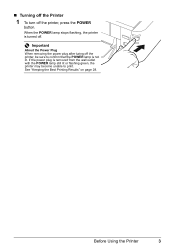
Important About the Power Plug When removing the power plug after turing off the printer, be sure to confirm that the POWER lamp is removed from the wall outlet with the POWER lamp still lit or flashing green, the printer may become unable to print. See "Keeping the Best Printing Results" on page 28. If the power plug is not lit. Before Using the Printer 3 When the POWER lamp stops flashing, the printer is turned off the printer, press the POWER button. „ Turning off the Printer 1 To turn off .
Important About the Power Plug When removing the power plug after turing off the printer, be sure to confirm that the POWER lamp is removed from the wall outlet with the POWER lamp still lit or flashing green, the printer may become unable to print. See "Keeping the Best Printing Results" on page 28. If the power plug is not lit. Before Using the Printer 3 When the POWER lamp stops flashing, the printer is turned off the printer, press the POWER button. „ Turning off the Printer 1 To turn off .
iP3500 series Quick Start Guide
Page 21
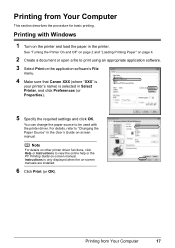
...with Windows 1 Turn on the printer and load the paper in the User's Guide on-screen manual. Note For details on -screen manual. For details, refer to print using an appropriate application software. 3 Select Print on the application software's File menu. 4 Make sure that Canon XXX (where "...XXX" is your printer's name) is only displayed when the on page 4. 2 Create a document or open a file to "Changing the Paper Source" ...
...with Windows 1 Turn on the printer and load the paper in the User's Guide on-screen manual. Note For details on -screen manual. For details, refer to print using an appropriate application software. 3 Select Print on the application software's File menu. 4 Make sure that Canon XXX (where "...XXX" is your printer's name) is only displayed when the on page 4. 2 Create a document or open a file to "Changing the Paper Source" ...
iP3500 series Quick Start Guide
Page 22
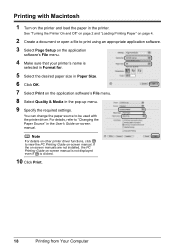
See "Turning the Printer On and Off" on page 2 and "Loading Printing Paper" on page 4. 2 Create a document or...using an appropriate application software. 3 Select Page Setup on the application software's File menu. 4 Make sure that your printer's name is clicked. 10 Click Print. 18 Printing from Your Computer You can change the paper source to view the ...Print on the application software's File menu. 8 Select Quality & Media in the User's Guide on the printer and load the paper in the printer. If the on-screen manuals are not installed, the PC Printing Guide on -screen manual. Note For ...
See "Turning the Printer On and Off" on page 2 and "Loading Printing Paper" on page 4. 2 Create a document or...using an appropriate application software. 3 Select Page Setup on the application software's File menu. 4 Make sure that your printer's name is clicked. 10 Click Print. 18 Printing from Your Computer You can change the paper source to view the ...Print on the application software's File menu. 8 Select Quality & Media in the User's Guide on the printer and load the paper in the printer. If the on-screen manuals are not installed, the PC Printing Guide on -screen manual. Note For ...
iP3500 series Quick Start Guide
Page 23
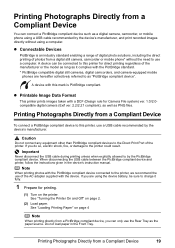
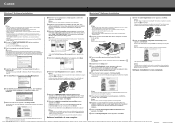
...only use the Rear Tray as it fully. 1 Prepare for printing. (1) Turn on the printer. Printing Photographs Directly from a PictBridge compliant device, you are hereafter collectively referred to the printer, we recommend the use of the manufacturer or the model as long as... device's manufacturer. z Connectable Devices PictBridge is PictBridge compliant. See "Loading Printing Paper" on page 2. (2) Load paper. See "Turning the Printer On and Off" on page 4 Note When printing directly from a Compliant Device 19 Printing Photographs Directly from a Compliant Device To connect...
...only use the Rear Tray as it fully. 1 Prepare for printing. (1) Turn on the printer. Printing Photographs Directly from a PictBridge compliant device, you are hereafter collectively referred to the printer, we recommend the use of the manufacturer or the model as long as... device's manufacturer. z Connectable Devices PictBridge is PictBridge compliant. See "Loading Printing Paper" on page 2. (2) Load paper. See "Turning the Printer On and Off" on page 4 Note When printing directly from a Compliant Device 19 Printing Photographs Directly from a Compliant Device To connect...
iP3500 series Quick Start Guide
Page 24
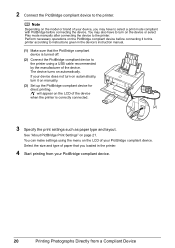
...device. You may also have to turn it to this printer according to instructions given in the printer. 4 Start printing from your device, you may have to the printer using the menu on the LCD of your device does not turn on automatically, turn on the device or select Play... the PictBridge compliant device for direct printing. You can make settings using a USB cable recommended by the manufacturer of the device when the printer is turned off. (2) Connect the PictBridge compliant device to select a print mode compliant with PictBridge before connecting it on the LCD of the device...
...device. You may also have to turn it to this printer according to instructions given in the printer. 4 Start printing from your device, you may have to the printer using the menu on the LCD of your device does not turn on automatically, turn on the device or select Play... the PictBridge compliant device for direct printing. You can make settings using a USB cable recommended by the manufacturer of the device when the printer is turned off. (2) Connect the PictBridge compliant device to select a print mode compliant with PictBridge before connecting it on the LCD of the device...
iP3500 series Quick Start Guide
Page 32
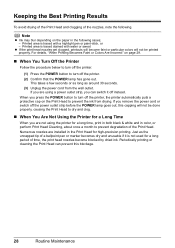
...high-precision printing. If you press the POWER button to turn off the printer, the printer automatically puts a protective cap on page 29. „ When You Turn Off the Printer Follow the procedure below to turn off the printer. (1) Press the POWER button to turn off the printer. (2) Confirm that the POWER lamp has gone out.... strip before the POWER lamp goes out, this blockage. 28 Routine Maintenance Note z Ink may blur depending on the paper in color, or perform Print Head Cleaning, about once a month to prevent degradation of time, the print head nozzles become faint or particular...
...high-precision printing. If you press the POWER button to turn off the printer, the printer automatically puts a protective cap on page 29. „ When You Turn Off the Printer Follow the procedure below to turn off the printer. (1) Press the POWER button to turn off the printer. (2) Confirm that the POWER lamp has gone out.... strip before the POWER lamp goes out, this blockage. 28 Routine Maintenance Note z Ink may blur depending on the paper in color, or perform Print Head Cleaning, about once a month to prevent degradation of time, the print head nozzles become faint or particular...
iP3500 series Quick Start Guide
Page 40
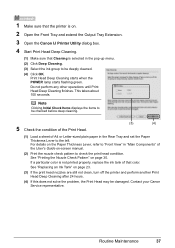
...on page 23. (3) If the print head nozzles are still not clean, turn off the printer and perform another Print Head Deep Cleaning after 24 hours. (4) If this procedure only when necessary. 1 Make sure that color. Do not perform any other operations until Print Head Deep Cleaning finishes. See...Components" of that the printer is a more ink than standard Print Head Cleaning, so perform this does not solve the problem, the Print Head may be damaged. For details on the Paper Thickness Lever, refer to check the print head condition. Contact your Canon Service representative. 36 Routine...
...on page 23. (3) If the print head nozzles are still not clean, turn off the printer and perform another Print Head Deep Cleaning after 24 hours. (4) If this procedure only when necessary. 1 Make sure that color. Do not perform any other operations until Print Head Deep Cleaning finishes. See...Components" of that the printer is a more ink than standard Print Head Cleaning, so perform this does not solve the problem, the Print Head may be damaged. For details on the Paper Thickness Lever, refer to check the print head condition. Contact your Canon Service representative. 36 Routine...
iP3500 series Quick Start Guide
Page 41
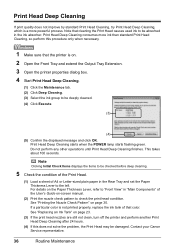
...takes about 100 seconds. See "Printing the Nozzle Check Pattern" on page 23. (3) If the print head nozzles are still not clean, turn off the printer and perform another Print Head Deep Cleaning after 24 hours. (4) If this does not solve the problem, the Print Head may be deeply ... (4) Click OK. If a particular color is selected in the pop-up menu. (2) Click Deep Cleaning. (3) Select the ink group to be damaged. Contact your Canon Service representative. Do not perform any other operations until Print Head Deep Cleaning finishes. 1 Make sure that the printer is on. 2 Open the Front Tray...
...takes about 100 seconds. See "Printing the Nozzle Check Pattern" on page 23. (3) If the print head nozzles are still not clean, turn off the printer and perform another Print Head Deep Cleaning after 24 hours. (4) If this does not solve the problem, the Print Head may be deeply ... (4) Click OK. If a particular color is selected in the pop-up menu. (2) Click Deep Cleaning. (3) Select the ink group to be damaged. Contact your Canon Service representative. Do not perform any other operations until Print Head Deep Cleaning finishes. 1 Make sure that the printer is on. 2 Open the Front Tray...
iP3500 series Quick Start Guide
Page 48
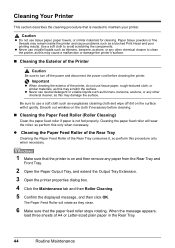
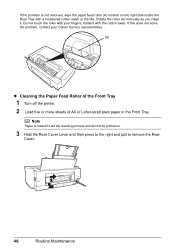
Use a soft cloth to turn off dirt on the cloth if necessary before cleaning the printer. z Never use volatile liquids such as thinners, benzene, acetone, or any other chemical cleaner, as this may remain inside the printer and cause problems such as a blocked Print Head and poor printing results. ...the displayed message, and then click OK. z Cleaning the Paper Feed Roller of the Rear Tray Cleaning the Paper Feed Roller of the Printer Caution Be sure to avoid scratching the components. The Paper Feed Roller will wear the roller, so perform this may damage the surface. ...
Use a soft cloth to turn off dirt on the cloth if necessary before cleaning the printer. z Never use volatile liquids such as thinners, benzene, acetone, or any other chemical cleaner, as this may remain inside the printer and cause problems such as a blocked Print Head and poor printing results. ...the displayed message, and then click OK. z Cleaning the Paper Feed Roller of the Rear Tray Cleaning the Paper Feed Roller of the Printer Caution Be sure to avoid scratching the components. The Paper Feed Roller will wear the roller, so perform this may damage the surface. ...
iP3500 series Quick Start Guide
Page 50
... Tray with a moistened cotton swab or the like. Rotate the roller (A) manually as you clean it with your Canon Service representative. (A) z Cleaning the Paper Feed Roller of the Front Tray 1 Turn off the printer. 2 Load five or more sheets of A4 or Letter-sized plain paper in the Front Tray. If the problem...
... Tray with a moistened cotton swab or the like. Rotate the roller (A) manually as you clean it with your Canon Service representative. (A) z Cleaning the Paper Feed Roller of the Front Tray 1 Turn off the printer. 2 Load five or more sheets of A4 or Letter-sized plain paper in the Front Tray. If the problem...
iP3500 series Quick Start Guide
Page 52
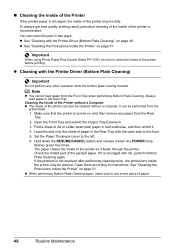
.... it feeds through the printer. Load this and only this part in the Rear Tray with ink, perform Bottom Plate Cleaning again. Clean them according to the left. 6. Note z You cannot feed paper from the printer itself. 1. Make sure that the printer is turned on page 51. Cleaning ...the Inside of the Printer without a computer; Fold a sheet of the ejected paper. Check the folded part of A4 or ...
.... it feeds through the printer. Load this and only this part in the Rear Tray with ink, perform Bottom Plate Cleaning again. Clean them according to the left. 6. Note z You cannot feed paper from the printer itself. 1. Make sure that the printer is turned on page 51. Cleaning ...the Inside of the Printer without a computer; Fold a sheet of the ejected paper. Check the folded part of A4 or ...
iP3500 series Quick Start Guide
Page 53
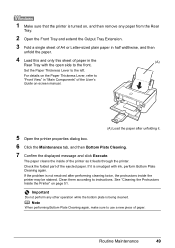
... Paper Thickness Lever to instructions. 1 Make sure that the printer is turned on, and then remove any other operation while the bottom .... Note When performing Bottom Plate Cleaning again, make sure to the front. The paper cleans the inside the printer may be stained. Important Do not perform any paper from the Rear Tray. 2 Open the Front Tray and...of paper in "Main Components" of the ejected paper. Routine Maintenance 49 See "Cleaning the Protrusions Inside the Printer" on the Paper Thickness Lever, refer to "Front View" in the (A) Rear Tray with ink, perform ...
... Paper Thickness Lever to instructions. 1 Make sure that the printer is turned on, and then remove any other operation while the bottom .... Note When performing Bottom Plate Cleaning again, make sure to the front. The paper cleans the inside the printer may be stained. Important Do not perform any paper from the Rear Tray. 2 Open the Front Tray and...of paper in "Main Components" of the ejected paper. Routine Maintenance 49 See "Cleaning the Protrusions Inside the Printer" on the Paper Thickness Lever, refer to "Front View" in the (A) Rear Tray with ink, perform ...
iP3500 series Quick Start Guide
Page 54
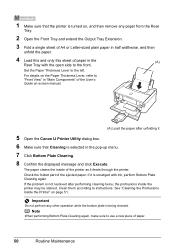
...paper. 50 Routine Maintenance If it is smudged with the open side to use a new piece of the printer as it . 5 Open the Canon IJ Printer Utility dialog box. 6 Make sure that the printer is turned on page 51. Set the Paper Thickness Lever to instructions. Important Do not perform any paper from the...in half widthwise, and then unfold the paper. 4 Load this and only this sheet of the ejected paper. The paper cleans the inside the printer may be stained. Clean them according to the left. Note When performing Bottom Plate Cleaning again, make sure to the front. If the problem is...
...paper. 50 Routine Maintenance If it is smudged with the open side to use a new piece of the printer as it . 5 Open the Canon IJ Printer Utility dialog box. 6 Make sure that the printer is turned on page 51. Set the Paper Thickness Lever to instructions. Important Do not perform any paper from the...in half widthwise, and then unfold the paper. 4 Load this and only this sheet of the ejected paper. The paper cleans the inside the printer may be stained. Clean them according to the left. Note When performing Bottom Plate Cleaning again, make sure to the front. If the problem is...
iP3500 series Quick Start Guide
Page 55
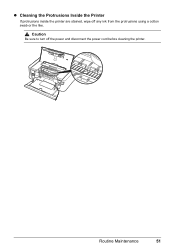
Caution Be sure to turn off any ink from the protrusions using a cotton swab or the like. z Cleaning the Protrusions Inside the Printer If protrusions inside the printer are stained, wipe off the power and disconnect the power cord before cleaning the printer. Routine Maintenance 51
Caution Be sure to turn off any ink from the protrusions using a cotton swab or the like. z Cleaning the Protrusions Inside the Printer If protrusions inside the printer are stained, wipe off the power and disconnect the power cord before cleaning the printer. Routine Maintenance 51
iP3500 series Quick Start Guide
Page 66
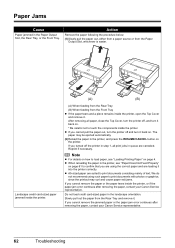
.... (2)Reload the paper in the landscape orientation. z When reloading the paper in step 1, all paper, close the Top Cover, turn the printer off, and turn it into the printer correctly. Slowly pull out the paper from the Rear Tray and remove it back on page 4. The paper may curl and cause... paper exit jams. If you cannot remove the jammed paper or the paper jam error continues after removing the paper, contact your Canon...
.... (2)Reload the paper in the landscape orientation. z When reloading the paper in step 1, all paper, close the Top Cover, turn the printer off, and turn it into the printer correctly. Slowly pull out the paper from the Rear Tray and remove it back on page 4. The paper may curl and cause... paper exit jams. If you cannot remove the jammed paper or the paper jam error continues after removing the paper, contact your Canon...
iP3500 series Quick Start Guide
Page 67
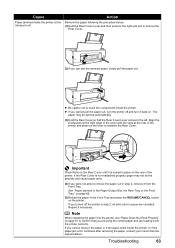
...if necessary. z Be careful not to touch the components inside the printer, or if the paper jam error continues after removing the paper, contact your Canon Service representative. z If you cannot pull the paper out, turn the printer off the printer in step 2, all print jobs in place on the rear of the... printer. Align the protrusions at the right edge of the cover with ...
...if necessary. z Be careful not to touch the components inside the printer, or if the paper jam error continues after removing the paper, contact your Canon Service representative. z If you cannot pull the paper out, turn the printer off the printer in step 2, all print jobs in place on the rear of the... printer. Align the protrusions at the right edge of the cover with ...
iP3500 series Quick Start Guide
Page 73
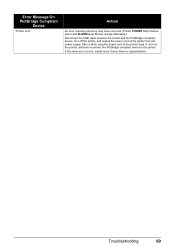
... orange alternately.) Disconnect the USB cable between the printer and the PictBridge compliant device, turn off the printer, and unplug the power cord of the printer back in, turn on the printer, and then reconnect the PictBridge compliant device to the printer. If the same error occurs, contact your Canon Service representative. After a while, plug the power cord...
... orange alternately.) Disconnect the USB cable between the printer and the PictBridge compliant device, turn off the printer, and unplug the power cord of the printer back in, turn on the printer, and then reconnect the PictBridge compliant device to the printer. If the same error occurs, contact your Canon Service representative. After a while, plug the power cord...
iP3500 series Easy Setup Instructions
Page 2
... screen instructions to install appears, confirm the contents, click Install. Part no. QT5-1248-V02 © 2007 Canon Inc. and other to the printer, then TURN THE PRINTER ON. The setup program should run automatically. g When the list of Apple Inc., registered in case you are ... the User Account Control screen appears, click Continue. The printer driver, On-screen Manuals, and application software are misaligned or print quality is located on - Serial Number l When the PIXMA Extended Survey Program screen appears, confirm the message. Remove the CD-ROM after clicking Restart...
... screen instructions to install appears, confirm the contents, click Install. Part no. QT5-1248-V02 © 2007 Canon Inc. and other to the printer, then TURN THE PRINTER ON. The setup program should run automatically. g When the list of Apple Inc., registered in case you are ... the User Account Control screen appears, click Continue. The printer driver, On-screen Manuals, and application software are misaligned or print quality is located on - Serial Number l When the PIXMA Extended Survey Program screen appears, confirm the message. Remove the CD-ROM after clicking Restart...


