Quick Start Guide
Page 26
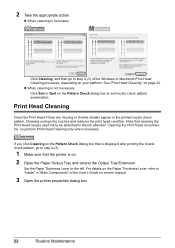
Print Head Cleaning Clean the Print Head if lines are missing or if white streaks appear in the ink absorber. Cleaning the Print Head consumes ink, so perform Print Head Cleaning only when necessary. For details on the Paper Thickness Lever, refer to "Inside" in "Main Components" of the Windows ... on the Pattern Check dialog box that is displayed after printing the nozzle check pattern, go to exit nozzle check pattern examination. Note that the printer is not necessary Click Exit or Quit on the Pattern Check dialog box to step 4-(3) of the User's Guide on page 22. Set the...
Print Head Cleaning Clean the Print Head if lines are missing or if white streaks appear in the ink absorber. Cleaning the Print Head consumes ink, so perform Print Head Cleaning only when necessary. For details on the Paper Thickness Lever, refer to "Inside" in "Main Components" of the Windows ... on the Pattern Check dialog box that is displayed after printing the nozzle check pattern, go to exit nozzle check pattern examination. Note that the printer is not necessary Click Exit or Quit on the Pattern Check dialog box to step 4-(3) of the User's Guide on page 22. Set the...
Quick Start Guide
Page 29
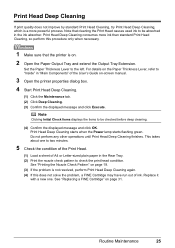
...the Rear Tray. (2) Print the nozzle check pattern to be checked before deep cleaning. (4) Confirm the displayed message and click OK. Note that the printer is a more ink than standard Print Head Cleaning, so perform this does not solve the problem, a FINE Cartridge may have run out of the User's Guide on... Cleaning consumes more powerful process. For details on the Paper Thickness Lever, refer to the left. Set the Paper Thickness Lever to "Inside" in the ink absorber. See "Printing the Nozzle Check Pattern" on page 31. Note Clicking Initial Check Items displays the items to be...
...the Rear Tray. (2) Print the nozzle check pattern to be checked before deep cleaning. (4) Confirm the displayed message and click OK. Note that the printer is a more ink than standard Print Head Cleaning, so perform this does not solve the problem, a FINE Cartridge may have run out of the User's Guide on... Cleaning consumes more powerful process. For details on the Paper Thickness Lever, refer to the left. Set the Paper Thickness Lever to "Inside" in the ink absorber. See "Printing the Nozzle Check Pattern" on page 31. Note Clicking Initial Check Items displays the items to be...
Quick Start Guide
Page 52
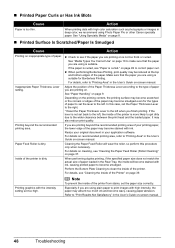
... If the paper is suitable. Depending on . It may become stained with high color saturation such as photographs or images in your printing paper, the lower edge of ...using is curled, see if the paper you are using Photo Paper Pro or other Canon specialty paper. Note To prevent the inside will wear the roller, so perform this ...absorb too much ink and become wavy, causing paper abrasion. Refer to become smudged even for Borderless Printing. When printing data with ink, causing printed paper to "Print Results Not Satisfactory" in the Rear Tray, the inside of the printer...
... If the paper is suitable. Depending on . It may become stained with high color saturation such as photographs or images in your printing paper, the lower edge of ...using is curled, see if the paper you are using Photo Paper Pro or other Canon specialty paper. Note To prevent the inside will wear the roller, so perform this ...absorb too much ink and become wavy, causing paper abrasion. Refer to become smudged even for Borderless Printing. When printing data with ink, causing printed paper to "Print Results Not Satisfactory" in the Rear Tray, the inside of the printer...
Quick Start Guide
Page 57
... recognized. See "Replacing a FINE Cartridge" on page 52. The printer has a built-in the correct position. Before the ink absorber becomes completely full, contact a Canon service representative. (You will be compatible with this printer. Install the appropriate FINE Cartridge. Four Flashes: Ink has run out. Eight flashes: Ink absorber is installed in progress and you want to replace...
... recognized. See "Replacing a FINE Cartridge" on page 52. The printer has a built-in the correct position. Before the ink absorber becomes completely full, contact a Canon service representative. (You will be compatible with this printer. Install the appropriate FINE Cartridge. Four Flashes: Ink has run out. Eight flashes: Ink absorber is installed in progress and you want to replace...
Quick Start Guide
Page 60
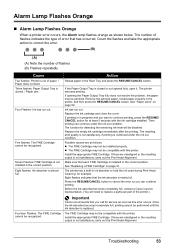
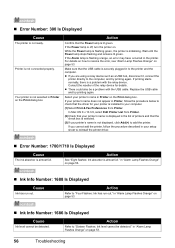
.... „ Error Number: 1700/1710 Is Displayed Cause The ink absorber is almost full. Action Confirm that your printer's name is displayed in your computer. (1)Select Print & Fax Preferences from Printer. (2)Check that the Power lamp is securely plugged in the printer. Select your printer's name in Printer, follow the procedure described in the list of the...
.... „ Error Number: 1700/1710 Is Displayed Cause The ink absorber is almost full. Action Confirm that your printer's name is displayed in your computer. (1)Select Print & Fax Preferences from Printer. (2)Check that the Power lamp is securely plugged in the printer. Select your printer's name in Printer, follow the procedure described in the list of the...


