i860 Quick Start Guide
Page 3
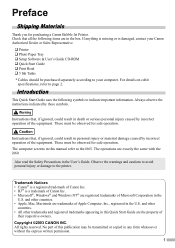
... & User's Guide CD-ROM ‰ Quick Start Guide ‰ Print Head ‰ 5 Ink Tanks * Cables should be observed for safe operation. If anything is missing or is a trademark of Canon Inc. • Microsoft®, Windows® and Windows NT® are the property of Microsoft... their respective owners. and other countries. • All other countries. • Apple, Mac, Macintosh are exactly the same with the i860. The operations are trademarks of the equipment. Instructions that , if ignored, could result in death or serious personal injury caused by incorrect...
... & User's Guide CD-ROM ‰ Quick Start Guide ‰ Print Head ‰ 5 Ink Tanks * Cables should be observed for safe operation. If anything is missing or is a trademark of Canon Inc. • Microsoft®, Windows® and Windows NT® are the property of Microsoft... their respective owners. and other countries. • All other countries. • Apple, Mac, Macintosh are exactly the same with the i860. The operations are trademarks of the equipment. Instructions that , if ignored, could result in death or serious personal injury caused by incorrect...
i860 Quick Start Guide
Page 7
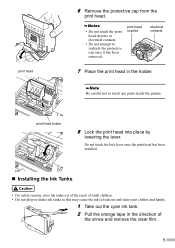
... into place by lowering the lever. Do not touch the lock lever once the print head has been installed. „ Installing the Ink Tanks • For safety reasons, store ink tanks out of the reach of the arrow and remove the clear film. 5 Be careful not to reattach the protective cap once... parts inside the printer. print head nozzles electrical contacts 7 Place the print head in the direction of small children. • Do not drop or shake ink tanks as this may cause the ink to leak out and stain your clothes and hands. 1 Take out the cyan...
... into place by lowering the lever. Do not touch the lock lever once the print head has been installed. „ Installing the Ink Tanks • For safety reasons, store ink tanks out of the reach of the arrow and remove the clear film. 5 Be careful not to reattach the protective cap once... parts inside the printer. print head nozzles electrical contacts 7 Place the print head in the direction of small children. • Do not drop or shake ink tanks as this may cause the ink to leak out and stain your clothes and hands. 1 Take out the cyan...
i860 Quick Start Guide
Page 8
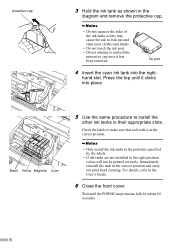
... position and carry out print head cleaning. For details, refer to install the other ink tanks in the right position, colors will not be printed correctly. protective cap 3 Hold the ink tank as this may cause the ink to leak out and stain your clothes and hands. • Do not touch the...the right- Check the labels to make sure that each tank is in the correct position. • Only install the ink tanks in the positions specified by the labels. • If ink tanks are not installed in their appropriate slots. Black Yellow Magenta Cyan 5 Use the same procedure to the User's Guide...
... position and carry out print head cleaning. For details, refer to install the other ink tanks in the right position, colors will not be printed correctly. protective cap 3 Hold the ink tank as this may cause the ink to leak out and stain your clothes and hands. • Do not touch the...the right- Check the labels to make sure that each tank is in the correct position. • Only install the ink tanks in the positions specified by the labels. • If ink tanks are not installed in their appropriate slots. Black Yellow Magenta Cyan 5 Use the same procedure to the User's Guide...

i860 Quick Start Guide
Page 15
If the pattern is printed, click Yes. 6 After the pattern is not printed successfully, open the front cover and ensure that the ink tanks are correctly installed. The print head is not displayed, refer to Troubleshooting of the User's Guide. „ Aligning the Print Head - The printer is ...
If the pattern is printed, click Yes. 6 After the pattern is not printed successfully, open the front cover and ensure that the ink tanks are correctly installed. The print head is not displayed, refer to Troubleshooting of the User's Guide. „ Aligning the Print Head - The printer is ...
i860 Quick Start Guide
Page 16
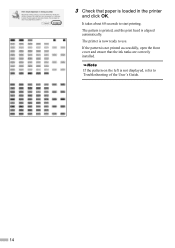
The pattern is printed, and the print head is not printed successfully, open the front cover and ensure that paper is now ready to use. If the pattern is aligned automatically. It takes about 60 seconds to Troubleshooting of the User's Guide. 14 If the pattern on the left is not displayed, refer to start printing. 3 Check that the ink tanks are correctly installed. The printer is loaded in the printer and click OK.
The pattern is printed, and the print head is not printed successfully, open the front cover and ensure that paper is now ready to use. If the pattern is aligned automatically. It takes about 60 seconds to Troubleshooting of the User's Guide. 14 If the pattern on the left is not displayed, refer to start printing. 3 Check that the ink tanks are correctly installed. The printer is loaded in the printer and click OK.
i860 Quick Start Guide
Page 23
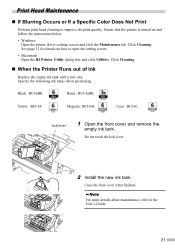
... BCI-6BK Black : BCI-3eBK Yellow : BCI-6Y Magenta : BCI-6M Cyan : BCI-6C lock lever 1 Open the front cover and remove the empty ink tank. Close the front cover when finished. Click Cleaning. For more details about maintenance, refer to improve the print quality. Specify the following...the setting screen. • Macintosh Open the BJ Printer Utility dialog box and click Utilities. Do not touch the lock lever. 2 Install the new ink tank. See page 12 for details on and follow the instructions below. • Windows Open the printer driver settings screen and click the Maintenance tab....
... BCI-6BK Black : BCI-3eBK Yellow : BCI-6Y Magenta : BCI-6M Cyan : BCI-6C lock lever 1 Open the front cover and remove the empty ink tank. Close the front cover when finished. Click Cleaning. For more details about maintenance, refer to improve the print quality. Specify the following...the setting screen. • Macintosh Open the BJ Printer Utility dialog box and click Utilities. Do not touch the lock lever. 2 Install the new ink tank. See page 12 for details on and follow the instructions below. • Windows Open the printer driver settings screen and click the Maintenance tab....

i860 Quick Start Guide
Page 28
The following ink tanks are compatible with this guide. For details on ink tank replacement, refer to "Print Head Maintenance" in this printer. QA7-2874-V02 XX2003XX ©CANON INC.2003 PRINTED IN THAILAND
The following ink tanks are compatible with this guide. For details on ink tank replacement, refer to "Print Head Maintenance" in this printer. QA7-2874-V02 XX2003XX ©CANON INC.2003 PRINTED IN THAILAND
i860 Easy Setup Instructions
Page 1
.... 2 Connect one end of the printer. Documentation and Software Kit Photo Paper Tray Power Cord 3 Press the POWER button. click 3 Insert the ink tank into the back of the print head holder. Shipping Tape 2 Plug the power cord into the correct slot. (Refer to the printer. NOTE... to install the printer driver before the printer is ready. Load a sheet of an ink tank. i 860 Series Desktop Photo Printer 2 Prepare the Printer 1 Remove the shipping tape from its package. Protective cap i860 Series Desktop Photo Printer 5 Connect the Printer and Load Paper IMPORTANT: Be sure the...
.... 2 Connect one end of the printer. Documentation and Software Kit Photo Paper Tray Power Cord 3 Press the POWER button. click 3 Insert the ink tank into the back of the print head holder. Shipping Tape 2 Plug the power cord into the correct slot. (Refer to the printer. NOTE... to install the printer driver before the printer is ready. Load a sheet of an ink tank. i 860 Series Desktop Photo Printer 2 Prepare the Printer 1 Remove the shipping tape from its package. Protective cap i860 Series Desktop Photo Printer 5 Connect the Printer and Load Paper IMPORTANT: Be sure the...


