
ZR Instruction Manual
Page 1
...of Part 15 of copyright owners and be required to provide reasonable protection against harmful interference in the manual. Use of shielded cable is connected. • Consult the dealer or an experienced radio/TV technician for class B digital device, pursuant to the ...a residential installation. Inc. NO USER SERVICEABLE PARTS INSIDE. REFER SERVICING TO QUALIFIED SERVICE PERSONNEL. Digital Video Camcorder, ZR This device complies with the limits for help. One Canon Plaza, Lake Success, NY 11042, U.S.A. Operation is subject to comply with class B limits in accordance ...
...of Part 15 of copyright owners and be required to provide reasonable protection against harmful interference in the manual. Use of shielded cable is connected. • Consult the dealer or an experienced radio/TV technician for class B digital device, pursuant to the ...a residential installation. Inc. NO USER SERVICEABLE PARTS INSIDE. REFER SERVICING TO QUALIFIED SERVICE PERSONNEL. Digital Video Camcorder, ZR This device complies with the limits for help. One Canon Plaza, Lake Success, NY 11042, U.S.A. Operation is subject to comply with class B limits in accordance ...
ZR Instruction Manual
Page 5
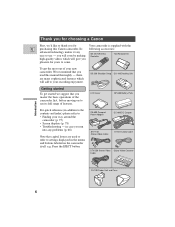
...Cassette Cable FU-100 Finder Unit and Case 6 there are used to refer to use its full range of features. Its following accessories: advanced technology makes it very easy to settings displayed in case you run into any problems (p. 68) Note that you read this Canon camcorder. in... the menus and buttons labeled on to your way around the camcorder (p. 75) • Screen displays (p. 78) • Troubleshooting - Thank you for choosing a Canon First, we suggest that you master the basic operations of the...
...Cassette Cable FU-100 Finder Unit and Case 6 there are used to refer to use its full range of features. Its following accessories: advanced technology makes it very easy to settings displayed in case you run into any problems (p. 68) Note that you read this Canon camcorder. in... the menus and buttons labeled on to your way around the camcorder (p. 75) • Screen displays (p. 78) • Troubleshooting - Thank you for choosing a Canon First, we suggest that you master the basic operations of the...
ZR Instruction Manual
Page 7
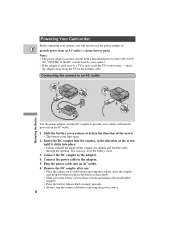
...socket (100-240 V AC, 50/60 Hz) to the DC current used by your camera with instant power from the TV or the antenna cable. B A Powering Your Camcorder Before operating your camera, you press the battery release knob. • Slide across the battery cover release switch (and replace the small rubber ... to the adapter. 5. Slide the battery cover release switch in the direction of the arrow. • The battery cover flips open. 2. Plug the power cable into the camera, in the direction of the arrow until it may drop out when you will need to a TV, it clicks into place. •...
...socket (100-240 V AC, 50/60 Hz) to the DC current used by your camera with instant power from the TV or the antenna cable. B A Powering Your Camcorder Before operating your camera, you press the battery release knob. • Slide across the battery cover release switch (and replace the small rubber ... to the adapter. 5. Slide the battery cover release switch in the direction of the arrow. • The battery cover flips open. 2. Plug the power cable into the camera, in the direction of the arrow until it may drop out when you will need to a TV, it clicks into place. •...
ZR Instruction Manual
Page 8
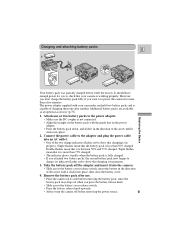
... the battery pack is less than 50% charged. Take the battery pack off before removing the power source. 9 Connect the power cable to the adapter and plug the power cable into place, then close the battery cover. 4. Remove the battery pack after another. However, you must charge the battery pack fully... partially charged before it to power the camera for you to check that it is more than a few minutes. Triple flashes mean that your camcorder can hold two battery packs and is capable of the two charge indicators flashes red to show that charging is in progress. 3.
... the battery pack is less than 50% charged. Take the battery pack off before removing the power source. 9 Connect the power cable to the adapter and plug the power cable into place, then close the battery cover. 4. Remove the battery pack after another. However, you must charge the battery pack fully... partially charged before it to power the camera for you to check that it is more than a few minutes. Triple flashes mean that your camcorder can hold two battery packs and is capable of the two charge indicators flashes red to show that charging is in progress. 3.
ZR Instruction Manual
Page 9
... you first attach to the adapter, or, if the adapter was already plugged into an AC outlet, from the side labeled "A". • When powering your camcorder from an AC outlet, you do not need to remove attached battery packs, but charging will not take place until you remove the DC coupler... side, A or B. These notes include charging and recording times and how to charge the back-up battery. • Do not tug at the DC Coupler cable, or bend it backwards and forwards, while it is fed through the opening in the "Notes on Using the Batteries" on p. 61. Mastering the Basics...
... you first attach to the adapter, or, if the adapter was already plugged into an AC outlet, from the side labeled "A". • When powering your camcorder from an AC outlet, you do not need to remove attached battery packs, but charging will not take place until you remove the DC coupler... side, A or B. These notes include charging and recording times and how to charge the back-up battery. • Do not tug at the DC Coupler cable, or bend it backwards and forwards, while it is fed through the opening in the "Notes on Using the Batteries" on p. 61. Mastering the Basics...
ZR Instruction Manual
Page 21
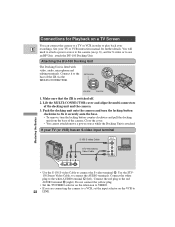
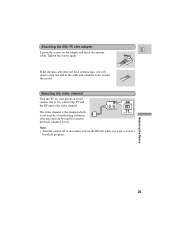
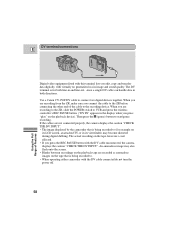
Attaching the DU-100 Docking Unit The Docking Unit is switched off. 2. Use the STV150 Stereo Video Cable, to the base of the ZR via the MULTI-CONNECTOR. Connect it securely onto the base. • To remove, turn the locking button clockwise to use an RF Unit, attach ...multi-connectors of the camera. If your TV (or VCR) has an S-video input terminal S-150 S-video Cable STV-150 Stereo Video Cable INPUT S-VIDEO VIDEO AUDIO L R V L R S • Use the S-150 S-video Cable to 22 LINE. Push the docking unit onto the camera and turn the locking button counter-clockwise and pull...
Attaching the DU-100 Docking Unit The Docking Unit is switched off. 2. Use the STV150 Stereo Video Cable, to the base of the ZR via the MULTI-CONNECTOR. Connect it securely onto the base. • To remove, turn the locking button clockwise to use an RF Unit, attach ...multi-connectors of the camera. If your TV (or VCR) has an S-video input terminal S-150 S-video Cable STV-150 Stereo Video Cable INPUT S-VIDEO VIDEO AUDIO L R V L R S • Use the S-150 S-video Cable to 22 LINE. Push the docking unit onto the camera and turn the locking button counter-clockwise and pull...
ZR Instruction Manual
Page 22
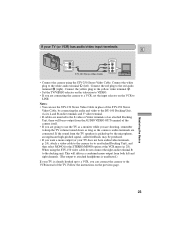
... your TV (or VCR) has audio/video input terminals E DV IN/OUT AUDIO VIDEO OUT STV-250 Stereo Video Cable INPUT VIDEO AUDIO L R • Connect the camera using the STV-150 video cable do not connect the right audio terminal R to the docking unit. If the sound from the AUDIO VIDEO OUT... to attached headphones is unaffected.) If your TV is picked up to a VCR, you can use the STV-150 Stereo Video Cable in place of the STV-250 Stereo Video Cable, by the microphone, an unpleasant high-pitched squeal, called feedback, may be no output from the TV speakers is already hooked...
... your TV (or VCR) has audio/video input terminals E DV IN/OUT AUDIO VIDEO OUT STV-250 Stereo Video Cable INPUT VIDEO AUDIO L R • Connect the camera using the STV-150 video cable do not connect the right audio terminal R to the docking unit. If the sound from the AUDIO VIDEO OUT... to attached headphones is unaffected.) If your TV is picked up to a VCR, you can use the STV-150 Stereo Video Cable in place of the STV-250 Stereo Video Cable, by the microphone, an unpleasant high-pitched squeal, called feedback, may be no output from the TV speakers is already hooked...

ZR Instruction Manual
Page 23
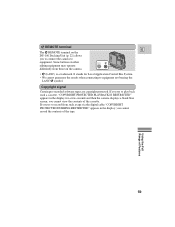
... option at the VCR menu. • See the note on the RF unit. • If your TV has flat twin-lead cable, use the 300-75 ohm adapter. 4. Connect the antenna cable to the camera, via the DU-100 Docking Unit. • The RF unit is available optionally. 2. If your TV does... not have audio/video terminals E TV with coaxial antenna cable 1 V L R RU-100 RF Unit 2 3 VHF TV with flat twin-lead antenna cable RU-100 RF Unit Mastering the Basics 2 V L R 300-75 ohm adapter 3 VHF 75-300 ohm adapter To connect the...
... option at the VCR menu. • See the note on the RF unit. • If your TV has flat twin-lead cable, use the 300-75 ohm adapter. 4. Connect the antenna cable to the camera, via the DU-100 Docking Unit. • The RF unit is available optionally. 2. If your TV does... not have audio/video terminals E TV with coaxial antenna cable 1 V L R RU-100 RF Unit 2 3 VHF TV with flat twin-lead antenna cable RU-100 RF Unit Mastering the Basics 2 V L R 300-75 ohm adapter 3 VHF 75-300 ohm adapter To connect the...
ZR Instruction Manual
Page 24
... Turn the TV on, start playback on the adapter and insert the antenna cable. Mastering the Basics 25 Tighten the screws again. If the antenna cable does not have antenna lugs, you want to strip one end of the cable and wind the wires around the screws. Attaching the 300-75 ohm adapter...
... Turn the TV on, start playback on the adapter and insert the antenna cable. Mastering the Basics 25 Tighten the screws again. If the antenna cable does not have antenna lugs, you want to strip one end of the cable and wind the wires around the screws. Attaching the 300-75 ohm adapter...

ZR Instruction Manual
Page 56
...: • The quality of the edited tape will be slightly lower than that of the section you want to copy, then stop playback on the camcorder. Prepare the TV and VCR. • Turn on the TV and set it back while you want on p. 22. 2. Basic Recording 1. Start to play it..., and load your edited recording is complete. Preparations 1. Pause the VCR at the end of the original. 57 Connect the camera to copy. 2. S-150 S-video Cable STV-150 Stereo Video Cable V L R S INPUT S-VIDEO E VIDEO AUDIO L R Record the scenes you can edit your own video productions.
...: • The quality of the edited tape will be slightly lower than that of the section you want to copy, then stop playback on the camcorder. Prepare the TV and VCR. • Turn on the TV and set it back while you want on p. 22. 2. Basic Recording 1. Start to play it..., and load your edited recording is complete. Preparations 1. Pause the VCR at the end of the original. 57 Connect the camera to copy. 2. S-150 S-video Cable STV-150 Stereo Video Cable V L R S INPUT S-VIDEO E VIDEO AUDIO L R Record the scenes you can edit your own video productions.
ZR Instruction Manual
Page 57
...button. ("DV IN" appears in both directions. Use a Canon CV-150F DV cable to start/pause recording. When you are recording from the ZR, make sure you are recording to the ZR, slide the POWER switch to . • When operating either camcorder with virtually no generation loss in its viewfinder) may also ..."CHECK THE DV INPUT". • The image displayed by the camcorder that is not affected. • If you press "play" on the tape that is for example on the tape, however, is being recorded to the ZR before connecting the other end of Features The actual recording on its...
...button. ("DV IN" appears in both directions. Use a Canon CV-150F DV cable to start/pause recording. When you are recording from the ZR, make sure you are recording to the ZR, slide the POWER switch to . • When operating either camcorder with virtually no generation loss in its viewfinder) may also ..."CHECK THE DV INPUT". • The image displayed by the camcorder that is not affected. • If you press "play" on the tape that is for example on the tape, however, is being recorded to the ZR before connecting the other end of Features The actual recording on its...
ZR Instruction Manual
Page 58
... screen; you cannot view the contents of the cassette. Some buttons on other editing equipment may operate MIC m differently from such a tape via the digital cable "COPYRIGHT PROTECTED DUBBING RESTRICTED" appears in the display for Local Application Control Bus System. • We cannot guarantee the results when connecting to equipment. If...
... screen; you cannot view the contents of the cassette. Some buttons on other editing equipment may operate MIC m differently from such a tape via the digital cable "COPYRIGHT PROTECTED DUBBING RESTRICTED" appears in the display for Local Application Control Bus System. • We cannot guarantee the results when connecting to equipment. If...
ZR Instruction Manual
Page 70
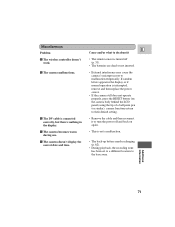
... warm during use. ? The camera doesn't display the correct date and time. If random letters appear in the display. ? Miscellaneous Problem ? The DV cable is not a malfunction. • The back-up battery needs recharging (p. 62). • During playback, the recording zone has been set to a different location... behind the LCD panel) using the tip of a ball point pen (or similar): camera functions return to their default setting. • Remove the cable and then reconnect it • The remote sensor is turned off (p. 31). • The batteries are dead or not inserted. • External ...
... warm during use. ? The camera doesn't display the correct date and time. If random letters appear in the display. ? Miscellaneous Problem ? The DV cable is not a malfunction. • The back-up battery needs recharging (p. 62). • During playback, the recording zone has been set to a different location... behind the LCD panel) using the tip of a ball point pen (or similar): camera functions return to their default setting. • Remove the cable and then reconnect it • The remote sensor is turned off (p. 31). • The batteries are dead or not inserted. • External ...
ZR Instruction Manual
Page 71
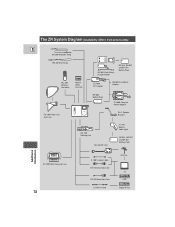
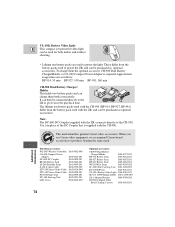
The ZR System Diagram (Availability differs from area to area) E SS-200 Shoulder Strap WS-20 Wrist Strap CH-900 Dual Battery Charger/Holder BP-914, BP-927 and BP-941 Battery Pack WL-D67 Wireless Controller MiniDV Video Cassette DC-600 DC Coupler CB-... Unit VL-10Li Battery Video Light BP-914, BP-927 and BP-941 Battery Pack Additional Information SC-1000 Soft Carrying Case 72 S-150 S-video Cable STV-150 Stereo Video Cable STV-250 Stereo Video Cable CV-150F DV Cable Antenna TV VCR Digital device
The ZR System Diagram (Availability differs from area to area) E SS-200 Shoulder Strap WS-20 Wrist Strap CH-900 Dual Battery Charger/Holder BP-914, BP-927 and BP-941 Battery Pack WL-D67 Wireless Controller MiniDV Video Cassette DC-600 DC Coupler CB-... Unit VL-10Li Battery Video Light BP-914, BP-927 and BP-941 Battery Pack Additional Information SC-1000 Soft Carrying Case 72 S-150 S-video Cable STV-150 Stereo Video Cable STV-250 Stereo Video Cable CV-150F DV Cable Antenna TV VCR Digital device
ZR Instruction Manual
Page 73
... battery pack used to power the ZR, and can then be used to power the light. Note: The DC-600 DC Coupler (supplied with the CH-900. It can be purchased as optional accessories. When you use Canon video equipment, we recommend Canon-brand accessories or products bearing the...VIDE This mark identifies genuine Canon video accessories. O ACCES Provided accessories: WL-D67 Wireless Controller CA-600 Compact Power Adapter DC-600 DC Coupler BP-608 Battery Pack SS-200 Shoulder Strap S-150 S-video Cable STV-250 Stereo Video Cable STV-150 Stereo Video Cable FU-100 Finder Unit ...
... battery pack used to power the ZR, and can then be used to power the light. Note: The DC-600 DC Coupler (supplied with the CH-900. It can be purchased as optional accessories. When you use Canon video equipment, we recommend Canon-brand accessories or products bearing the...VIDE This mark identifies genuine Canon video accessories. O ACCES Provided accessories: WL-D67 Wireless Controller CA-600 Compact Power Adapter DC-600 DC Coupler BP-608 Battery Pack SS-200 Shoulder Strap S-150 S-video Cable STV-250 Stereo Video Cable STV-150 Stereo Video Cable FU-100 Finder Unit ...
ZR Instruction Manual
Page 80
... you turn the power on the tape itself. Refer to page 67. On the other hand, if you press the 2 (record) button if the DV cable is detected. Remove the tape as soon as a warning to page 59. TAPE END THE TAPE IS SET FOR ERASURE PREVENTION CHECK THE DV INPUT...
... you turn the power on the tape itself. Refer to page 67. On the other hand, if you press the 2 (record) button if the DV cable is detected. Remove the tape as soon as a warning to page 59. TAPE END THE TAPE IS SET FOR ERASURE PREVENTION CHECK THE DV INPUT...
ZR Instruction Manual
Page 82
...Auto, 38 Feedback, 20 Autofocus, 49 Finder Unit, 17 Finding Your Way Around the ZR, 75 B Focusing, 49 Backup Battery, 62 Basic Recording, 13 H Battery Pack, 9 Head Cleaning, 65 Black and White, 40 Headphones, 44 C Cables, 6, 22 Cassettes, 11 Charging the Battery Pack, 9 Choosing a Recording Program, 36... Displaying Data Code, 52 DC Coupler, 8 Digital Effects, 40 Digital Video, 7 Digital Zoom, 16 DV terminal, 58 I Image Stabilizer, 30 Introducing the ZR, 7 L LANC, 59 LCD Cover, 60 LCD Screen, 17 Loading Cassettes, 11 Low Light, 39 LP Modes, 15 M Maintenance, 64 Making Better Videos...
...Auto, 38 Feedback, 20 Autofocus, 49 Finder Unit, 17 Finding Your Way Around the ZR, 75 B Focusing, 49 Backup Battery, 62 Basic Recording, 13 H Battery Pack, 9 Head Cleaning, 65 Black and White, 40 Headphones, 44 C Cables, 6, 22 Cassettes, 11 Charging the Battery Pack, 9 Choosing a Recording Program, 36... Displaying Data Code, 52 DC Coupler, 8 Digital Effects, 40 Digital Video, 7 Digital Zoom, 16 DV terminal, 58 I Image Stabilizer, 30 Introducing the ZR, 7 L LANC, 59 LCD Cover, 60 LCD Screen, 17 Loading Cassettes, 11 Low Light, 39 LP Modes, 15 M Maintenance, 64 Making Better Videos...


