DV Messenger Ver 1.0 Instruction Manual
Page 12
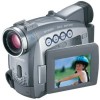
... installing the driver ( 10). ¡ Close any programs that are running before installing the driver. ¡ Do not turn off the camcorder until the driver installation is complete. Click [Cancel] to the computer using the DV cable ( 22). • The driver installation starts automatically... must first log in as an Administrator to install programs. 1 Start the computer. 2 Connect the power adapter to the camcorder. 3 Set the camcorder to CARD PLAY (VCR) mode. 4 Connect the camcorder to close this program. • If the installation is complete, the [Scanner and Camera Wizard] ...
... installing the driver ( 10). ¡ Close any programs that are running before installing the driver. ¡ Do not turn off the camcorder until the driver installation is complete. Click [Cancel] to the computer using the DV cable ( 22). • The driver installation starts automatically... must first log in as an Administrator to install programs. 1 Start the computer. 2 Connect the power adapter to the camcorder. 3 Set the camcorder to CARD PLAY (VCR) mode. 4 Connect the camcorder to close this program. • If the installation is complete, the [Scanner and Camera Wizard] ...
DV Messenger Ver 1.0 Instruction Manual
Page 14
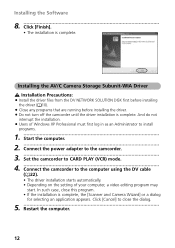
..., the computer is set to automatically start automatically when you connect the camcorder to the computer. 14 Use the following procedures to change the setting. 1 Connect the power adapter to the camcorder. 2 Set the camcorder to CARD PLAY (VCR) mode. 3 Connect the camcorder to the computer using the DV cable ( 22). 4 From the [start] menu...]. 6 Click the [Events] tab. 7 Select [Take no action] and click [OK]. • Now the application will not start an application each time you connect the camcorder to the computer.
..., the computer is set to automatically start automatically when you connect the camcorder to the computer. 14 Use the following procedures to change the setting. 1 Connect the power adapter to the camcorder. 2 Set the camcorder to CARD PLAY (VCR) mode. 3 Connect the camcorder to the computer using the DV cable ( 22). 4 From the [start] menu...]. 6 Click the [Events] tab. 7 Select [Take no action] and click [OK]. • Now the application will not start an application each time you connect the camcorder to the computer.

DV Messenger Ver 1.0 Instruction Manual
Page 16
...161; Close all programs that are open, close them. 16 Connect the camcorder to CARD PLAY (VCR) mode 3. Uninstalling the AV/C Camera Storage Subunit-WIA Driver 1 Connect the power adapter to the camcorder. 2 Set the camcorder to the computer using the DV cable ( 22). • If [...Scanner and Camera Wizard] or Explorer are running before uninstalling. Uninstalling the DV Messenger 1 From the [start] menu, select [All Programs], [Canon Utilities], [DV Messenger...
...161; Close all programs that are open, close them. 16 Connect the camcorder to CARD PLAY (VCR) mode 3. Uninstalling the AV/C Camera Storage Subunit-WIA Driver 1 Connect the power adapter to the camcorder. 2 Set the camcorder to the computer using the DV cable ( 22). • If [...Scanner and Camera Wizard] or Explorer are running before uninstalling. Uninstalling the DV Messenger 1 From the [start] menu, select [All Programs], [Canon Utilities], [DV Messenger...
DV Messenger Ver 1.0 Instruction Manual
Page 22
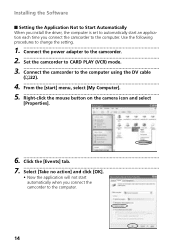
... on the computer and you connect your camcorder's instruction manual for this procedure. • Refer to CARD PLAY (VCR) mode, [Canon Camera Storage Device] (camera icon) or [Canon DV Camcorder] (camcorder icon) appears in the explorer view. Camcorder icon: You can download still images/movies... DV Terminal on the Camcorder DV (IEEE1394) cable IEEE1394 Terminal on the Computer Camcorder End Computer End 4-pin: 6-pin: 22 Connecting the Camcorder to a Computer Connection Precautions: ¡ Make sure the camcorder is being powered by the compact power adapter before connecting it ...
... on the computer and you connect your camcorder's instruction manual for this procedure. • Refer to CARD PLAY (VCR) mode, [Canon Camera Storage Device] (camera icon) or [Canon DV Camcorder] (camcorder icon) appears in the explorer view. Camcorder icon: You can download still images/movies... DV Terminal on the Camcorder DV (IEEE1394) cable IEEE1394 Terminal on the Computer Camcorder End Computer End 4-pin: 6-pin: 22 Connecting the Camcorder to a Computer Connection Precautions: ¡ Make sure the camcorder is being powered by the compact power adapter before connecting it ...
DV Messenger Ver 1.0 Instruction Manual
Page 23
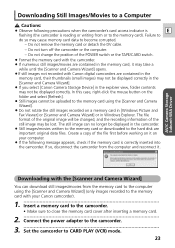
... and Camera Wizard]. ¡ Do not rotate the still images recorded on your Canon camcorder). 1 Insert a memory card to the camcorder. • Make sure to close the memory card cover after inserting a memory card. 2 Connect the power adapter to the camcorder. 3 Set the camcorder to become corrupted. - AV/C Camera Storage Subunit-WIA Driver Downloading with the...
... and Camera Wizard]. ¡ Do not rotate the still images recorded on your Canon camcorder). 1 Insert a memory card to the camcorder. • Make sure to close the memory card cover after inserting a memory card. 2 Connect the power adapter to the camcorder. 3 Set the camcorder to become corrupted. - AV/C Camera Storage Subunit-WIA Driver Downloading with the...
DV Messenger Ver 1.0 Instruction Manual
Page 29
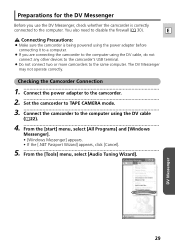
E Connecting Precautions: ¡ Make sure the camcorder is being powered using the power adapter before connecting it to a computer. ¡ If you use the DV Messenger, check whether the camcorder is correctly connected to the computer. You also need to the computer using the DV cable...[Cancel]. 5 From the [Tools] menu, select [Audio Tuning Wizard]. Checking the Camcorder Connection 1 Connect the power adapter to the camcorder. 2 Set the camcorder to TAPE CAMERA mode. 3 Connect the camcorder to disable the firewall ( 30). The DV Messenger may not operate correctly. DV ...
E Connecting Precautions: ¡ Make sure the camcorder is being powered using the power adapter before connecting it to a computer. ¡ If you use the DV Messenger, check whether the camcorder is correctly connected to the computer. You also need to the computer using the DV cable...[Cancel]. 5 From the [Tools] menu, select [Audio Tuning Wizard]. Checking the Camcorder Connection 1 Connect the power adapter to the camcorder. 2 Set the camcorder to TAPE CAMERA mode. 3 Connect the camcorder to disable the firewall ( 30). The DV Messenger may not operate correctly. DV ...
DV Messenger Ver 1.0 Instruction Manual
Page 52
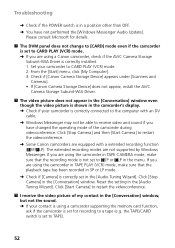
...recording to a tape (e.g. Click [Stop Camera] and then [Start Camera] to restart the videoconference. ➜ Some Canon camcorders are using the camcorder in TAPE CAMERA mode, make sure that the recording mode is not set to SP or LP in the menu. ...Canon Camera Storage Device] does not appear, install the AV/C Camera Storage Subunit-WIA Driver. ? Troubleshooting ➜ Check if the POWER switch is in a position other than OFF. ➜ You have changed the operating mode of my contact in the [Conversation] window, but not the sound. ➜ If your contact is using a camcorder...
...recording to a tape (e.g. Click [Stop Camera] and then [Start Camera] to restart the videoconference. ➜ Some Canon camcorders are using the camcorder in TAPE CAMERA mode, make sure that the recording mode is not set to SP or LP in the menu. ...Canon Camera Storage Device] does not appear, install the AV/C Camera Storage Subunit-WIA Driver. ? Troubleshooting ➜ Check if the POWER switch is in a position other than OFF. ➜ You have changed the operating mode of my contact in the [Conversation] window, but not the sound. ➜ If your contact is using a camcorder...

ZR80 Instruction Manual
Page 3
...In these safety instructions the word "product" 10. Regarding other sources of antenna discharge unit, connection to be operated only E ZR90/ZR85/ZR80 A and all its accessories. fully into the 4. should be sure the antenna is connected to the product, be adhered to provide some...pinched by items placed upon or against voltage surges and built-up static charges. 8. Do not use the camera close to the Canon Digital Video Camcorder Power Adapter should be read before cleaning. moved with respect to plugs and the point from 7. Follow Instructions - Do not use ...
...In these safety instructions the word "product" 10. Regarding other sources of antenna discharge unit, connection to be operated only E ZR90/ZR85/ZR80 A and all its accessories. fully into the 4. should be sure the antenna is connected to the product, be adhered to provide some...pinched by items placed upon or against voltage surges and built-up static charges. 8. Do not use the camera close to the Canon Digital Video Camcorder Power Adapter should be read before cleaning. moved with respect to plugs and the point from 7. Follow Instructions - Do not use ...

ZR80 Instruction Manual
Page 4
...operate normally even if you will need for further information. Improper adjustment of time, disconnect it with a power supply between 100 and 240 V AC. e. Contact your nearest Canon Service Center for service. 19. PART H) 14. Servicing - If the product has been exposed to ...lightning and power-line surges. 15. When replacement parts are required, be used with the same type number CA...
...operate normally even if you will need for further information. Improper adjustment of time, disconnect it with a power supply between 100 and 240 V AC. e. Contact your nearest Canon Service Center for service. 19. PART H) 14. Servicing - If the product has been exposed to ...lightning and power-line surges. 15. When replacement parts are required, be used with the same type number CA...

ZR80 Instruction Manual
Page 5
... and/or other countries. • Other names and products not mentioned above may be registered trademarks or trademarks of Canon Inc. • D is a trademark. • is a trademark. • Windows® is New POWER Switch CAMERA PLAY (VCR) CAMERA PLAY (VCR) TAPE/CARD Switch b (TAPE) b (TAPE) (CARD) (... Date and Time Set the time zone, date and time when you first start using your camcorder, or when you use the camcorder and retain it for purchasing the Canon ZR90/ZR85/ZR80. Using this mode. Please read this manual carefully before you for future reference. E Change ...
... and/or other countries. • Other names and products not mentioned above may be registered trademarks or trademarks of Canon Inc. • D is a trademark. • is a trademark. • Windows® is New POWER Switch CAMERA PLAY (VCR) CAMERA PLAY (VCR) TAPE/CARD Switch b (TAPE) b (TAPE) (CARD) (... Date and Time Set the time zone, date and time when you first start using your camcorder, or when you use the camcorder and retain it for purchasing the Canon ZR90/ZR85/ZR80. Using this mode. Please read this manual carefully before you for future reference. E Change ...

ZR80 Instruction Manual
Page 6
... Using this Manual ...5 Checking Supplied Accessories 8 Components Guide ...9 Basic Functions Preparations Preparing the Power Supply 13 Loading/Unloading a Cassette 16 Installing the Backup Battery 17 Preparing the Camcorder 18 Using the Wireless Controller 20 Setting the Time Zone, Date and Time 21 Recording Recording... Movies on a Tape 24 Recording Still Images on a Tape 29 Zooming ...30 Tips for Making Better Videos 32 ...
... Using this Manual ...5 Checking Supplied Accessories 8 Components Guide ...9 Basic Functions Preparations Preparing the Power Supply 13 Loading/Unloading a Cassette 16 Installing the Backup Battery 17 Preparing the Camcorder 18 Using the Wireless Controller 20 Setting the Time Zone, Date and Time 21 Recording Recording... Movies on a Tape 24 Recording Still Images on a Tape 29 Zooming ...30 Tips for Making Better Videos 32 ...

ZR80 Instruction Manual
Page 8
power cord) STV-250N Stereo Video Cable WL-D82 Wireless Controller Two AA (R6) Batteries SDC-8M SD Memory Card (containing sample images) IFC-300PCU USB ... viewfinder. Write down the number and other information here and retain this product can be found on the underside of Purchase: Model Name: ZR90/ZR85/ZR80 A Purchased From: Serial No.: Dealer Address: 8 Dealer Phone No.: Checking Supplied Accessories Lens Cap and Lens Cap Cord Lithium Button Battery CR1616 SS-900 Shoulder...
power cord) STV-250N Stereo Video Cable WL-D82 Wireless Controller Two AA (R6) Batteries SDC-8M SD Memory Card (containing sample images) IFC-300PCU USB ... viewfinder. Write down the number and other information here and retain this product can be found on the underside of Purchase: Model Name: ZR90/ZR85/ZR80 A Purchased From: Serial No.: Dealer Address: 8 Dealer Phone No.: Checking Supplied Accessories Lens Cap and Lens Cap Cord Lithium Button Battery CR1616 SS-900 Shoulder...

ZR80 Instruction Manual
Page 10
Viewfinder ( 18) Dioptric adjustment lever ( 18) Serial number Viewfinder protect cover ( 135) Strap mount ( 19) Start/stop button ( 24, 101) Power switch ( 5) POWER CAMERA OFF PLAY(VCR) CAMERA OFF PLAY(VCR) PHOTO button ( 29, 96) Accessory shoe ( 145) Zoom lever ( 30) TAPE/CARD switch*( 5) b Using a tape Using a memory card Grip belt ( 18) Strap mount ( 19) Cassette compartment ( 16) Cassette compartment cover ( 16) * ZR90/ZR85 only. 10
Viewfinder ( 18) Dioptric adjustment lever ( 18) Serial number Viewfinder protect cover ( 135) Strap mount ( 19) Start/stop button ( 24, 101) Power switch ( 5) POWER CAMERA OFF PLAY(VCR) CAMERA OFF PLAY(VCR) PHOTO button ( 29, 96) Accessory shoe ( 145) Zoom lever ( 30) TAPE/CARD switch*( 5) b Using a tape Using a memory card Grip belt ( 18) Strap mount ( 19) Cassette compartment ( 16) Cassette compartment cover ( 16) * ZR90/ZR85 only. 10

ZR80 Instruction Manual
Page 13
... in the direction of the arrow until it from the camcorder. Plug the power cord into a power outlet. 3. Press the BATT. Attach the battery pack to remove the battery. Move the viewfinder upward. 3. Connect the power cord to the camcorder's DC IN terminal. Connect the power adapter to the adapter. 2. It glows steadily when charging is...
... in the direction of the arrow until it from the camcorder. Plug the power cord into a power outlet. 3. Press the BATT. Attach the battery pack to remove the battery. Move the viewfinder upward. 3. Connect the power cord to the camcorder's DC IN terminal. Connect the power adapter to the adapter. 2. It glows steadily when charging is...

ZR80 Instruction Manual
Page 14
.... 730 min. Playback Time 90 min. 170 min. 195 min. 345 min. 550 min. * Approximate times for recording with repeated operations such as start/stop, zooming, power on/off the camcorder before connecting or disconnecting the power adapter. ❍ If the adapter is not a malfunction. ❍ Do not disconnect and reconnect the...
.... 730 min. Playback Time 90 min. 170 min. 195 min. 345 min. 550 min. * Approximate times for recording with repeated operations such as start/stop, zooming, power on/off the camcorder before connecting or disconnecting the power adapter. ❍ If the adapter is not a malfunction. ❍ Do not disconnect and reconnect the...

ZR80 Instruction Manual
Page 16
... set to OFF. 16 Slide and hold the OPEN/EJECT switch and open the cassette compartment cover. If the camcorder is connected to a power source, cassettes can be loaded/ unloaded even if the POWER switch is opening or closing automatically, or attempt to get your fingers caught in the cassette compartment cover. Loading...
... set to OFF. 16 Slide and hold the OPEN/EJECT switch and open the cassette compartment cover. If the camcorder is connected to a power source, cassettes can be loaded/ unloaded even if the POWER switch is opening or closing automatically, or attempt to get your fingers caught in the cassette compartment cover. Loading...

ZR80 Instruction Manual
Page 17
... e + side facing outward. 3. If it needs to be replaced. 17 The backup battery has a life span of children. Power the camcorder from E a household power source when replacing the backup battery to retain the settings. 1. Use of other batteries may present a risk of explosion. The battery...water to avoid the risk of fire or explosion. ❍ Do not pick up the battery using tweezers or other camcorder settings while the power source is swallowed, seek medical assistance immediately. Open the backup battery cover. 2. Basic Functions Preparations WARNING! • The...
... e + side facing outward. 3. If it needs to be replaced. 17 The backup battery has a life span of children. Power the camcorder from E a household power source when replacing the backup battery to retain the settings. 1. Use of other batteries may present a risk of explosion. The battery...water to avoid the risk of fire or explosion. ❍ Do not pick up the battery using tweezers or other camcorder settings while the power source is swallowed, seek medical assistance immediately. Open the backup battery cover. 2. Basic Functions Preparations WARNING! • The...

ZR80 Instruction Manual
Page 24
...24 Before you make important recordings, clean the video heads ( 135). Set the camcorder to CAMERA mode. • Set the POWER switch to CAMERA and the TAPE/CARD switch to b. • Set the POWER switch to OFF. 2. Push the OPEN button at the LCD panel and open... Recording 1. Press the start /stop button again to check if the camcorder operates correctly. Recording Movies on a Tape Before You Begin Recording Make a test recording first to pause recording. q w POWER CAMERA OFF PLAY(VCR) 3. r POWER CAMERA OFF PLAY(VCR) e When You Have Finished Recording 1. Close the...
...24 Before you make important recordings, clean the video heads ( 135). Set the camcorder to CAMERA mode. • Set the POWER switch to CAMERA and the TAPE/CARD switch to b. • Set the POWER switch to OFF. 2. Push the OPEN button at the LCD panel and open... Recording 1. Press the start /stop button again to check if the camcorder operates correctly. Recording Movies on a Tape Before You Begin Recording Make a test recording first to pause recording. q w POWER CAMERA OFF PLAY(VCR) 3. r POWER CAMERA OFF PLAY(VCR) e When You Have Finished Recording 1. Close the...
ZR80 Instruction Manual
Page 25
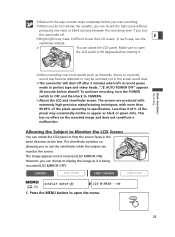
... the viewfinder while the subject can monitor the screen. E ❍ Bright light may make it is being recorded (LCD MIRROR OFF). " AUTO POWER OFF" appears 20 seconds before shutoff. CAMERA PLAY (VCR) CARD CAMERA CARD PLAY ( 39) DISPLAY SETUP/ LCD MIRROR•••ON 1....produced with extremely high-precision manufacturing techniques, with more than 0.01% of the pixels operating to specification. To continue recording, turn the camcorder off after 5 minutes when left in record pause mode to Monitor the LCD Screen You can rotate the LCD panel so that the ...
... the viewfinder while the subject can monitor the screen. E ❍ Bright light may make it is being recorded (LCD MIRROR OFF). " AUTO POWER OFF" appears 20 seconds before shutoff. CAMERA PLAY (VCR) CARD CAMERA CARD PLAY ( 39) DISPLAY SETUP/ LCD MIRROR•••ON 1....produced with extremely high-precision manufacturing techniques, with more than 0.01% of the pixels operating to specification. To continue recording, turn the camcorder off after 5 minutes when left in record pause mode to Monitor the LCD Screen You can rotate the LCD panel so that the ...

ZR80 Instruction Manual
Page 27
...and seconds. • k starts flashing in red when the battery pack is not installed, or when it runs out. t Recording reminder The camcorder counts from 1 to avoid scenes that are used. Basic Functions Recording 27 w Remaining tape Indicates the remaining time of the tape in red when ... when the tape reaches the end. • When the time left is helpful to 10 seconds when you attach an empty battery pack, the power may turn off without displaying k. • The actual battery charge may not be displayed correctly. Screen Displays during Recording e Remaining battery charge q...
...and seconds. • k starts flashing in red when the battery pack is not installed, or when it runs out. t Recording reminder The camcorder counts from 1 to avoid scenes that are used. Basic Functions Recording 27 w Remaining tape Indicates the remaining time of the tape in red when ... when the tape reaches the end. • When the time left is helpful to 10 seconds when you attach an empty battery pack, the power may turn off without displaying k. • The actual battery charge may not be displayed correctly. Screen Displays during Recording e Remaining battery charge q...

