VIXIA HF R10 Red - Canon
VIXIA HF R10 Red
View Results Below
Free Canon VIXIA HF R10 manuals!
Problems with Canon VIXIA HF R10?
Ask a Question
Free Canon VIXIA HF R10 manuals!
Problems with Canon VIXIA HF R10?
Ask a Question
Related Manual Pages

Similar Questions

Flashing Red Symbol On Screen
turned on camera and a small flashing symbol shows up. Any idea what is means
turned on camera and a small flashing symbol shows up. Any idea what is means
(Posted by Robyn338 9 months ago)

Blinking Red Icon
I have a blinking red icon on my screen. It had a red line through it. The unit won't rewind the tap...
I have a blinking red icon on my screen. It had a red line through it. The unit won't rewind the tap...
(Posted by grinz1 11 years ago)
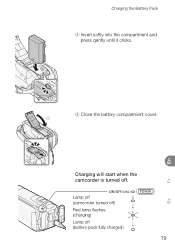
Not Charging, Red Light Flashing
Attempting to charge, when charger plugged in, red light flashes 3x, then shuts down and not chargin...
Attempting to charge, when charger plugged in, red light flashes 3x, then shuts down and not chargin...
(Posted by seanbohan 11 years ago)