Instruction Manual
Page 2
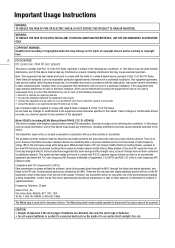
... should be made, you could be co-located or operated in the microwave range while being transmitted. One Canon Park, Melville, NY 11747, USA Tel No. 1-800-OK-CANON (1-800-652-2666) The Mains plug is required to comply with class B limits in Subpart B of ...operation. This transmitter must not be required to copyright laws. 2 FCC/IC NOTICE HD Camcorder, VIXIA HF G30 systems This device complies with using low power wireless devices. Frequecncy Tolerance: 25 ppm Canon U.S.A., Inc. Therefore, the transmitter will be on the rights of copyright owners and be determined ...
... should be made, you could be co-located or operated in the microwave range while being transmitted. One Canon Park, Melville, NY 11747, USA Tel No. 1-800-OK-CANON (1-800-652-2666) The Mains plug is required to comply with class B limits in Subpart B of ...operation. This transmitter must not be required to copyright laws. 2 FCC/IC NOTICE HD Camcorder, VIXIA HF G30 systems This device complies with using low power wireless devices. Frequecncy Tolerance: 25 ppm Canon U.S.A., Inc. Therefore, the transmitter will be on the rights of copyright owners and be determined ...
Instruction Manual
Page 3
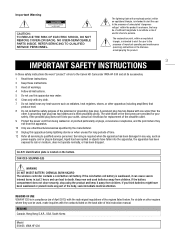
...) instructions in the literature accompanying the product. 3 IMPORTANT SAFETY INSTRUCTIONS In these safety instructions the word "product" refers to the Canon HD Camcorder VIXIA HF G30 and all its accessories. 1 Read these instructions. 2 Keep these instructions. 3 Heed all warnings. 4 Follow all servicing to... controller contains a coin/button cell battery. A grounding type plug has two blades and a third grounding prong. REGIONS OF USE VIXIA HF G30 is swallowed, it away from children. The exclamation point, within the product's enclosure, that produce heat. 8 Do not defeat ...
...) instructions in the literature accompanying the product. 3 IMPORTANT SAFETY INSTRUCTIONS In these safety instructions the word "product" refers to the Canon HD Camcorder VIXIA HF G30 and all its accessories. 1 Read these instructions. 2 Keep these instructions. 3 Heed all warnings. 4 Follow all servicing to... controller contains a coin/button cell battery. A grounding type plug has two blades and a third grounding prong. REGIONS OF USE VIXIA HF G30 is swallowed, it away from children. The exclamation point, within the product's enclosure, that produce heat. 8 Do not defeat ...
Instruction Manual
Page 4
... Corporation, its affiliates or subsidiaries in the United States and other use for the MPEG-4 standard and may be used under the AT&T patents to Canon camcorders compliant with high-definition video composed of Cisco in the U.S.
... Corporation, its affiliates or subsidiaries in the United States and other use for the MPEG-4 standard and may be used under the AT&T patents to Canon camcorders compliant with high-definition video composed of Cisco in the U.S.
Instruction Manual
Page 5
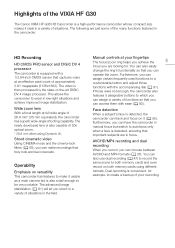
.../MP4 recording and dual recording When you record, you can assign a variety of functions so that important subjects are in the field. Highlights of the VIXIA HF G30 The Canon VIXIA HF G30 HD Camcorder is a high-performance camcorder whose compact size makes it ideal in the camcorder. If those functions with the accompanying dial (A 91). The...
.../MP4 recording and dual recording When you record, you can assign a variety of functions so that important subjects are in the field. Highlights of the VIXIA HF G30 The Canon VIXIA HF G30 HD Camcorder is a high-performance camcorder whose compact size makes it ideal in the camcorder. If those functions with the accompanying dial (A 91). The...
Instruction Manual
Page 6
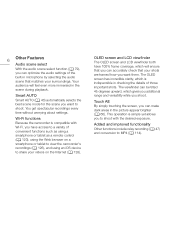
Wi-Fi functions Because the camcorder is compatible with the desired exposure. The viewfinder can be tilted 45 degrees upward, which will feel even more immersed in the scene during playback. You get spectacular recordings every time without worrying about settings. Added and improved functionality Other functions include relay recording (A 47) and conversion to MP4 (A 114). This operation is indispensible in checking the details of those important shots. OLED screen and LCD viewfinder The OLED screen and LCD viewfinder both have access to a variety of convenient functions such...
Wi-Fi functions Because the camcorder is compatible with the desired exposure. The viewfinder can be tilted 45 degrees upward, which will feel even more immersed in the scene during playback. You get spectacular recordings every time without worrying about settings. Added and improved functionality Other functions include relay recording (A 47) and conversion to MP4 (A 114). This operation is indispensible in checking the details of those important shots. OLED screen and LCD viewfinder The OLED screen and LCD viewfinder both have access to a variety of convenient functions such...
Instruction Manual
Page 7
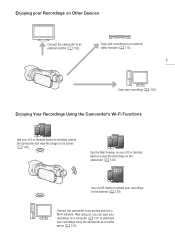
Use the Web browser on the camcorder (A 126). Connect the camcorder to the Internet (A 128). After doing so, you can save your recordings on a computer (A 131) or play back your iOS or Android device to view the recordings on your recordings using the camcorder as a media server (A 130). Enjoying your recordings (A 108). Copy your recordings to an external video recorder (A 115). 7 Save your Recordings on Other Devices Connect the camcorder to remotely control the camcorder and view the image on a Wi-Fi network. Use an iOS device to upload your iOS or Android device...
Use the Web browser on the camcorder (A 126). Connect the camcorder to the Internet (A 128). After doing so, you can save your recordings on a computer (A 131) or play back your iOS or Android device to view the recordings on your recordings using the camcorder as a media server (A 130). Enjoying your recordings (A 108). Copy your recordings to an external video recorder (A 115). 7 Save your Recordings on Other Devices Connect the camcorder to remotely control the camcorder and view the image on a Wi-Fi network. Use an iOS device to upload your iOS or Android device...
Instruction Manual
Page 8
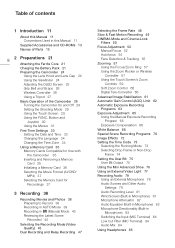
Table of contents 1 Introduction 11 About this Manual 11 Conventions Used in Microphone) 83 Switching the Input (MIC Terminal) 84 Low Cut Filter (MIC Terminal) 84 Audio Mix 84 Using Headphones 85 Button and Joystick 30 Using the Menus 31 First Time Settings 33 Setting the Date and Time 33 Changing the Language 34 Changing the Time Zone 34 Using a Memory Card 35 Memory Cards Compatible for Use with the Camcorder 35 Inserting and Removing a Memory Card 35 Initializing a Memory Card 36 Selecting the Movie Format (AVCHD/ MP4) 37 Selecting the Memory Card for Recordings 37 3 Recording 38 ...
Table of contents 1 Introduction 11 About this Manual 11 Conventions Used in Microphone) 83 Switching the Input (MIC Terminal) 84 Low Cut Filter (MIC Terminal) 84 Audio Mix 84 Using Headphones 85 Button and Joystick 30 Using the Menus 31 First Time Settings 33 Setting the Date and Time 33 Changing the Language 34 Changing the Time Zone 34 Using a Memory Card 35 Memory Cards Compatible for Use with the Camcorder 35 Inserting and Removing a Memory Card 35 Initializing a Memory Card 36 Selecting the Movie Format (AVCHD/ MP4) 37 Selecting the Memory Card for Recordings 37 3 Recording 38 ...
Instruction Manual
Page 9
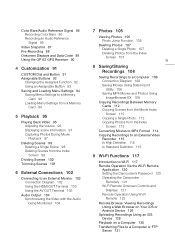
Color Bars/Audio Reference Signal 86 Recording Color Bars 86 Recording an Audio Reference Signal 86 Video Snapshot 87 Pre-Recording 88 Onscreen Displays and Data Code 89 Using the GP-E2 GPS Receiver 90 4 Customization 91 CUSTOM Dial and Button 91 Assignable Buttons 92 Changing the Assigned Function 92 Using an Assignable Button 93 Saving and Loading Menu Settings 94 Saving Menu Settings to a Memory Card 94 Loading Menu Settings from a Memory Card 94 5 Playback 95 Playing Back Video 95 Adjusting the volume 96 Displaying scene information 97 Capturing Photos During Movie Playback 97 Deleting ...
Color Bars/Audio Reference Signal 86 Recording Color Bars 86 Recording an Audio Reference Signal 86 Video Snapshot 87 Pre-Recording 88 Onscreen Displays and Data Code 89 Using the GP-E2 GPS Receiver 90 4 Customization 91 CUSTOM Dial and Button 91 Assignable Buttons 92 Changing the Assigned Function 92 Using an Assignable Button 93 Saving and Loading Menu Settings 94 Saving Menu Settings to a Memory Card 94 Loading Menu Settings from a Memory Card 94 5 Playback 95 Playing Back Video 95 Adjusting the volume 96 Displaying scene information 97 Capturing Photos During Movie Playback 97 Deleting ...
Instruction Manual
Page 10
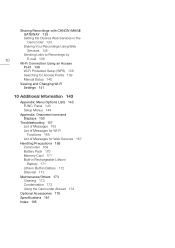
... Points 139 Manual Setup 140 Viewing and Changing Wi-Fi Settings 141 10 Additional Information 143 Appendix: Menu Options Lists 143 FUNC. Sharing Recordings with CANON iMAGE GATEWAY 133 Setting the Desired Web Services in Rechargeable Lithium Battery 171 Lithium Button Battery 172 Disposal 172 Maintenance/Others 173 Cleaning 173 Condensation...
... Points 139 Manual Setup 140 Viewing and Changing Wi-Fi Settings 141 10 Additional Information 143 Appendix: Menu Options Lists 143 FUNC. Sharing Recordings with CANON iMAGE GATEWAY 133 Setting the Desired Web Services in Rechargeable Lithium Battery 171 Lithium Button Battery 172 Disposal 172 Maintenance/Others 173 Cleaning 173 Condensation...
Instruction Manual
Page 11
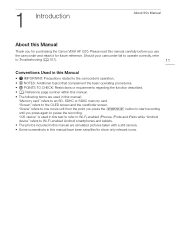
.... • Some screenshots in this manual carefully before you press again to start recording until you use the camcorder and retain it for purchasing the Canon VIXIA HF G30. 1 Introduction Introduction About this Manual About this Manual Thank you for future reference. "Scene" refers to one movie unit from the point you press the...
.... • Some screenshots in this manual carefully before you press again to start recording until you use the camcorder and retain it for purchasing the Canon VIXIA HF G30. 1 Introduction Introduction About this Manual About this Manual Thank you for future reference. "Scene" refers to one movie unit from the point you press the...
Instruction Manual
Page 12
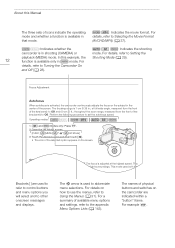
For details, refer to Setting the playback (MEDIA) mode. For details, refer to Turning the Camcorder On and Off (A 28). In this Manual The three sets of icons indicate the operating mode and whether a function is adjusted at full wide-angle, measured from the front of the selected option appears on how to use the menus, refer to G. Operating modes: 1 and modes only: Press B. 2 Open the [AF Mode] screen. [FUNC.] > [MENU] > p > [AF Mode] 3 Touch the desired option and then touch [X]. • The icon of the lens barrel) to Using the Menus (A 31). This mode is ...
For details, refer to Setting the playback (MEDIA) mode. For details, refer to Turning the Camcorder On and Off (A 28). In this Manual The three sets of icons indicate the operating mode and whether a function is adjusted at full wide-angle, measured from the front of the selected option appears on how to use the menus, refer to G. Operating modes: 1 and modes only: Press B. 2 Open the [AF Mode] screen. [FUNC.] > [MENU] > p > [AF Mode] 3 Touch the desired option and then touch [X]. • The icon of the lens barrel) to Using the Menus (A 31). This mode is ...
Instruction Manual
Page 13
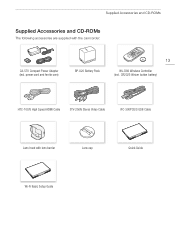
Supplied Accessories and CD-ROMs Supplied Accessories and CD-ROMs The following accessories are supplied with lens barrier Lens cap Quick Guide Wi-Fi Basic Setup Guide CR2025 lithium button battery) HTC-100/S High Speed HDMI Cable STV-250N Stereo Video Cable IFC-300PCU/S USB Cable Lens hood with the camcorder: CA-570 Compact Power Adapter (incl. power cord and ferrite core) BP-820 Battery Pack 13 WL-D89 Wireless Controller (incl.
Supplied Accessories and CD-ROMs Supplied Accessories and CD-ROMs The following accessories are supplied with lens barrier Lens cap Quick Guide Wi-Fi Basic Setup Guide CR2025 lithium button battery) HTC-100/S High Speed HDMI Cable STV-250N Stereo Video Cable IFC-300PCU/S USB Cable Lens hood with the camcorder: CA-570 Compact Power Adapter (incl. power cord and ferrite core) BP-820 Battery Pack 13 WL-D89 Wireless Controller (incl.
Instruction Manual
Page 14
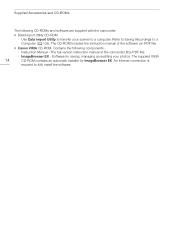
... editing your scenes to a computer. Supplied Accessories and CD-ROMs The following components. - The full-version instruction manual of the software (on PDF file). • Canon VIXIA CD-ROM. Software for ImageBrowser EX. An Internet connection is required to a Computer (A 108). Use Data Import Utility to transfer your photos.
... editing your scenes to a computer. Supplied Accessories and CD-ROMs The following components. - The full-version instruction manual of the software (on PDF file). • Canon VIXIA CD-ROM. Software for ImageBrowser EX. An Internet connection is required to a Computer (A 108). Use Data Import Utility to transfer your photos.

Instruction Manual
Page 15
INFO (battery information) button (A 156) Names of Parts Left side view 2 1 Names of Parts 15 3 4 5 67 8 9 10 1 Lens barrier switch (A 38) 2 Memory card slot 2 (A 35) 3 Memory card slot 3 (A 35) 4 u (review recording) button (A 44)/ Assignable button 5 (A 92) 5 Lens hood (A 24) 6 Focus/Zoom ring (A 52, 57) 7 CUSTOM (customizable) dial (A 91) 8 CUSTOM (customizable) button (A 91) 9 Double memory card slot cover 10 DISP. (onscreen display) button (A 89)/BATT.
INFO (battery information) button (A 156) Names of Parts Left side view 2 1 Names of Parts 15 3 4 5 67 8 9 10 1 Lens barrier switch (A 38) 2 Memory card slot 2 (A 35) 3 Memory card slot 3 (A 35) 4 u (review recording) button (A 44)/ Assignable button 5 (A 92) 5 Lens hood (A 24) 6 Focus/Zoom ring (A 52, 57) 7 CUSTOM (customizable) dial (A 91) 8 CUSTOM (customizable) button (A 91) 9 Double memory card slot cover 10 DISP. (onscreen display) button (A 89)/BATT.

Instruction Manual
Page 16
Names of Parts Right side view 16 78 1 9 5 2 6 3 4 1 Built-in speaker (A 96) 2 MIC terminal (A 79) 3 HDMI OUT terminal (A 102, 103) 4 REMOTE terminal For connecting commercially available remote controllers. 5 × (headphones) terminal (A 85) 6 USB terminal (A 108) 7 DC IN terminal (A 21) 8 AV OUT terminal (A 102, 103) 9 Grip belt (A 26)
Names of Parts Right side view 16 78 1 9 5 2 6 3 4 1 Built-in speaker (A 96) 2 MIC terminal (A 79) 3 HDMI OUT terminal (A 102, 103) 4 REMOTE terminal For connecting commercially available remote controllers. 5 × (headphones) terminal (A 85) 6 USB terminal (A 108) 7 DC IN terminal (A 21) 8 AV OUT terminal (A 102, 103) 9 Grip belt (A 26)
Instruction Manual
Page 17
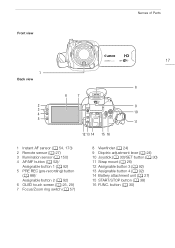
Front view Names of Parts 17 1 Back view 8 6 7 2 9 3 4 10 5 11 12 13 14 15 16 1 Instant AF sensor (A 54, 173) 2 Remote sensor (A 27) 3 Illumination sensor (A 150) 4 AF/MF button (A 52)/ Assignable button 1 (A 92) 5 PRE REC (pre-recording) button (A 88)/ Assignable button 2 (A 92) 6 OLED touch screen (A 25, 29) 7 Focus/Zoom ring switch (A 57) 8 Viewfinder (A 24) 9 Dioptric adjustment lever (A 24) 10 Joystick (A 30)/SET button (A 30) 11 Strap mount (A 26) 12 Assignable button 3 (A 92) 13 Assignable button 4 (A 92) 14 Battery attachment unit (A 21) 15 START/STOP button (A 38) 16 ...
Front view Names of Parts 17 1 Back view 8 6 7 2 9 3 4 10 5 11 12 13 14 15 16 1 Instant AF sensor (A 54, 173) 2 Remote sensor (A 27) 3 Illumination sensor (A 150) 4 AF/MF button (A 52)/ Assignable button 1 (A 92) 5 PRE REC (pre-recording) button (A 88)/ Assignable button 2 (A 92) 6 OLED touch screen (A 25, 29) 7 Focus/Zoom ring switch (A 57) 8 Viewfinder (A 24) 9 Dioptric adjustment lever (A 24) 10 Joystick (A 30)/SET button (A 30) 11 Strap mount (A 26) 12 Assignable button 3 (A 92) 13 Assignable button 4 (A 92) 14 Battery attachment unit (A 21) 15 START/STOP button (A 38) 16 ...

Instruction Manual
Page 18
Names of Parts Top view 1 18 23 45 6 78 1 Built-in stereo microphone (A 78) 2 Accessory shoe Cold shoe for attaching accessories. 3 Mode switch (A 29) 4 Zoom rocker (A 57) 5 ACCESS indicator (A 38) 6 Mini advanced shoe (A 76) 7 Power switch (A 28) 8 POWER / CHG (battery charging) indicator (A 21)
Names of Parts Top view 1 18 23 45 6 78 1 Built-in stereo microphone (A 78) 2 Accessory shoe Cold shoe for attaching accessories. 3 Mode switch (A 29) 4 Zoom rocker (A 57) 5 ACCESS indicator (A 38) 6 Mini advanced shoe (A 76) 7 Power switch (A 28) 8 POWER / CHG (battery charging) indicator (A 21)

Instruction Manual
Page 19
Bottom view Names of Parts 19 1 2 3 1 Tripod socket (A 27) 2 BATTERY RELEASE switch (A 22) 3 Eye cup (A 24)
Bottom view Names of Parts 19 1 2 3 1 Tripod socket (A 27) 2 BATTERY RELEASE switch (A 22) 3 Eye cup (A 24)
Instruction Manual
Page 20
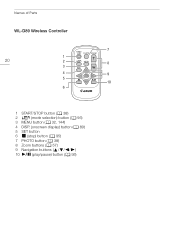
Names of Parts WL-D89 Wireless Controller 7 1 20 2 8 3 4 9 5 10 6 1 START/STOP button (A 38) 2 G (mode selection) button (A 95) 3 MENU button (A 32, 144) 4 DISP. (onscreen display) button (A 89) 5 SET button 6 Ñ (stop) button (A 95) 7 PHOTO button (A 38) 8 Zoom buttons (A 57) 9 Navigation buttons 10 Ò (play/pause) button (A 95)
Names of Parts WL-D89 Wireless Controller 7 1 20 2 8 3 4 9 5 10 6 1 START/STOP button (A 38) 2 G (mode selection) button (A 95) 3 MENU button (A 32, 144) 4 DISP. (onscreen display) button (A 89) 5 SET button 6 Ñ (stop) button (A 95) 7 PHOTO button (A 38) 8 Zoom buttons (A 57) 9 Navigation buttons 10 Ò (play/pause) button (A 95)
Instruction Manual
Page 21
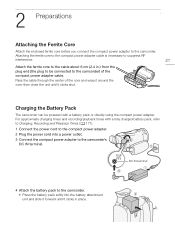
For approximate charging times and recording/playback times with a battery pack or directly using the compact power adapter. DC IN terminal 4 Attach the battery pack to the camcorder) of the core and wrap it around the core, then close the unit until it clicks shut. Charging the Battery Pack The camcorder can be connected to the camcorder. • Press the battery pack softly into the battery attachment unit and slide it forward until it clicks in .) from the plug end (the plug to be powered with a fully charged battery pack, refer to Charging, Recording and Playback ...
For approximate charging times and recording/playback times with a battery pack or directly using the compact power adapter. DC IN terminal 4 Attach the battery pack to the camcorder) of the core and wrap it around the core, then close the unit until it clicks shut. Charging the Battery Pack The camcorder can be connected to the camcorder. • Press the battery pack softly into the battery attachment unit and slide it forward until it clicks in .) from the plug end (the plug to be powered with a fully charged battery pack, refer to Charging, Recording and Playback ...
