VIXIA HF G10 Instruction Manual
Page 2
HD Camcorder, VIXIA HF G10 A systems This device complies with the instructions, may be ... Reorient or relocate the receiving antenna. • Increase the separation between the equipment and receiver. • Connect the equipment into an outlet on the rights of batteries. • Do not expose batteries or product to... of copyrighted materials may cause undesired operation. This equipment generates, uses and can be contrary to persons. One Canon Plaza, Lake Success, NY 11042, U.S.A. COPYRIGHT WARNING: 2 Unauthorized recording of important operating and maintenance (servicing)...
HD Camcorder, VIXIA HF G10 A systems This device complies with the instructions, may be ... Reorient or relocate the receiving antenna. • Increase the separation between the equipment and receiver. • Connect the equipment into an outlet on the rights of batteries. • Do not expose batteries or product to... of copyrighted materials may cause undesired operation. This equipment generates, uses and can be contrary to persons. One Canon Plaza, Lake Success, NY 11042, U.S.A. COPYRIGHT WARNING: 2 Unauthorized recording of important operating and maintenance (servicing)...

VIXIA HF G10 Instruction Manual
Page 3
...or table. This is left unattended and unused for your safety. If the plug still fails to fit, contact your electrician to the Canon HD Camcorder VIXIA HF G10 A and all its accessories. 1 Read these instructions. 2 Keep these safety instructions the word "product" refers to replace your obsolete...grounding of the mast and supporting structure, grounding of the lead-in this manual. 18 Accessories - Section 810 of antenna discharge unit, connection to lightning and powerline surges. 27 Overloading - See figure 1. 26 Lightning - This will fit into the apparatus, the apparatus has ...
...or table. This is left unattended and unused for your safety. If the plug still fails to fit, contact your electrician to the Canon HD Camcorder VIXIA HF G10 A and all its accessories. 1 Read these instructions. 2 Keep these safety instructions the word "product" refers to replace your obsolete...grounding of the mast and supporting structure, grounding of the lead-in this manual. 18 Accessories - Section 810 of antenna discharge unit, connection to lightning and powerline surges. 27 Overloading - See figure 1. 26 Lightning - This will fit into the apparatus, the apparatus has ...
VIXIA HF G10 Instruction Manual
Page 6
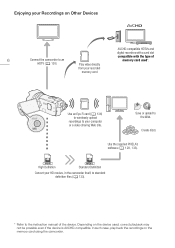
... if the device is AVCHD-compatible. In such case, play back the recordings on the device used *. Save or upload to the instruction manual of 6 Connect the camcorder to your computer or a video sharing Web site.
... if the device is AVCHD-compatible. In such case, play back the recordings on the device used *. Save or upload to the instruction manual of 6 Connect the camcorder to your computer or a video sharing Web site.
VIXIA HF G10 Instruction Manual
Page 8
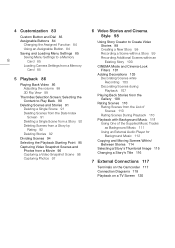
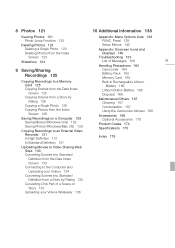
... External Audio Player for Background Music 112 Copying and Moving Scenes Within/ Between Stories 114 Selecting a Story's Thumbnail Image 115 Changing a Story's Title 116 7 External Connections 117 Terminals on the Camcorder 117 Connection Diagrams 118 Playback on a TV Screen 120
... External Audio Player for Background Music 112 Copying and Moving Scenes Within/ Between Stories 114 Selecting a Story's Thumbnail Image 115 Changing a Story's Title 116 7 External Connections 117 Terminals on the Camcorder 117 Connection Diagrams 118 Playback on a TV Screen 120
VIXIA HF G10 Instruction Manual
Page 9
... Definition 131 In Standard Definition 131 Uploading Movies to Video Sharing Web Sites 133 Converting Scenes into Standard Definition from the Date Index Screen 133 Connecting to the Computer and Uploading your Videos 134 Converting Scenes into Standard Definition from a Story by Rating 135 Converting Only Part of Messages 158 9 Handling...
... Definition 131 In Standard Definition 131 Uploading Movies to Video Sharing Web Sites 133 Converting Scenes into Standard Definition from the Date Index Screen 133 Connecting to the Computer and Uploading your Videos 134 Converting Scenes into Standard Definition from a Story by Rating 135 Converting Only Part of Messages 158 9 Handling...
VIXIA HF G10 Instruction Manual
Page 20
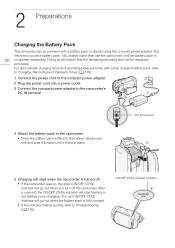
...) indicator will be powered with a fully charged battery pack, refer to Charging, Recording and Playback Times (0 170). 1 Connect the power cord to the compact power adapter. 2 Plug the power cord into a power outlet. 3 Connect the compact power adapter to the camcorder's DC IN terminal. 4 Attach the battery pack to Troubleshooting (0 155). Doing...
...) indicator will be powered with a fully charged battery pack, refer to Charging, Recording and Playback Times (0 170). 1 Connect the power cord to the compact power adapter. 2 Plug the power cord into a power outlet. 3 Connect the compact power adapter to the camcorder's DC IN terminal. 4 Attach the battery pack to Troubleshooting (0 155). Doing...
VIXIA HF G10 Instruction Manual
Page 21
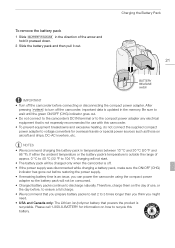
...inverters, etc. Please call 1-800-8-BATTERY for information on how to recycle this camcorder. • To prevent equipment breakdowns and excessive heating, do not connect the supplied compact power adapter to voltage converters for use , or the day before, to ensure a full charge. • We recommend that you prepare... off the camcorder, important data is recyclable. Be sure to wait until the green ON/OFF (CHG) indicator goes out. • Do not connect to the camcorder's DC IN terminal or to 3 times longer than you think you can power the camcorder using the compact power adapter so the...
...inverters, etc. Please call 1-800-8-BATTERY for information on how to recycle this camcorder. • To prevent equipment breakdowns and excessive heating, do not connect the supplied compact power adapter to voltage converters for use , or the day before, to ensure a full charge. • We recommend that you prepare... off the camcorder, important data is recyclable. Be sure to wait until the green ON/OFF (CHG) indicator goes out. • Do not connect to the camcorder's DC IN terminal or to 3 times longer than you think you can power the camcorder using the compact power adapter so the...

VIXIA HF G10 Instruction Manual
Page 68
... to the mini advanced shoe. - Operating modes: 1 Open the [Built-in Mic Directionality] screen. 68 [FUNC.] [MENU] 7 [Built-in microphone. When an external microphone is connected to the MIC terminal with the sound linked to [B Off]. In the following cases, the built-in microphone's directionality cannot be . The larger the subject...
... to the mini advanced shoe. - Operating modes: 1 Open the [Built-in Mic Directionality] screen. 68 [FUNC.] [MENU] 7 [Built-in microphone. When an external microphone is connected to the MIC terminal with the sound linked to [B Off]. In the following cases, the built-in microphone's directionality cannot be . The larger the subject...

VIXIA HF G10 Instruction Manual
Page 70
... the [MIC Terminal Input] screen. [FUNC.] [MENU] 7 [MIC Terminal Input] 3 Touch [ External Audio] or [ Microphone] and then touch [f]. • This step is not necessary after connecting an optional WM-V1 wireless microphone. 4 Activate the audio mix. [Audio Mix] [A On] 5 Adjust the audio mix balance as desired. 6 Touch [a] to set the audio...
... the [MIC Terminal Input] screen. [FUNC.] [MENU] 7 [MIC Terminal Input] 3 Touch [ External Audio] or [ Microphone] and then touch [f]. • This step is not necessary after connecting an optional WM-V1 wireless microphone. 4 Activate the audio mix. [Audio Mix] [A On] 5 Adjust the audio mix balance as desired. 6 Touch [a] to set the audio...
VIXIA HF G10 Instruction Manual
Page 71
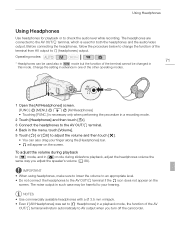
...headphones to AV output when you adjust the speaker's volume (0 88). Operating modes: * 71 * Headphones can also drag your hearing. Before connecting the headphones, follow the procedure below to change the function of the terminal cannot be changed in the menu, touch [Volume]. 5 Touch [c] ... on the screen. IMPORTANT • When using headphones, make sure to lower the volume to an appropriate level. • Do not connect the headphones to X (headphones) output. Using Headphones Using Headphones Use headphones for both the headphones and the audio/video output.
...headphones to AV output when you adjust the speaker's volume (0 88). Operating modes: * 71 * Headphones can also drag your hearing. Before connecting the headphones, follow the procedure below to change the function of the terminal cannot be changed in the menu, touch [Volume]. 5 Touch [c] ... on the screen. IMPORTANT • When using headphones, make sure to lower the volume to an appropriate level. • Do not connect the headphones to X (headphones) output. Using Headphones Using Headphones Use headphones for both the headphones and the audio/video output.

VIXIA HF G10 Instruction Manual
Page 74
... the optional SM-V1 Surround Microphone: - NOTES • When an external microphone is connected to the camcorder, 7 [Wind Screen] will be set to the instruction manual supplied with 5.1ch surround sound connected to the camcorder's MIC terminal. MIC terminal 74 3 If necessary, activate the audio ..., make sure that the jacket covering above the plug is monaural. You can connect almost any stereo microphone with a ∅ 3.5 mm plug but audio recording levels may vary. 1 Connect the external microphone to 2ch stereo. Using Commercially Available Microphones You can enjoy the...
... the optional SM-V1 Surround Microphone: - NOTES • When an external microphone is connected to the camcorder, 7 [Wind Screen] will be set to the instruction manual supplied with 5.1ch surround sound connected to the camcorder's MIC terminal. MIC terminal 74 3 If necessary, activate the audio ..., make sure that the jacket covering above the plug is monaural. You can connect almost any stereo microphone with a ∅ 3.5 mm plug but audio recording levels may vary. 1 Connect the external microphone to 2ch stereo. Using Commercially Available Microphones You can enjoy the...

VIXIA HF G10 Instruction Manual
Page 76
NOTES • In mode, the only available functions are turning the power on/off , starting /stopping a recording, and zoom. Operating modes: 76 Connect the optional ZR-2000 or ZR-1000 Zoom Remote Controller to the REMOTE terminal on a tripod and you want to ensure maximum stability of the ...
NOTES • In mode, the only available functions are turning the power on/off , starting /stopping a recording, and zoom. Operating modes: 76 Connect the optional ZR-2000 or ZR-1000 Zoom Remote Controller to the REMOTE terminal on a tripod and you want to ensure maximum stability of the ...
VIXIA HF G10 Instruction Manual
Page 111
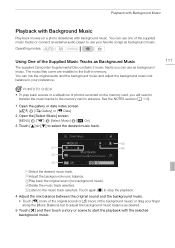
... background music mix balance to use as background music. POINTS TO CHECK • To play back scenes or a slideshow of the supplied music tracks or connect an external audio player to your favorite songs as background music. CPlay back the original sound (no background music). Playback with Background Music Playback with...
... background music mix balance to use as background music. POINTS TO CHECK • To play back scenes or a slideshow of the supplied music tracks or connect an external audio player to your favorite songs as background music. CPlay back the original sound (no background music). Playback with Background Music Playback with...

VIXIA HF G10 Instruction Manual
Page 112
... 1 During playback, touch the screen to display the playback controls. 2 Touch [ ], drag your favorite songs as background music by connecting an external player. Playback with the video linked to the external audio 6 Start the music playback on the external player will pause. ...gallery or date index screen. [b] [ Gallery] or [1 Date] 2 Open the [External Audio Input] screen. [MENU] y [External Audio Input] 3 Touch [A On ]. 4 Connect the external player to the camcorder's MIC terminal. 5 Adjust the audio input as desired and touch [f]. 112 To delete a music track In the [Select Music...
... 1 During playback, touch the screen to display the playback controls. 2 Touch [ ], drag your favorite songs as background music by connecting an external player. Playback with the video linked to the external audio 6 Start the music playback on the external player will pause. ...gallery or date index screen. [b] [ Gallery] or [1 Date] 2 Open the [External Audio Input] screen. [MENU] y [External Audio Input] 3 Touch [A On ]. 4 Connect the external player to the camcorder's MIC terminal. 5 Adjust the audio input as desired and touch [f]. 112 To delete a music track In the [Select Music...

VIXIA HF G10 Instruction Manual
Page 117
... 2 AV OUT/X Terminal Access: Open the LCD panel and terminal cover. The HDMI OUT terminal offers a high-quality digital connection that combines audio and video in speaker will be muted while the STV-250N Stereo Video Cable is for video only. Sound from...single convenient cable. 4 USB Terminal Access: Open the side terminal cover. 117 * When connecting a cable to the camcorder, make sure to the camcorder. 7 External Connections External Connections Terminals on the Camcorder Terminals on the connected TV. 3 HDMI OUT Terminal* Access: Open the side terminal cover. The component video...
... 2 AV OUT/X Terminal Access: Open the LCD panel and terminal cover. The HDMI OUT terminal offers a high-quality digital connection that combines audio and video in speaker will be muted while the STV-250N Stereo Video Cable is for video only. Sound from...single convenient cable. 4 USB Terminal Access: Open the side terminal cover. 117 * When connecting a cable to the camcorder, make sure to the camcorder. 7 External Connections External Connections Terminals on the Camcorder Terminals on the connected TV. 3 HDMI OUT Terminal* Access: Open the side terminal cover. The component video...
VIXIA HF G10 Instruction Manual
Page 118
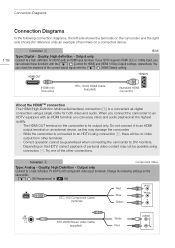
... While the camcorder is a convenient all-digital connection using connection A. Connection B Component Video Type: Analog Quality: High Definition Output only Connect to a high-definition TV (HDTV) with an HDMI terminal, you connect the camcorder to an HDTV equipped with component ... HDMI Cable (supplied) (standard HDMI connector) About the HDMITM connection The HDMI (High-Definition Multimedia Interface) connection (A) is connected to an HDTV using connection A, there will be no video output from other connections. Depending on the HDTV, correct playback of the other terminals. ...
... While the camcorder is a convenient all-digital connection using connection A. Connection B Component Video Type: Analog Quality: High Definition Output only Connect to a high-definition TV (HDTV) with an HDMI terminal, you connect the camcorder to an HDTV equipped with component ... HDMI Cable (supplied) (standard HDMI connector) About the HDMITM connection The HDMI (High-Definition Multimedia Interface) connection (A) is connected to an HDTV using connection A, there will be no video output from other connections. Depending on the HDTV, correct playback of the other terminals. ...

VIXIA HF G10 Instruction Manual
Page 119
...the following settings on a computer. - USB Cable (supplied) NOTES • Power the camcorder using the compact power adapter and only then connect it to the computer using the supplied USB cable in order to use them as background music. y [TV Type] according to the TV ... and change the aspect ratio - 6 [AV/Headphones] to [H AV] STV-250N Stereo Video Cable (supplied) Yellow White Red 119 Connection D USB Type: Digital data connection Connect to a computer to save your recordings, or to a compatible digital video recorder to copy your recordings. Change the following cases. - ...
...the following settings on a computer. - USB Cable (supplied) NOTES • Power the camcorder using the compact power adapter and only then connect it to the computer using the supplied USB cable in order to use them as background music. y [TV Type] according to the TV ... and change the aspect ratio - 6 [AV/Headphones] to [H AV] STV-250N Stereo Video Cable (supplied) Yellow White Red 119 Connection D USB Type: Digital data connection Connect to a computer to save your recordings, or to a compatible digital video recorder to copy your recordings. Change the following cases. - ...
VIXIA HF G10 Instruction Manual
Page 120
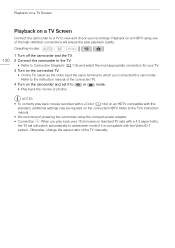
...correctly play back your 16:9 movies on standard TV sets with the Video ID-1 system. Otherwise, change the aspect ratio of the high-definition connections will switch automatically to widescreen mode if it to or mode. • Play back the movies or photos. Playback on a TV Screen Playback...with a 4:3 aspect ratio, the TV set will ensure the best playback quality. Operating modes: 120 1 Turn off the camcorder and the TV. 2 Connect the camcorder to the TV. • Refer to the TV's instruction manual. • We recommend powering the camcorder using one of the TV manually...
...correctly play back your 16:9 movies on standard TV sets with the Video ID-1 system. Otherwise, change the aspect ratio of the high-definition connections will switch automatically to widescreen mode if it to or mode. • Play back the movies or photos. Playback on a TV Screen Playback...with a 4:3 aspect ratio, the TV set will ensure the best playback quality. Operating modes: 120 1 Turn off the camcorder and the TV. 2 Connect the camcorder to the TV. • Refer to the TV's instruction manual. • We recommend powering the camcorder using one of the TV manually...
VIXIA HF G10 Instruction Manual
Page 128
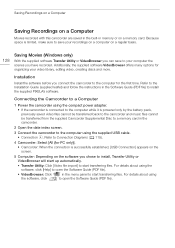
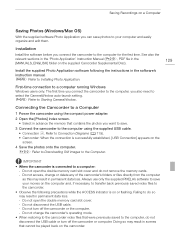
... the Software Guide (PDF file). • VideoBrowser: Click the software, click in the camcorder. 2 Open the date index screen. 3 Connect the camcorder to the computer using the supplied USB cable. • Connection D. Installation Install the software before you chose to install, Transfer Utility or VideoBrowser will start up automatically. • Transfer Utility...
... the Software Guide (PDF file). • VideoBrowser: Click the software, click in the camcorder. 2 Open the date index screen. 3 Connect the camcorder to the computer using the supplied USB cable. • Connection D. Installation Install the software before you chose to install, Transfer Utility or VideoBrowser will start up automatically. • Transfer Utility...
VIXIA HF G10 Instruction Manual
Page 129
...on the screen. 4 Save the photos onto the computer. Do not disconnect the USB cable. - Refer to Connection Diagrams (0 119). • Camcorder: When the connection is successfully established, [USB Connection] appears on the supplied Camcorder Supplemental Disc). Do not open the double memory card slot cover and do so... may result in scenes that contains the photos you want to save. 3 Connect the camcorder to the computer using the compact power adapter. 2 Open the [Photos] index screen. • Select in advance the memory ...
...on the screen. 4 Save the photos onto the computer. Do not disconnect the USB cable. - Refer to Connection Diagrams (0 119). • Camcorder: When the connection is successfully established, [USB Connection] appears on the supplied Camcorder Supplemental Disc). Do not open the double memory card slot cover and do so... may result in scenes that contains the photos you want to save. 3 Connect the camcorder to the computer using the compact power adapter. 2 Open the [Photos] index screen. • Select in advance the memory ...


