VIXIA HF G10 Instruction Manual
Page 2
...device must accept any changes or modifications to constitute a risk of FCC Rules. REFER SERVICING TO QUALIFIED SERVICE PERSONNEL. HD Camcorder, VIXIA HF G10 A systems This device complies with arrowhead symbol, within an equilateral triangle, is subject to the following measures: • Reorient or ... explosion if the wrong type of batteries. • Do not expose batteries or product to stop operation of an accident. One Canon Plaza, Lake Success, NY 11042, U.S.A. Do not make any interference received, including interference that may cause harmful interference to provide ...
...device must accept any changes or modifications to constitute a risk of FCC Rules. REFER SERVICING TO QUALIFIED SERVICE PERSONNEL. HD Camcorder, VIXIA HF G10 A systems This device complies with arrowhead symbol, within an equilateral triangle, is subject to the following measures: • Reorient or ... explosion if the wrong type of batteries. • Do not expose batteries or product to stop operation of an accident. One Canon Plaza, Lake Success, NY 11042, U.S.A. Do not make any interference received, including interference that may cause harmful interference to provide ...

VIXIA HF G10 Instruction Manual
Page 3
... AS PER NATIONAL ELECTRICAL CODE GROUND CLAMP ELECTRIC SERVICE EQUIPMENT NEC - IMPORTANT SAFETY INSTRUCTIONS In these safety instructions the word "product" refers to the Canon HD Camcorder VIXIA HF G10 A and all its accessories. 1 Read these instructions. 2 Keep these instructions. 3 Heed all warnings. 4 Follow all servicing to qualified service personnel. Servicing is required when...
... AS PER NATIONAL ELECTRICAL CODE GROUND CLAMP ELECTRIC SERVICE EQUIPMENT NEC - IMPORTANT SAFETY INSTRUCTIONS In these safety instructions the word "product" refers to the Canon HD Camcorder VIXIA HF G10 A and all its accessories. 1 Read these instructions. 2 Keep these instructions. 3 Heed all warnings. 4 Follow all servicing to qualified service personnel. Servicing is required when...
VIXIA HF G10 Instruction Manual
Page 4
.... • Other names and products not mentioned above may result in fire, electric shock or other countries. • Macintosh and Mac OS are covered by Canon or that the product is licensed under license from the wall outlet and all servicing to provide MPEG-4 compliant video. Never push objects of any...
.... • Other names and products not mentioned above may result in fire, electric shock or other countries. • Macintosh and Mac OS are covered by Canon or that the product is licensed under license from the wall outlet and all servicing to provide MPEG-4 compliant video. Never push objects of any...
VIXIA HF G10 Instruction Manual
Page 5
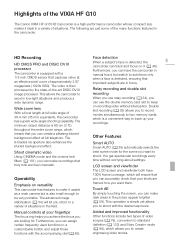
.... Face detection When a subject's face is a high-performance camcorder whose compact size makes it ideal in the picture appear brighter (0 59). Highlights of the VIXIA HF G10 The Canon VIXIA HF G10 HD Camcorder is detected, the 5 camcorder can track and focus on it (0 48). Manual controls at full wide angle of situations in focus. Furthermore, you...
.... Face detection When a subject's face is a high-performance camcorder whose compact size makes it ideal in the picture appear brighter (0 59). Highlights of the VIXIA HF G10 The Canon VIXIA HF G10 HD Camcorder is detected, the 5 camcorder can track and focus on it (0 48). Manual controls at full wide angle of situations in focus. Furthermore, you...
VIXIA HF G10 Instruction Manual
Page 6
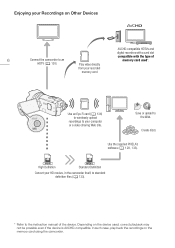
High Definition Standard Definition Convert your Recordings on Other Devices AVCHD-compatible HDTVs and digital recorders with a card slot compatible with the type of the device. Depending on the memory card using the camcorder. In such case, play back the recordings on the device used *. Create discs Use the supplied PIXELA's software (0 128, 133). Enjoying your HD movies, in the camcorder itself, to standard definition files (0 133). * Refer to the instruction manual of 6 Connect the camcorder to an HDTV (0 120) Play video directly memory card used , correct playback ...
High Definition Standard Definition Convert your Recordings on Other Devices AVCHD-compatible HDTVs and digital recorders with a card slot compatible with the type of the device. Depending on the memory card using the camcorder. In such case, play back the recordings on the device used *. Create discs Use the supplied PIXELA's software (0 128, 133). Enjoying your HD movies, in the camcorder itself, to standard definition files (0 133). * Refer to the instruction manual of 6 Connect the camcorder to an HDTV (0 120) Play video directly memory card used , correct playback ...
VIXIA HF G10 Instruction Manual
Page 7
Table of contents 1 Introduction 10 About this Manual 10 Conventions Used in this Manual 10 Supplied Accessories and CD-ROMs 12 Names of Parts 14 2 Preparations 20 Charging the Battery Pack 20 Preparing the Camcorder 22 Attaching the Lens Hood 22 Using the Viewfinder 22 Adjusting the Position and Brightness of the LCD Screen 23 Wireless Controller 25 Using a Tripod 25 Basic Operation of the Camcorder 26 Using the Touch Screen 26 Operating Modes 27 Using the Menus 28 First Time Settings 30 Setting the Date and Time 30 Changing the Language 30 Changing the Time Zone 31 Using a Memory Card 32 ...
Table of contents 1 Introduction 10 About this Manual 10 Conventions Used in this Manual 10 Supplied Accessories and CD-ROMs 12 Names of Parts 14 2 Preparations 20 Charging the Battery Pack 20 Preparing the Camcorder 22 Attaching the Lens Hood 22 Using the Viewfinder 22 Adjusting the Position and Brightness of the LCD Screen 23 Wireless Controller 25 Using a Tripod 25 Basic Operation of the Camcorder 26 Using the Touch Screen 26 Operating Modes 27 Using the Menus 28 First Time Settings 30 Setting the Date and Time 30 Changing the Language 30 Changing the Time Zone 31 Using a Memory Card 32 ...
VIXIA HF G10 Instruction Manual
Page 8
4 Customization 83 Custom Button and Dial 83 Assignable Buttons 84 Changing the Assigned Function 84 Using an Assignable Button 84 Saving and Loading Menu Settings 85 Saving Menu Settings to a Memory 8 Card 85 Loading Camera Settings from a Memory Card 85 5 Playback 86 Playing Back Video 86 Adjusting the volume 88 3D Flip View 89 The Index Selection Screen: Selecting the Content to Play Back 90 Deleting Scenes and Stories 91 Deleting a Single Scene 91 Deleting Scenes from the Date Index Screen 91 Deleting a Single Scene from a Story 92 Deleting Scenes from a Story by Rating 92 ...
4 Customization 83 Custom Button and Dial 83 Assignable Buttons 84 Changing the Assigned Function 84 Using an Assignable Button 84 Saving and Loading Menu Settings 85 Saving Menu Settings to a Memory 8 Card 85 Loading Camera Settings from a Memory Card 85 5 Playback 86 Playing Back Video 86 Adjusting the volume 88 3D Flip View 89 The Index Selection Screen: Selecting the Content to Play Back 90 Deleting Scenes and Stories 91 Deleting a Single Scene 91 Deleting Scenes from the Date Index Screen 91 Deleting a Single Scene from a Story 92 Deleting Scenes from a Story by Rating 92 ...
VIXIA HF G10 Instruction Manual
Page 9
8 Photos 121 10 Additional Information 138 Viewing Photos 121 Photo Jump Function 122 Deleting Photos 123 Deleting a Single Photo 123 Deleting Photos from the Index Screen 123 Slideshow 124 9 Saving/Sharing Recordings 125 Copying Recordings to a Memory Card 125 Copying Scenes from the Date Index Screen 125 Copying Scenes from a Story by Rating 126 Copying a Single Photo 126 Copying Photos from the Index Screen 126 Saving Recordings on a Computer 128 Saving Movies (Windows only) 128 Saving Photos (Windows/Mac OS) 129 Copying Recordings to an External Video Recorder 131 In High Definition 131 ...
8 Photos 121 10 Additional Information 138 Viewing Photos 121 Photo Jump Function 122 Deleting Photos 123 Deleting a Single Photo 123 Deleting Photos from the Index Screen 123 Slideshow 124 9 Saving/Sharing Recordings 125 Copying Recordings to a Memory Card 125 Copying Scenes from the Date Index Screen 125 Copying Scenes from a Story by Rating 126 Copying a Single Photo 126 Copying Photos from the Index Screen 126 Saving Recordings on a Computer 128 Saving Movies (Windows only) 128 Saving Photos (Windows/Mac OS) 129 Copying Recordings to an External Video Recorder 131 In High Definition 131 ...
VIXIA HF G10 Instruction Manual
Page 10
... terms are simulated pictures taken with a still camera. • Some screenshots in this Manual Thank you use the camcorder and retain it for purchasing the Canon VIXIA HF G10. Should your camcorder fail to operate correctly, refer 10 to show only relevant icons. Please read this manual have been simplified to Troubleshooting (0 153).
... terms are simulated pictures taken with a still camera. • Some screenshots in this Manual Thank you use the camcorder and retain it for purchasing the Canon VIXIA HF G10. Should your camcorder fail to operate correctly, refer 10 to show only relevant icons. Please read this manual have been simplified to Troubleshooting (0 153).
VIXIA HF G10 Instruction Manual
Page 11
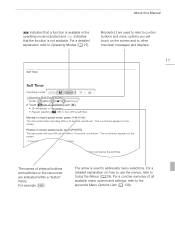
The camcorder will record the photo after a 10-second countdown*. For example h. Photos: In record pause mode, touch [PHOTO]. For a detailed explanation on the screen. Pressing g, when recording movies. For a concise summary of physical buttons and switches on the camcorder are used to abbreviate menu selections. The camcorder starts recording after a 10-second countdown*. NOTES • Once the countdown has begun, any of the following actions will appear on the screen. • Repeat, selecting [B Off], to turn off the self timer. j The names of all available ...
The camcorder will record the photo after a 10-second countdown*. For example h. Photos: In record pause mode, touch [PHOTO]. For a detailed explanation on the screen. Pressing g, when recording movies. For a concise summary of physical buttons and switches on the camcorder are used to abbreviate menu selections. The camcorder starts recording after a 10-second countdown*. NOTES • Once the countdown has begun, any of the following actions will appear on the screen. • Repeat, selecting [B Off], to turn off the self timer. j The names of all available ...
VIXIA HF G10 Instruction Manual
Page 12
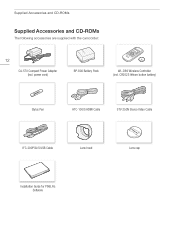
power cord) BP-808 Battery Pack WL-D89 Wireless Controller (incl. Supplied Accessories and CD-ROMs Supplied Accessories and CD-ROMs The following accessories are supplied with the camcorder: 12 CA-570 Compact Power Adapter (incl. CR2025 lithium button battery) Stylus Pen HTC-100/S HDMI Cable STV-250N Stereo Video Cable IFC-300PCU/S USB Cable Lens hood Lens cap Installation Guide for PIXELA's Software
power cord) BP-808 Battery Pack WL-D89 Wireless Controller (incl. Supplied Accessories and CD-ROMs Supplied Accessories and CD-ROMs The following accessories are supplied with the camcorder: 12 CA-570 Compact Power Adapter (incl. CR2025 lithium button battery) Stylus Pen HTC-100/S HDMI Cable STV-250N Stereo Video Cable IFC-300PCU/S USB Cable Lens hood Lens cap Installation Guide for PIXELA's Software
VIXIA HF G10 Instruction Manual
Page 13
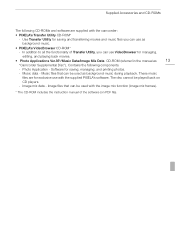
Use Transfer Utility for saving, managing, and printing photos. - Music data - Music files that can use VideoBrowser for exclusive use as background music. • PIXELA's VideoBrowser CD-ROM* - Image mix data - Software for saving and transferring movies and music files you can be played back on PDF file). Supplied Accessories and CD-ROMs The following components. - The disc cannot be used as 13 "Camcorder Supplemental Disc"). In addition to all the functionality of the software (on CD players. - Image files that can be used with the image mix ...
Use Transfer Utility for saving, managing, and printing photos. - Music data - Music files that can use VideoBrowser for exclusive use as background music. • PIXELA's VideoBrowser CD-ROM* - Image mix data - Software for saving and transferring movies and music files you can be played back on PDF file). Supplied Accessories and CD-ROMs The following components. - The disc cannot be used as 13 "Camcorder Supplemental Disc"). In addition to all the functionality of the software (on CD players. - Image files that can be used with the image mix ...
VIXIA HF G10 Instruction Manual
Page 14
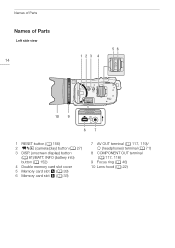
INFO (battery info) button (0 152) 4 Double memory card slot cover 5 Memory card slot X (0 33) 6 Memory card slot Y (0 33) 7 AV OUT terminal (0 117, 119)/ X (headphones) terminal (0 71) 8 COMPONENT OUT terminal (0 117, 118) 9 Focus ring (0 46) 10 Lens hood (0 22) Names of Parts Names of Parts Left side view 14 56 123 4 10 9 87 1 RESET button (0 156) 2 2 (camera/play) button (0 27) 3 DISP. (onscreen display) button (0 81)/BATT.
INFO (battery info) button (0 152) 4 Double memory card slot cover 5 Memory card slot X (0 33) 6 Memory card slot Y (0 33) 7 AV OUT terminal (0 117, 119)/ X (headphones) terminal (0 71) 8 COMPONENT OUT terminal (0 117, 118) 9 Focus ring (0 46) 10 Lens hood (0 22) Names of Parts Names of Parts Left side view 14 56 123 4 10 9 87 1 RESET button (0 156) 2 2 (camera/play) button (0 27) 3 DISP. (onscreen display) button (0 81)/BATT.
VIXIA HF G10 Instruction Manual
Page 15
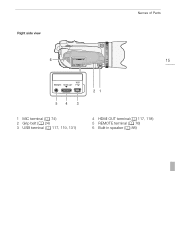
Right side view 6 Names of Parts 15 54 3 1 MIC terminal (0 74) 2 Grip belt (0 24) 3 USB terminal (0 117, 119, 131) 21 4 HDMI OUT terminal (0 117, 118) 5 REMOTE terminal (0 76) 6 Built-in speaker (0 88)
Right side view 6 Names of Parts 15 54 3 1 MIC terminal (0 74) 2 Grip belt (0 24) 3 USB terminal (0 117, 119, 131) 21 4 HDMI OUT terminal (0 117, 118) 5 REMOTE terminal (0 76) 6 Built-in speaker (0 88)
VIXIA HF G10 Instruction Manual
Page 16
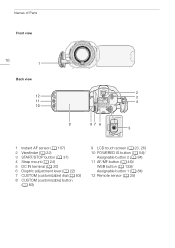
Names of Parts Front view 16 1 Back view 12 11 10 9 87 6 2 3 4 5 1 Instant AF sensor (0 167) 2 Viewfinder (0 22) 3 START/STOP button (0 37) 4 Strap mount (0 24) 5 DC IN terminal (0 20) 6 Dioptric adjustment lever (0 22) 7 CUSTOM (customizable) dial (0 83) 8 CUSTOM (customizable) button (0 83) 9 LCD touch screen (0 23, 26) 10 POWERED IS button (0 54)/ Assignable button 2 (0 84) 11 AF/MF button (0 46)/ WEB button (0 133)/ Assignable button 1 (0 84) 12 Remote sensor (0 25)
Names of Parts Front view 16 1 Back view 12 11 10 9 87 6 2 3 4 5 1 Instant AF sensor (0 167) 2 Viewfinder (0 22) 3 START/STOP button (0 37) 4 Strap mount (0 24) 5 DC IN terminal (0 20) 6 Dioptric adjustment lever (0 22) 7 CUSTOM (customizable) dial (0 83) 8 CUSTOM (customizable) button (0 83) 9 LCD touch screen (0 23, 26) 10 POWERED IS button (0 54)/ Assignable button 2 (0 84) 11 AF/MF button (0 46)/ WEB button (0 133)/ Assignable button 1 (0 84) 12 Remote sensor (0 25)
VIXIA HF G10 Instruction Manual
Page 17
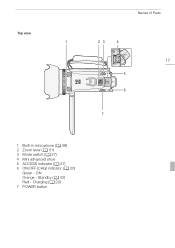
Charging (0 20) 7 POWER button ON Orange - Standby (0 43) Red - Top view Names of Parts 1 23 4 17 5 6 7 1 Built-in microphone (0 68) 2 Zoom lever (0 51) 3 Mode switch (0 27) 4 Mini advanced shoe 5 ACCESS indicator (0 37) 6 ON/OFF (CHG) indicator (0 20) Green -
Charging (0 20) 7 POWER button ON Orange - Standby (0 43) Red - Top view Names of Parts 1 23 4 17 5 6 7 1 Built-in microphone (0 68) 2 Zoom lever (0 51) 3 Mode switch (0 27) 4 Mini advanced shoe 5 ACCESS indicator (0 37) 6 ON/OFF (CHG) indicator (0 20) Green -
VIXIA HF G10 Instruction Manual
Page 18
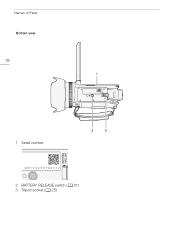
Names of Parts Bottom view 18 1 1 Serial number 3 2 2 BATTERY RELEASE switch (0 21) 3 Tripod socket (0 25)
Names of Parts Bottom view 18 1 1 Serial number 3 2 2 BATTERY RELEASE switch (0 21) 3 Tripod socket (0 25)
VIXIA HF G10 Instruction Manual
Page 19
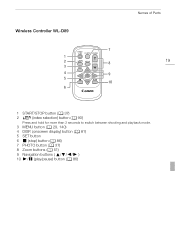
Wireless Controller WL-D89 1 2 3 4 5 6 Names of Parts 7 8 19 9 10 1 START/STOP button (0 37) 2 b (index selection) button (0 90) Press and hold for more than 2 seconds to switch between shooting and playback mode. 3 MENU button (0 29, 140) 4 DISP. (onscreen display) button (0 81) 5 SET button 6 B (stop) button (0 86) 7 PHOTO button (0 37) 8 Zoom buttons (0 51) 9 Navigation buttons ( Z/O/y/A ) 10 A/C (play/pause) button (0 86)
Wireless Controller WL-D89 1 2 3 4 5 6 Names of Parts 7 8 19 9 10 1 START/STOP button (0 37) 2 b (index selection) button (0 90) Press and hold for more than 2 seconds to switch between shooting and playback mode. 3 MENU button (0 29, 140) 4 DISP. (onscreen display) button (0 81) 5 SET button 6 B (stop) button (0 86) 7 PHOTO button (0 37) 8 Zoom buttons (0 51) 9 Navigation buttons ( Z/O/y/A ) 10 A/C (play/pause) button (0 86)
VIXIA HF G10 Instruction Manual
Page 20
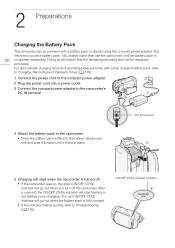
The red ON/OFF (CHG) indicator will start when the camcorder is turned off the camcorder. After a moment, the ON/OFF (CHG) indicator will go out when you use a battery pack, fully charge it clicks in red (battery pack charging). ON/OFF (CHG) (charge) indicator For approximate charging times and recording/playback times with a battery pack or directly using the compact power adapter. The first time you turn off . • If the camcorder was on, the green ON/OFF (CHG) indicator will be powered with a fully charged battery pack, refer to Charging, Recording and Playback ...
The red ON/OFF (CHG) indicator will start when the camcorder is turned off the camcorder. After a moment, the ON/OFF (CHG) indicator will go out when you use a battery pack, fully charge it clicks in red (battery pack charging). ON/OFF (CHG) (charge) indicator For approximate charging times and recording/playback times with a battery pack or directly using the compact power adapter. The first time you turn off . • If the camcorder was on, the green ON/OFF (CHG) indicator will be powered with a fully charged battery pack, refer to Charging, Recording and Playback ...
VIXIA HF G10 Instruction Manual
Page 21
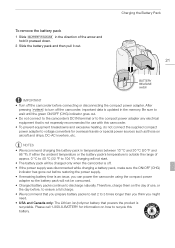
Therefore, charge them on the day of use with this camcorder. • To prevent equipment breakdowns and excessive heating, do not connect the supplied compact power adapter to voltage converters for information on aircraft and ships, DC-AC inverters, etc. NOTES • We recommend charging the battery pack in the memory. If either the ambient temperature or the battery pack's temperature is outside the range of the arrow and hold it pressed down. 2 Slide the battery pack and then pull it out. Charging the Battery Pack 21 BATTERY RELEASE switch IMPORTANT • Turn off the ...
Therefore, charge them on the day of use with this camcorder. • To prevent equipment breakdowns and excessive heating, do not connect the supplied compact power adapter to voltage converters for information on aircraft and ships, DC-AC inverters, etc. NOTES • We recommend charging the battery pack in the memory. If either the ambient temperature or the battery pack's temperature is outside the range of the arrow and hold it pressed down. 2 Slide the battery pack and then pull it out. Charging the Battery Pack 21 BATTERY RELEASE switch IMPORTANT • Turn off the ...
