Instruction Manual
Page 4
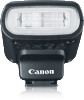
The Canon Speedlite 90EX is performed on the camera side, letting you for Canon EOS cameras, and works with an EOS DIGITAL camera. Be sure to also read the description of flash shooting in the camera's instruction manual. * The menu screens used in this instruction manual are the EOS M menu screens. 2 Thank you easily enjoy flash shooting in the same manner as a built-in flash. Use with an EOS DIGITAL camera • The 90EX is designed for optimum use with the E-TTL II and E-TTL autoflash systems. All control is a compact flash unit for purchasing a Canon product.
The Canon Speedlite 90EX is performed on the camera side, letting you for Canon EOS cameras, and works with an EOS DIGITAL camera. Be sure to also read the description of flash shooting in the camera's instruction manual. * The menu screens used in this instruction manual are the EOS M menu screens. 2 Thank you easily enjoy flash shooting in the same manner as a built-in flash. Use with an EOS DIGITAL camera • The 90EX is designed for optimum use with the E-TTL II and E-TTL autoflash systems. All control is a compact flash unit for purchasing a Canon product.
Instruction Manual
Page 5
Contents Nomenclature ...4 Installing the Batteries 5 Attaching the Flash 7 Flash Shooting ...8 Flash Shooting in Each Camera Mode 9 Other Functions ...12 Setting the Flash Functions by Camera Operation 13 About Wireless Flash 15 Wireless Settings ...15 Fully Automatic Wireless Flash 18 Flash Ratio with E-TTL II 22 Wireless Multiple Speedlite Shooting with Manual Flash Output 27 Troubleshooting Guide 28 Specifications ...30 3
Contents Nomenclature ...4 Installing the Batteries 5 Attaching the Flash 7 Flash Shooting ...8 Flash Shooting in Each Camera Mode 9 Other Functions ...12 Setting the Flash Functions by Camera Operation 13 About Wireless Flash 15 Wireless Settings ...15 Fully Automatic Wireless Flash 18 Flash Ratio with E-TTL II 22 Wireless Multiple Speedlite Shooting with Manual Flash Output 27 Troubleshooting Guide 28 Specifications ...30 3
Instruction Manual
Page 6
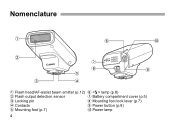
Nomenclature " ' + # ( ) * & $ % " Flash head/AF-assist beam emitter (p.12) ' lamp (p.8) # Flash output detection sensor ( Battery compartment cover (p.5) $ Locking pin ) Mounting foot lock lever (p.7) % Contacts * Power button (p.8) & Mounting foot (p.7) + Power lamp 4
Nomenclature " ' + # ( ) * & $ % " Flash head/AF-assist beam emitter (p.12) ' lamp (p.8) # Flash output detection sensor ( Battery compartment cover (p.5) $ Locking pin ) Mounting foot lock lever (p.7) % Contacts * Power button (p.8) & Mounting foot (p.7) + Power lamp 4

Instruction Manual
Page 7
Installing the Batteries 1 Slide the battery compartment cover and open it as shown by the arrows. 2 Install two batteries. Make sure the + and - battery contacts are correctly oriented. Return the cover to its original position. Recycling Time and Flash Count Recycling Time: Approx. 0.1 - 5.5 sec. Flash Count: Approx. 100 flashes or more Based on new size-AAA/LR03 alkaline batteries and Canon's testing standards. 5
Installing the Batteries 1 Slide the battery compartment cover and open it as shown by the arrows. 2 Install two batteries. Make sure the + and - battery contacts are correctly oriented. Return the cover to its original position. Recycling Time and Flash Count Recycling Time: Approx. 0.1 - 5.5 sec. Flash Count: Approx. 100 flashes or more Based on new size-AAA/LR03 alkaline batteries and Canon's testing standards. 5

Instruction Manual
Page 8
When replacing the batteries, replace both batteries at once. Do not fire more than 20 continuous flashes in a short time. If you change the batteries after firing flashes continuously, be aware that the batteries might be hot. Using size-AAA/LR03 batteries other than the alkaline type may cause improper battery contact due to use a new set of two batteries of the battery contacts. 6 Be sure to the irregular shape of the same brand.
When replacing the batteries, replace both batteries at once. Do not fire more than 20 continuous flashes in a short time. If you change the batteries after firing flashes continuously, be aware that the batteries might be hot. Using size-AAA/LR03 batteries other than the alkaline type may cause improper battery contact due to use a new set of two batteries of the battery contacts. 6 Be sure to the irregular shape of the same brand.

Instruction Manual
Page 9
Attaching the Flash Be sure to turn off the Speedlite before attaching or detaching it. 1 Slide the lock lever to the left and attach the Speedlite to the camera. Slip the Speedlite's mounting foot firmly all the way into the camera's hot shoe. 2 Secure the Speedlite. Slide the lock lever to the right. To remove the Speedlite, slide the lock lever to the left and detach it from the camera. 7
Attaching the Flash Be sure to turn off the Speedlite before attaching or detaching it. 1 Slide the lock lever to the left and attach the Speedlite to the camera. Slip the Speedlite's mounting foot firmly all the way into the camera's hot shoe. 2 Secure the Speedlite. Slide the lock lever to the right. To remove the Speedlite, slide the lock lever to the left and detach it from the camera. 7
Instruction Manual
Page 10
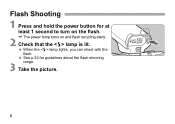
BThe power lamp turns on the flash. Flash Shooting 1 Press and hold the power button for at least 1 second to turn on and flash recycling starts. 2 Check that the lamp is lit. When the lamp lights, you can shoot with the flash. See p.32 for guidelines about the flash shooting range. 3 Take the picture. 8
BThe power lamp turns on the flash. Flash Shooting 1 Press and hold the power button for at least 1 second to turn on and flash recycling starts. 2 Check that the lamp is lit. When the lamp lights, you can shoot with the flash. See p.32 for guidelines about the flash shooting range. 3 Take the picture. 8

Instruction Manual
Page 11
X: Shutter Priority AE In this mode, the camera will automatically adjust the flash output level to achieve standard exposure with Program AE, which automatically sets the shutter speed and aperture according to achieve standard exposure for the automatically ...set aperture. • If the aperture display blinks, it means that the background exposure will automatically adjust the flash output level to the brightness of the subject. • If the resulting picture is underexposed, increase the ISO speed...
X: Shutter Priority AE In this mode, the camera will automatically adjust the flash output level to achieve standard exposure with Program AE, which automatically sets the shutter speed and aperture according to achieve standard exposure for the automatically ...set aperture. • If the aperture display blinks, it means that the background exposure will automatically adjust the flash output level to the brightness of the subject. • If the resulting picture is underexposed, increase the ISO speed...

Instruction Manual
Page 12
... achieve standard exposure for low-light scenes, using a tripod is dark, like a night scene, a slow sync speed will automatically adjust the flash output level to obtain a standard exposure of both the shutter speed and aperture manually. Standard exposure of the main subject is obtained with the ... the camera will be used for the set . 10 As the camera will automatically adjust the flash output level according to set , the exposure of the background is obtained with the flash, while a standard exposure of the main subject will be standard. Adjust the aperture until the ...
... achieve standard exposure for low-light scenes, using a tripod is dark, like a night scene, a slow sync speed will automatically adjust the flash output level to obtain a standard exposure of both the shutter speed and aperture manually. Standard exposure of the main subject is obtained with the ... the camera will be used for the set . 10 As the camera will automatically adjust the flash output level according to set , the exposure of the background is obtained with the flash, while a standard exposure of the main subject will be standard. Adjust the aperture until the ...

Instruction Manual
Page 13
Flash Sync Speeds and Apertures Used Shutter Speed Setting V Set automatically (1/X sec. - 1/60 sec.) X Set manually (1/X sec. - 30 sec.) W Set automatically (1/X sec. - 30 sec.) q Set manually (1/X sec. - 30 sec., Bulb) 1/X sec. is the camera's maximum flash sync speed. Aperture Setting Automatic Automatic Manual Manual 11
Flash Sync Speeds and Apertures Used Shutter Speed Setting V Set automatically (1/X sec. - 1/60 sec.) X Set manually (1/X sec. - 30 sec.) W Set automatically (1/X sec. - 30 sec.) q Set manually (1/X sec. - 30 sec., Bulb) 1/X sec. is the camera's maximum flash sync speed. Aperture Setting Automatic Automatic Manual Manual 11
Instruction Manual
Page 14
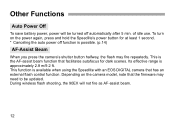
... on the power again, press and hold the Speedlite's power button for dark scenes. This is available when using the Speedlite with an EOS DIGITAL camera that the firmware may... fire repeatedly. Other Functions Auto Power Off To save battery power, power will not fire as AF-assist beam. 12 To turn on the camera model, note that has an external flash... control function. Its effective range is possible. (p.14) AF-Assist Beam When you press the camera's shutter button halfway, the flash may need to be...
... on the power again, press and hold the Speedlite's power button for dark scenes. This is available when using the Speedlite with an EOS DIGITAL camera that the firmware may... fire repeatedly. Other Functions Auto Power Off To save battery power, power will not fire as AF-assist beam. 12 To turn on the camera model, note that has an external flash... control function. Its effective range is possible. (p.14) AF-Assist Beam When you press the camera's shutter button halfway, the flash may need to be...
Instruction Manual
Page 15
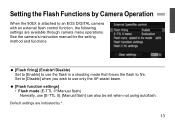
...method and functions. [Flash firing] (Enable*/Disable) Set to [Enable] to use [E-TTL II]. [Manual flash] can also be set when ...not using autoflash. Default settings are available through camera menu operations. Set to [Disable] when you wish to use only the AF-assist beam. [Flash function settings] • Flash mode (E-TTL II*/Manual flash) Normally, use the flash... in a shooting mode that forces the flash to an EOS DIGITAL camera with an external flash...
...method and functions. [Flash firing] (Enable*/Disable) Set to [Enable] to use [E-TTL II]. [Manual flash] can also be set when ...not using autoflash. Default settings are available through camera menu operations. Set to [Disable] when you wish to use only the AF-assist beam. [Flash function settings] • Flash mode (E-TTL II*/Manual flash) Normally, use the flash... in a shooting mode that forces the flash to an EOS DIGITAL camera with an external flash...

Instruction Manual
Page 16
...8226; Optical channel (1* to fill-flash shooting. - Evaluative: Fully automatic flash shooting can adjust the flash output level in which the flash fires at the timing when the shutter is fully open. - 2nd curtain: The flash fires right before the shutter closes. • Flash exp. • Shutter sync. (...1st curtain*/2nd curtain) - 1st curtain: This is the normal flash shooting mode in the same way as normal exposure compensation. &#...
...8226; Optical channel (1* to fill-flash shooting. - Evaluative: Fully automatic flash shooting can adjust the flash output level in which the flash fires at the timing when the shutter is fully open. - 2nd curtain: The flash fires right before the shutter closes. • Flash exp. • Shutter sync. (...1st curtain*/2nd curtain) - 1st curtain: This is the normal flash shooting mode in the same way as normal exposure compensation. &#...
Instruction Manual
Page 17
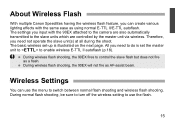
... enable wireless E-TTL II autoflash (p.18). During wireless flash shooting, the 90EX fires to control the slave flash but does not fire as a flash. During wireless flash shooting, the 90EX will not fire as using normal E-TTL II/E-TTL autoflash. The...flash shooting and wireless flash shooting. Therefore, you need to do is illustrated on the next page. During normal flash shooting, be sure to turn off the wireless setting to the slave units which are controlled by the master unit via wireless. About Wireless Flash With multiple Canon Speedlites having the wireless flash...
... enable wireless E-TTL II autoflash (p.18). During wireless flash shooting, the 90EX fires to control the slave flash but does not fire as a flash. During wireless flash shooting, the 90EX will not fire as using normal E-TTL II/E-TTL autoflash. The...flash shooting and wireless flash shooting. Therefore, you need to do is illustrated on the next page. During normal flash shooting, be sure to turn off the wireless setting to the slave units which are controlled by the master unit via wireless. About Wireless Flash With multiple Canon Speedlites having the wireless flash...

Instruction Manual
Page 18
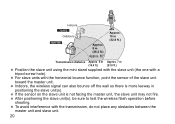
Positioning and Operation Range Indoors x Outdoors M Approx. 8m (26.2 ft.) Approx. 80° Approx. 10 m (32.8 ft.) Transmission distance Approx. 5 m Approx. 7 m (16.4 ft.) (23.0 ft.) The settings of the flash exposure compensation, high-speed sync (FP flash), FE lock, and manual flash set on the master unit are wirelessly and automatically set on the slave unit. Even with multiple slave units, all of them will be controlled in the same way via wireless. 16
Positioning and Operation Range Indoors x Outdoors M Approx. 8m (26.2 ft.) Approx. 80° Approx. 10 m (32.8 ft.) Transmission distance Approx. 5 m Approx. 7 m (16.4 ft.) (23.0 ft.) The settings of the flash exposure compensation, high-speed sync (FP flash), FE lock, and manual flash set on the master unit are wirelessly and automatically set on the slave unit. Even with multiple slave units, all of them will be controlled in the same way via wireless. 16
Instruction Manual
Page 19
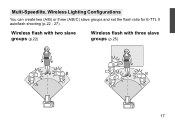
Multi-Speedlite, Wireless Lighting Configurations You can create two (A/B) or three (A/B/C) slave groups and set the flash ratio for E-TTL II autoflash shooting (p.22 - 27). Wireless flash with two slave groups (p.22) Wireless flash with three slave groups (p.25) B C B A A 17
Multi-Speedlite, Wireless Lighting Configurations You can create two (A/B) or three (A/B/C) slave groups and set the flash ratio for E-TTL II autoflash shooting (p.22 - 27). Wireless flash with two slave groups (p.22) Wireless flash with three slave groups (p.25) B C B A A 17
Instruction Manual
Page 20
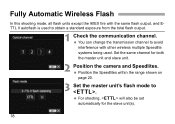
Fully Automatic Wireless Flash In this shooting mode, all flash units except the 90EX fire with the same flash output, and ETTL II autoflash is used to obtain a standard exposure from the total flash output. 1 Check the communication channel. You can change the transmission channel to . ...the master unit and slave unit. 2 Position the camera and Speedlites. Position the Speedlites within the range shown on page 20. 3 Set the master unit's flash mode to avoid interference with other wireless multiple Speedlite systems being used. Set the same channel for the slave ...
Fully Automatic Wireless Flash In this shooting mode, all flash units except the 90EX fire with the same flash output, and ETTL II autoflash is used to obtain a standard exposure from the total flash output. 1 Check the communication channel. You can change the transmission channel to . ...the master unit and slave unit. 2 Position the camera and Speedlites. Position the Speedlites within the range shown on page 20. 3 Set the master unit's flash mode to avoid interference with other wireless multiple Speedlite systems being used. Set the same channel for the slave ...

Instruction Manual
Page 21
4 Check that the flash is ready. When the slave unit is fully charged, its flash-ready lamp lights or its AF-assist beam (LED) blinks at 1-second intervals. 5 Take the picture. Set the camera in the same way as with normal flash shooting. 19
4 Check that the flash is ready. When the slave unit is fully charged, its flash-ready lamp lights or its AF-assist beam (LED) blinks at 1-second intervals. 5 Take the picture. Set the camera in the same way as with normal flash shooting. 19
Instruction Manual
Page 22
... unit is not facing the master unit, the slave unit may not fire. After positioning the slave unit(s), be sure to test the wireless flash operation before shooting. To avoid interference with the transmission, do not place any obstacles between the master unit and slave unit. 20
... unit is not facing the master unit, the slave unit may not fire. After positioning the slave unit(s), be sure to test the wireless flash operation before shooting. To avoid interference with the transmission, do not place any obstacles between the master unit and slave unit. 20
Instruction Manual
Page 23
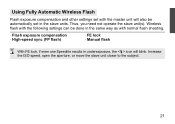
... way as with the master unit will also be automatically set with normal flash shooting. · Flash exposure compensation · High-speed sync (FP flash) · FE lock · Manual flash With FE lock, if even one Speedlite results in the slave units. Thus, you need not operate the slave unit...(s). Increase the ISO speed, open the aperture, or move the slave unit closer to the subject. 21 Using Fully Automatic Wireless Flash Flash exposure compensation and ...
... way as with the master unit will also be automatically set with normal flash shooting. · Flash exposure compensation · High-speed sync (FP flash) · FE lock · Manual flash With FE lock, if even one Speedlite results in the slave units. Thus, you need not operate the slave unit...(s). Increase the ISO speed, open the aperture, or move the slave unit closer to the subject. 21 Using Fully Automatic Wireless Flash Flash exposure compensation and ...


