
Realis_E.pdf
Page 5
Menu 62 System Settings Menu 69 MAINTENANCE 75 Cleaning the Projector 75 Cleaning and Replacing the Air Filter .........76 Replacing the Lamp 77 PROJECTING AN IMAGE FROM THE COMPUTER 23 Connecting the Projector to AV Equipment 42 Starting Projection 44 Adjusting the Image 48 SETTING UP FUNCTIONS USING MENUS 49 Using Menus 49 Display...
Menu 62 System Settings Menu 69 MAINTENANCE 75 Cleaning the Projector 75 Cleaning and Replacing the Air Filter .........76 Replacing the Lamp 77 PROJECTING AN IMAGE FROM THE COMPUTER 23 Connecting the Projector to AV Equipment 42 Starting Projection 44 Adjusting the Image 48 SETTING UP FUNCTIONS USING MENUS 49 Using Menus 49 Display...

Realis_E.pdf
Page 6
... SYMBOL INDICATES THAT THERE ARE IMPORTANT OPERATING AND MAINTENANCE INSTRUCTIONS IN THE OWNER'S MANUAL WITH THIS UNIT. 6 If your projector seems to manage those features and maintains it in better condition for a considerable time. Improper operation may result in the... SHOCK IS PRESENT WITHIN THIS UNIT. Operating the projector properly enables you purchased the projector or the service center. NO USER-SERVICEABLE PARTS INSIDE EXCEPT LAMP REPLACEMENT. SAFETY INSTRUCTIONS SAFETY INSTRUCTIONS Before operating this projector, read this manual again, check operations and cable...
... SYMBOL INDICATES THAT THERE ARE IMPORTANT OPERATING AND MAINTENANCE INSTRUCTIONS IN THE OWNER'S MANUAL WITH THIS UNIT. 6 If your projector seems to manage those features and maintains it in better condition for a considerable time. Improper operation may result in the... SHOCK IS PRESENT WITHIN THIS UNIT. Operating the projector properly enables you purchased the projector or the service center. NO USER-SERVICEABLE PARTS INSIDE EXCEPT LAMP REPLACEMENT. SAFETY INSTRUCTIONS SAFETY INSTRUCTIONS Before operating this projector, read this manual again, check operations and cable...
Realis_E.pdf
Page 10
...Power Cord supplied with this safety feature. AC Power Cord has a grounding-type AC line plug. NOTE FOR CUSTOMERS IN THE US Hg LAMP(S) INSIDE THIS PRODUCT CONTAIN MERCURY AND MUST BE RECYCLED OR DISPOSED OF ACCORDING TO LOCAL, STATE OR FEDERAL LAWS. 10 Upon completion of...OUTLET SHOULD BE INSTALLED NEAR THE EQUIPMENT AND EASILY ACCESSIBLE. Should you purchased it. This is a safety feature to be sure that the projector is listed by the Underwriters Laboratories (UL) and certified by the manufacturer that have the same characteristics as the original part. SAFETY INSTRUCTIONS ...
...Power Cord supplied with this safety feature. AC Power Cord has a grounding-type AC line plug. NOTE FOR CUSTOMERS IN THE US Hg LAMP(S) INSIDE THIS PRODUCT CONTAIN MERCURY AND MUST BE RECYCLED OR DISPOSED OF ACCORDING TO LOCAL, STATE OR FEDERAL LAWS. 10 Upon completion of...OUTLET SHOULD BE INSTALLED NEAR THE EQUIPMENT AND EASILY ACCESSIBLE. Should you purchased it. This is a safety feature to be sure that the projector is listed by the Underwriters Laboratories (UL) and certified by the manufacturer that have the same characteristics as the original part. SAFETY INSTRUCTIONS ...
Realis_E.pdf
Page 12
...Canon service representative to clean and check the inside of the cabinet, and it is intended for protection from dust and scratches on it put in a shorter period of time than other similar lamps. • A lamp gradually becomes darker with the carrying bag. CARRYING/TRANSPORTING THE PROJECTOR This projector is not guarantee of the broken lamp...bag, do not suffer from the gas and broken shards of the lamp. Do not transport the projector through a courier or transport service with time of use. • If the projector indicates that you inhale the gas or the shards of the same...
...Canon service representative to clean and check the inside of the cabinet, and it is intended for protection from dust and scratches on it put in a shorter period of time than other similar lamps. • A lamp gradually becomes darker with the carrying bag. CARRYING/TRANSPORTING THE PROJECTOR This projector is not guarantee of the broken lamp...bag, do not suffer from the gas and broken shards of the lamp. Do not transport the projector through a courier or transport service with time of use. • If the projector indicates that you inhale the gas or the shards of the same...
Realis_E.pdf
Page 15
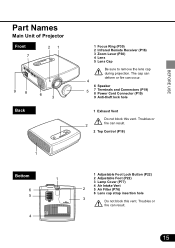
Troubles or fire can result. 2 2 Top Control (P18) 1 Bottom 1 6 5 4 1 Adjustable Foot Lock Button (P22) 2 Adjustable Foot (P22) 3 Lamp Cover (P77) 4 Air Intake Vent 2 5 Air Filter (P76) 6 Lens cap strap insertion hole 3 Do not block this vent. The cap can deform or fire ... (P19) 9 Anti-theft lock hole 1 Exhaust Vent Do not block this vent. Troubles or fire can result. 15 BEFORE USE Part Names Main Unit of Projector Front 7 21 9 8 Back 6 3 1 Focus Ring (P30) 2 Infrared Remote Receiver (P16) 3 Zoom Lever (P30) 4 Lens 5 Lens Cap Be sure to remove the lens cap during...
Troubles or fire can result. 2 2 Top Control (P18) 1 Bottom 1 6 5 4 1 Adjustable Foot Lock Button (P22) 2 Adjustable Foot (P22) 3 Lamp Cover (P77) 4 Air Intake Vent 2 5 Air Filter (P76) 6 Lens cap strap insertion hole 3 Do not block this vent. The cap can deform or fire ... (P19) 9 Anti-theft lock hole 1 Exhaust Vent Do not block this vent. Troubles or fire can result. 15 BEFORE USE Part Names Main Unit of Projector Front 7 21 9 8 Back 6 3 1 Focus Ring (P30) 2 Infrared Remote Receiver (P16) 3 Zoom Lever (P30) 4 Lens 5 Lens Cap Be sure to remove the lens cap during...
Realis_E.pdf
Page 18
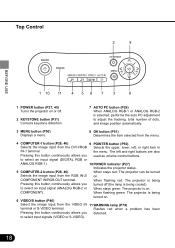
... be turned Selects the image input from the RGB IN-2/ on or off (the lamp is being turned on . When flashing red: The projector is being Pressing this button continuously allows you turned off . 2 KEYSTONE button (P31) Corrects keystone distortion. 7 AUTO PC button (...POINTER button (P50) Selects the image input from the VIDEO IN 11 WARNING lamp (P79) terminal or S-VIDEO terminal. Flashes red when a problem has been Pressing this button continuously allows you detected. When flashing green: The projector is on . 6 VIDEO/S button (P46) Select the image input from the...
... be turned Selects the image input from the RGB IN-2/ on or off (the lamp is being turned on . When flashing red: The projector is being Pressing this button continuously allows you turned off . 2 KEYSTONE button (P31) Corrects keystone distortion. 7 AUTO PC button (...POINTER button (P50) Selects the image input from the VIDEO IN 11 WARNING lamp (P79) terminal or S-VIDEO terminal. Flashes red when a problem has been Pressing this button continuously allows you detected. When flashing green: The projector is on . 6 VIDEO/S button (P46) Select the image input from the...

Realis_E.pdf
Page 22
.... Before making this adjustment, connect the computer and AV equipment and project an image on the screen. 1 Lift the front of the projector. If the tilt is trapezoidal). If Keystone Distortion is Large Extending the adjustable foot too far causes keystone distortion (the projected picture is... more than 20 degrees above and below, a lamp problem can result. With the adjustable foot, the projection angle can be adjusted up to +/-20 degrees or less. The keystone distortion can...
.... Before making this adjustment, connect the computer and AV equipment and project an image on the screen. 1 Lift the front of the projector. If the tilt is trapezoidal). If Keystone Distortion is Large Extending the adjustable foot too far causes keystone distortion (the projected picture is... more than 20 degrees above and below, a lamp problem can result. With the adjustable foot, the projection angle can be adjusted up to +/-20 degrees or less. The keystone distortion can...

Realis_E.pdf
Page 27
... Countdown Function Performed at the Start ( P61) • Displaying a Unique Logo on for about 60 seconds. Turning On the Projector Once the projector is Not in order to use the projector safely. Wait until the lamp cooling period ends and the [POWER] indicator lights red. 1 Make sure that the [POWER] indicator lights red. 2 Press...
... Countdown Function Performed at the Start ( P61) • Displaying a Unique Logo on for about 60 seconds. Turning On the Projector Once the projector is Not in order to use the projector safely. Wait until the lamp cooling period ends and the [POWER] indicator lights red. 1 Make sure that the [POWER] indicator lights red. 2 Press...

Realis_E.pdf
Page 35
... on again for about 4 seconds) or press a button other than 24 hours continuously may shorten the lamp life. A confirmation message appears on the projector may shorten the life of the lamp starts. Wait at least once in 24 hours and give it a rest for more than the [POWER...AC power cord immediately can damage the lamp and circuits. • Using the projector for about one hour. When the power is displayed. PROJECTING AN IMAGE FROM THE COMPUTER Turning Off the Projector • Turning off the projector again with the lamp in an unstable state shortly after poweroff....
... on again for about 4 seconds) or press a button other than 24 hours continuously may shorten the lamp life. A confirmation message appears on the projector may shorten the life of the lamp starts. Wait at least once in 24 hours and give it a rest for more than the [POWER...AC power cord immediately can damage the lamp and circuits. • Using the projector for about one hour. When the power is displayed. PROJECTING AN IMAGE FROM THE COMPUTER Turning Off the Projector • Turning off the projector again with the lamp in an unstable state shortly after poweroff....

Realis_E.pdf
Page 36
...Ready mode Select this mode to turn off . When the lamp is turned off and its cooling starts. The lamp will turn off the projector automatically. Shutdown mode Select this mode to enter the ready status. When the lamp has been cooled down , the [POWER] indicator stops flashing ...remote control is inoperative. Projection will enter the power management mode selected in a power management mode (for 90 seconds), the projector is pressed. When the lamp has been cooled down , the [POWER] indicator starts flashing red and green to start projection immediately. PROJECTING AN IMAGE ...
...Ready mode Select this mode to turn off . When the lamp is turned off and its cooling starts. The lamp will turn off the projector automatically. Shutdown mode Select this mode to enter the ready status. When the lamp has been cooled down , the [POWER] indicator stops flashing ...remote control is inoperative. Projection will enter the power management mode selected in a power management mode (for 90 seconds), the projector is pressed. When the lamp has been cooled down , the [POWER] indicator starts flashing red and green to start projection immediately. PROJECTING AN IMAGE ...

Realis_E.pdf
Page 44
Wait until the lamp cooling period ends and the [POWER] indicator lights red. Starting Projection Connect the power cord and turn on the projector. • Before connecting the power cord, connect the projector to the AV equipment. • Once the projector is connected to a computer. (P23) Lets take a look at only the topics specific to AV equipment. The projection method is basically the same as that used when the projector is turned off, it cannot be turned on for about 90 seconds. Buttons Used Here Remote control Top control PROJECTING AN IMAGE FROM AV EQUIPMENT 44
Wait until the lamp cooling period ends and the [POWER] indicator lights red. Starting Projection Connect the power cord and turn on the projector. • Before connecting the power cord, connect the projector to the AV equipment. • Once the projector is connected to a computer. (P23) Lets take a look at only the topics specific to AV equipment. The projection method is basically the same as that used when the projector is turned off, it cannot be turned on for about 90 seconds. Buttons Used Here Remote control Top control PROJECTING AN IMAGE FROM AV EQUIPMENT 44

Realis_E.pdf
Page 62
... balance P66 Correcting the Screen Color [Screen color correction P66 Making Advanced Color Adjustment [Advanced color adjustment P67 Performing Progressive Processing [Progressive P67 Reducing the Lamp Brightness [Lamp mode P68 Resetting the Image Settings [Reset] ..... SETTING UP FUNCTIONS USING MENUS 62 Image adj. Select this to that of the original image. A picture...
... balance P66 Correcting the Screen Color [Screen color correction P66 Making Advanced Color Adjustment [Advanced color adjustment P67 Performing Progressive Processing [Progressive P67 Reducing the Lamp Brightness [Lamp mode P68 Resetting the Image Settings [Reset] ..... SETTING UP FUNCTIONS USING MENUS 62 Image adj. Select this to that of the original image. A picture...

Realis_E.pdf
Page 68
... is selected, the settings saved for each input signal and image mode. Image settings are saved for the image mode of the lamp. If you want to make all image settings from the beginning, you to reduce the power consumption of the currently selected input signal are.... • Selecting [Quiet] allows you can reset the current settings to the factory defaults. Resetting is projected at the normal brightness level. Lamp mode Image adj. Reducing the Lamp Brightness Resetting the Image Settings When you want to make the image darker or you feel the fan noisy, reduce the...
... is selected, the settings saved for each input signal and image mode. Image settings are saved for the image mode of the lamp. If you want to make all image settings from the beginning, you to reduce the power consumption of the currently selected input signal are.... • Selecting [Quiet] allows you can reset the current settings to the factory defaults. Resetting is projected at the normal brightness level. Lamp mode Image adj. Reducing the Lamp Brightness Resetting the Image Settings When you want to make the image darker or you feel the fan noisy, reduce the...

Realis_E.pdf
Page 69
... Setting up the Remote Control [Remote control P72 Selecting a Display Language [Language P73 Resetting to Factory Defaults [Factory defaults P73 Resetting the Lamp Counter [Lamp counter P74 You can be done even if [ANALOG RGB] is used as an output terminal. The RGB IN-2/COMPONENT IN/RGB OUT... output setting. System settings Terminal INPUT MONITOR OUT The RGB IN-2/COMPONENT IN/RGB OUT terminal is used to set various functions of this projector. An image can use the RGB IN-2/COMPONENT IN/RGB OUT terminal as an input terminal. System Settings Menu Outputting an Image to a...
... Setting up the Remote Control [Remote control P72 Selecting a Display Language [Language P73 Resetting to Factory Defaults [Factory defaults P73 Resetting the Lamp Counter [Lamp counter P74 You can be done even if [ANALOG RGB] is used as an output terminal. The RGB IN-2/COMPONENT IN/RGB OUT... output setting. System settings Terminal INPUT MONITOR OUT The RGB IN-2/COMPONENT IN/RGB OUT terminal is used to set various functions of this projector. An image can use the RGB IN-2/COMPONENT IN/RGB OUT terminal as an input terminal. System Settings Menu Outputting an Image to a...

Realis_E.pdf
Page 70
...is issued. A beep is not issued. Selecting the Power Management Mode Issuing a Beep When the projector is not used . Off A beep is not issued when the sound has been muted by pressing the [MUTE] button. ...70 The projector enters the power management mode. For details on the top control or remote control is pressed. A beep...USING MENUS Off Standby Exit The power management mode is not used , the mercury lamp is turned off or the power is turned on/off or a button on Power Management Mode, refer to P36...
...is issued. A beep is not issued. Selecting the Power Management Mode Issuing a Beep When the projector is not used . Off A beep is not issued when the sound has been muted by pressing the [MUTE] button. ...70 The projector enters the power management mode. For details on the top control or remote control is pressed. A beep...USING MENUS Off Standby Exit The power management mode is not used , the mercury lamp is turned off or the power is turned on/off or a button on Power Management Mode, refer to P36...

Realis_E.pdf
Page 73
... to factory defaults. • For the factory defaults, refer to P86. 73 OK Cancel All menu item settings of the projector are reset to the factory defaults. Resetting is canceled. • The [Lamp counter] and [Language] settings will be used in the selected language. Selecting a Display Language Resetting to the Factory Defaults...
... to factory defaults. • For the factory defaults, refer to P86. 73 OK Cancel All menu item settings of the projector are reset to the factory defaults. Resetting is canceled. • The [Lamp counter] and [Language] settings will be used in the selected language. Selecting a Display Language Resetting to the Factory Defaults...

Realis_E.pdf
Page 74
... cannot indicate the correct timing of use is 1,000 to P77. Resetting the Lamp Counter When you have changed the lamp, reset the lamp counter that indicates the lamp replacement timing. System settings Lamp counter • When the time of use is less than 1,000 hours Reset • When ... time of use is 1,400 hours or longer OK Cancel The lamp counter is canceled. For the lamp replacement method, refer to 1,400 hours • When the time of lamp replacement. Do not reset the lamp counter except when you have replaced the lamp. SETTING UP FUNCTIONS USING MENUS 74
... cannot indicate the correct timing of use is 1,000 to P77. Resetting the Lamp Counter When you have changed the lamp, reset the lamp counter that indicates the lamp replacement timing. System settings Lamp counter • When the time of use is less than 1,000 hours Reset • When ... time of use is 1,400 hours or longer OK Cancel The lamp counter is canceled. For the lamp replacement method, refer to 1,400 hours • When the time of lamp replacement. Do not reset the lamp counter except when you have replaced the lamp. SETTING UP FUNCTIONS USING MENUS 74

Realis_E.pdf
Page 76
... Remove the air filter. You may suffer electric shock or injury due to remove the power plug from your Canon dealer. Electric shock or fire may cause a problem. Wait until the projector cools down , remove the cover by pushing the latch. You may get burned or injured. • Before... not work properly. • Replace the air filter whenever you replace the lamp. 76 • An air filter can be sure to the high-voltage parts or rotating parts. Cleaning the Air Filter Turn the projector upside down sufficiently before cleaning the air filter. MAINTENANCE 4 Attach a new ...
... Remove the air filter. You may suffer electric shock or injury due to remove the power plug from your Canon dealer. Electric shock or fire may cause a problem. Wait until the projector cools down , remove the cover by pushing the latch. You may get burned or injured. • Before... not work properly. • Replace the air filter whenever you replace the lamp. 76 • An air filter can be sure to the high-voltage parts or rotating parts. Cleaning the Air Filter Turn the projector upside down sufficiently before cleaning the air filter. MAINTENANCE 4 Attach a new ...

Realis_E.pdf
Page 77
... Check the time of use the lamp of the lamp in [Lamp counter] from the System settings menu. (P74) • When replacing the lamp, turn off . • When replacing the lamp do not touch the inner glass surface. About the Replacement Lamp This projector uses the following message (two types)... is displayed for at least 1 hour. You may degrade. A lamp can be ordered from your dealer...
... Check the time of use the lamp of the lamp in [Lamp counter] from the System settings menu. (P74) • When replacing the lamp, turn off . • When replacing the lamp do not touch the inner glass surface. About the Replacement Lamp This projector uses the following message (two types)... is displayed for at least 1 hour. You may degrade. A lamp can be ordered from your dealer...

Realis_E.pdf
Page 78
... as it will go and secure it with a flathead screwdriver. Lamp Screws MAINTENANCE Allow the projector to cool for Replacing the Lamp 1 Turn off the projector and disconnect the power plug from the AC outlet. Procedure for a least 1 hour. 2 Detach the lamp cover by loosening Lamp cover a screw with two screws. * After installation, be sure to...
... as it will go and secure it with a flathead screwdriver. Lamp Screws MAINTENANCE Allow the projector to cool for Replacing the Lamp 1 Turn off the projector and disconnect the power plug from the AC outlet. Procedure for a least 1 hour. 2 Detach the lamp cover by loosening Lamp cover a screw with two screws. * After installation, be sure to...


