Photo Application Guide(Mac)
Page 66
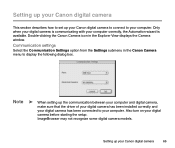
... Settings option from the Settings submenu in the Explorer View displays the Camera window. Note ➤ When setting up the communication between your computer and digital camera, make sure that the driver of your digital camera has been installed correctly and your digital camera has ...following dialog box. Setting up your Canon digital camera to connect to your computer. Double-clicking the Canon Camera icon in the Canon Camera menu to your computer. Setting up your Canon digital camera This section describes how to set up your Canon digital camera 66 Only when your...
... Settings option from the Settings submenu in the Explorer View displays the Camera window. Note ➤ When setting up the communication between your computer and digital camera, make sure that the driver of your digital camera has been installed correctly and your digital camera has ...following dialog box. Setting up your Canon digital camera to connect to your computer. Double-clicking the Canon Camera icon in the Canon Camera menu to your computer. Setting up your Canon digital camera This section describes how to set up your Canon digital camera 66 Only when your...
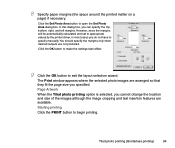
Photo Application Guide(Mac)
Page 94
8 Specify paper margins (the space around the printed matter on a page) if necessary. The Print window appears where the selected photo images are not produced. You should specify the margins only when desired outputs are arranged so that they fit...printing option is selected, you can specify the top, bottom, right, and left margins. Starting printing Click the PRINT button to appropriate values by the printer driver, in most cases you specified. However, since the margins will be automatically calculated and set to begin printing. Tiled photo printing (Borderless ...
8 Specify paper margins (the space around the printed matter on a page) if necessary. The Print window appears where the selected photo images are not produced. You should specify the margins only when desired outputs are arranged so that they fit...printing option is selected, you can specify the top, bottom, right, and left margins. Starting printing Click the PRINT button to appropriate values by the printer driver, in most cases you specified. However, since the margins will be automatically calculated and set to begin printing. Tiled photo printing (Borderless ...
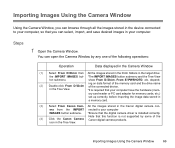
Photo Application Guide(Windows)
Page 66
...the Tree View. *It is required that your computer IMAGES button submenu. *Ensure that the digital camera driver is not supported by any one of the connected device. icon in a memory card. (3) Select From Canon Cam- ing on data format of the memory card and the drive name (2) Double-click From D:\... From D:\Dcim from the IMPORT nected to your computer, so that this function is installed correctly. Importing Images Using the Camera Window 66 You can select, import, and save desired images in your computer. show From D:\Dcim, From E:\PWSHOTO, etc. ory card reader or PC card ...
...the Tree View. *It is required that your computer IMAGES button submenu. *Ensure that the digital camera driver is not supported by any one of the connected device. icon in a memory card. (3) Select From Canon Cam- ing on data format of the memory card and the drive name (2) Double-click From D:\... From D:\Dcim from the IMPORT nected to your computer, so that this function is installed correctly. Importing Images Using the Camera Window 66 You can select, import, and save desired images in your computer. show From D:\Dcim, From E:\PWSHOTO, etc. ory card reader or PC card ...

Photo Application Guide(Windows)
Page 81
...a TWAIN-compliant device such as the date of shooting and situation of the device. Use the procedure in Importing Images Using the Camera Window if you use the procedure herein to your computer and turn on the power of shot is not saved in your computer. Select Select ...Source from a Canon digital camera that the TWAIN driver is a standardized protocol for the procedure to start ZoomBrowser EX. 3 Click the IMPORT IMAGES button to your computer. 2 Start ...
...a TWAIN-compliant device such as the date of shooting and situation of the device. Use the procedure in Importing Images Using the Camera Window if you use the procedure herein to your computer and turn on the power of shot is not saved in your computer. Select Select ...Source from a Canon digital camera that the TWAIN driver is a standardized protocol for the procedure to start ZoomBrowser EX. 3 Click the IMPORT IMAGES button to your computer. 2 Start ...
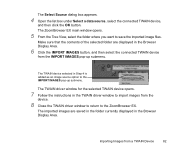
Photo Application Guide(Windows)
Page 82
The imported images are displayed in the TWAIN driver window to the ZoomBrowser EX. The TWAIN driver window for the selected TWAIN device opens. 7 Follow the instructions in the Browser Display Area. 6 Click the IMPORT IMAGES button, and then select the connected TWAIN... device from the IMPORT IMAGES pop-up submenu. Importing Images from the device. 8 Close the TWAIN driver window to return to import images from a TWAIN Device 82 The Select Source dialog box appears. 4 Open the list box under Select a data source, select ...
The imported images are displayed in the TWAIN driver window to the ZoomBrowser EX. The TWAIN driver window for the selected TWAIN device opens. 7 Follow the instructions in the Browser Display Area. 6 Click the IMPORT IMAGES button, and then select the connected TWAIN... device from the IMPORT IMAGES pop-up submenu. Importing Images from the device. 8 Close the TWAIN driver window to return to import images from a TWAIN Device 82 The Select Source dialog box appears. 4 Open the list box under Select a data source, select ...

S520 User's Guide
Page 2
Table of Contents Table of Contents Introduction ...4 How to Use This Manual 5 Safety Precautions 7 Printer Parts and Their Functions 12 Front View 13 Rear View ...14 Inside the Printer 15 Operation Panel 16 Printer Driver Functions (Windows 17 Opening the Printer Properties Dialog Box 18 Printer Properties Dialog Box Description 20 BJ Status Monitor Functions 34 Canceling a Print Job 37 Uninstalling Printer Drivers 38 Printer Driver Functions (Macintosh 39 Description of Print Settings 40 BJ Print Monitor 56 Canceling a Print Job 58 Using the Printer with a Network 59 1
Table of Contents Table of Contents Introduction ...4 How to Use This Manual 5 Safety Precautions 7 Printer Parts and Their Functions 12 Front View 13 Rear View ...14 Inside the Printer 15 Operation Panel 16 Printer Driver Functions (Windows 17 Opening the Printer Properties Dialog Box 18 Printer Properties Dialog Box Description 20 BJ Status Monitor Functions 34 Canceling a Print Job 37 Uninstalling Printer Drivers 38 Printer Driver Functions (Macintosh 39 Description of Print Settings 40 BJ Print Monitor 56 Canceling a Print Job 58 Using the Printer with a Network 59 1
S520 User's Guide
Page 18
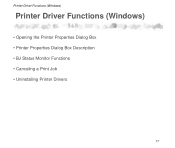
Printer Driver Functions (Windows) Printer Driver Functions (Windows) • Opening the Printer Properties Dialog Box • Printer Properties Dialog Box Description • BJ Status Monitor Functions • Canceling a Print Job • Uninstalling Printer Drivers 17
Printer Driver Functions (Windows) Printer Driver Functions (Windows) • Opening the Printer Properties Dialog Box • Printer Properties Dialog Box Description • BJ Status Monitor Functions • Canceling a Print Job • Uninstalling Printer Drivers 17
S520 User's Guide
Page 19
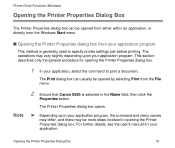
.... This section describes only the general procedure for your application, select the command to specify printer settings just before printing. Note 2 Ensure that Canon S520 is generally used to print a document. Printer Driver Functions (Windows) Opening the Printer Properties Dialog Box The Printer Properties dialog box can usually be opened from either within an application, or directly from...
.... This section describes only the general procedure for your application, select the command to specify printer settings just before printing. Note 2 Ensure that Canon S520 is generally used to print a document. Printer Driver Functions (Windows) Opening the Printer Properties Dialog Box The Printer Properties dialog box can usually be opened from either within an application, or directly from...

S520 User's Guide
Page 20
... from within an application. For Windows XP, click Start, then click Control Panel, Printers and Other Hardware, then Printers and Faxes. 2 Click the Canon S520 icon. 3 Open the File menu and click: • Windows Me/Windows 98/Windows 95 ➔ Properties • Windows NT 4.0 ➔ Document Defaults • Windows XP/Windows 2000 ➔ Printing Preferences The Printer Properties dialog box opens. Opening...
... from within an application. For Windows XP, click Start, then click Control Panel, Printers and Other Hardware, then Printers and Faxes. 2 Click the Canon S520 icon. 3 Open the File menu and click: • Windows Me/Windows 98/Windows 95 ➔ Properties • Windows NT 4.0 ➔ Document Defaults • Windows XP/Windows 2000 ➔ Printing Preferences The Printer Properties dialog box opens. Opening...

S520 User's Guide
Page 72
...check pattern to determine whether the ink sprays normally from the Printer Drivers Windows 1 With the printer on, load a sheet of letter-size or A4 paper in the printer. 2 Open the Printer Properties dialog box. ➡ Opening the Printer Properties Dialog Box 3 Click the Maintenance tab, then click... Check icon. 4 When the confirmation message is incorrect. Nozzle check pattern printing can be executed from the Windows and Macintosh printer drivers, or from the printer itself. ■ Printing the Nozzle Check Pattern from the printhead nozzles, and to verify printhead alignment. Use...
...check pattern to determine whether the ink sprays normally from the Printer Drivers Windows 1 With the printer on, load a sheet of letter-size or A4 paper in the printer. 2 Open the Printer Properties dialog box. ➡ Opening the Printer Properties Dialog Box 3 Click the Maintenance tab, then click... Check icon. 4 When the confirmation message is incorrect. Nozzle check pattern printing can be executed from the Windows and Macintosh printer drivers, or from the printer itself. ■ Printing the Nozzle Check Pattern from the printhead nozzles, and to verify printhead alignment. Use...

S520 User's Guide
Page 76
Note ➤ Cleaning the printhead consumes ink, so perform printhead cleaning only when necessary. ■ Cleaning the Printhead from the Printer Drivers Windows 1 Ensure that the nozzles might be performed either from the printer drivers or from the printer itself. Printhead cleaning can be clogged. Printhead Cleaning 75 Routine Maintenance Printhead Cleaning Clean the printhead if you suspect that the printer is on. 2 Open the Printer Properties Dialog Box. ➡ Opening the Printer Properties Dialog Box 3 Click the Maintenance tab, then click the Cleaning icon.
Note ➤ Cleaning the printhead consumes ink, so perform printhead cleaning only when necessary. ■ Cleaning the Printhead from the Printer Drivers Windows 1 Ensure that the nozzles might be performed either from the printer drivers or from the printer itself. Printhead cleaning can be clogged. Printhead Cleaning 75 Routine Maintenance Printhead Cleaning Clean the printhead if you suspect that the printer is on. 2 Open the Printer Properties Dialog Box. ➡ Opening the Printer Properties Dialog Box 3 Click the Maintenance tab, then click the Cleaning icon.

S520 User's Guide
Page 185
Index PICT File (Macintosh) Poster Printing POWER Button POWER Lamp Print Advisor (Windows) Print Dialog Box (Macintosh) Print Mode (Macintosh) Print server (Macintosh) Printable area Printer Driver (Macintosh) Printer Driver (Windows) Printer port Printer Port (Parallel) Printer Properties Dialog Box (Windows) Printhead Holder Printhead Lock Lever Printing Area Printing the Nozzle Check Pattern R Replacing an Ink Tank RESUME/CANCEL Button S Sheet...
Index PICT File (Macintosh) Poster Printing POWER Button POWER Lamp Print Advisor (Windows) Print Dialog Box (Macintosh) Print Mode (Macintosh) Print server (Macintosh) Printable area Printer Driver (Macintosh) Printer Driver (Windows) Printer port Printer Port (Parallel) Printer Properties Dialog Box (Windows) Printhead Holder Printhead Lock Lever Printing Area Printing the Nozzle Check Pattern R Replacing an Ink Tank RESUME/CANCEL Button S Sheet...

S520 User's Guide
Page 186
Index T Transparencies CF-102 Transporting the Printer T-Shirt Transfers TR-201 U Uninstalling Printer Drivers (Macintosh) Uninstalling Printer Drivers (Windows) USB Port W When to Replace Ink Tank and Maintain Printhead WPS driver 106 82 108 63 38 14 65 151, 161 185
Index T Transparencies CF-102 Transporting the Printer T-Shirt Transfers TR-201 U Uninstalling Printer Drivers (Macintosh) Uninstalling Printer Drivers (Windows) USB Port W When to Replace Ink Tank and Maintain Printhead WPS driver 106 82 108 63 38 14 65 151, 161 185

S520 User's Guide
Page 73
... nozzles, and to determine whether the ink sprays normally from the printer itself. s Printing the Nozzle Check Pattern from the Printer Drivers Windows 1 With the printer on, load a sheet of A4 or Letter paper in the printer. 2 Open the Printer Properties dialog box. ¬ Opening the Printer Properties Dialog Box 3 Click the Maintenance tab and then click the...
... nozzles, and to determine whether the ink sprays normally from the printer itself. s Printing the Nozzle Check Pattern from the Printer Drivers Windows 1 With the printer on, load a sheet of A4 or Letter paper in the printer. 2 Open the Printer Properties dialog box. ¬ Opening the Printer Properties Dialog Box 3 Click the Maintenance tab and then click the...

S520 User's Guide
Page 77
Print Head Cleaning 77 Print Head Cleaning Routine Maintenance Clean the print head if you suspect that the printer is on. 2 Open the Printer Properties Dialog Box. ¬ Opening the Printer Properties Dialog Box 3 Click the Maintenance tab and then click the Cleaning icon. Note ® Cleaning the head consumes ink, so perform head cleaning only when necessary. s Cleaning the Print Head from the printer itself. Head cleaning can be performed either from the printer drivers or from the Printer Drivers Windows 1 Ensure that the nozzles might be clogged.
Print Head Cleaning 77 Print Head Cleaning Routine Maintenance Clean the print head if you suspect that the printer is on. 2 Open the Printer Properties Dialog Box. ¬ Opening the Printer Properties Dialog Box 3 Click the Maintenance tab and then click the Cleaning icon. Note ® Cleaning the head consumes ink, so perform head cleaning only when necessary. s Cleaning the Print Head from the printer itself. Head cleaning can be performed either from the printer drivers or from the Printer Drivers Windows 1 Ensure that the nozzles might be clogged.

S520 User's Guide
Page 185
PICT File (Macintosh) Poster Printing POWER Button POWER Lamp Print Advisor (Windows) Print Dialog Box (Macintosh) Print Head Holder Print Head Lock Lever Print Mode (Macintosh) Print server (Macintosh) Printable area Printer Driver (Macintosh) Printer Driver (Windows) Printer port Printer Port (Parallel) Printer Properties Dialog Box (Windows) Printing Area Printing the Nozzle Check Pattern R Replacing an Ink Tank RESUME/CANCEL Button...
PICT File (Macintosh) Poster Printing POWER Button POWER Lamp Print Advisor (Windows) Print Dialog Box (Macintosh) Print Head Holder Print Head Lock Lever Print Mode (Macintosh) Print server (Macintosh) Printable area Printer Driver (Macintosh) Printer Driver (Windows) Printer port Printer Port (Parallel) Printer Properties Dialog Box (Windows) Printing Area Printing the Nozzle Check Pattern R Replacing an Ink Tank RESUME/CANCEL Button...

S520 User's Guide
Page 186
T Transparencies CF-102 Transporting the Printer T-Shirt Transfers TR-201 U Uninstalling Printer Drivers (Macintosh) Uninstalling Printer Drivers (Windows) USB Port W When to Replace Ink Tank and Maintain Print Head WPS driver Index 108 84 110 65 40 16 67 152, 162 186
T Transparencies CF-102 Transporting the Printer T-Shirt Transfers TR-201 U Uninstalling Printer Drivers (Macintosh) Uninstalling Printer Drivers (Windows) USB Port W When to Replace Ink Tank and Maintain Print Head WPS driver Index 108 84 110 65 40 16 67 152, 162 186

S520 Quick Start Guide
Page 9
... for information on loading envelopes and other media. print side 3 Load the paper, aligning it against the left position. You now need to install the printer driver: Windows: Go to page 8 Macintosh: Go to 100 sheets of the print head holder to the left side of the stack of the sheet feeder. You...
... for information on loading envelopes and other media. print side 3 Load the paper, aligning it against the left position. You now need to install the printer driver: Windows: Go to page 8 Macintosh: Go to 100 sheets of the print head holder to the left side of the stack of the sheet feeder. You...

S520 Quick Start Guide
Page 10
... be correctly installed. • The screens below refer to install the driver. Windows ¯Notes • Do not disconnect the cable or remove the CD-ROM during the installation. Screen may differ depending on the environment you are switched off the printer. Disable any applications automatically run, quit them. If the following screen...
... be correctly installed. • The screens below refer to install the driver. Windows ¯Notes • Do not disconnect the cable or remove the CD-ROM during the installation. Screen may differ depending on the environment you are switched off the printer. Disable any applications automatically run, quit them. If the following screen...
S520 Easy Setup Instructions
Page 2
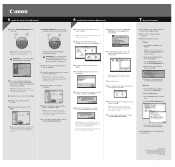
... the CD-ROM, then click OK. Right-click the Canon S520 icon, then click Properties. b. Follow the on the CD-ROM, then double-click the Installer icon. Specifications subject to the right of Canon Inc. 6 Install the Printer Driver (Windows®) Windows 1 Be sure to TURN THE PRINTER OFF before continuing. Printed in the paper rest. 2 Start the...
... the CD-ROM, then click OK. Right-click the Canon S520 icon, then click Properties. b. Follow the on the CD-ROM, then double-click the Installer icon. Specifications subject to the right of Canon Inc. 6 Install the Printer Driver (Windows®) Windows 1 Be sure to TURN THE PRINTER OFF before continuing. Printed in the paper rest. 2 Start the...


