
User Manual
Page 3
... the Macintosh Printer Driver Printer Driver Basics Preparing and Executing a Print Job Print Mode Settings Executing Special Functions Printer Maintenance Routine Maintenance Prolonging the Service Life of the Printer BJ Cartridges You Can Use With the Printer Notes on Handling BJ Cartridges BJ Cartridge Maintenance When to Replace a BJ Cartridge Printing a Nozzle Check Pattern Cleaning the Print Heads Replacing the...
... the Macintosh Printer Driver Printer Driver Basics Preparing and Executing a Print Job Print Mode Settings Executing Special Functions Printer Maintenance Routine Maintenance Prolonging the Service Life of the Printer BJ Cartridges You Can Use With the Printer Notes on Handling BJ Cartridges BJ Cartridge Maintenance When to Replace a BJ Cartridge Printing a Nozzle Check Pattern Cleaning the Print Heads Replacing the...

User Manual
Page 22
Paper Thickness Lever Adjusts the gap between the print heads and the surface of paper or other media, which are printing on. Auto Sheet Feeder Holds multiple sheets of the paper you are automatically fed into the printer. Paper Rest Raise to remove a paper jam. Parts and Functions of the paper ...loaded in the auto sheet feeder feed straight into the printer one sheet at a time. Paper Output Tray Holds printed sheets after they are ejected from the paper stack in the auto sheet feeder. Always align this guide with ...
Paper Thickness Lever Adjusts the gap between the print heads and the surface of paper or other media, which are printing on. Auto Sheet Feeder Holds multiple sheets of the paper you are automatically fed into the printer. Paper Rest Raise to remove a paper jam. Parts and Functions of the paper ...loaded in the auto sheet feeder feed straight into the printer one sheet at a time. Paper Output Tray Holds printed sheets after they are ejected from the paper stack in the auto sheet feeder. Always align this guide with ...

User Manual
Page 26
Cleaning the Print Heads • If you release the button after the light flashes twice: A Nozzle Check Pattern is performed. Note Operation Panel Hold down the RESUME button ... are performed, depending on how many times the light flashes. • If you release the button after the light flashes once: Print head cleaning is printed out. Windows Using Maintenance Functions Macintosh Printer Maintenance Parts and Functions of the Printer 26 Printing a Nozzle Check Pattern • You can also perform these tasks from the...
Cleaning the Print Heads • If you release the button after the light flashes twice: A Nozzle Check Pattern is performed. Note Operation Panel Hold down the RESUME button ... are performed, depending on how many times the light flashes. • If you release the button after the light flashes once: Print head cleaning is printed out. Windows Using Maintenance Functions Macintosh Printer Maintenance Parts and Functions of the Printer 26 Printing a Nozzle Check Pattern • You can also perform these tasks from the...

User Manual
Page 37
Media type Plain Paper Artist Canvas Back Print Film Banner Paper Glossy Photo Cards Glossy Photo Paper Greeting Cards High Gloss Photo Film High Resolution Paper Magnet Sheets Transparency Envelope Position Up Down Up Down Up Up Down Up Up Down Up Down Paper Handling 37 Setting the Paper Thickness Lever Before you are printing on. Paper Thickness Lever Adjusts the gap between the print head and the surface of the paper you print, be sure to set the paper thickness lever as listed below.
Media type Plain Paper Artist Canvas Back Print Film Banner Paper Glossy Photo Cards Glossy Photo Paper Greeting Cards High Gloss Photo Film High Resolution Paper Magnet Sheets Transparency Envelope Position Up Down Up Down Up Up Down Up Up Down Up Down Paper Handling 37 Setting the Paper Thickness Lever Before you are printing on. Paper Thickness Lever Adjusts the gap between the print head and the surface of the paper you print, be sure to set the paper thickness lever as listed below.

User Manual
Page 99
... to Know the Windows 98/95 Printer Driver I Opening the Printer Properties Dialog Box When you specify the print settings or use maintenance functions such as print head cleaning, you use, different menu items may be used for printing (for example, Print or Print Setup from the pull-down -arrow and then select Canon S450 from the File menu) in...
... to Know the Windows 98/95 Printer Driver I Opening the Printer Properties Dialog Box When you specify the print settings or use maintenance functions such as print head cleaning, you use, different menu items may be used for printing (for example, Print or Print Setup from the pull-down -arrow and then select Canon S450 from the File menu) in...

User Manual
Page 101
Using the Windows 98/95 Printer Driver 101 Point to Settings, then click Printers. 2 When the Printers window is also helpful when you wish to specify print settings that are common to all application programs, open the Printer Properties dialog box from the Start menu. This method is displayed, click the Canon S450 icon. Getting to Know the Windows 98/95 Printer Driver From the Start menu When you wish to use maintenance functions such as print head cleaning without starting up an application program. 1 Click the Start button.
Using the Windows 98/95 Printer Driver 101 Point to Settings, then click Printers. 2 When the Printers window is also helpful when you wish to specify print settings that are common to all application programs, open the Printer Properties dialog box from the Start menu. This method is displayed, click the Canon S450 icon. Getting to Know the Windows 98/95 Printer Driver From the Start menu When you wish to use maintenance functions such as print head cleaning without starting up an application program. 1 Click the Start button.
User Manual
Page 138
... as photographs. Diffusion: Randomly places ink dots of the print head. Use this setting for printing graphics or charts with clearly defined color boundaries. Making the Most of the Windows 98/95 Printer Driver Print Quality: When you wish to improve the print quality, drag the Print Quality slide bar to the most appropriate halftoning method...
... as photographs. Diffusion: Randomly places ink dots of the print head. Use this setting for printing graphics or charts with clearly defined color boundaries. Making the Most of the Windows 98/95 Printer Driver Print Quality: When you wish to improve the print quality, drag the Print Quality slide bar to the most appropriate halftoning method...

User Manual
Page 176
Using Maintenance Functions Cleaning the Print Heads Printing a Nozzle Check Pattern Aligning the Print Heads Turning the Printer On and Off Using the Special Settings Using ECP Mode Uninstalling the BJ Printer Driver Using the Windows 98/95 Printer Driver 176
Using Maintenance Functions Cleaning the Print Heads Printing a Nozzle Check Pattern Aligning the Print Heads Turning the Printer On and Off Using the Special Settings Using ECP Mode Uninstalling the BJ Printer Driver Using the Windows 98/95 Printer Driver 176

User Manual
Page 177
... clean the print heads: normal print head cleaning and deep print head cleaning. Normal print head cleaning 1 Open the Printer Properties dialog box, then click the Maintenance tab. 2 Click the first (left) print head cleaning icon in the Print Head Cleaning box. If this does not correct the problem then execute deep print head cleaning. Using Maintenance Functions I Cleaning the Print Heads Cleaning the print heads clears the...
... clean the print heads: normal print head cleaning and deep print head cleaning. Normal print head cleaning 1 Open the Printer Properties dialog box, then click the Maintenance tab. 2 Click the first (left) print head cleaning icon in the Print Head Cleaning box. If this does not correct the problem then execute deep print head cleaning. Using Maintenance Functions I Cleaning the Print Heads Cleaning the print heads clears the...

User Manual
Page 178
... message appears, make sure that the printer is turned on the printer. Using the Windows 98/95 Printer Driver 178 Press and hold down the RESUME button until the POWER light flashes once, and then release it. Print head cleaning begins. (It takes about 40 seconds to complete print head cleaning and the POWER light stops...
... message appears, make sure that the printer is turned on the printer. Using the Windows 98/95 Printer Driver 178 Press and hold down the RESUME button until the POWER light flashes once, and then release it. Print head cleaning begins. (It takes about 40 seconds to complete print head cleaning and the POWER light stops...

User Manual
Page 179
Only when the normal print head cleaning does not correct the problem, perform deep print head cleaning. 1 Open the Printer Properties dialog box, then click the Maintenance tab. 2 Click the print head deep cleaning icon in the Print Head Cleaning box. Using the Windows 98/95 Printer Driver 179 Deep print head cleaning Using Maintenance Functions Note Always execute normal print head cleaning first.
Only when the normal print head cleaning does not correct the problem, perform deep print head cleaning. 1 Open the Printer Properties dialog box, then click the Maintenance tab. 2 Click the print head deep cleaning icon in the Print Head Cleaning box. Using the Windows 98/95 Printer Driver 179 Deep print head cleaning Using Maintenance Functions Note Always execute normal print head cleaning first.

User Manual
Page 180
...firmation message appears, make sure that the printer is not satisfactory, a print head may be worn out and the corresponding BJ cartridge must be replaced. Printing a Nozzle Check Pattern Note If the cleaning had no effect, perform normal print head cleaning and deep print head cleaning again. After cleaning the print heads several times, if the Nozzle Check Pattern...
...firmation message appears, make sure that the printer is not satisfactory, a print head may be worn out and the corresponding BJ cartridge must be replaced. Printing a Nozzle Check Pattern Note If the cleaning had no effect, perform normal print head cleaning and deep print head cleaning again. After cleaning the print heads several times, if the Nozzle Check Pattern...

User Manual
Page 181
Using Maintenance Functions I Printing a Nozzle Check Pattern The Nozzle Check Pattern confirms whether the inks are being correctly ejected from the print head nozzles and whether the print heads on the BJ cartridges are not correct, or after performing print head cleaning. 1 Open the Printer Properties dialog box, then click the Maintenance tab. 2 Click the nozzle check pattern icon in the Test Prints box. Using the Windows 98/95 Printer Driver 181 Print the Nozzle Check Pattern when your printouts are streaked or the color tones are correctly aligned.
Using Maintenance Functions I Printing a Nozzle Check Pattern The Nozzle Check Pattern confirms whether the inks are being correctly ejected from the print head nozzles and whether the print heads on the BJ cartridges are not correct, or after performing print head cleaning. 1 Open the Printer Properties dialog box, then click the Maintenance tab. 2 Click the nozzle check pattern icon in the Test Prints box. Using the Windows 98/95 Printer Driver 181 Print the Nozzle Check Pattern when your printouts are streaked or the color tones are correctly aligned.

User Manual
Page 183
Aligning the Print Heads Using the Windows 98/95 Printer Driver 183 Separate patterns are printed to display the status of each BJ cartridge. • Standard color combination BC-30e (Black BJ Cartridge and BC-31e Color BJ Cartridge) (1) (2) (3) (1) BC-30e Black BJ Cartridge nozzle check pattern (2) BC-31e Color BJ Cartridge nozzle check pattern (3) Print head alignment check pattern...
Aligning the Print Heads Using the Windows 98/95 Printer Driver 183 Separate patterns are printed to display the status of each BJ cartridge. • Standard color combination BC-30e (Black BJ Cartridge and BC-31e Color BJ Cartridge) (1) (2) (3) (1) BC-30e Black BJ Cartridge nozzle check pattern (2) BC-31e Color BJ Cartridge nozzle check pattern (3) Print head alignment check pattern...

User Manual
Page 184
Cleaning the Print Heads If patterns (3) are broken or missing, print head cleaning is required. Aligning the Print Heads Using the Windows 98/95 Printer Driver 184 Using Maintenance Functions • Photo color combination-optional (BC-32e Photo BJ Cartridge optional and BC-31e Color BJ Cartridge) (1) (2) (3) (1) BC-32e Photo BJ Cartridge nozzle check pattern (2) BC-31e Color BJ Cartridge nozzle check pattern (3) Print head alignment check pattern for both BJ cartridges If patterns (1) or (2) are not overlapped perfectly, print head alignment is required.
Cleaning the Print Heads If patterns (3) are broken or missing, print head cleaning is required. Aligning the Print Heads Using the Windows 98/95 Printer Driver 184 Using Maintenance Functions • Photo color combination-optional (BC-32e Photo BJ Cartridge optional and BC-31e Color BJ Cartridge) (1) (2) (3) (1) BC-32e Photo BJ Cartridge nozzle check pattern (2) BC-31e Color BJ Cartridge nozzle check pattern (3) Print head alignment check pattern for both BJ cartridges If patterns (1) or (2) are not overlapped perfectly, print head alignment is required.

User Manual
Page 185
After cleaning the print heads several times, if the Nozzle Check Pattern is not satisfactory, one of the print heads may be worn out and the corresponding BJ cartridge must be replaced. Note Using Maintenance Functions If the cleaning had no effect, perform normal print head cleaning and deep print head cleaning again. Replacing a BJ Cartridge Using the Windows 98/95 Printer Driver 185
After cleaning the print heads several times, if the Nozzle Check Pattern is not satisfactory, one of the print heads may be worn out and the corresponding BJ cartridge must be replaced. Note Using Maintenance Functions If the cleaning had no effect, perform normal print head cleaning and deep print head cleaning again. Replacing a BJ Cartridge Using the Windows 98/95 Printer Driver 185
User Manual
Page 186
Normally you can execute manual print head alignment. If this does not work for a special print job, you must align the print heads to print the head alignment pattern. There are always installed in the S450 printer. The printer starts to ensure optimum results in the printer. Using the Windows 98/95 Printer Driver 186 Each time you replace a BJ cartridge or switch...
Normally you can execute manual print head alignment. If this does not work for a special print job, you must align the print heads to print the head alignment pattern. There are always installed in the S450 printer. The printer starts to ensure optimum results in the printer. Using the Windows 98/95 Printer Driver 186 Each time you replace a BJ cartridge or switch...
User Manual
Page 187
... alignment does not work properly in the following pattern prints, the print heads of the print heads are aligned properly. Note • The automatic print head alignment feature may not work properly, execute manual print head alignment. When ink runs out. - Manual print head alignment • To turn off the printer after automatic head alignment, always press the POWER button to strong light...
... alignment does not work properly in the following pattern prints, the print heads of the print heads are aligned properly. Note • The automatic print head alignment feature may not work properly, execute manual print head alignment. When ink runs out. - Manual print head alignment • To turn off the printer after automatic head alignment, always press the POWER button to strong light...
User Manual
Page 188
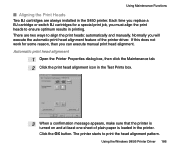
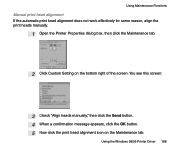
Using the Windows 98/95 Printer Driver 188 Using Maintenance Functions Manual print head alignment If the automatic print head alignment does not work effectively for some reason, align the print heads manually. 1 Open the Printer Properties dialog box, then click the Maintenance tab. 2 Click Custom Setting on the Maintenance tab. You see this screen: 3 Check "Align heads manually," then click the Send button. 4 When a confirmation message appears, click the OK button. 5 Now click the print head alignment icon on the bottom right of the screen.
Using the Windows 98/95 Printer Driver 188 Using Maintenance Functions Manual print head alignment If the automatic print head alignment does not work effectively for some reason, align the print heads manually. 1 Open the Printer Properties dialog box, then click the Maintenance tab. 2 Click Custom Setting on the Maintenance tab. You see this screen: 3 Check "Align heads manually," then click the Send button. 4 When a confirmation message appears, click the OK button. 5 Now click the print head alignment icon on the bottom right of the screen.

User Manual
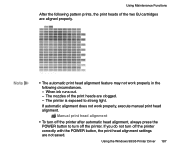
Page 189
Print head alignment pattern Using the Windows 98/95 Printer Driver 189 Using Maintenance Functions 6 When a confirmation message appears, make sure the printer is printed, click the Yes button. The printer starts to print the standard head alignment pattern. During print head alignment, do not open the front cover. 7 When this pattern is turned on and at least two sheets of letter-size plain paper are loaded; then click the OK button.
Print head alignment pattern Using the Windows 98/95 Printer Driver 189 Using Maintenance Functions 6 When a confirmation message appears, make sure the printer is printed, click the Yes button. The printer starts to print the standard head alignment pattern. During print head alignment, do not open the front cover. 7 When this pattern is turned on and at least two sheets of letter-size plain paper are loaded; then click the OK button.


