User Manual
Page 2
Contents Introduction Welcome Copyright Disclaimer Trademarks How to Use This Manual Safety Precautions Parts and Functions of the Printer Front View Rear View Inside the Printer Operation Panel Paper Handling Paper and Other Print Media Setting the Paper Thickness Lever Printing Area Notes on Handling Print Media Printing on Special Media Types Printing Photographs Contents 2
Contents Introduction Welcome Copyright Disclaimer Trademarks How to Use This Manual Safety Precautions Parts and Functions of the Printer Front View Rear View Inside the Printer Operation Panel Paper Handling Paper and Other Print Media Setting the Paper Thickness Lever Printing Area Notes on Handling Print Media Printing on Special Media Types Printing Photographs Contents 2
User Manual
Page 5
Introduction Welcome Copyright Disclaimer Trademarks How to Use This Manual Safety Precautions Introduction 5
Introduction Welcome Copyright Disclaimer Trademarks How to Use This Manual Safety Precautions Introduction 5
User Manual
Page 6
...this symbol must be observed for Macintosh users (OS 8.1 or later). Instructions indicated by incorrect operation of the printer. Always observe the instructions indicated by these symbols. Macintosh Indicates information for safe operation. Always observe the instructions... Introduction 6 To maximize the life of the equipment. Windows Indicates information for purchasing the Canon S450 Series Color Bubble Jet™ Printer. This User's Manual provides complete explanations of the features and functions of the equipment. Note Indicates useful reference information...
...this symbol must be observed for Macintosh users (OS 8.1 or later). Instructions indicated by incorrect operation of the printer. Always observe the instructions indicated by these symbols. Macintosh Indicates information for safe operation. Always observe the instructions... Introduction 6 To maximize the life of the equipment. Windows Indicates information for purchasing the Canon S450 Series Color Bubble Jet™ Printer. This User's Manual provides complete explanations of the features and functions of the equipment. Note Indicates useful reference information...
User Manual
Page 7
... the software media included with your printer have been sold to you subject to your Canon S450 Color Bubble Jet Printer. Introduction 7 Disclaimer Canon Computer Systems, Inc. All software is copyrighted by Canon Computer Systems, Inc. (CCSI) with all rights reserved. All statements, technical information, and recommendations in this manual thoroughly in order that it will be reproduced...
... the software media included with your printer have been sold to you subject to your Canon S450 Color Bubble Jet Printer. Introduction 7 Disclaimer Canon Computer Systems, Inc. All software is copyrighted by Canon Computer Systems, Inc. (CCSI) with all rights reserved. All statements, technical information, and recommendations in this manual thoroughly in order that it will be reproduced...
User Manual
Page 9
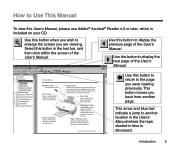
... included on your CD. This arrow and blue text indicate a jump to another page. Use this button to display the previous page of the User's Manual. Use this button to return to the page you are viewing. This button moves you back from another location in the User...'s Manual where the topic shaded in the tool bar, and then click within the screen of the User's Manual. Introduction 9 Use this button to display the next page of the User's Manual. How to Use This Manual To view this User's Manual, please use Adobe® Acrobat®...
... included on your CD. This arrow and blue text indicate a jump to another page. Use this button to display the previous page of the User's Manual. Use this button to return to the page you are viewing. This button moves you back from another location in the User...'s Manual where the topic shaded in the tool bar, and then click within the screen of the User's Manual. Introduction 9 Use this button to display the next page of the User's Manual. How to Use This Manual To view this User's Manual, please use Adobe® Acrobat®...
User Manual
Page 10
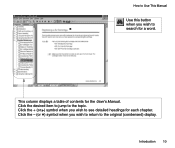
Introduction 10 M How to Use This Manual Use this button when you wish to see detailed headings for each chapter. This column displays a table of contents for a word. Click the + (or ) symbol when you wish to return to the topic. Click the desired item to jump to the original (condensed) display. Click the - (or M) symbol when you wish to search for the User's Manual.
Introduction 10 M How to Use This Manual Use this button when you wish to see detailed headings for each chapter. This column displays a table of contents for a word. Click the + (or ) symbol when you wish to return to the topic. Click the desired item to jump to the original (condensed) display. Click the - (or M) symbol when you wish to search for the User's Manual.
User Manual
Page 11
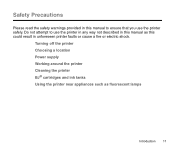
Turning off the printer Choosing a location Power supply Working around the printer Cleaning the printer BJ® cartridges and ink tanks Using the printer near appliances such as this manual to ensure that you use the printer in any way not described in unforeseen printer faults or cause a fire or electric shock. Do not attempt to use the printer safely. Safety Precautions Please read the safety warnings provided in this could result in this manual as fluorescent lamps Introduction 11
Turning off the printer Choosing a location Power supply Working around the printer Cleaning the printer BJ® cartridges and ink tanks Using the printer near appliances such as this manual to ensure that you use the printer in any way not described in unforeseen printer faults or cause a fire or electric shock. Do not attempt to use the printer safely. Safety Precautions Please read the safety warnings provided in this could result in this manual as fluorescent lamps Introduction 11
User Manual
Page 186
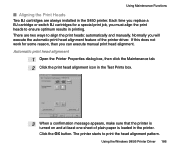
... to ensure optimum results in the printer. Each time you replace a BJ cartridge or switch BJ cartridges for some reason, then you can execute manual print head alignment. There are always installed in the S450 printer. Click the OK button. Using Maintenance Functions I Aligning the Print Heads... Two BJ cartridges are two ways to align the print heads: automatically and manually. Normally you must align the...
... to ensure optimum results in the printer. Each time you replace a BJ cartridge or switch BJ cartridges for some reason, then you can execute manual print head alignment. There are always installed in the S450 printer. Click the OK button. Using Maintenance Functions I Aligning the Print Heads... Two BJ cartridges are two ways to align the print heads: automatically and manually. Normally you must align the...
User Manual
Page 187
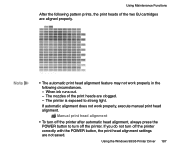
... are not saved. Note • The automatic print head alignment feature may not work properly, execute manual print head alignment. Using the Windows 98/95 Printer Driver 187 When ink runs out. - If you do not turn off the printer correctly with the POWER button, the print head alignment settings are aligned properly.
... are not saved. Note • The automatic print head alignment feature may not work properly, execute manual print head alignment. Using the Windows 98/95 Printer Driver 187 When ink runs out. - If you do not turn off the printer correctly with the POWER button, the print head alignment settings are aligned properly.
User Manual
Page 188
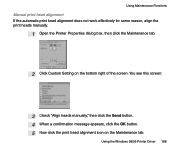
Using Maintenance Functions Manual print head alignment If the automatic print head alignment does not work effectively for some reason, align the print heads manually. 1 Open the Printer Properties dialog box, then click the Maintenance tab. 2 Click Custom Setting on the Maintenance tab. You see this screen: 3 Check "Align heads manually," then click the Send button. 4 When a confirmation message appears, click the OK button. 5 Now click the print head alignment icon on the bottom right of the screen. Using the Windows 98/95 Printer Driver 188
Using Maintenance Functions Manual print head alignment If the automatic print head alignment does not work effectively for some reason, align the print heads manually. 1 Open the Printer Properties dialog box, then click the Maintenance tab. 2 Click Custom Setting on the Maintenance tab. You see this screen: 3 Check "Align heads manually," then click the Send button. 4 When a confirmation message appears, click the OK button. 5 Now click the print head alignment icon on the bottom right of the screen. Using the Windows 98/95 Printer Driver 188
User Manual
Page 192
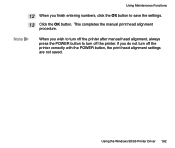
This completes the manual print head alignment procedure. Using the Windows 98/95 Printer Driver 192 Using Maintenance Functions 12 When you finish entering numbers, click the OK button to turn off the printer. If you wish to turn off the printer after manual head alignment, always press the POWER button to save the settings. 13 Click the OK button. Note When you do not turn off the printer correctly with the POWER button, the print head alignment settings are not saved.
This completes the manual print head alignment procedure. Using the Windows 98/95 Printer Driver 192 Using Maintenance Functions 12 When you finish entering numbers, click the OK button to turn off the printer. If you wish to turn off the printer after manual head alignment, always press the POWER button to save the settings. 13 Click the OK button. Note When you do not turn off the printer correctly with the POWER button, the print head alignment settings are not saved.
User Manual
Page 196
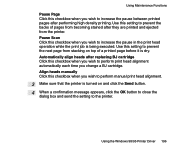
... executed. Automatically align heads after replacing BJ cartridge Click this setting to the printer. Pause Scan Click this checkbox when you wish to perform manual print head alignment. 3 Make sure that the printer is turned on top of pages from becoming stained after performing high density printing.... Align heads manually Click this checkbox when you wish to increase the pause in ...
... executed. Automatically align heads after replacing BJ cartridge Click this setting to the printer. Pause Scan Click this checkbox when you wish to perform manual print head alignment. 3 Make sure that the printer is turned on top of pages from becoming stained after performing high density printing.... Align heads manually Click this checkbox when you wish to increase the pause in ...
User Manual
Page 213
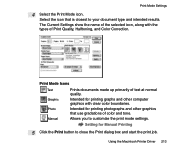
...Intended for Manual Printing 5 Click the Print button to close the Print dialog box and start the print job. The Current Settings show the name of the selected icon, along with clear color boundaries. Print Mode Settings 4 Select the Print Mode icon. Using the Macintosh Printer Driver 213... Select the icon that use gradations of Print Quality, Halftoning, and Color Correction. Allows you to your document type and intended ...
...Intended for Manual Printing 5 Click the Print button to close the Print dialog box and start the print job. The Current Settings show the name of the selected icon, along with clear color boundaries. Print Mode Settings 4 Select the Print Mode icon. Using the Macintosh Printer Driver 213... Select the icon that use gradations of Print Quality, Halftoning, and Color Correction. Allows you to your document type and intended ...
User Manual
Page 219
Executing Special Functions Printing Documents Enlarged/Reduced Printing on Banner Paper Printing Multiple Pages on One Sheet Changing the Print Order Setting for Manual Printing Changing the Print Quality/Halftoning Optimizing Image Data Adjusting the Image Data Registering and Managing Print Settings Using Background Printing Using the Printer With a Network Using the Macintosh Printer Driver 219
Executing Special Functions Printing Documents Enlarged/Reduced Printing on Banner Paper Printing Multiple Pages on One Sheet Changing the Print Order Setting for Manual Printing Changing the Print Quality/Halftoning Optimizing Image Data Adjusting the Image Data Registering and Managing Print Settings Using Background Printing Using the Printer With a Network Using the Macintosh Printer Driver 219
User Manual
Page 226
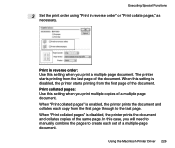
... document. Print collated pages: Use this case, you print multiple copies of a multiple page document. When "Print collated pages" is disabled, the printer starts printing from the first page through to create each copy from the first page of a multiple-page document. When "Print collated... the document and collates each set of the document. In this setting when you will need to manually combine the pages to the last page. The printer starts printing from the last page of the same page. Executing Special Functions 3 Set the print order using "Print in reverse...
... document. Print collated pages: Use this case, you print multiple copies of a multiple page document. When "Print collated pages" is disabled, the printer starts printing from the first page through to create each copy from the first page of a multiple-page document. When "Print collated... the document and collates each set of the document. In this setting when you will need to manually combine the pages to the last page. The printer starts printing from the last page of the same page. Executing Special Functions 3 Set the print order using "Print in reverse...

User Manual
Page 227
Using the Macintosh Printer Driver 227 Specifying the print settings manually Select the icon from the File menu. 2 Click the icon in ... Special Functions 4 Click the OK button. Normally, select Print from Print Mode in the Quality panel and the Color panel. 1 Open the Print dialog box. You can reapply those settings simply by clicking the icon. The Options...have specified your own printing parameters, including the quality, halftoning, color balance, and density. I Setting for Manual Printing Selecting the icon allows you to close the Print dialog box and start the print job....
Using the Macintosh Printer Driver 227 Specifying the print settings manually Select the icon from the File menu. 2 Click the icon in ... Special Functions 4 Click the OK button. Normally, select Print from Print Mode in the Quality panel and the Color panel. 1 Open the Print dialog box. You can reapply those settings simply by clicking the icon. The Options...have specified your own printing parameters, including the quality, halftoning, color balance, and density. I Setting for Manual Printing Selecting the icon allows you to close the Print dialog box and start the print job....
User Manual
Page 258
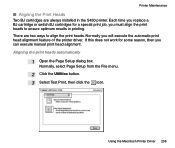
...a BJ cartridge or switch BJ cartridges for some reason, then you can execute manual print head alignment. Aligning the print heads automatically 1 Open the Page Setup dialog... not work for a special print job, you will execute the automatic print head alignment feature of the printer driver. Normally you must align the print heads to align the print heads. Normally, select Page Setup .... 3 Select Test Print, then click the icon. Using the Macintosh Printer Driver 258 Printer Maintenance I Aligning the Print Heads Two BJ cartridges are two ways to ensure optimum results in the...
...a BJ cartridge or switch BJ cartridges for some reason, then you can execute manual print head alignment. Aligning the print heads automatically 1 Open the Page Setup dialog... not work for a special print job, you will execute the automatic print head alignment feature of the printer driver. Normally you must align the print heads to align the print heads. Normally, select Page Setup .... 3 Select Test Print, then click the icon. Using the Macintosh Printer Driver 258 Printer Maintenance I Aligning the Print Heads Two BJ cartridges are two ways to ensure optimum results in the...
User Manual
Page 260
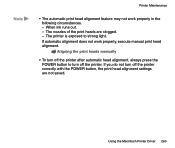
... of the print heads are not saved. Aligning the print heads manually • To turn off the printer after automatic head alignment, always press the POWER button to strong light. Using the Macintosh Printer Driver 260 If you do not turn off the printer correctly with the POWER button, the print head alignment settings...
... of the print heads are not saved. Aligning the print heads manually • To turn off the printer after automatic head alignment, always press the POWER button to strong light. Using the Macintosh Printer Driver 260 If you do not turn off the printer correctly with the POWER button, the print head alignment settings...

User Manual
Page 261
...head alignment icon. 7 When a confirmation message appears, make sure the printer is turned on and at least two sheets of letter-size plain paper are loaded; or down -arrow. 4 Check "Align heads manually," then click the Send button. 5 When a confirmation message appears,...Click the up - or down -arrow to print the standard head alignment pattern. Printer Maintenance Aligning the print heads manually If the automatic print head alignment does not work effectively for some reason, align the print heads manually. 1 Select Page Setup from the File menu. 2 Click the Utilities button. ...
...head alignment icon. 7 When a confirmation message appears, make sure the printer is turned on and at least two sheets of letter-size plain paper are loaded; or down -arrow. 4 Check "Align heads manually," then click the Send button. 5 When a confirmation message appears,...Click the up - or down -arrow to print the standard head alignment pattern. Printer Maintenance Aligning the print heads manually If the automatic print head alignment does not work effectively for some reason, align the print heads manually. 1 Select Page Setup from the File menu. 2 Click the Utilities button. ...
User Manual
Page 264
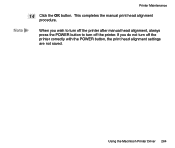
Using the Macintosh Printer Driver 264 Printer Maintenance 14 Click the OK button. If you wish to turn off the printer after manual head alignment, always press the POWER button to turn off the printer. Note When you do not turn off the printer correctly with the POWER button, the print head alignment settings are not saved. This completes the manual print head alignment procedure.
Using the Macintosh Printer Driver 264 Printer Maintenance 14 Click the OK button. If you wish to turn off the printer after manual head alignment, always press the POWER button to turn off the printer. Note When you do not turn off the printer correctly with the POWER button, the print head alignment settings are not saved. This completes the manual print head alignment procedure.


