
User Manual
Page 2
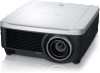
...'s operations are as "the projector") is a high-performance projector that is given here. Contact the Canon Customer Support Center for the WUX5000 / WUX4000 / WX6000 / SX6000 Multimedia Projectors. A precaution about operation or restriction is capable of projecting a highresolution computer screen... control or the LENS button on a large screen. Installation of the projector should be pressed Symbols Used in this manual are shown as perform maintenance. These descriptions are for WX6000 / SX6000. These descriptions are for WUX5000 / WUX4000. User's Manual (Operation) / ...
...'s operations are as "the projector") is a high-performance projector that is given here. Contact the Canon Customer Support Center for the WUX5000 / WUX4000 / WX6000 / SX6000 Multimedia Projectors. A precaution about operation or restriction is capable of projecting a highresolution computer screen... control or the LENS button on a large screen. Installation of the projector should be pressed Symbols Used in this manual are shown as perform maintenance. These descriptions are for WX6000 / SX6000. These descriptions are for WUX5000 / WUX4000. User's Manual (Operation) / ...

User Manual
Page 27
... you hear a click to impact. • Do not spill any liquids on the remote controller. ment with the + and - partment lid. Insert batteries. partment lid. pressing it . 1 2 Open the battery com- Insert 2 new AA batter- Raise the battery ies in the compart- ing it . 27 Insert the tab into the remote...
... you hear a click to impact. • Do not spill any liquids on the remote controller. ment with the + and - partment lid. Insert batteries. partment lid. pressing it . 1 2 Open the battery com- Insert 2 new AA batter- Raise the battery ies in the compart- ing it . 27 Insert the tab into the remote...

User Manual
Page 34
..., down, left, or right when the screen aspect setting is [16:9 D. image shift] or [4:3 D. Freezes the projected image. tion nearer. Press D.SHIFT/KEYSTONE to correct keystone distortion. • Moves the image up to operate all functions of the projector. ■ RS-RC04 POWER button (... buttons on the remote control or the side control on or off. ASPECT button (P70) Changes the aspect ratio mode. image shift] is included with WX6000 / SX6000. mum). FOCUS button (P73) Adjusts focusing. [ ] / [ ] buttons: Moves the focus posi- IMAGE button (P79) Switches the...
..., down, left, or right when the screen aspect setting is [16:9 D. image shift] or [4:3 D. Freezes the projected image. tion nearer. Press D.SHIFT/KEYSTONE to correct keystone distortion. • Moves the image up to operate all functions of the projector. ■ RS-RC04 POWER button (... buttons on the remote control or the side control on or off. ASPECT button (P70) Changes the aspect ratio mode. image shift] is included with WX6000 / SX6000. mum). FOCUS button (P73) Adjusts focusing. [ ] / [ ] buttons: Moves the focus posi- IMAGE button (P79) Switches the...

User Manual
Page 35
.... Part Names Before Use INPUT button (P60) Switches the input signal. VOL button (P83) P-TIMER button (P85) Displays the time elapsed since this button was pressed.
.... Part Names Before Use INPUT button (P60) Switches the input signal. VOL button (P83) P-TIMER button (P85) Displays the time elapsed since this button was pressed.

User Manual
Page 38
... shut down. • WARNING (red) : Lights up or flashes when an error occurs. • LAMP (orange) : Flashes when the time for replacing the lamp is pressed, the screen changes to focus adjustment (P73), zoom (image size) adjustment (P71), or lens shift (image position) adjustment (P74). If the temperature inside the projector...
... shut down. • WARNING (red) : Lights up or flashes when an error occurs. • LAMP (orange) : Flashes when the time for replacing the lamp is pressed, the screen changes to focus adjustment (P73), zoom (image size) adjustment (P71), or lens shift (image position) adjustment (P74). If the temperature inside the projector...

User Manual
Page 56
...least 5 minutes before turning it on again. Starting Projection 1 Check the connection between the projector and the computer or AV equipment. (P52 - Not doing so could result in use. 3 Press the POWER button. It may suffer electromagnetic interference or be subject to poor TV and radio reception. • Fully...the power cord when not in an electric shock. The [POWER] indicator flashes green, and then stops flashing and remains lit. Press the OK or EXIT button (WX6000 / SX6000) to ground. Also the computer may shorten the lamp life if you turn on the power plug to make sure ...
...least 5 minutes before turning it on again. Starting Projection 1 Check the connection between the projector and the computer or AV equipment. (P52 - Not doing so could result in use. 3 Press the POWER button. It may suffer electromagnetic interference or be subject to poor TV and radio reception. • Fully...the power cord when not in an electric shock. The [POWER] indicator flashes green, and then stops flashing and remains lit. Press the OK or EXIT button (WX6000 / SX6000) to ground. Also the computer may shorten the lamp life if you turn on the power plug to make sure ...

User Manual
Page 57
... guage to perform focus adjustment. (P73) Remote control Projector Remote control An item highlighted in orange will be used by connecting the power cord, without pressing the POWER button. (P121) • You can change the language from the menu at a later time. (P125) If the language selection screen is out of... countdown window. (P56) Using the Power Saving Mode (Power Management) When you enable the power management mode, the lamp is turned on the computer or AV equipment power. You can select a lan- Select the desired language with the pointer buttons and...
... guage to perform focus adjustment. (P73) Remote control Projector Remote control An item highlighted in orange will be used by connecting the power cord, without pressing the POWER button. (P121) • You can change the language from the menu at a later time. (P125) If the language selection screen is out of... countdown window. (P56) Using the Power Saving Mode (Power Management) When you enable the power management mode, the lamp is turned on the computer or AV equipment power. You can select a lan- Select the desired language with the pointer buttons and...
User Manual
Page 58
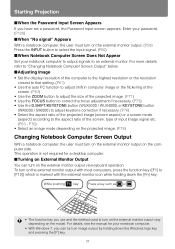
...9632;When "No signal" Appears With a notebook computer, the user must turn on the external monitor output on the external monitor output. (P58) Press the INPUT button to select the input signal. (P60) ■When Notebook Computer Screen Does Not Appear Set your notebook computer. • With ...FOCUS button to correct the focus adjustment if necessary. (P73) • Use the D.SHIFT/KEYSTONE button (WUX5000 / WUX4000) or KEYSTONE button (WX6000 / SX6000) to adjust keystone correction if necessary. (P76) • Select the aspect ratio of input image signal etc. (P63 - While pushing key...
...9632;When "No signal" Appears With a notebook computer, the user must turn on the external monitor output on the external monitor output. (P58) Press the INPUT button to select the input signal. (P60) ■When Notebook Computer Screen Does Not Appear Set your notebook computer. • With ...FOCUS button to correct the focus adjustment if necessary. (P73) • Use the D.SHIFT/KEYSTONE button (WUX5000 / WUX4000) or KEYSTONE button (WX6000 / SX6000) to adjust keystone correction if necessary. (P76) • Select the aspect ratio of input image signal etc. (P63 - While pushing key...

User Manual
Page 60
However [HDMI] and [DVI-D] (WUX5000 / WUX4000) (Digital PC), or [Digital PC] (WX6000 / SX6000) may be selected. 3 Press the OK button to confirm the input signal type. Remote control Projector Remote control The currently active input signal is displayed in white. An ... signals displayed in white can be displayed in orange. Change the input signal with the input signal buttons. (WX6000 / SX6000) For WX6000 / SX6000, you can also switch to the input signal you want by pressing the INPUT button. • You can select the target input signal with a circle and highlighted in gray ...
However [HDMI] and [DVI-D] (WUX5000 / WUX4000) (Digital PC), or [Digital PC] (WX6000 / SX6000) may be selected. 3 Press the OK button to confirm the input signal type. Remote control Projector Remote control The currently active input signal is displayed in white. An ... signals displayed in white can be displayed in orange. Change the input signal with the input signal buttons. (WX6000 / SX6000) For WX6000 / SX6000, you can also switch to the input signal you want by pressing the INPUT button. • You can select the target input signal with a circle and highlighted in gray ...

User Manual
Page 62
... on page 218. 62 Remote control If the projected image was not properly adjusted with the same computer, when the input signal is selected, press the AUTO PC button to adjust the projector to the optimal condition. P98) • For the signal types supported by the projector, see ... If the image display is shifted or there is flickering of the screen when [Analog PC] (WUX5000 / WUX4000) or [Analog PC-1] [Analog PC-2] (WX6000 / SX6000) is selected the image will be projected automatically under the same conditions that were previously adjusted. ■Performing the Auto PC Function...
... on page 218. 62 Remote control If the projected image was not properly adjusted with the same computer, when the input signal is selected, press the AUTO PC button to adjust the projector to the optimal condition. P98) • For the signal types supported by the projector, see ... If the image display is shifted or there is flickering of the screen when [Analog PC] (WUX5000 / WUX4000) or [Analog PC-1] [Analog PC-2] (WX6000 / SX6000) is selected the image will be projected automatically under the same conditions that were previously adjusted. ■Performing the Auto PC Function...

User Manual
Page 63
Perform the following steps to select the aspect ratio of the projected image. 1 Press the MENU button to display a menu window. Remote control Projector Remote control 63 You may need to change the setting depending on for the screen ... mode (aspect) according to the aspect ratio of the screen, type of input image signal and so on the resolution of the computer or other AV equipment connected. In general, select [Auto].
Perform the following steps to select the aspect ratio of the projected image. 1 Press the MENU button to display a menu window. Remote control Projector Remote control 63 You may need to change the setting depending on for the screen ... mode (aspect) according to the aspect ratio of the screen, type of input image signal and so on the resolution of the computer or other AV equipment connected. In general, select [Auto].

User Manual
Page 64
Remote control Projector Remote control 64 Adjusting the Image 2 Use the [ ] / [ ] buttons to select the [Display settings] tab (WUX5000 / WUX4000) or [Install settings] (WX6000 / SX6000). Remote control Projector Remote control 3 Select [Screen aspect] with the [ ] / [ ], and then press the OK button.
Remote control Projector Remote control 64 Adjusting the Image 2 Use the [ ] / [ ] buttons to select the [Display settings] tab (WUX5000 / WUX4000) or [Install settings] (WX6000 / SX6000). Remote control Projector Remote control 3 Select [Screen aspect] with the [ ] / [ ], and then press the OK button.

User Manual
Page 66
...when you use a screen with aspect ratio of 4:3. You can move the image, refer to page 68. 5 Press the OK button to confirm your setting and then press the MENU button. 66 Keystone correction cannot be performed in this mode, but you can correct keystone distortion with this... up or down with images being projected horizontally. For details about how to shift the image, refer to page 67. 4:3 D. image shift (WUX5000 / WUX4000 / WX6000) Select this mode. (P76) 16:9 screen 16:10 D. You can move the image, refer to page 67. 4:3 screen 16:9 D. For the details on ...
...when you use a screen with aspect ratio of 4:3. You can move the image, refer to page 68. 5 Press the OK button to confirm your setting and then press the MENU button. 66 Keystone correction cannot be performed in this mode, but you can correct keystone distortion with this... up or down with images being projected horizontally. For details about how to shift the image, refer to page 67. 4:3 D. image shift (WUX5000 / WUX4000 / WX6000) Select this mode. (P76) 16:9 screen 16:10 D. You can move the image, refer to page 67. 4:3 screen 16:9 D. For the details on ...
User Manual
Page 67
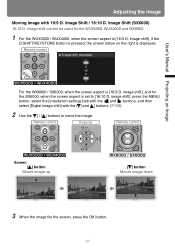
...'s Manual Projecting an Image Adjusting the Image Moving Image with the [ ] and [ ] buttons. (P108) 2 Use the [ ] / [ ] buttons to [16:10 D. image shift], press the MENU button, select the [Installation settings] tab with the [ ] and [ ] buttons, and then select [Digital image shift] with 16:9 D. image shift cannot be used... for the SX6000, when the screen aspect is [16:9 D. Remote control For the WX6000 / SX6000, when the screen aspect is displayed. Image Shift (SX6000) 16:10 D. image shift], and for the WUX5000, WUX4000 and...
...'s Manual Projecting an Image Adjusting the Image Moving Image with the [ ] and [ ] buttons. (P108) 2 Use the [ ] / [ ] buttons to [16:10 D. image shift], press the MENU button, select the [Installation settings] tab with the [ ] and [ ] buttons, and then select [Digital image shift] with 16:9 D. image shift cannot be used... for the SX6000, when the screen aspect is [16:9 D. Remote control For the WX6000 / SX6000, when the screen aspect is displayed. Image Shift (SX6000) 16:10 D. image shift], and for the WUX5000, WUX4000 and...

User Manual
Page 68
...control Screen [ ] button Moves the image left [ ] button Moves the image right 3 When the image fits the screen, press the OK button. 68 Image Shift (WUX5000 / WUX4000 / WX6000) 4:3 D image shift cannot be used for SX6000. 1 For the WUX5000 / WUX4000, when the screen aspect is displayed. ...image shift], if the D.SHIFT/KEYSTONE button is pressed, the screen below on the right is [4:3 D. Remote control For the WX6000, when the screen aspect is set to move the image. image shift], press the MENU button, select the [Installation settings] tab with the [ ]...
...control Screen [ ] button Moves the image left [ ] button Moves the image right 3 When the image fits the screen, press the OK button. 68 Image Shift (WUX5000 / WUX4000 / WX6000) 4:3 D image shift cannot be used for SX6000. 1 For the WUX5000 / WUX4000, when the screen aspect is displayed. ...image shift], if the D.SHIFT/KEYSTONE button is pressed, the screen below on the right is [4:3 D. Remote control For the WX6000, when the screen aspect is set to move the image. image shift], press the MENU button, select the [Installation settings] tab with the [ ]...

User Manual
Page 69
... Resetting the Image Shift Perform the following steps to page 207. This can only be selected when the screen aspect is 16:10. 16:10 (WX6000 / SX6000) The image is projected at the top/bottom of the screen) when using an input signal aspect ratio of 4:3 aspect ratio cannot be correctly... or out of the center of the image according to display the [D. Zoom This cuts the upper/lower or left/right part of the image. Press the D.SHIFT/KEYSTONE button (WUX5000 / WUX4000), twice to the screen aspect and zooms in [Auto] mode when using an input signal aspect ratio of the...
... Resetting the Image Shift Perform the following steps to page 207. This can only be selected when the screen aspect is 16:10. 16:10 (WX6000 / SX6000) The image is projected at the top/bottom of the screen) when using an input signal aspect ratio of 4:3 aspect ratio cannot be correctly... or out of the center of the image according to display the [D. Zoom This cuts the upper/lower or left/right part of the image. Press the D.SHIFT/KEYSTONE button (WUX5000 / WUX4000), twice to the screen aspect and zooms in [Auto] mode when using an input signal aspect ratio of the...

User Manual
Page 70
Remote control Example: You can also select any aspect ratio from [Aspect] in the menu. (P93) Some aspect ratios may not appear depending on the remote control and select an appropriate aspect ratio. For more details about aspect ratios, refer to change the aspect ratio type. Adjusting the Image How to Select an Aspect Ratio Press the ASPECT button on the type of input signal. 70 Press the ASPECT button to page 207.
Remote control Example: You can also select any aspect ratio from [Aspect] in the menu. (P93) Some aspect ratios may not appear depending on the remote control and select an appropriate aspect ratio. For more details about aspect ratios, refer to change the aspect ratio type. Adjusting the Image How to Select an Aspect Ratio Press the ASPECT button on the type of input signal. 70 Press the ASPECT button to page 207.

User Manual
Page 71
Remote control Projector Push twice Remote control User's Manual Projecting an Image 71 Change the projector installation position if your desired image is too large or too small to adjust it with the zoom function. (P156) 1 Press either the ZOOM button on the remote control or the LENS button on the projector. Adjusting the Image Adjusting the Image Size The size of the projected image can be adjusted by pressing the ZOOM button on the remote control or the LENS button on the projector twice in order to display the window shown below.
Remote control Projector Push twice Remote control User's Manual Projecting an Image 71 Change the projector installation position if your desired image is too large or too small to adjust it with the zoom function. (P156) 1 Press either the ZOOM button on the remote control or the LENS button on the projector. Adjusting the Image Adjusting the Image Size The size of the projected image can be adjusted by pressing the ZOOM button on the remote control or the LENS button on the projector twice in order to display the window shown below.

User Manual
Page 72
Use the [ ] button on the remote control, or the DOWN button on the projector to increase the image size. When the Short Fixed Lens (RS-IL03WF) is selected, press the OK button or the ZOOM button. Adjusting the Image 2 Press the pointer buttons to decrease the image size. 3 When the desired image size is attached, zoom adjustment cannot be performed. 72 Remote control Projector Remote control Screen Use the [ ] button on the remote control, or the UP button on the projector to adjust the image size.
Use the [ ] button on the remote control, or the DOWN button on the projector to increase the image size. When the Short Fixed Lens (RS-IL03WF) is selected, press the OK button or the ZOOM button. Adjusting the Image 2 Press the pointer buttons to decrease the image size. 3 When the desired image size is attached, zoom adjustment cannot be performed. 72 Remote control Projector Remote control Screen Use the [ ] button on the remote control, or the UP button on the projector to adjust the image size.

User Manual
Page 73
Use the [ ] button on the remote control, or the DOWN button on the projector to perform fine adjustment. 3 When the focus is adjusted optimally, press the OK button or the FOCUS button. 73 Remote control Projector Remote control Use the [ ] button on the remote control, or the UP button on... the projector to adjust the focus position. For the projection distances of the lens unit, refer to page 156. 1 Press either the FOCUS button on the remote control or the LENS button on the projector. Adjusting the Image Adjusting the Focus To adjust the focus...
Use the [ ] button on the remote control, or the DOWN button on the projector to perform fine adjustment. 3 When the focus is adjusted optimally, press the OK button or the FOCUS button. 73 Remote control Projector Remote control Use the [ ] button on the remote control, or the UP button on... the projector to adjust the focus position. For the projection distances of the lens unit, refer to page 156. 1 Press either the FOCUS button on the remote control or the LENS button on the projector. Adjusting the Image Adjusting the Focus To adjust the focus...
