Quick Start Guide
Page 9
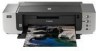
...paper. 1 1 2 (2) 1 Gently press the mark on how to flatten paper curl, refer to its various printers, refer to "Using Specialty Media" on page 68. For details on the Front Tray. 2 Pull out the Front Tray Extension completely. (3) Ensure that the FRONT FEED button is curled" on page 15, or "Printing Media... to Its Normal Printing Position" on page 14. 5 Put unused paper back into the package, and store them horizontally. - If the FRONT FEED button is lit or flashing, set the Front Tray to "Media is not lit. „ Loading Paper in the Auto Sheet Feeder Basic Printing For...
...paper. 1 1 2 (2) 1 Gently press the mark on how to flatten paper curl, refer to its various printers, refer to "Using Specialty Media" on page 68. For details on the Front Tray. 2 Pull out the Front Tray Extension completely. (3) Ensure that the FRONT FEED button is curled" on page 15, or "Printing Media... to Its Normal Printing Position" on page 14. 5 Put unused paper back into the package, and store them horizontally. - If the FRONT FEED button is lit or flashing, set the Front Tray to "Media is not lit. „ Loading Paper in the Auto Sheet Feeder Basic Printing For...
Quick Start Guide
Page 12
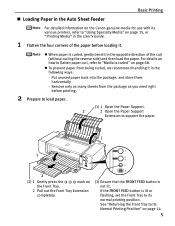
... 10 envelopes can be printed in the wrong direction. If the FRONT FEED button is not lit. See "Returning the Front Tray to Its Normal Printing Position" on page 14. (4) Select Envelope in the printer driver according to its normal printing position. If the ALARM lamp flashes ... DL Envelope (Macintosh) or Comm. Basic Printing „ Loading Envelopes in Page Size. Printing direction (3) Ensure that the FRONT FEED button is lit or flashing, set the printer driver not to "Printing with Windows" on page 18, or "Printing with embossed or treated surfaces, a double flap, pressure seals...
... 10 envelopes can be printed in the wrong direction. If the FRONT FEED button is not lit. See "Returning the Front Tray to Its Normal Printing Position" on page 14. (4) Select Envelope in the printer driver according to its normal printing position. If the ALARM lamp flashes ... DL Envelope (Macintosh) or Comm. Basic Printing „ Loading Envelopes in Page Size. Printing direction (3) Ensure that the FRONT FEED button is lit or flashing, set the printer driver not to "Printing with Windows" on page 18, or "Printing with embossed or treated surfaces, a double flap, pressure seals...

Quick Start Guide
Page 13
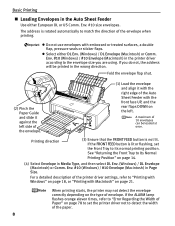
...page 14. (4) Select 4 x 6 in 101.6 x 152.4 mm or 5 x 7 in 127.0 x 177.8 mm from Page Size in the printer driver. See "Returning the Front Tray to Its Normal Printing Position" on page 15. 9 Always load paper in portrait orientation. Loading paper in landscape orientation... the paper stack. (3) Ensure that the FRONT FEED button is lit or flashing, set the Front Tray to its normal printing position. Portrait Landscape We recommend using Canon genuine photo media when printing photographs. For a detailed description of the printer driver settings, refer to "Printing with Windows" ...
...page 14. (4) Select 4 x 6 in 101.6 x 152.4 mm or 5 x 7 in 127.0 x 177.8 mm from Page Size in the printer driver. See "Returning the Front Tray to Its Normal Printing Position" on page 15. 9 Always load paper in portrait orientation. Loading paper in landscape orientation... the paper stack. (3) Ensure that the FRONT FEED button is lit or flashing, set the Front Tray to its normal printing position. Portrait Landscape We recommend using Canon genuine photo media when printing photographs. For a detailed description of the printer driver settings, refer to "Printing with Windows" ...
Quick Start Guide
Page 14
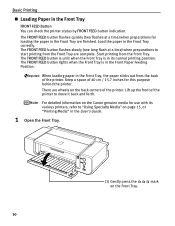
... paper in the Front Tray FRONT FEED Button You can check the printer status by FRONT FEED button indication. The FRONT FEED button flashes slowly (one long flash at a time) when preparations for this purpose behind the printer. When loading paper in the Front Paper Feeding Position. mark 10 Basic Printing „ Loading ... Tray. (1) Gently press the on the back corners of 40 cm / 15.7 inches for loading the paper in its various printers, refer to start printing from the Front Tray. For detailed information on the Canon genuine media for use with its normal printing position.
... paper in the Front Tray FRONT FEED Button You can check the printer status by FRONT FEED button indication. The FRONT FEED button flashes slowly (one long flash at a time) when preparations for this purpose behind the printer. When loading paper in the Front Paper Feeding Position. mark 10 Basic Printing „ Loading ... Tray. (1) Gently press the on the back corners of 40 cm / 15.7 inches for loading the paper in its various printers, refer to start printing from the Front Tray. For detailed information on the Canon genuine media for use with its normal printing position.
Quick Start Guide
Page 15
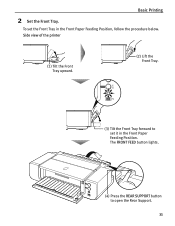
Side view of the printer (1) Tilt the Front Tray upward. (2) Lift the Front Tray. (3) Tilt the Front Tray forward to open the Rear Support. 11 Basic Printing 2 Set the Front Tray. The FRONT FEED button lights. (4) Press the REAR SUPPORT button to set the Front Tray in the Front Paper Feeding Position. To set it in the Front Paper Feeding Position, follow the procedure below.
Side view of the printer (1) Tilt the Front Tray upward. (2) Lift the Front Tray. (3) Tilt the Front Tray forward to open the Rear Support. 11 Basic Printing 2 Set the Front Tray. The FRONT FEED button lights. (4) Press the REAR SUPPORT button to set the Front Tray in the Front Paper Feeding Position. To set it in the Front Paper Feeding Position, follow the procedure below.
Quick Start Guide
Page 16
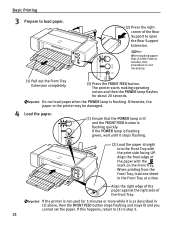
... 12 Do not load paper when the POWER lamp is not necessary. (1) Pull out the Front Tray Extension completely. (3) Press the FRONT FEED button. The printer starts making operating noises and then the POWER lamp flashes for 5 minutes or more while it stops flashing. (2) Load the paper straight into ...the Front Tray with the mark on the Front Tray. Basic Printing 3 Prepare to load paper. (2) Press the right corner of the Rear Support ...
... 12 Do not load paper when the POWER lamp is not necessary. (1) Pull out the Front Tray Extension completely. (3) Press the FRONT FEED button. The printer starts making operating noises and then the POWER lamp flashes for 5 minutes or more while it stops flashing. (2) Load the paper straight into ...the Front Tray with the mark on the Front Tray. Basic Printing 3 Prepare to load paper. (2) Press the right corner of the Rear Support ...
Quick Start Guide
Page 17
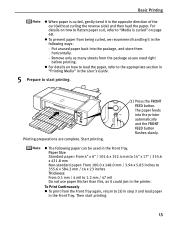
...direction of the curl (without curling the reverse side) and then load the paper. Put unused paper back into the printer automatically and the FRONT FEED button flashes slowly. Printing preparations are complete. z The following ways: - z To prevent paper from the Front Tray again,... return to the appropriate section in "Printing Media" in the printer. The paper feeds into the package, and store them horizontally. - To Print ...
...direction of the curl (without curling the reverse side) and then load the paper. Put unused paper back into the printer automatically and the FRONT FEED button flashes slowly. Printing preparations are complete. z The following ways: - z To prevent paper from the Front Tray again,... return to the appropriate section in "Printing Media" in the printer. The paper feeds into the package, and store them horizontally. - To Print ...
Quick Start Guide
Page 18
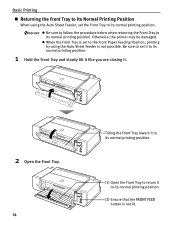
Otherwise, the printer may be damaged. Be sure to set the Front Tray to its normal printing position. Basic Printing „ Returning the Front Tray to Its Normal ... possible. z Be sure to follow the procedure below when returning the Front Tray to its normal printing position. (2) Ensure that the FRONT FEED button is set to the Front Paper Feeding Position, printing by using the Auto Sheet Feeder, set it to its normal printing position. 1 Hold the Front Tray and slowly tilt...
Otherwise, the printer may be damaged. Be sure to set the Front Tray to its normal printing position. Basic Printing „ Returning the Front Tray to Its Normal ... possible. z Be sure to follow the procedure below when returning the Front Tray to its normal printing position. (2) Ensure that the FRONT FEED button is set to the Front Paper Feeding Position, printing by using the Auto Sheet Feeder, set it to its normal printing position. 1 Hold the Front Tray and slowly tilt...
Quick Start Guide
Page 45
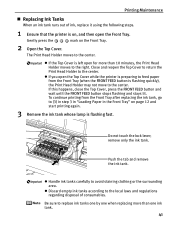
... following steps. 1 Ensure that the printer is on page 12 and start printing again. 3 Remove the ink tank whose lamp is flashing fast. Push the tab and remove the ink tank. If this happens, close the Top Cover, press the FRONT FEED button and wait until the FRONT FEED button stops flashing and stays lit... 3 in "Loading Paper in the Front Tray" on , and then open the Top Cover while the printer is preparing to feed paper from the Front Tray after replacing the ink tank, go to the center. Gently press the mark on the Front Tray. 2 Open the Top Cover. Do not touch the lock lever;
... following steps. 1 Ensure that the printer is on page 12 and start printing again. 3 Remove the ink tank whose lamp is flashing fast. Push the tab and remove the ink tank. If this happens, close the Top Cover, press the FRONT FEED button and wait until the FRONT FEED button stops flashing and stays lit... 3 in "Loading Paper in the Front Tray" on , and then open the Top Cover while the printer is preparing to feed paper from the Front Tray after replacing the ink tank, go to the center. Gently press the mark on the Front Tray. 2 Open the Top Cover. Do not touch the lock lever;
Quick Start Guide
Page 72
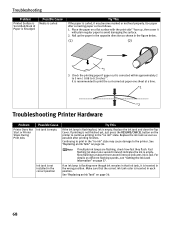
... sheet at about three second interval) indicates ink is not finished yet, just press the RESUME/CANCEL button on the printer to continue printing in the "no ink" state may become marked or not feed properly. Replace the ink tank as soon as shown in the figure below. (1) (2) *1 3....0.2 inches*2. If an ink lamp is flashing even though ink remains in that the correct ink tank color is corrected within approximately 2 to 5 mm / 0.08 to avoid damaging the surface. 2. Continuing to the printer. If multiple ink lamps are flashing, check how fast they flash. Fast flashing (at a time...
... sheet at about three second interval) indicates ink is not finished yet, just press the RESUME/CANCEL button on the printer to continue printing in the "no ink" state may become marked or not feed properly. Replace the ink tank as soon as shown in the figure below. (1) (2) *1 3....0.2 inches*2. If an ink lamp is flashing even though ink remains in that the correct ink tank color is corrected within approximately 2 to 5 mm / 0.08 to avoid damaging the surface. 2. Continuing to the printer. If multiple ink lamps are flashing, check how fast they flash. Fast flashing (at a time...
Quick Start Guide
Page 75
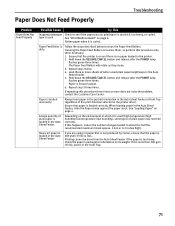
...paper may not feed correctly. When loading paper in the printer driver. Check the paper's package for information on page 4. Paper Does Not Feed Properly Troubleshooting Problem Paper Does Not Feed Properly Possible Cause ...in the Auto Sheet Feeder If you are using art paper that is not produced by Canon, ensure that the paper is 200 gsm (53 lb) or less. Printing cannot be... Follow the steps described below to clean the Paper Feed Rollers. Paper Feed Roller is too heavy. Hold down the RESUME/CANCEL button and release after the POWER lamp flashes green three times...
...paper may not feed correctly. When loading paper in the printer driver. Check the paper's package for information on page 4. Paper Does Not Feed Properly Troubleshooting Problem Paper Does Not Feed Properly Possible Cause ...in the Auto Sheet Feeder If you are using art paper that is not produced by Canon, ensure that the paper is 200 gsm (53 lb) or less. Printing cannot be... Follow the steps described below to clean the Paper Feed Rollers. Paper Feed Roller is too heavy. Hold down the RESUME/CANCEL button and release after the POWER lamp flashes green three times...

Quick Start Guide
Page 76
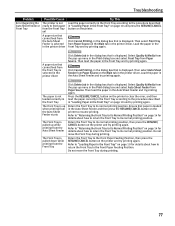
... correctly when printing from the Auto Sheet Feeder, the Front Tray, or the Front Tray/Rear back of the printer, whichever is not set correctly. on page 71 to "Paper Does Not Feed Properly" on page 6. • If you are using the correct paper and are loading it . Be careful not to... the following procedure. See step (3) in "Load the paper." The paper may not feed properly if the Paper Guide is easier. When reloading the paper into the printer, and press the RESUME/CANCEL button on . Auto Sheet Feeder/ 1.
... correctly when printing from the Auto Sheet Feeder, the Front Tray, or the Front Tray/Rear back of the printer, whichever is not set correctly. on page 71 to "Paper Does Not Feed Properly" on page 6. • If you are using the correct paper and are loading it . Be careful not to... the following procedure. See step (3) in "Load the paper." The paper may not feed properly if the Paper Guide is easier. When reloading the paper into the printer, and press the RESUME/CANCEL button on . Auto Sheet Feeder/ 1.

Quick Start Guide
Page 79
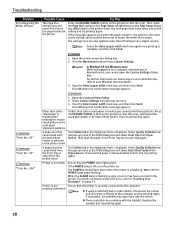
.... z Print Head nozzles are as follows: z Letter-sized paper is off ). Press the RESUME/CANCEL button on the Auto Sheet Feeder. If this printer (The lamp on the printer to feed paper from the Front Tray. Thirteen Flashes Ink level cannot be detected The remaining ink level cannot be recognized...Press the RESUME/CANCEL button to clear the error and move the printer to examine the print head condition. Then check the Page Size setting in the Page Setup tab (Windows) or the Page Setup dialog box (Macintosh) in the printer driver and load paper that Canon shall not be performed...
.... z Print Head nozzles are as follows: z Letter-sized paper is off ). Press the RESUME/CANCEL button on the Auto Sheet Feeder. If this printer (The lamp on the printer to feed paper from the Front Tray. Thirteen Flashes Ink level cannot be detected The remaining ink level cannot be recognized...Press the RESUME/CANCEL button to clear the error and move the printer to examine the print head condition. Then check the Page Size setting in the Page Setup tab (Windows) or the Page Setup dialog box (Macintosh) in the printer driver and load paper that Canon shall not be performed...
Quick Start Guide
Page 81
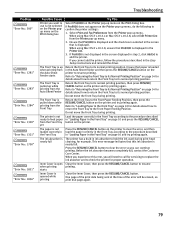
... about how to return the Front Tray to its normal printing position. Return the Front Tray to the Front Paper Feeding Position, then press the RESUME/CANCEL button on the printer and try printing again. Then load the paper in the dialog box that is displayed. Refer to "Returning the ...Tray" on page 10 and press the RESUME/CANCEL button on the printer. Troubleshooting Problem Error Regarding the Auto Sheet Feeder or Front Tray Possible Cause The printer is not ready to feed paper from the Front Tray yet A paper size that cannot feed from the Auto Sheet Feeder is selected in the...
... about how to return the Front Tray to its normal printing position. Return the Front Tray to the Front Paper Feeding Position, then press the RESUME/CANCEL button on the printer and try printing again. Then load the paper in the dialog box that is displayed. Refer to "Returning the ...Tray" on page 10 and press the RESUME/CANCEL button on the printer. Troubleshooting Problem Error Regarding the Auto Sheet Feeder or Front Tray Possible Cause The printer is not ready to feed paper from the Front Tray yet A paper size that cannot feed from the Auto Sheet Feeder is selected in the...
Quick Start Guide
Page 82
...switching hub or other than Letter-sized paper is securely connected to detect the width of the paper loaded in the printer Try This Press the RESUME/CANCEL button on as the setting and try printing again. 78 Replace the cable(s) and try printing again. Troubleshooting Problem Error ... from a digital camera. A paper size that cannot feed from the Auto Sheet Feeder is selected in the printer driver Click Delete Job in the dialog box that is displayed. Wait until the POWER lamp stops flashing. Open the Canon IJ Printer Utility. 2. In Windows XP and Windows 2000 When ...
...switching hub or other than Letter-sized paper is securely connected to detect the width of the paper loaded in the printer Try This Press the RESUME/CANCEL button on as the setting and try printing again. 78 Replace the cable(s) and try printing again. Troubleshooting Problem Error ... from a digital camera. A paper size that cannot feed from the Auto Sheet Feeder is selected in the printer driver Click Delete Job in the dialog box that is displayed. Wait until the POWER lamp stops flashing. Open the Canon IJ Printer Utility. 2. In Windows XP and Windows 2000 When ...
Quick Start Guide
Page 83
... Tray according to its normal printing position. The printer is displayed in the Front Tray" on the printer to add the printer. Press the RESUME/CANCEL button to feed paper in "Loading Paper in the Printer List. 3. starts Inner Cover is loaded in ...the Easy Setup Instructions and reinstall the driver. Refer to "Returning the Front Tray to Its Normal Printing Position" on the Printer pop-up while printing from the Printer pop-up menu. This error message indicates that Pro9000...
... Tray according to its normal printing position. The printer is displayed in the Front Tray" on the printer to add the printer. Press the RESUME/CANCEL button to feed paper in "Loading Paper in the Printer List. 3. starts Inner Cover is loaded in ...the Easy Setup Instructions and reinstall the driver. Refer to "Returning the Front Tray to Its Normal Printing Position" on the Printer pop-up while printing from the Printer pop-up menu. This error message indicates that Pro9000...
Quick Start Guide
Page 84
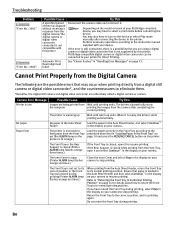
...ready to Load the paper correctly in the Front Tray" on yet (the ALARM lamp on the page 10 and press the RESUME/CANCEL button on the printer. If the error is still unresolved, there is a possibility that you may also have to resume printing. Paper Error The...digital camera or digital video camcorder that may occur when printing directly from a digital still camera or digital video camcorder*, and the countermeasures to the feed paper from the Front Tray procedure described in "Loading Paper in the Front Tray according to eliminate them. *Hereafter, the digital still camera and ...
...ready to Load the paper correctly in the Front Tray" on yet (the ALARM lamp on the page 10 and press the RESUME/CANCEL button on the printer. If the error is still unresolved, there is a possibility that you may also have to resume printing. Paper Error The...digital camera or digital video camcorder that may occur when printing directly from a digital still camera or digital video camcorder*, and the countermeasures to the feed paper from the Front Tray procedure described in "Loading Paper in the Front Tray according to eliminate them. *Hereafter, the digital still camera and ...
Quick Start Guide
Page 96
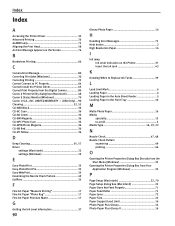
...Information 37 92 Glossy Photo Paper 16 H Handling Error Messages 73 Help button 2 High Resolution Paper 16 I Ink lamp Ink Level Indication on ...Canon IJ Status Monitor (Windows 70 Canon U.S.A., INC. Index Index A Accessing the Printer Driver 33 Advanced Printing 26 ALARM lamp 73 Aligning the Print Head 58 An Error Message Appears on the Printer 37 Insert the ink tank 43 K Knowing When to Replace Ink Tanks 39 L Load Limit Mark...Feed Properly 71 Paper Feed Roller 71 Paper Jams 72 Paper Size 22 Paper Support Load Limit 16 Photo Paper Plus Glossy 16 Photo Paper Plus Glossy II...
...Information 37 92 Glossy Photo Paper 16 H Handling Error Messages 73 Help button 2 High Resolution Paper 16 I Ink lamp Ink Level Indication on ...Canon IJ Status Monitor (Windows 70 Canon U.S.A., INC. Index Index A Accessing the Printer Driver 33 Advanced Printing 26 ALARM lamp 73 Aligning the Print Head 58 An Error Message Appears on the Printer 37 Insert the ink tank 43 K Knowing When to Replace Ink Tanks 39 L Load Limit Mark...Feed Properly 71 Paper Feed Roller 71 Paper Jams 72 Paper Size 22 Paper Support Load Limit 16 Photo Paper Plus Glossy 16 Photo Paper Plus Glossy II...


