
User Guide
Page 4
... (7) AV OUT (Audio/video output) / DIGITAL terminal (8) HDMITM terminal (9) [ (Playback)] button (10) Indicator (11) [ (Drive mode)] button (12) [ ] button (13) [ (ISO speed)] / Up button (14) [ (Manual focus)] / [ (Macro)] / Left button (15) FUNC./SET button (16) [ (Flash)] / Right button (17) [ (Display)] / Down button Before Use Basic Guide Advanced Guide 1 Camera Basics 2 Auto...
... (7) AV OUT (Audio/video output) / DIGITAL terminal (8) HDMITM terminal (9) [ (Playback)] button (10) Indicator (11) [ (Drive mode)] button (12) [ ] button (13) [ (ISO speed)] / Up button (14) [ (Manual focus)] / [ (Macro)] / Left button (15) FUNC./SET button (16) [ (Flash)] / Right button (17) [ (Display)] / Down button Before Use Basic Guide Advanced Guide 1 Camera Basics 2 Auto...
User Guide
Page 6
Seek 36 Easily Composing Shots after Manual Zooming (Framing Assist - Lock 36 Before Use Basic Guide Advanced Guide 1 Camera Basics 2 Auto Mode / Hybrid Auto Mode 3 Other Shooting Modes 4 P Mode 5 Tv, Av, and M ... 33 Image Stabilization Icons 34 On-Screen Frames 34 Common, Convenient Features 35 Zooming In Closer on Subjects (Digital Zoom 35 Easily Reacquiring Subjects after Manual Zooming (Framing Assist - Menu 26 Using the Menu Screen 27 Indicator Display 28 Clock 28 2 Auto Mode / Hybrid Auto Mode 29 Shooting with Camera-Determined...
Seek 36 Easily Composing Shots after Manual Zooming (Framing Assist - Lock 36 Before Use Basic Guide Advanced Guide 1 Camera Basics 2 Auto Mode / Hybrid Auto Mode 3 Other Shooting Modes 4 P Mode 5 Tv, Av, and M ... 33 Image Stabilization Icons 34 On-Screen Frames 34 Common, Convenient Features 35 Zooming In Closer on Subjects (Digital Zoom 35 Easily Reacquiring Subjects after Manual Zooming (Framing Assist - Menu 26 Using the Menu Screen 27 Indicator Display 28 Clock 28 2 Auto Mode / Hybrid Auto Mode 29 Shooting with Camera-Determined...

User Guide
Page 8
Shooting Range and Focusing 63 Shooting Close-Ups (Macro 63 Shooting in Manual Focus Mode 63 Digital Tele-Converter 64 Changing the AF Frame Mode 65 Center 65 Face AiAF 65 Choosing Subjects to Focus On (Tracking AF ...
Shooting Range and Focusing 63 Shooting Close-Ups (Macro 63 Shooting in Manual Focus Mode 63 Digital Tele-Converter 64 Changing the AF Frame Mode 65 Center 65 Face AiAF 65 Choosing Subjects to Focus On (Tracking AF ...
User Guide
Page 9
... Camera with Household Power 105 Using a Lens Hood (Sold Separately 106 Using Lens Filters (Sold Separately 106 Using the Software 107 Software 107 Software Instruction Manual 107 Checking Your Computer Environment 108 Installing the Software 108 Saving Images to a Computer 109 Printing Images 110 Easy Print 110 Configuring Print Settings 111...
... Camera with Household Power 105 Using a Lens Hood (Sold Separately 106 Using Lens Filters (Sold Separately 106 Using the Software 107 Software 107 Software Instruction Manual 107 Checking Your Computer Environment 108 Installing the Software 108 Saving Images to a Computer 109 Printing Images 110 Easy Print 110 Configuring Print Settings 111...

User Guide
Page 24
... off after a specific period of inactivity. Power-Saving Features (Auto Power Down) As a way to focus.) ●●Press the shutter button halfway. In this manual, shutter button operations are in Playback Mode The camera turns itself off automatically after about two more minutes, the lens is still out, press the...
... off after a specific period of inactivity. Power-Saving Features (Auto Power Down) As a way to focus.) ●●Press the shutter button halfway. In this manual, shutter button operations are in Playback Mode The camera turns itself off automatically after about two more minutes, the lens is still out, press the...

User Guide
Page 36
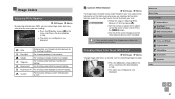
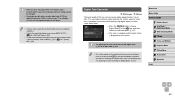
... zoom factor that the camera reverts to shoot at the zoom factor of a subject while zoomed in self-timer mode (= 39). Easily Composing Shots after Manual Zooming (Framing Assist - Lock) Still Images Movies You can reduce camera shake at the telephoto end, which makes it easier to compose shots. 1 Compensate camera... is now restored, so that a changed zoom factor and camera operating sounds are recorded. ●● If you press the [ ] button. Easily Reacquiring Subjects after Manual Zooming (Framing Assist -
... zoom factor that the camera reverts to shoot at the zoom factor of a subject while zoomed in self-timer mode (= 39). Easily Composing Shots after Manual Zooming (Framing Assist - Lock) Still Images Movies You can reduce camera shake at the telephoto end, which makes it easier to compose shots. 1 Compensate camera... is now restored, so that a changed zoom factor and camera operating sounds are recorded. ●● If you press the [ ] button. Easily Reacquiring Subjects after Manual Zooming (Framing Assist -

User Guide
Page 37
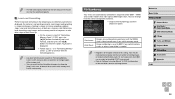
●● The zoom factor cannot be adjusted by moving the zoom lever. Face Upper Body Whole Body Manual Keep faces large enough to show the person's upper body. Release the zoom lever once the desired size has been obtained. If this case, [ ] is ...
●● The zoom factor cannot be adjusted by moving the zoom lever. Face Upper Body Whole Body Manual Keep faces large enough to show the person's upper body. Release the zoom lever once the desired size has been obtained. If this case, [ ] is ...
User Guide
Page 61
... shooting outdoors in the menu, and choose the desired option (=26). ●●The option you are shooting. For shooting under white fluorescent lighting. For manually setting a custom white balance (= 61). Press the [ ] button. ●●The tint of the screen changes once the white balance data has been recorded. ●...
... shooting outdoors in the menu, and choose the desired option (=26). ●●The option you are shooting. For shooting under white fluorescent lighting. For manually setting a custom white balance (= 61). Press the [ ] button. ●●The tint of the screen changes once the white balance data has been recorded. ●...

User Guide
Page 63
...;●Press the [ ] button, press the [ ][ ] buttons to choose [ ], and then press the [ ] button. ●●Once the setting is complete, [ ] is not possible in Manual Focus Mode Still Images Movies When focusing is displayed. ●● If the flash fires, vignetting may occur. ●● Be careful to avoid damaging... then press the shutter button halfway to have the camera determine the optimal focal position near the position you specified. Shooting in AF mode, use manual focus.
...;●Press the [ ] button, press the [ ][ ] buttons to choose [ ], and then press the [ ] button. ●●Once the setting is complete, [ ] is not possible in Manual Focus Mode Still Images Movies When focusing is displayed. ●● If the flash fires, vignetting may occur. ●● Be careful to avoid damaging... then press the shutter button halfway to have the camera determine the optimal focal position near the position you specified. Shooting in AF mode, use manual focus.
User Guide
Page 64
...). ●● The shutter speed may be equivalent when you move the zoom lever all the way toward [ ] for maximum telephoto, and when you focus manually, the AF frame mode (=65) is [Center] and AF frame size is [Normal], and these settings cannot be changed. ●● Focusing is pressed halfway...
...). ●● The shutter speed may be equivalent when you move the zoom lever all the way toward [ ] for maximum telephoto, and when you focus manually, the AF frame mode (=65) is [Center] and AF frame size is [Normal], and these settings cannot be changed. ●● Focusing is pressed halfway...

User Guide
Page 65
...;● No AF frames are displayed if the camera cannot focus when you use the digital zoom (=35) or digital tele-converter (=64), and in manual focus mode (=63). ●● To compose shots so that cannot be the main subject, and up to two gray frames are displayed around other...
...;● No AF frames are displayed if the camera cannot focus when you use the digital zoom (=35) or digital tele-converter (=64), and in manual focus mode (=63). ●● To compose shots so that cannot be the main subject, and up to two gray frames are displayed around other...

User Guide
Page 73
...Images Choose from the three flash levels in [ ] or [ ] mode by accessing MENU (=27) and choosing [ ] tab > [Flash Settings] > [Flash Mode] > [Manual]. ●● You can set the flash level by accessing MENU (=27) and choosing [ ] tab > [Flash Settings] > [Flash Output]. ●● You can also...some settings. ●● With shutter speeds of 1.3 seconds or slower, ISO speed is [ ] and cannot be changed. ●● [ ]: Manual ●● Calculation of standard exposure is up and the mode is set to [ ]. ●● To have the setting you set the shutter speed...
...Images Choose from the three flash levels in [ ] or [ ] mode by accessing MENU (=27) and choosing [ ] tab > [Flash Settings] > [Flash Mode] > [Manual]. ●● You can set the flash level by accessing MENU (=27) and choosing [ ] tab > [Flash Settings] > [Flash Output]. ●● You can also...some settings. ●● With shutter speeds of 1.3 seconds or slower, ISO speed is [ ] and cannot be changed. ●● [ ]: Manual ●● Calculation of standard exposure is up and the mode is set to [ ]. ●● To have the setting you set the shutter speed...

User Guide
Page 95
... can deactivate this information. ●●Choose [Hints & Tips], and then choose [Off]. This convenient feature eliminates the need to change the Date/Time setting manually. Before using the world clock, be sure to set the date and time and your [ Home] time and date. Before Use Basic Guide Advanced Guide...
... can deactivate this information. ●●Choose [Hints & Tips], and then choose [Off]. This convenient feature eliminates the need to change the Date/Time setting manually. Before using the world clock, be sure to set the date and time and your [ Home] time and date. Before Use Basic Guide Advanced Guide...
User Guide
Page 98
...;Follow steps 2 - 3 in step 2 of "Formatting Memory Cards" (=97), press the [ ][ ] buttons to choose [Low Level Format], and then press the [ ][ ] buttons to "Software Instruction Manual" (= 107) for information on a memory card. To start saving shots from all storage regions of the memory card. ●● You can cancel low-level...
...;Follow steps 2 - 3 in step 2 of "Formatting Memory Cards" (=97), press the [ ][ ] buttons to choose [Low Level Format], and then press the [ ][ ] buttons to "Software Instruction Manual" (= 107) for information on a memory card. To start saving shots from all storage regions of the memory card. ●● You can cancel low-level...
User Guide
Page 103
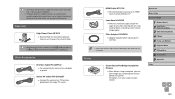
... by connecting the camera directly to a printer. Stereo AV Cable AVC-DC400ST ●●Connect the camera to a TV to a computer or printer. Printer Canon-Brand PictBridge-Compatible Printers ●●Even without using a computer, you can be used in areas with 100 - 240 V AC power (50/60 Hz).... ●● For power outlets in [ ] or [ ] mode when [Flash Mode] is set to [Manual]. Other Accessories Interface Cable IFC-400PCU ●●For connecting the camera to enjoy playback on the larger TV screen. Lens Hood LH-DC60 ●...
... by connecting the camera directly to a printer. Stereo AV Cable AVC-DC400ST ●●Connect the camera to a TV to a computer or printer. Printer Canon-Brand PictBridge-Compatible Printers ●●Even without using a computer, you can be used in areas with 100 - 240 V AC power (50/60 Hz).... ●● For power outlets in [ ] or [ ] mode when [Flash Mode] is set to [Manual]. Other Accessories Interface Cable IFC-400PCU ●●For connecting the camera to enjoy playback on the larger TV screen. Lens Hood LH-DC60 ●...

User Guide
Page 104
... as you control the camera. 1 Make sure the camera and TV are not played while the camera is connected to a TV, you to the TV manual. ●● Some information may not be viewed in high definition. 1 Make sure the camera and TV are off . For details on connection or how...
... as you control the camera. 1 Make sure the camera and TV are not played while the camera is connected to a TV, you to the TV manual. ●● Some information may not be viewed in high definition. 1 Make sure the camera and TV are off . For details on connection or how...

User Guide
Page 107
...following things on your computer. ●● CameraWindow -- ●● We recommend the use of genuine Canon filters (67 mm dia.). ●● When not using auto focus to shoot, set the manual focus option [Safety MF] to [On]. ●● If you can be accessed from the help... system of the image may cause the attachments to the instruction manual when using the software. Software After downloading the software from the Canon website is required, and any ISP account charges and access fees must be attached to the camera at ...
...following things on your computer. ●● CameraWindow -- ●● We recommend the use of genuine Canon filters (67 mm dia.). ●● When not using auto focus to shoot, set the manual focus option [Safety MF] to [On]. ●● If you can be accessed from the help... system of the image may cause the attachments to the instruction manual when using the software. Software After downloading the software from the Canon website is required, and any ISP account charges and access fees must be attached to the camera at ...
User Guide
Page 109
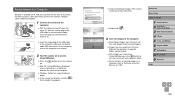
... system of the relevant software (some software excluded). (2) (1) 1 Connect the camera to "Software Instruction Manual" (= 107). For details about USB connections on the computer, refer to the computer user manual. 2 Turn the camera on to access CameraWindow. ●●Press the [ ] button to turn ...introduced below. ●●In the screen that displays, click the [ ] link to modify the program. ●●Choose [Downloads Images From Canon Camera] and then click [OK]. ●●Double-click [ ]. 3 Save the images to the computer. ●●Click [Import Images from...
... system of the relevant software (some software excluded). (2) (1) 1 Connect the camera to "Software Instruction Manual" (= 107). For details about USB connections on the computer, refer to the computer user manual. 2 Turn the camera on to access CameraWindow. ●●Press the [ ] button to turn ...introduced below. ●●In the screen that displays, click the [ ] link to modify the program. ●●Choose [Downloads Images From Canon Camera] and then click [OK]. ●●Double-click [ ]. 3 Save the images to the computer. ●●Click [Import Images from...
User Guide
Page 110
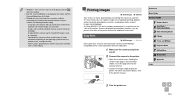
...camera to the computer until camera images are off. 2 Connect the camera to the printer. ●●Open the terminal cover. A Canon SELPHY CP series compact photo printer is not displayed after you can easily be saved in horizontal orientation. -- Image protection settings may be ... in the orientation shown, insert the plug fully into the camera terminal. ●●Connect the larger cable plug to the printer manual for additional information. It may occur when saving images or image information, depending on . 110 Printing Images Still Images Movies Your shots...
...camera to the computer until camera images are off. 2 Connect the camera to the printer. ●●Open the terminal cover. A Canon SELPHY CP series compact photo printer is not displayed after you can easily be saved in horizontal orientation. -- Image protection settings may be ... in the orientation shown, insert the plug fully into the camera terminal. ●●Connect the larger cable plug to the printer manual for additional information. It may occur when saving images or image information, depending on . 110 Printing Images Still Images Movies Your shots...

User Guide
Page 116
... warn you will select images. ●● [ ] may overwrite all previous settings. ●● After importing images to your computer, also refer to "Software Instruction Manual" (= 107) and the printer manual for further information.
... warn you will select images. ●● [ ] may overwrite all previous settings. ●● After importing images to your computer, also refer to "Software Instruction Manual" (= 107) and the printer manual for further information.

