User Manual
Page 3
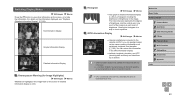
... Information ●● Take and review some pixels may be for personal use. This does not indicate damage. Also, the numbers in parenthesis indicates the numbers of an image to be recorded or to as red or black dots. Please note that Canon Inc., its subsidiaries and affiliates, ...may become warm. This does not indicate damage. In case of camera problems while abroad, return to the area of purchase before contacting a Canon Customer Support Help Desk. ●● Although the screen is used to represent the corresponding camera buttons on which they appear, or which ...
... Information ●● Take and review some pixels may be for personal use. This does not indicate damage. Also, the numbers in parenthesis indicates the numbers of an image to be recorded or to as red or black dots. Please note that Canon Inc., its subsidiaries and affiliates, ...may become warm. This does not indicate damage. In case of camera problems while abroad, return to the area of purchase before contacting a Canon Customer Support Help Desk. ●● Although the screen is used to represent the corresponding camera buttons on which they appear, or which ...
User Manual
Page 40
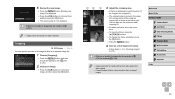
... Mode 3 Other Shooting Modes 4 P Mode 5 Playback Mode 6 Wi-Fi Functions 7 Setting Menu 8 Accessories 9 Appendix Index 40 Hold Off 1 Access the [Review image after shooting] screen. ●●Press the [ ] button, choose [Review image after shooting. Changing the Image Display Style after Shots Still Images Movies You can shoot again. Displays images until...
... Mode 3 Other Shooting Modes 4 P Mode 5 Playback Mode 6 Wi-Fi Functions 7 Setting Menu 8 Accessories 9 Appendix Index 40 Hold Off 1 Access the [Review image after shooting] screen. ●●Press the [ ] button, choose [Review image after shooting. Changing the Image Display Style after Shots Still Images Movies You can shoot again. Displays images until...
User Manual
Page 61
... Advanced Guide 1 Camera Basics 2 Auto Mode 3 Other Shooting Modes 4 P Mode 5 Playback Mode 6 Wi-Fi Functions 7 Setting Menu 8 Accessories 9 Appendix Index 61 5 Playback Mode Have fun reviewing your shots, and browse or edit them on a computer, or images from other cameras.
... Advanced Guide 1 Camera Basics 2 Auto Mode 3 Other Shooting Modes 4 P Mode 5 Playback Mode 6 Wi-Fi Functions 7 Setting Menu 8 Accessories 9 Appendix Index 61 5 Playback Mode Have fun reviewing your shots, and browse or edit them on a computer, or images from other cameras.
User Manual
Page 63
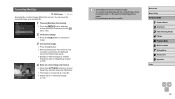
... Switching Display Modes Still Images Movies Press the [ ] button to view other information on the screen, or to the camera via Wi-Fi, you can review this information. No Information Display Simple Information Display Detailed Information Display Overexposure Warning (for images that lack this information in the GPS information display. ●...
... Switching Display Modes Still Images Movies Press the [ ] button to view other information on the screen, or to the camera via Wi-Fi, you can review this information. No Information Display Simple Information Display Detailed Information Display Overexposure Warning (for images that lack this information in the GPS information display. ●...
User Manual
Page 74
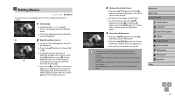
... buttons. ●●To change the frame orientation, press the [ ] button. ●●Press the [ ] button. 4 Save as a new image and review. ●●Follow steps 4 - 5 in "Resizing Images" (= 73). ●● Editing is not possible for images shot at a resolution of [ ...a lower resolution than uncropped images. You can specify a portion of [ ] (= 37). ●● Images cannot be resized to a higher resolution. 5 Review the new image. ●●Press the [ ] button. [Display new image?] is displayed. ●●Press the [ ][ ] buttons to choose [Yes...
... buttons. ●●To change the frame orientation, press the [ ] button. ●●Press the [ ] button. 4 Save as a new image and review. ●●Follow steps 4 - 5 in "Resizing Images" (= 73). ●● Editing is not possible for images shot at a resolution of [ ...a lower resolution than uncropped images. You can specify a portion of [ ] (= 37). ●● Images cannot be resized to a higher resolution. 5 Review the new image. ●●Press the [ ] button. [Display new image?] is displayed. ●●Press the [ ][ ] buttons to choose [Yes...

User Manual
Page 75
...3 Choose an option. ●●Press the [ ][ ] buttons to choose an option, and then press the [ ] button. 4 Save as a new image and review. ●●Follow steps 4 - 5 in "Resizing Images" (= 73). ●● Image quality of pictures you repeatedly edit this way will be a little lower ... The color of images shot using this function may vary slightly from four correction levels, and then save the edited image as a new image and review. ●●Follow steps 4 - 5 in "Resizing Images" (= 73). ●● For some images, correction may be detected and automatically...
...3 Choose an option. ●●Press the [ ][ ] buttons to choose an option, and then press the [ ] button. 4 Save as a new image and review. ●●Follow steps 4 - 5 in "Resizing Images" (= 73). ●● Image quality of pictures you repeatedly edit this way will be a little lower ... The color of images shot using this function may vary slightly from four correction levels, and then save the edited image as a new image and review. ●●Follow steps 4 - 5 in "Resizing Images" (= 73). ●● For some images, correction may be detected and automatically...
User Manual
Page 76
.... ●●The image is now corrected, and frames are displayed around corrected image areas. ●●Enlarge or reduce images as a new image and review. ●●Press the buttons to choose an image. 3 Correct the image. ●●Press the [ ] button. ●●Red-eye detected by red-eye...
.... ●●The image is now corrected, and frames are displayed around corrected image areas. ●●Enlarge or reduce images as a new image and review. ●●Press the buttons to choose an image. 3 Correct the image. ●●Press the [ ] button. ●●Red-eye detected by red-eye...
User Manual
Page 77
...;● To overwrite the original movie with the cut one, choose [Overwrite] in [ ] the portion after the nearest [ ] mark on the left will be cut. 3 Review the edited movie. ●●Press the [ ][ ] buttons to a position other than a [ ] mark, in [ ] the portion before the nearest [ ] mark on the right will be...
...;● To overwrite the original movie with the cut one, choose [Overwrite] in [ ] the portion after the nearest [ ] mark on the left will be cut. 3 Review the edited movie. ●●Press the [ ][ ] buttons to a position other than a [ ] mark, in [ ] the portion before the nearest [ ] mark on the right will be...

User Manual
Page 138
... OOOOOOOOOOOOOO OOOOOOOOOOOOOO - OOOOOOOOOOOOO OOOOOOO - Shooting Mode Function AF-assist Beam (=39) On Off Flash Settings (=40) Red-Eye Lamp On/Off i-Contrast (=51) Auto Off Review Image after Shooting (=40) Display Time Off/Quick/2 sec./4 sec./ 8 sec./Hold Display Info Off/Detailed Grid Lines (=38) On/Off IS Settings (=59) IS...
... OOOOOOOOOOOOOO OOOOOOOOOOOOOO - OOOOOOOOOOOOO OOOOOOO - Shooting Mode Function AF-assist Beam (=39) On Off Flash Settings (=40) Red-Eye Lamp On/Off i-Contrast (=51) Auto Off Review Image after Shooting (=40) Display Time Off/Quick/2 sec./4 sec./ 8 sec./Hold Display Info Off/Detailed Grid Lines (=38) On/Off IS Settings (=59) IS...
