
PowerShot SX260 HS / SX240 HS Getting Started
Page 1
Getting Started Please refer to the complete user guide included on the CD-ROM for more detailed information. • Before use, be sure to read this guide, including the safety precautions. • This guide will familiarize you with how to use the camera correctly. • Keep the guide handy for future reference. ENGLISH
Getting Started Please refer to the complete user guide included on the CD-ROM for more detailed information. • Before use, be sure to read this guide, including the safety precautions. • This guide will familiarize you with how to use the camera correctly. • Keep the guide handy for future reference. ENGLISH
PowerShot SX260 HS / SX240 HS Getting Started
Page 2
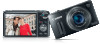
... NB-6L (with the camera. 2 Warranty Card About Getting Started (This Guide) and the PDF Manuals To master more advanced operations and use , make sure the ...to work with terminal cover) Battery Charger CB-2LY/CB-2LYE Interface Cable IFC-400PCU Wrist Strap WS-DC11 Getting Started (This Guide) DIGITAL CAMERA Solution Disk • A memory card is not included (see below). If anything is required to view the PDF manuals. Compatible Memory Cards...use the included software, refer to the PDF manuals on the CD-ROM (p. 22). • Adobe Reader is missing, contact your camera dealer.
... NB-6L (with the camera. 2 Warranty Card About Getting Started (This Guide) and the PDF Manuals To master more advanced operations and use , make sure the ...to work with terminal cover) Battery Charger CB-2LY/CB-2LYE Interface Cable IFC-400PCU Wrist Strap WS-DC11 Getting Started (This Guide) DIGITAL CAMERA Solution Disk • A memory card is not included (see below). If anything is required to view the PDF manuals. Compatible Memory Cards...use the included software, refer to the PDF manuals on the CD-ROM (p. 22). • Adobe Reader is missing, contact your camera dealer.

PowerShot SX260 HS / SX240 HS Getting Started
Page 3
Please note that Canon Inc., its subsidiaries and affiliates, and its distributors are not liable for protection against scratches during shipment. This does not indicate camera damage or affect recorded images. • The LCD monitor may be defective or may become warm. In case of an issue with an ...version of the card is required to make sure the images were recorded correctly. This does not indicate damage. 3 Refrain from any malfunction of a camera or accessory, including memory cards, that results in the failure of an image to be recorded or to be recorded in a way that is ...
Please note that Canon Inc., its subsidiaries and affiliates, and its distributors are not liable for protection against scratches during shipment. This does not indicate camera damage or affect recorded images. • The LCD monitor may be defective or may become warm. In case of an issue with an ...version of the card is required to make sure the images were recorded correctly. This does not indicate damage. 3 Refrain from any malfunction of a camera or accessory, including memory cards, that results in the failure of an image to be recorded or to be recorded in a way that is ...
PowerShot SX260 HS / SX240 HS Getting Started
Page 4
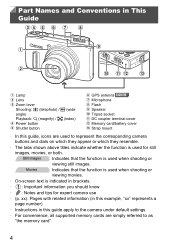
...) Playback: k (magnify) / g (index) Power button Shutter button GPS antenna SX260 HS Microphone Flash Speaker Tripod socket DC coupler terminal cover Memory card/battery cover Strap mount • In this guide apply to the camera under default settings. • For convenience, all supported memory cards are used when ...or both. Movies : Indicates that the function is indicated in this guide, icons are simply referred to represent the corresponding camera buttons and dials on which they appear or which they resemble. • The tabs shown above titles indicate whether the ...
...) Playback: k (magnify) / g (index) Power button Shutter button GPS antenna SX260 HS Microphone Flash Speaker Tripod socket DC coupler terminal cover Memory card/battery cover Strap mount • In this guide apply to the camera under default settings. • For convenience, all supported memory cards are used when ...or both. Movies : Indicates that the function is indicated in this guide, icons are simply referred to represent the corresponding camera buttons and dials on which they appear or which they resemble. • The tabs shown above titles indicate whether the ...
PowerShot SX260 HS / SX240 HS Getting Started
Page 5
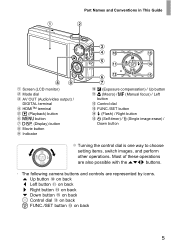
... on back 5 Control dial on back m FUNC./SET button on back 5 Most of these operations are also possible with the opqr buttons. • The following camera buttons and controls are represented by icons.
... on back 5 Control dial on back m FUNC./SET button on back 5 Most of these operations are also possible with the opqr buttons. • The following camera buttons and controls are represented by icons.
PowerShot SX260 HS / SX240 HS Getting Started
Page 6
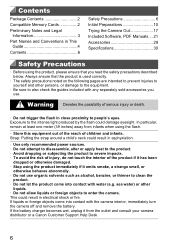
In particular, remain at least one meter (39 inches) away from the outlet and consult your camera distributor or a Canon Customer Support Help Desk. 6 If liquids or foreign objects come into contact with water (e.g. If the battery charger becomes wet,...Cards 2 Preliminary Notes and Legal Information 3 Part Names and Conventions in This Guide 4 Contents 6 Safety Precautions 6 Initial Preparations 10 Trying the Camera Out 17 Included Software, PDF Manuals.... 21 Accessories 28 Specifications 30 Safety Precautions • Before using the flash. • Store this equipment out...
In particular, remain at least one meter (39 inches) away from the outlet and consult your camera distributor or a Canon Customer Support Help Desk. 6 If liquids or foreign objects come into contact with water (e.g. If the battery charger becomes wet,...Cards 2 Preliminary Notes and Legal Information 3 Part Names and Conventions in This Guide 4 Contents 6 Safety Precautions 6 Initial Preparations 10 Trying the Camera Out 17 Included Software, PDF Manuals.... 21 Accessories 28 Specifications 30 Safety Precautions • Before using the flash. • Store this equipment out...
PowerShot SX260 HS / SX240 HS Getting Started
Page 7
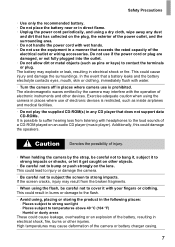
...where use is prohibited. This could cause injury and damage the surroundings. Places subject to strong sunlight - This could lead to injury or damage the camera. • Be careful not to subject the screen to strong impacts. Places subject to temperatures above 40 °C (104 °F) - Additionally,...• Be careful not to bump or push strongly on the lens. Caution Denotes the possibility of injury. • When holding the camera by the camera may result from listening with headphones to the loud sounds of a CD-ROM played on an audio CD player (music player). This could...
...where use is prohibited. This could cause injury and damage the surroundings. Places subject to strong sunlight - This could lead to injury or damage the camera. • Be careful not to subject the screen to strong impacts. Places subject to temperatures above 40 °C (104 °F) - Additionally,...• Be careful not to bump or push strongly on the lens. Caution Denotes the possibility of injury. • When holding the camera by the camera may result from listening with headphones to the loud sounds of a CD-ROM played on an audio CD player (music player). This could...
PowerShot SX260 HS / SX240 HS Getting Started
Page 8
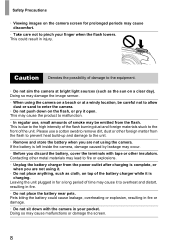
...prolonged periods may cause discomfort. • Take care not to pinch your pocket. Doing so may damage the image sensor. • When using the camera on a beach or at bright light sources (such as cloth, on top of the battery charger while it is charging. Pets biting the battery ... unit. • Remove and store the battery when you discard the battery, cover the terminals with the camera in your finger when the flash lowers. Safety Precautions • Viewing images on the camera screen for a long period of time may cause it to overheat and distort, resulting in fire. •...
...prolonged periods may cause discomfort. • Take care not to pinch your pocket. Doing so may damage the image sensor. • When using the camera on a beach or at bright light sources (such as cloth, on top of the battery charger while it is charging. Pets biting the battery ... unit. • Remove and store the battery when you discard the battery, cover the terminals with the camera in your finger when the flash lowers. Safety Precautions • Viewing images on the camera screen for a long period of time may cause it to overheat and distort, resulting in fire. •...
PowerShot SX260 HS / SX240 HS Getting Started
Page 9
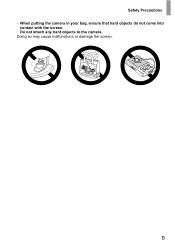
Safety Precautions • When putting the camera in your bag, ensure that hard objects do not come into contact with the screen. • Do not attach any hard objects to the camera. Doing so may cause malfunctions or damage the screen. 9
Safety Precautions • When putting the camera in your bag, ensure that hard objects do not come into contact with the screen. • Do not attach any hard objects to the camera. Doing so may cause malfunctions or damage the screen. 9
PowerShot SX260 HS / SX240 HS Getting Started
Page 10
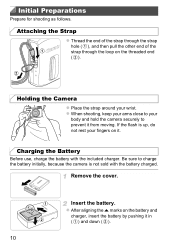
... other end of the strap through the loop on the battery and charger, insert the battery by pushing it in ( ) and down ( ). 10 Holding the Camera z Place the strap around your fingers on it from moving. z When shooting, keep your arms close to your body and hold the... camera securely to charge the battery initially, because the camera is up, do not rest your wrist. Remove the cover. Insert the battery. z After aligning the o marks on the threaded end...
... other end of the strap through the loop on the battery and charger, insert the battery by pushing it in ( ) and down ( ). 10 Holding the Camera z Place the strap around your fingers on it from moving. z When shooting, keep your arms close to your body and hold the... camera securely to charge the battery initially, because the camera is up, do not rest your wrist. Remove the cover. Insert the battery. z After aligning the o marks on the threaded end...
PowerShot SX260 HS / SX240 HS Getting Started
Page 11
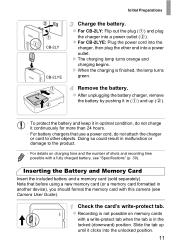
... when the tab is in optimal condition, do not attach the charger or cord to the product. • For details on memory cards with this camera (see "Specifications" (p. 30). z For CB-2LY: Flip out the plug ( ) and plug the charger into a power outlet. Remove the battery. X When... the charging is not possible on charging time and the number of shots and recording time possible with a fully charged battery, see Camera User Guide). X The charging lamp turns orange and charging begins. z After unplugging the battery charger, remove the battery by pushing it in malfunction...
... when the tab is in optimal condition, do not attach the charger or cord to the product. • For details on memory cards with this camera (see "Specifications" (p. 30). z For CB-2LY: Flip out the plug ( ) and plug the charger into a power outlet. Remove the battery. X When... the charging is not possible on charging time and the number of shots and recording time possible with a fully charged battery, see Camera User Guide). X The charging lamp turns orange and charging begins. z After unplugging the battery charger, remove the battery by pushing it in malfunction...
PowerShot SX260 HS / SX240 HS Getting Started
Page 12
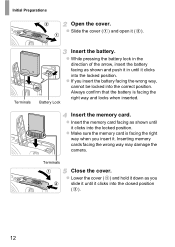
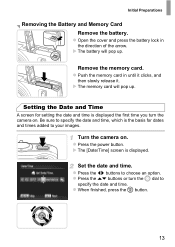
... Lock Insert the battery. Initial Preparations Open the cover. z Slide the cover ( ) and open it ( ). Inserting memory cards facing the wrong way may damage the camera.
... Lock Insert the battery. Initial Preparations Open the cover. z Slide the cover ( ) and open it ( ). Inserting memory cards facing the wrong way may damage the camera.
PowerShot SX260 HS / SX240 HS Getting Started
Page 13
... it clicks, and then slowly release it. X The memory card will pop up . z Push the memory card in the direction of the arrow. Turn the camera on . Set the date and time. z Press the qr buttons to specify the date and time. z When finished, press the m button. 13 X The battery ... up . X The [Date/Time] screen is displayed the first time you turn the 5 dial to choose an option. z Press the op buttons or turn the camera on . z Press the power button. Setting the Date and Time A screen for dates and times added to your images. Initial Preparations Removing the Battery and...
... it clicks, and then slowly release it. X The memory card will pop up . z Push the memory card in the direction of the arrow. Turn the camera on . Set the date and time. z Press the qr buttons to specify the date and time. z When finished, press the m button. 13 X The battery ... up . X The [Date/Time] screen is displayed the first time you turn the 5 dial to choose an option. z Press the op buttons or turn the camera on . z Press the power button. Setting the Date and Time A screen for dates and times added to your images. Initial Preparations Removing the Battery and...
PowerShot SX260 HS / SX240 HS Getting Started
Page 14
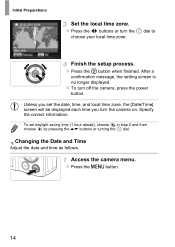
... [Date/Time] screen will be displayed each time you turn the 5 dial to choose your local time zone. Access the camera menu. z Press the m button when finished. z To turn off the camera, press the power button. • Unless you set daylight saving time (1 hour ahead), choose in step 2 and then choose by... the 5 dial. z Press the n button. 14 Changing the Date and Time Adjust the date and time as follows. z Press the qr buttons or turn the camera on. Finish the setup process. Initial Preparations Set the local time zone.
... [Date/Time] screen will be displayed each time you turn the 5 dial to choose your local time zone. Access the camera menu. z Press the m button when finished. z To turn off the camera, press the power button. • Unless you set daylight saving time (1 hour ahead), choose in step 2 and then choose by... the 5 dial. z Press the n button. 14 Changing the Date and Time Adjust the date and time as follows. z Press the qr buttons or turn the camera on. Finish the setup process. Initial Preparations Set the local time zone.
PowerShot SX260 HS / SX240 HS Getting Started
Page 15
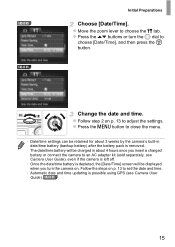
... [Date/Time] screen will be displayed when you insert a charged battery or connect the camera to choose [Date/Time], and then press the m button. Follow the steps on . Change the date and time. SX260 HS SX240 HS Initial Preparations Choose [Date/Time]. z Press the n button to close the menu. ...• Date/time settings can be retained for about 4 hours once you turn the 5 dial to an AC adapter kit (sold separately, see Camera User Guide).
... [Date/Time] screen will be displayed when you insert a charged battery or connect the camera to choose [Date/Time], and then press the m button. Follow the steps on . Change the date and time. SX260 HS SX240 HS Initial Preparations Choose [Date/Time]. z Press the n button to close the menu. ...• Date/time settings can be retained for about 4 hours once you turn the 5 dial to an AC adapter kit (sold separately, see Camera User Guide).
PowerShot SX260 HS / SX240 HS Getting Started
Page 17
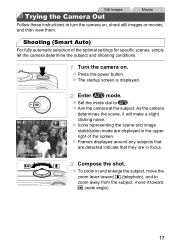
...from the subject, move it will make a slight clicking noise. Compose the shot. X The startup screen is displayed. z Aim the camera at the subject. X Frames displayed around any subjects that are detected indicate that they are displayed in the upper right of the optimal ...settings for specific scenes, simply let the camera determine the subject and shooting conditions. Still Images Trying the Camera Out Movies Follow these instructions to turn the camera on . As the camera determines the scene, it toward j (wide angle). 17 z To zoom ...
...from the subject, move it will make a slight clicking noise. Compose the shot. X The startup screen is displayed. z Aim the camera at the subject. X Frames displayed around any subjects that are detected indicate that they are displayed in the upper right of the optimal ...settings for specific scenes, simply let the camera determine the subject and shooting conditions. Still Images Trying the Camera Out Movies Follow these instructions to turn the camera on . As the camera determines the scene, it toward j (wide angle). 17 z To zoom ...
PowerShot SX260 HS / SX240 HS Getting Started
Page 18
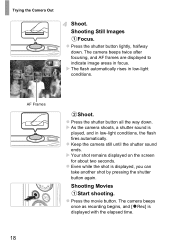
...areas in low-light conditions. AF Frames Shoot. Shooting Movies Start shooting. z Press the movie button. Shooting Still Images Focus. z Keep the camera still until the shutter sound ends. X Your shot remains displayed on the screen for about two seconds. X The flash automatically rises in focus.... X As the camera shoots, a shutter sound is displayed, you can take another shot by pressing the shutter button again. z Even while the shot is played...
...areas in low-light conditions. AF Frames Shoot. Shooting Movies Start shooting. z Press the movie button. Shooting Still Images Focus. z Keep the camera still until the shutter sound ends. X Your shot remains displayed on the screen for about two seconds. X The flash automatically rises in focus.... X As the camera shoots, a shutter sound is displayed, you can take another shot by pressing the shutter button again. z Even while the shot is played...
PowerShot SX260 HS / SX240 HS Getting Started
Page 19
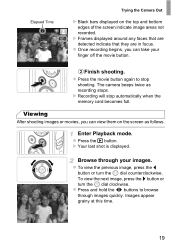
X Frames displayed around any faces that are detected indicate that they are in focus. The camera beeps twice as follows. Enter Playback mode. z To view the previous image, press the q button or turn the 5 dial clockwise. z Once recording begins, you can ... view the next image, press the r button or turn the 5 dial counterclockwise. X Recording will stop shooting. X Your last shot is displayed. Elapsed Time Trying the Camera Out X Black bars displayed on the screen as recording stops. z Press and hold the qr buttons to stop automatically when the memory card becomes full.
X Frames displayed around any faces that are detected indicate that they are in focus. The camera beeps twice as follows. Enter Playback mode. z To view the previous image, press the q button or turn the 5 dial clockwise. z Once recording begins, you can ... view the next image, press the r button or turn the 5 dial counterclockwise. X Recording will stop shooting. X Your last shot is displayed. Elapsed Time Trying the Camera Out X Black bars displayed on the screen as recording stops. z Press and hold the qr buttons to stop automatically when the memory card becomes full.

PowerShot SX260 HS / SX240 HS Getting Started
Page 20
... recovered. z To browse images grouped by shooting date, press the op buttons in Scroll Display mode. In this mode, turn the 5 dial rapidly. Trying the Camera Out z To access Scroll Display mode, turn the 5 dial to browse through images.
... recovered. z To browse images grouped by shooting date, press the op buttons in Scroll Display mode. In this mode, turn the 5 dial rapidly. Trying the Camera Out z To access Scroll Display mode, turn the 5 dial to browse through images.
PowerShot SX260 HS / SX240 HS Getting Started
Page 21
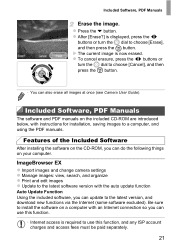
... z After [Erase?] is now erased. Included Software, PDF Manuals The software and PDF manuals on your computer. ImageBrowser EX z Import images and change camera settings z Manage images: view, search, and organize z Print and edit images z Update to use this function, and any ISP account charges and access...paid separately. 21 Features of the Included Software After installing the software on the CD-ROM, you can also erase all images at once (see Camera User Guide). Included Software, PDF Manuals Erase the image. z Press the p button. X The current image is displayed, press the qr ...
... z After [Erase?] is now erased. Included Software, PDF Manuals The software and PDF manuals on your computer. ImageBrowser EX z Import images and change camera settings z Manage images: view, search, and organize z Print and edit images z Update to use this function, and any ISP account charges and access...paid separately. 21 Features of the Included Software After installing the software on the CD-ROM, you can also erase all images at once (see Camera User Guide). Included Software, PDF Manuals Erase the image. z Press the p button. X The current image is displayed, press the qr ...


