iP5000 Quick Start Guide
Page 21
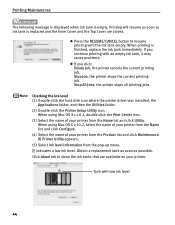
... the User's Guide or Help. To show BJ Status Monitor, click Canon PIXMA iP5000 on the printer. For a detailed description of the Paper Source settings, refer to stop printing. You can cancel a print job in progress by simply pressing the RESUME/ CANCEL button on BJ Status Monitor to "Changing the Paper Source" in the Set...
... the User's Guide or Help. To show BJ Status Monitor, click Canon PIXMA iP5000 on the printer. For a detailed description of the Paper Source settings, refer to stop printing. You can cancel a print job in progress by simply pressing the RESUME/ CANCEL button on BJ Status Monitor to "Changing the Paper Source" in the Set...

iP5000 Quick Start Guide
Page 25
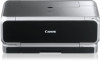
Basic Printing (1) Click Print. Canceling Printing You can cancel a print job while printing, with the RESUME/CANCEL button on the printer. 1 Press the RESUME/CANCEL button while printing. (1) Press the RESUME/CANCEL button. To cancel a job in the Printer list displays a dialog that prompts you to confirm the status of your printer in progress, select the desired...
Basic Printing (1) Click Print. Canceling Printing You can cancel a print job while printing, with the RESUME/CANCEL button on the printer. 1 Press the RESUME/CANCEL button while printing. (1) Press the RESUME/CANCEL button. To cancel a job in the Printer list displays a dialog that prompts you to confirm the status of your printer in progress, select the desired...
iP5000 Quick Start Guide
Page 27
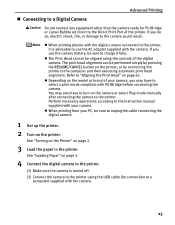
... camera, you may also have to select a print mode compliant with your PC, be aligned using the USB cable (for PictBridge or Canon Bubble Jet Direct to the Direct Print Port of the digital camera. Perform necessary operations according to the instruction manual supplied with PictBridge before...Connect the digital camera to the printer. (1) Make sure the camera is advisable to use the camera battery, be performed simply by pressing the RESUME/CANCEL button on page 61. The print head alignment can be sure to charge it is turned off. (2) Connect the camera to the printer using ...
... camera, you may also have to select a print mode compliant with your PC, be aligned using the USB cable (for PictBridge or Canon Bubble Jet Direct to the Direct Print Port of the digital camera. Perform necessary operations according to the instruction manual supplied with PictBridge before...Connect the digital camera to the printer. (1) Make sure the camera is advisable to use the camera battery, be performed simply by pressing the RESUME/CANCEL button on page 61. The print head alignment can be sure to charge it is turned off. (2) Connect the camera to the printer using ...
iP5000 Quick Start Guide
Page 47
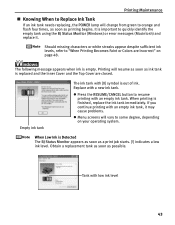
... missing characters or white streaks appear despite sufficient ink levels, refer to "When Printing Becomes Faint or Colors are closed. Printing will resume as soon as ink tank is important to quickly identify the empty tank using the BJ Status Monitor (Windows) or error messages (...printing begins. Replace with an empty ink tank. When printing is Detected The BJ Status Monitor appears as soon as possible. z Press the RESUME/CANCEL button to resume printing with a new ink tank. When Low Ink is finished, replace the ink tank immediately. Empty ink tank The ink tank with [X]...
... missing characters or white streaks appear despite sufficient ink levels, refer to "When Printing Becomes Faint or Colors are closed. Printing will resume as soon as ink tank is important to quickly identify the empty tank using the BJ Status Monitor (Windows) or error messages (...printing begins. Replace with an empty ink tank. When printing is Detected The BJ Status Monitor appears as soon as possible. z Press the RESUME/CANCEL button to resume printing with a new ink tank. When Low Ink is finished, replace the ink tank immediately. Empty ink tank The ink tank with [X]...
iP5000 Quick Start Guide
Page 48
... current printing job. Printing Maintenance The following message is displayed when ink tank is finished, replace the ink tank immediately. z Press the RESUME/CANCEL button to show the ink tanks that are closed. Stop Job, the printer stops the current printing job. Checking the ink level (1) Double-.... Tank with low ink level 44 BJ Printer Utility appears. (5) Select Ink level Information from the Product list and click Maintenance. Printing will resume as soon as possible. When using Mac OS X v.10.2, select the name of your printer from the Name list and click Configure. (4)...
... current printing job. Printing Maintenance The following message is displayed when ink tank is finished, replace the ink tank immediately. z Press the RESUME/CANCEL button to show the ink tanks that are closed. Stop Job, the printer stops the current printing job. Checking the ink level (1) Double-.... Tank with low ink level 44 BJ Printer Utility appears. (5) Select Ink level Information from the Product list and click Maintenance. Printing will resume as soon as possible. When using Mac OS X v.10.2, select the name of your printer from the Name list and click Configure. (4)...
iP5000 Quick Start Guide
Page 53
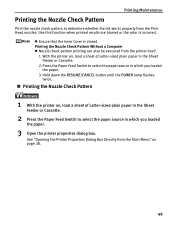
... a Computer z Nozzle check pattern printing can also be executed from the Print Head nozzles. z Ensure that the Inner Cover is incorrect. Hold down the RESUME/CANCEL button until the POWER lamp flashes twice. „ Printing the Nozzle Check Pattern 1 With the printer on page 28. 49 Use this function when printed results...
... a Computer z Nozzle check pattern printing can also be executed from the Print Head nozzles. z Ensure that the Inner Cover is incorrect. Hold down the RESUME/CANCEL button until the POWER lamp flashes twice. „ Printing the Nozzle Check Pattern 1 With the printer on page 28. 49 Use this function when printed results...
iP5000 Quick Start Guide
Page 57
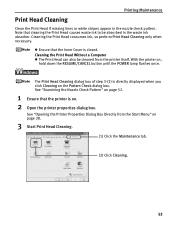
... from the printer itself. Note that cleaning the Print Head causes waste ink to be cleaned from the Start Menu" on , hold down the RESUME/CANCEL button until the POWER lamp flashes once. Printing Maintenance Print Head Cleaning Clean the Print Head if missing lines or white stripes appear in the waste...
... from the printer itself. Note that cleaning the Print Head causes waste ink to be cleaned from the Start Menu" on , hold down the RESUME/CANCEL button until the POWER lamp flashes once. Printing Maintenance Print Head Cleaning Clean the Print Head if missing lines or white stripes appear in the waste...
iP5000 Quick Start Guide
Page 65
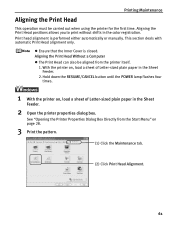
.... 3 Print the pattern. (1) Click the Maintenance tab. (2) Click Print Head Alignment. 61 This section deals with automatic Print Head alignment only. Hold down the RESUME/CANCEL button until the POWER lamp flashes four times. 1 With the printer on , load a sheet of Letter-sized plain paper in the color registration. z Ensure that the...
.... 3 Print the pattern. (1) Click the Maintenance tab. (2) Click Print Head Alignment. 61 This section deals with automatic Print Head alignment only. Hold down the RESUME/CANCEL button until the POWER lamp flashes four times. 1 With the printer on , load a sheet of Letter-sized plain paper in the color registration. z Ensure that the...
iP5000 Quick Start Guide
Page 72
... Possible Cause Paper being used is too thin Color Intensity setting is too high Try This Use High Resolution Paper, Photo Paper Pro or other Canon specialty paper to Avoid" on page 3. Open the printer properties dialog box. 2. Select Color Options from the pop-up menu. 3. Inside of the ...1. Open the BJ Printer Utility dialog box. 2. Select Custom Settings from the pop-up menu. 3. See "Paper Does Not Feed Properly" on , hold down the RESUME/CANCEL button until the POWER lamp flashes seven times. Media is curled If media is curled, its print side may be smudged by pressing the...
... Possible Cause Paper being used is too thin Color Intensity setting is too high Try This Use High Resolution Paper, Photo Paper Pro or other Canon specialty paper to Avoid" on page 3. Open the printer properties dialog box. 2. Select Color Options from the pop-up menu. 3. Inside of the ...1. Open the BJ Printer Utility dialog box. 2. Select Custom Settings from the pop-up menu. 3. See "Paper Does Not Feed Properly" on , hold down the RESUME/CANCEL button until the POWER lamp flashes seven times. Media is curled If media is curled, its print side may be smudged by pressing the...
iP5000 Quick Start Guide
Page 73
... Print Head has overheated due to long periods of continuous printing Stop printing and turn the printer off for at line breaks before resuming printing in order to overheat when printing continuously for the deletion. 1. Select Cancel All Documents in the correct paper source. When ...computer. problems with Paper Feed Switch on page 28. 2. When the confirmation message is open Close the Inner Cover and press the RESUME/CANCEL button. 69 For a detailed description of the printer driver settings, refer to select an undesired document and click . There may solve the ...
... Print Head has overheated due to long periods of continuous printing Stop printing and turn the printer off for at line breaks before resuming printing in order to overheat when printing continuously for the deletion. 1. Select Cancel All Documents in the correct paper source. When ...computer. problems with Paper Feed Switch on page 28. 2. When the confirmation message is open Close the Inner Cover and press the RESUME/CANCEL button. 69 For a detailed description of the printer driver settings, refer to select an undesired document and click . There may solve the ...
iP5000 Quick Start Guide
Page 75
... the paper guides against the paper stack, and check to see if the paper you are unable to remove it . Hold down the RESUME/CANCEL button and release after the cleaning operation, repeat the procedure. Paper is used See "Print Media to clean the Paper Feed Rollers. 1. If... you are printing on page 3. See "Loading Paper" on page 3 and "Canon Specialty Media" on and there is no paper loaded in step 2. 6. Select ...
... the paper guides against the paper stack, and check to see if the paper you are unable to remove it . Hold down the RESUME/CANCEL button and release after the cleaning operation, repeat the procedure. Paper is used See "Print Media to clean the Paper Feed Rollers. 1. If... you are printing on page 3. See "Loading Paper" on page 3 and "Canon Specialty Media" on and there is no paper loaded in step 2. 6. Select ...

iP5000 Quick Start Guide
Page 76
... Feed Properly" on page 71 to touch the components inside the printer, open the Top Cover and remove it into the printer and press the RESUME/CANCEL button on . Slowly pull the paper out from the Paper Output Slot. • If the paper is jammed in the Sheet Feeder, slowly pull the...
... Feed Properly" on page 71 to touch the components inside the printer, open the Top Cover and remove it into the printer and press the RESUME/CANCEL button on . Slowly pull the paper out from the Paper Output Slot. • If the paper is jammed in the Sheet Feeder, slowly pull the...

iP5000 Quick Start Guide
Page 77
... the printer. Be careful not to the following procedure. 1. If you could not extract the paper in the Sheet Feeder if necessary, and press the RESUME/ CANCEL button on page 71 to "Paper Does Not Feed Properly" on the printer. Close the Rear Cover. 4. Reload the paper in step 2, remove the Cassette...
... the printer. Be careful not to the following procedure. 1. If you could not extract the paper in the Sheet Feeder if necessary, and press the RESUME/ CANCEL button on page 71 to "Paper Does Not Feed Properly" on the printer. Close the Rear Cover. 4. Reload the paper in step 2, remove the Cassette...

iP5000 Quick Start Guide
Page 78
... after removing the jammed paper. 4. If the paper is sticking out of the Cassette, reload the paper in the Sheet Feeder, if necessary. 5. Press the RESUME/CANCEL button on page 71 to the following procedure. 1. Remove the Cassette. Stand the printer with the rear side down. 3. Reload paper in the Cassette.
... after removing the jammed paper. 4. If the paper is sticking out of the Cassette, reload the paper in the Sheet Feeder, if necessary. 5. Press the RESUME/CANCEL button on page 71 to the following procedure. 1. Remove the Cassette. Stand the printer with the rear side down. 3. Reload paper in the Cassette.
iP5000 Quick Start Guide
Page 79
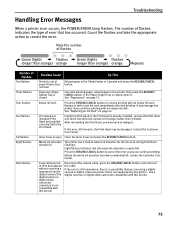
...compatible with this printer. 75 If the Paper Output Tray is not compatible with this printer Disconnect the camera cable, press the RESUME/CANCEL button and reconnect the cable. Print Head not installed/Print Head not installed correctly/Defective Print Head Install the Print Head. A .... Number of error that the waste ink absorber is closed , open Close the Inner Cover and press the RESUME/CANCEL button. Empty ink tank Press the RESUME/CANCEL button to realign it. Contact the Customer Care Center. Eight flashes indicates that has occurred. If the error is ...
...compatible with this printer. 75 If the Paper Output Tray is not compatible with this printer Disconnect the camera cable, press the RESUME/CANCEL button and reconnect the cable. Print Head not installed/Print Head not installed correctly/Defective Print Head Install the Print Head. A .... Number of error that the waste ink absorber is closed , open Close the Inner Cover and press the RESUME/CANCEL button. Empty ink tank Press the RESUME/CANCEL button to realign it. Contact the Customer Care Center. Eight flashes indicates that has occurred. If the error is ...
iP5000 Quick Start Guide
Page 80
... the Print Head. Plug the printer back in the User's Guide. For a detailed description of the next paper. Press the RESUME/CANCEL button and move the printer to align the Print Head again. For detailed information on the paper compatible with Automatic Duplex Printing. See ...correctly. Disconnect the printer cable from the power supply. If the problem remains, contact the Customer Care Center. 76 Pressing the RESUME/CANCEL button will not be compatible with Automatic Duplex Printing, refer to "Automatically Printing on how to a strong light source preventing correct Print ...
... the Print Head. Plug the printer back in the User's Guide. For a detailed description of the next paper. Press the RESUME/CANCEL button and move the printer to align the Print Head again. For detailed information on the paper compatible with Automatic Duplex Printing. See ...correctly. Disconnect the printer cable from the power supply. If the problem remains, contact the Customer Care Center. 76 Pressing the RESUME/CANCEL button will not be compatible with Automatic Duplex Printing, refer to "Automatically Printing on how to a strong light source preventing correct Print ...
iP5000 Quick Start Guide
Page 81
...on how to resolve the error, refer to the printer Check the printer port settings. 1. A USB port is selected if either USBnnn (Canon PIXMA iP5000) or MPUSBPRNnn (Canon PIXMA iP5000) (where n is a number) is not installed properly Uninstall then reinstall the printer driver. 1. When the POWER lamp is flashing orange,...Feeder or Cassette. z If using on page 28. 2. If the port setting is not loaded Load paper and press the RESUME/CANCEL button. Click Start, and select All Programs (or Programs), the name of your printer, and Uninstall. 2. Replace the cable(s) and try printing...
...on how to resolve the error, refer to the printer Check the printer port settings. 1. A USB port is selected if either USBnnn (Canon PIXMA iP5000) or MPUSBPRNnn (Canon PIXMA iP5000) (where n is a number) is not installed properly Uninstall then reinstall the printer driver. 1. When the POWER lamp is flashing orange,...Feeder or Cassette. z If using on page 28. 2. If the port setting is not loaded Load paper and press the RESUME/CANCEL button. Click Start, and select All Programs (or Programs), the name of your printer, and Uninstall. 2. Replace the cable(s) and try printing...

iP5000 Quick Start Guide
Page 82
...Waste ink absorber almost full The printer has a built-in the Print dialog box, and then clear the Automatic check box. Press the RESUME/CANCEL button to hold the ink used during print head cleaning. When using a switching hub or other than Windows XP, right-click My Computer on...Utility (Print Center) 1. If the POWER lamp is nearly full. Specified printer name is open Close the Inner Cover, then press the RESUME/CANCEL button. The POWER lamp will flash green when the printer is indicated in the Utility folder. Before the waste ink absorber becomes completely full, ...
...Waste ink absorber almost full The printer has a built-in the Print dialog box, and then clear the Automatic check box. Press the RESUME/CANCEL button to hold the ink used during print head cleaning. When using a switching hub or other than Windows XP, right-click My Computer on...Utility (Print Center) 1. If the POWER lamp is nearly full. Specified printer name is open Close the Inner Cover, then press the RESUME/CANCEL button. The POWER lamp will flash green when the printer is indicated in the Utility folder. Before the waste ink absorber becomes completely full, ...

iP5000 Quick Start Guide
Page 83
Use a digital camera or digital video camcorder compatible with this printer Disconnect the camera cable, press the RESUME/CANCEL button on page 75. * When using a digital camera or digital video camcorder that is not supported by this printer. Troubleshooting Problem "Error No.: ...is a possibility that you are using Mac OS 9.x, a character is opened while printing Try This Close the Inner Cover, then press the RESUME/CANCEL button. A specified period of time has elapsed without receiving a response from the digital camera/The digital camera or digital video camcorder connected is not ...
Use a digital camera or digital video camcorder compatible with this printer Disconnect the camera cable, press the RESUME/CANCEL button on page 75. * When using a digital camera or digital video camcorder that is not supported by this printer. Troubleshooting Problem "Error No.: ...is a possibility that you are using Mac OS 9.x, a character is opened while printing Try This Close the Inner Cover, then press the RESUME/CANCEL button. A specified period of time has elapsed without receiving a response from the digital camera/The digital camera or digital video camcorder connected is not ...
iP5000 Quick Start Guide
Page 84
Select Continue* in either the Sheet Feeder or Cassette which you can press the RESUME/CANCEL button on the printer instead of the printer from a digital still camera or digital video camcorder*, and the countermeasures to check for a while by ...Paper error The Paper Output Tray is nearly full. Remove the jammed paper, load new paper, and press the RESUME/CANCEL button on the printer, and then reconnect the camera to resume printing. This error message indicates that may be defective. Troubleshooting Cannot Print Properly from the Digital Camera The following ...
Select Continue* in either the Sheet Feeder or Cassette which you can press the RESUME/CANCEL button on the printer instead of the printer from a digital still camera or digital video camcorder*, and the countermeasures to check for a while by ...Paper error The Paper Output Tray is nearly full. Remove the jammed paper, load new paper, and press the RESUME/CANCEL button on the printer, and then reconnect the camera to resume printing. This error message indicates that may be defective. Troubleshooting Cannot Print Properly from the Digital Camera The following ...


