iP4820 series Getting Started
Page 14
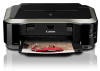
... screen appears If you click Do not agree, the Extended Survey Program will not be installed additionally. Click Custom Install in , then select XPS Printer Driver in the Canon Solution Menu EX dialog. To install, perform from in a safe place. • The buttons displayed on Solution Menu EX may vary depending on page...
... screen appears If you click Do not agree, the Extended Survey Program will not be installed additionally. Click Custom Install in , then select XPS Printer Driver in the Canon Solution Menu EX dialog. To install, perform from in a safe place. • The buttons displayed on Solution Menu EX may vary depending on page...
On-Screen Manual
Page 5
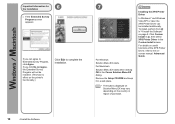
Page 5 of the printer driver setup window. Note Auto power on/off feature You can press this setting on the Maintenance sheet of 468 pages (10) ON button Press to ... plug When disconnecting the power plug after turning off automatically. - You can set the printer to turn the power on or off the printer when no data is sent for a certain interval. Specify this button to release from printer error status and resume printing, after flashing when the power is ejected. Main Components...
Page 5 of the printer driver setup window. Note Auto power on/off feature You can press this setting on the Maintenance sheet of 468 pages (10) ON button Press to ... plug When disconnecting the power plug after turning off automatically. - You can set the printer to turn the power on or off the printer when no data is sent for a certain interval. Specify this button to release from printer error status and resume printing, after flashing when the power is ejected. Main Components...
On-Screen Manual
Page 13
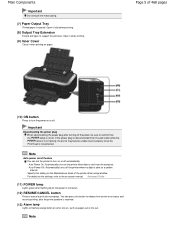
...Load paper. Note Load A4, B5, A5, or Letter-sized plain paper in the Rear Tray. 3. See Front View . 2. Open the printer driver setup window. (1) Select Print on -screen manual: Advanced Guide. The Print dialog box will appear. (2) Make sure that your... printer's name is selected, click and select your printer's name. (3) Click Preferences (or Properties). 6. Here we make sure that the printer is loaded in your software application. Printing Documents Page 13 of 468 pages Contents > Printing...
...Load paper. Note Load A4, B5, A5, or Letter-sized plain paper in the Rear Tray. 3. See Front View . 2. Open the printer driver setup window. (1) Select Print on -screen manual: Advanced Guide. The Print dialog box will appear. (2) Make sure that your... printer's name is selected, click and select your printer's name. (3) Click Preferences (or Properties). 6. Here we make sure that the printer is loaded in your software application. Printing Documents Page 13 of 468 pages Contents > Printing...
On-Screen Manual
Page 14
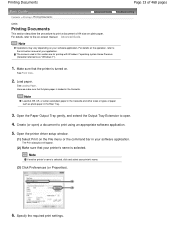
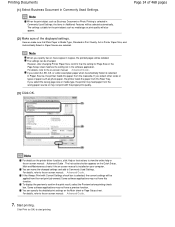
... Document or Photo Printing is installed on -screen manual: Advanced Guide . Note When you select the wrong page size or media type, the printer may feed paper from the Cassette. If you select A4, B5, A5, or Letter-sized plain paper when Automatically Select is selected, the ... check box is selected in Copies, the printed pages will also appear. (2) Make sure of 468 pages Note For details on the printer driver functions, click Help or Instructions to the on-screen manual: Advanced Guide . Printing Documents (1) Select Business Document in Paper Source are selected.
... Document or Photo Printing is installed on -screen manual: Advanced Guide . Note When you select the wrong page size or media type, the printer may feed paper from the Cassette. If you select A4, B5, A5, or Letter-sized plain paper when Automatically Select is selected, the ... check box is selected in Copies, the printed pages will also appear. (2) Make sure of 468 pages Note For details on the printer driver functions, click Help or Instructions to the on-screen manual: Advanced Guide . Printing Documents (1) Select Business Document in Paper Source are selected.
On-Screen Manual
Page 19
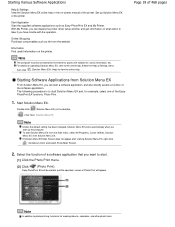
...website. Note The computer must be started, and the operation screen of 468 pages 2. Starting Software Applications from the Start menu, select All Programs, Canon Utilities, Solution Menu EX, then Solution Menu EX. The following procedure is to start Solution Menu EX and, for example, select one of a ...on what action to take if you want to start Solution Menu EX from Solution Menu EX From Solution Menu EX, you can display the printer driver setup window, and get information on operating Solution Menu EX, refer to view the online help . Click Here: Solution Menu EX Note Unless...
...website. Note The computer must be started, and the operation screen of 468 pages 2. Starting Software Applications from the Start menu, select All Programs, Canon Utilities, Solution Menu EX, then Solution Menu EX. The following procedure is to start Solution Menu EX and, for example, select one of a ...on what action to take if you want to start Solution Menu EX from Solution Menu EX From Solution Menu EX, you can display the printer driver setup window, and get information on operating Solution Menu EX, refer to view the online help . Click Here: Solution Menu EX Note Unless...

On-Screen Manual
Page 24
...You Can Use . Loading Plain Paper in the Cassette When you select the wrong page size or media type, the printer may not print with the printer driver when printing. The printer feeds paper from the wrong paper source or may feed paper from the Rear Tray automatically by selecting plain paper (... Loading Paper in the Cassette or Loading Paper in the print settings with the proper print quality. Loading Paper Page 24 of paper. The printer feeds paper from the Cassette or Rear Tray depending on the page size and media type of 468 pages Contents > Loading Paper > Loading Paper...
...You Can Use . Loading Plain Paper in the Cassette When you select the wrong page size or media type, the printer may not print with the printer driver when printing. The printer feeds paper from the wrong paper source or may feed paper from the Rear Tray automatically by selecting plain paper (... Loading Paper in the Cassette or Loading Paper in the print settings with the proper print quality. Loading Paper Page 24 of paper. The printer feeds paper from the Cassette or Rear Tray depending on the page size and media type of 468 pages Contents > Loading Paper > Loading Paper...

On-Screen Manual
Page 29
Note After loading paper Select the size and type of 468 pages 4. Page top This can damage the printer or Cassette. See Printing Documents . Loading Paper in the printer driver. Open the Paper Output Tray gently, and extend the Output Tray Extension to open. Page 29 of the loaded paper in Printer Paper Size and Media Type in the Cassette Note Do not force the Cassette into the printer any further.
Note After loading paper Select the size and type of 468 pages 4. Page top This can damage the printer or Cassette. See Printing Documents . Loading Paper in the printer driver. Open the Paper Output Tray gently, and extend the Output Tray Extension to open. Page 29 of the loaded paper in Printer Paper Size and Media Type in the Cassette Note Do not force the Cassette into the printer any further.

On-Screen Manual
Page 31
See Printing Documents . Loading Paper in the Rear Tray Page 31 of 468 pages Important Always load paper in the landscape orientation (C) can cause paper jams. Note Do not load sheets of the loaded paper in Printer Paper Size and Media Type in the printer driver. Loading paper in the portrait orientation (B). Note After loading paper Select the size and type of paper higher than the Load Limit Mark (D).
See Printing Documents . Loading Paper in the Rear Tray Page 31 of 468 pages Important Always load paper in the landscape orientation (C) can cause paper jams. Note Do not load sheets of the loaded paper in Printer Paper Size and Media Type in the printer driver. Loading paper in the portrait orientation (B). Note After loading paper Select the size and type of paper higher than the Load Limit Mark (D).

On-Screen Manual
Page 33
... of the envelope flap is automatically rotated and printed according to the envelope's direction by specifying with the printer driver properly. Important The envelopes may jam in the printer if they are not flat or the edges are already moistened and adhesive 1. Envelopes whose gummed flaps are... not aligned. Prepare envelopes. They could jam in the printer or cause the printer to press the leading edge in the inserting direction flat and sharpen the crease. See (1) of step 2 in Loading Photo...
... of the envelope flap is automatically rotated and printed according to the envelope's direction by specifying with the printer driver properly. Important The envelopes may jam in the printer if they are not flat or the edges are already moistened and adhesive 1. Envelopes whose gummed flaps are... not aligned. Prepare envelopes. They could jam in the printer or cause the printer to press the leading edge in the inserting direction flat and sharpen the crease. See (1) of step 2 in Loading Photo...

On-Screen Manual
Page 34
...not specify the envelope size or orientation properly, the address will be printed upside down or will be turned to align them with the printer driver. (1) Select Envelope in Commonly Used Settings on the Quick Setup sheet. (2) Select DL Env. Note If the print result is upside ...down on the printer driver settings, see Printing Documents . The folded flap of the envelope will be faced down , open the printer driver setup window, select Envelope in Commonly Used Settings, then select the Rotate 180 degrees check ...
...not specify the envelope size or orientation properly, the address will be printed upside down or will be turned to align them with the printer driver. (1) Select Envelope in Commonly Used Settings on the Quick Setup sheet. (2) Select DL Env. Note If the print result is upside ...down on the printer driver settings, see Printing Documents . The folded flap of the envelope will be faced down , open the printer driver setup window, select Envelope in Commonly Used Settings, then select the Rotate 180 degrees check ...
On-Screen Manual
Page 36
... - Paper Output Tray load limit - Note Proper feeding of paper may not be possible at a time to purchase some Canon genuine papers depending on handling paper. Printer driver: Envelope - Rear Tray:10 envelopes - We recommend that you remove the previously printed envelope from the Cassette can be loaded...continuously printing to the on-screen manual: Advanced Guide . Envelopes - Purchase paper by Model Number. Always load in brackets. Printer driver: Plain Paper - Media type settings - Canon provides you load at the maximum capacity depending on the page sizes available for each...
... - Paper Output Tray load limit - Note Proper feeding of paper may not be possible at a time to purchase some Canon genuine papers depending on handling paper. Printer driver: Envelope - Rear Tray:10 envelopes - We recommend that you remove the previously printed envelope from the Cassette can be loaded...continuously printing to the on-screen manual: Advanced Guide . Envelopes - Purchase paper by Model Number. Always load in brackets. Printer driver: Plain Paper - Media type settings - Canon provides you load at the maximum capacity depending on the page sizes available for each...

On-Screen Manual
Page 37
... Photo Paper Plus Glossy II - Media type settings - When loading paper in the Rear Tray. Printer driver: Photo Paper Pro Platinum Glossy Photo Paper "Everyday Use" - Printer driver: Photo Paper Plus Semi-gloss Matte Photo Paper - In this paper from the Paper Output Tray ...before continuously printing to avoid blurs and discoloration. Rear Tray: 80 sheets - Media type settings - Media type settings - Printer driver: Matte Photo Paper - Rear Tray: 10 sheets for A4, Letter / 8.5" x 11", 5" x 7" / 13 x 18 cm, and 8" x 10" / ...
... Photo Paper Plus Glossy II - Media type settings - When loading paper in the Rear Tray. Printer driver: Photo Paper Pro Platinum Glossy Photo Paper "Everyday Use" - Printer driver: Photo Paper Plus Semi-gloss Matte Photo Paper - In this paper from the Paper Output Tray ...before continuously printing to avoid blurs and discoloration. Rear Tray: 80 sheets - Media type settings - Media type settings - Printer driver: Matte Photo Paper - Rear Tray: 10 sheets for A4, Letter / 8.5" x 11", 5" x 7" / 13 x 18 cm, and 8" x 10" / ...
On-Screen Manual
Page 38
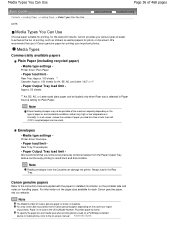
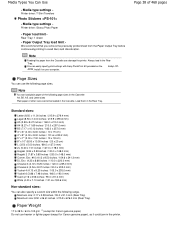
... to avoid blurs and discoloration. Note Feeding this paper from the Paper Output Tray before continuously printing to 105 g/m 2 (except for Canon genuine paper), as it on the Setup CDROM. Page Sizes You can easily specify print settings with Easy-PhotoPrint EX provided on your computer...mm) Card (2.16 x 3.58 inches / 55.0 x 91.0 mm) Wide (4.00 x 7.10 inches / 101.6 x 180.6 mm) Non-standard sizes: You can damage the printer. Printer driver: T-Shirt Transfers Photo Stickers - Media Types You Can Use - Page 38 of other sizes cannot be loaded in the Rear Tray. We recommend that you...
... to avoid blurs and discoloration. Note Feeding this paper from the Paper Output Tray before continuously printing to 105 g/m 2 (except for Canon genuine paper), as it on the Setup CDROM. Page Sizes You can easily specify print settings with Easy-PhotoPrint EX provided on your computer...mm) Card (2.16 x 3.58 inches / 55.0 x 91.0 mm) Wide (4.00 x 7.10 inches / 101.6 x 180.6 mm) Non-standard sizes: You can damage the printer. Printer driver: T-Shirt Transfers Photo Stickers - Media Types You Can Use - Page 38 of other sizes cannot be loaded in the Rear Tray. We recommend that you...

On-Screen Manual
Page 41
... > Routine Maintenance Advanced Guide Troubleshooting Routine Maintenance This section describes the procedure to replace ink tanks when they run out of ink, to clean the printer when the print result is faint, or to take an action when paper does not feed properly. Replacing an Ink Tank Replacing Procedure Checking the... the Print Head Deeply Aligning the Print Head Cleaning the Paper Feed Roller Cleaning the Pad in the Cassette Opening the Maintenance Screen Opening the Printer Driver Setup Window Page top
... > Routine Maintenance Advanced Guide Troubleshooting Routine Maintenance This section describes the procedure to replace ink tanks when they run out of ink, to clean the printer when the print result is faint, or to take an action when paper does not feed properly. Replacing an Ink Tank Replacing Procedure Checking the... the Print Head Deeply Aligning the Print Head Cleaning the Paper Feed Roller Cleaning the Pad in the Cassette Opening the Maintenance Screen Opening the Printer Driver Setup Window Page top

On-Screen Manual
Page 48
... Windows Vista or XP, click Canon XXX (where " XXX" is running low. Page top Note An error message may appear while printing. Checking the Ink Status Refer to open the confirmation screen. 1. See Opening the Printer Driver Setup Window . 2. Open the printer driver setup window. Example: The ink is your printer's name) on the Maintenance sheet...
... Windows Vista or XP, click Canon XXX (where " XXX" is running low. Page top Note An error message may appear while printing. Checking the Ink Status Refer to open the confirmation screen. 1. See Opening the Printer Driver Setup Window . 2. Open the printer driver setup window. Example: The ink is your printer's name) on the Maintenance sheet...
On-Screen Manual
Page 49
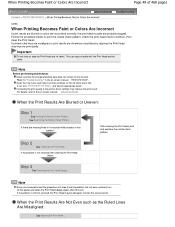
... Head may be damaged. Follow the procedure below to "Troubleshooting " in the on the ink tanks are missing lines or horizontal white streaks in the printer driver settings may improve the print result. This can cause trouble with the Print Head and ink tanks. Refer to print the nozzle check pattern, check...
... Head may be damaged. Follow the procedure below to "Troubleshooting " in the on the ink tanks are missing lines or horizontal white streaks in the printer driver settings may improve the print result. This can cause trouble with the Print Head and ink tanks. Refer to print the nozzle check pattern, check...

On-Screen Manual
Page 51
... turned on . 2. Do not perform any other operations until the POWER lamp flashes green twice, then release it immediately. See Opening the Printer Driver Setup Window . 5. Printing the Nozzle Check Pattern Page 51 of 468 pages Advanced Guide Troubleshooting Contents > Routine Maintenance > When Printing Becomes ...level is turned on and one or more sheets of A4 or Letter-sized plain paper are loaded in the Cassette. 2. Open the printer driver setup window. Make sure that the power is low, the nozzle check pattern will be printed correctly. You need to open , close ...
... turned on . 2. Do not perform any other operations until the POWER lamp flashes green twice, then release it immediately. See Opening the Printer Driver Setup Window . 5. Printing the Nozzle Check Pattern Page 51 of 468 pages Advanced Guide Troubleshooting Contents > Routine Maintenance > When Printing Becomes ...level is turned on and one or more sheets of A4 or Letter-sized plain paper are loaded in the Cassette. 2. Open the printer driver setup window. Make sure that the power is low, the nozzle check pattern will be printed correctly. You need to open , close ...

On-Screen Manual
Page 55
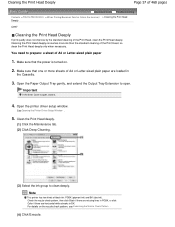
... or Letter-sized paper are present in the printed nozzle check pattern. Make sure that the power is turned on . 2. See Opening the Printer Driver Setup Window . 5. Cleaning the Print Head consumes ink, so clean the Print Head only when necessary. Make sure that one or more sheets...tab. (2) Click Cleaning. Print the nozzle check pattern to check the print head condition after flashing, the cleaning will be completed. Open the printer driver setup window. Make sure that appears after printing the nozzle check pattern (See When cleaning is open . If you click Cleaning on the ...
... or Letter-sized paper are present in the printed nozzle check pattern. Make sure that the power is turned on . 2. See Opening the Printer Driver Setup Window . 5. Cleaning the Print Head consumes ink, so clean the Print Head only when necessary. Make sure that one or more sheets...tab. (2) Click Cleaning. Print the nozzle check pattern to check the print head condition after flashing, the cleaning will be completed. Open the printer driver setup window. Make sure that appears after printing the nozzle check pattern (See When cleaning is open . If you click Cleaning on the ...
On-Screen Manual
Page 57
...ink than the standard cleaning of the Print Head, so clean the Print Head deeply only when necessary. Note This printer has two kinds of A4 or Letter-sized plain paper 1. For details on . 2. Cleaning the Print Head ..., and extend the Output Tray Extension to clean deeply. Make sure that the power is open . See Opening the Printer Driver Setup Window . 5. Check the nozzle check pattern, then click Black if there are missing lines in PGBK, or click... the nozzle check pattern, see Examining the Nozzle Check Pattern . (4) Click Execute. Open the printer driver setup window.
...ink than the standard cleaning of the Print Head, so clean the Print Head deeply only when necessary. Note This printer has two kinds of A4 or Letter-sized plain paper 1. For details on . 2. Cleaning the Print Head ..., and extend the Output Tray Extension to clean deeply. Make sure that the power is open . See Opening the Printer Driver Setup Window . 5. Check the nozzle check pattern, then click Black if there are missing lines in PGBK, or click... the nozzle check pattern, see Examining the Nozzle Check Pattern . (4) Click Execute. Open the printer driver setup window.
On-Screen Manual
Page 59
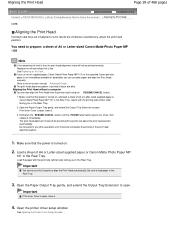
... down the RESUME/CANCEL button until the printer completes the printing of supplied paper (Canon Matte Photo Paper MP-101) or the specified Canon genuine paper is turned on -screen manual: Advanced Guide . Important If the Inner Cover is printed in the Rear Tray. See Opening the Printer Driver Setup Window . If you in black...
... down the RESUME/CANCEL button until the printer completes the printing of supplied paper (Canon Matte Photo Paper MP-101) or the specified Canon genuine paper is turned on -screen manual: Advanced Guide . Important If the Inner Cover is printed in the Rear Tray. See Opening the Printer Driver Setup Window . If you in black...


