iP4820 series Getting Started
Page 1
... and Mac OS X v.10.6.x. (Unless noted otherwise, the screens are those of Windows 7.) 1 Preparation P.1 2 Install the Print Head P.3 3 Install the Ink Tanks P.6 4 Install the Software P.8 5 Load Paper P.13 6 Try Using the Printer P.16 Print Photos from a Computer P.17 7 Specifications P.18 Make sure to read this manual before using the printer. Please keep...
... and Mac OS X v.10.6.x. (Unless noted otherwise, the screens are those of Windows 7.) 1 Preparation P.1 2 Install the Print Head P.3 3 Install the Ink Tanks P.6 4 Install the Software P.8 5 Load Paper P.13 6 Try Using the Printer P.16 Print Photos from a Computer P.17 7 Specifications P.18 Make sure to read this manual before using the printer. Please keep...
iP4820 series Getting Started
Page 13
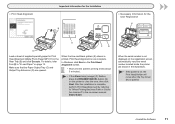
... is not displayed on the registration screen automatically, input the serial number located inside the printer (as shown in "5 Load Paper" on -screen manual: Basic Guide. Make sure that the Paper Output Tray (C) and Output Tray Extension (D) are opened . 4 Install the Software 11 When the serial number is...then click Next. □ Print Head Alignment Important Information for the Installation B □ Necessary Information for the User Registration H C E F G D Load a sheet of supplied specialty paper for Print Head Alignment (Matte Photo Paper MP-101) in the on page 15.
... is not displayed on the registration screen automatically, input the serial number located inside the printer (as shown in "5 Load Paper" on -screen manual: Basic Guide. Make sure that the Paper Output Tray (C) and Output Tray Extension (D) are opened . 4 Install the Software 11 When the serial number is...then click Next. □ Print Head Alignment Important Information for the Installation B □ Necessary Information for the User Registration H C E F G D Load a sheet of supplied specialty paper for Print Head Alignment (Matte Photo Paper MP-101) in the on page 15.

iP4820 series Getting Started
Page 15
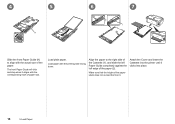
Specialty paper including photo paper Load paper in the Cassette (B). 1 2 E C D 3 G F Close the Paper Output Tray (C), pull out the Cassette (D) and remove the Cover (E). A B Plain paper Load paper in the Rear Tray (A). Pull the Tab (F) in the direction of Move the left Paper Guide the arrow and extend the Cassette. (G) to the edge. 13 Load Paper 5 With the printer, the paper source varies depending on the media type.
Specialty paper including photo paper Load paper in the Cassette (B). 1 2 E C D 3 G F Close the Paper Output Tray (C), pull out the Cassette (D) and remove the Cover (E). A B Plain paper Load paper in the Rear Tray (A). Pull the Tab (F) in the direction of Move the left Paper Guide the arrow and extend the Cassette. (G) to the edge. 13 Load Paper 5 With the printer, the paper source varies depending on the media type.
iP4820 series Getting Started
Page 16
... side of the Cassette (1), and slide the left Paper Guide completely against the left edge of the paper. Make sure that the height of paper size. Attach the Cover and insert the Cassette into place. 14 5 Load Paper Load paper with the actual size of the paper (2). Load plain paper. Align the paper to align with the printing side facing down...
... side of the Cassette (1), and slide the left Paper Guide completely against the left edge of the paper. Make sure that the height of paper size. Attach the Cover and insert the Cassette into place. 14 5 Load Paper Load paper with the actual size of the paper (2). Load plain paper. Align the paper to align with the printing side facing down...

iP4820 series Getting Started
Page 17
Slide the left and right Paper Guides against both edges. Setup is complete. Move the Paper Guides (K) to "6 Try Using the Printer". 5 Load Paper 15 8 J 9 2 K 10 11 M L Open the Paper Support (J), and pull it up . Make sure that the height of the paper. Proceed to both edges of the paper stack does not exceed the line (M). • For details, refer to the onscreen manual: Basic Guide. Load paper in portrait orientation with the printing side facing up . Load paper in the center of the Rear Tray (L). Congratulations!
Slide the left and right Paper Guides against both edges. Setup is complete. Move the Paper Guides (K) to "6 Try Using the Printer". 5 Load Paper 15 8 J 9 2 K 10 11 M L Open the Paper Support (J), and pull it up . Make sure that the height of the paper. Proceed to both edges of the paper stack does not exceed the line (M). • For details, refer to the onscreen manual: Basic Guide. Load paper in portrait orientation with the printing side facing up . Load paper in the center of the Rear Tray (L). Congratulations!

On-Screen Manual
Page 2
... Pages (Easy-WebPrint EX) Starting Various Software Applications Other Usages Printing Photos from a PictBridge Compliant Device Loading Paper Loading Paper Advanced Guide Routine Maintenance Replacing an Ink Tank When Printing Becomes Faint or Colors Are Incorrect Cleaning the Paper Feed Roller Cleaning the Pad in the Cassette Opening the Maintenance Screen Appendix Legal Limitations on...
... Pages (Easy-WebPrint EX) Starting Various Software Applications Other Usages Printing Photos from a PictBridge Compliant Device Loading Paper Loading Paper Advanced Guide Routine Maintenance Replacing an Ink Tank When Printing Becomes Faint or Colors Are Incorrect Cleaning the Paper Feed Roller Cleaning the Pad in the Cassette Opening the Maintenance Screen Appendix Legal Limitations on...

On-Screen Manual
Page 4
... (1) Top Cover Open to replace the ink tanks or remove jammed paper inside the printer. (2) Paper Guides Slide to align with both sides of the paper stack. (3) Rear Tray Load photo paper or envelopes which you can be loaded at the same time, and fed automatically one sheet at a time... the printer. Warning Do not connect any equipment other than PictBridge compliant devices to load paper in the Rear Tray. (5) Cassette Load A4, B5, A5, or Letter-sized plain paper and insert it into the printer. See Loading Paper . (4) Paper Support Open and pull out to the Direct Print Port of...
... (1) Top Cover Open to replace the ink tanks or remove jammed paper inside the printer. (2) Paper Guides Slide to align with both sides of the paper stack. (3) Rear Tray Load photo paper or envelopes which you can be loaded at the same time, and fed automatically one sheet at a time... the printer. Warning Do not connect any equipment other than PictBridge compliant devices to load paper in the Rear Tray. (5) Cassette Load A4, B5, A5, or Letter-sized plain paper and insert it into the printer. See Loading Paper . (4) Paper Support Open and pull out to the Direct Print Port of...

On-Screen Manual
Page 9
.... To install Easy-PhotoPrint EX, select Easy-PhotoPrint EX in the Rear Tray. (3) Open the Paper Output Tray gently, and extend the Output Tray Extension to open. 2. See Loading Paper . Note Printing Photos (Easy-PhotoPrint EX) Page 9 of Photo Print will appear. This section... describes the procedure to the on . See Front View . (2) Load paper. Here we load 4" x 6" / 10 x 15 cm photo paper in the Photo Print menu. Click Here:...
.... To install Easy-PhotoPrint EX, select Easy-PhotoPrint EX in the Rear Tray. (3) Open the Paper Output Tray gently, and extend the Output Tray Extension to open. 2. See Loading Paper . Note Printing Photos (Easy-PhotoPrint EX) Page 9 of Photo Print will appear. This section... describes the procedure to the on . See Front View . (2) Load paper. Here we load 4" x 6" / 10 x 15 cm photo paper in the Photo Print menu. Click Here:...

On-Screen Manual
Page 10
... or more copies, click (Up arrow) to change the number of 468 pages 3. You can also correct or enhance the selected image. Select the loaded paper. (1) Make sure that your printer's name is selected in Printer. (2) Make sure that Automatically Select is selected in the selected image area (A) and... click (Delete Imported Image) (B). Select a photo to print. (1) Select the folder in which images are available. The number of the loaded paper in the selected image area (A). Advanced (3) Select the size and type of copies appears as "1", and the image you selected appears in...
... or more copies, click (Up arrow) to change the number of 468 pages 3. You can also correct or enhance the selected image. Select the loaded paper. (1) Make sure that your printer's name is selected in Printer. (2) Make sure that Automatically Select is selected in the selected image area (A) and... click (Delete Imported Image) (B). Select a photo to print. (1) Select the folder in which images are available. The number of the loaded paper in the selected image area (A). Advanced (3) Select the size and type of copies appears as "1", and the image you selected appears in...
On-Screen Manual
Page 13
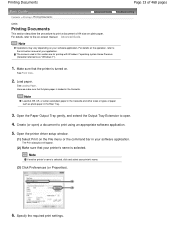
... will appear. (2) Make sure that your software application. See Front View . 2. Load paper. Here we make sure that the printer is loaded in the Cassette and other sizes or types of paper such as "Windows 7"). 1. The screens used in your printer's name is selected,... click and select your printer's name. (3) Click Preferences (or Properties). 6. See Loading Paper . Open the Paper Output Tray gently, and extend the Output Tray Extension to print using an appropriate software application. 5. Create (or open) a document to ...
... will appear. (2) Make sure that your software application. See Front View . 2. Load paper. Here we make sure that the printer is loaded in the Cassette and other sizes or types of paper such as "Windows 7"). 1. The screens used in your printer's name is selected,... click and select your printer's name. (3) Click Preferences (or Properties). 6. See Loading Paper . Open the Paper Output Tray gently, and extend the Output Tray Extension to print using an appropriate software application. 5. Create (or open) a document to ...

On-Screen Manual
Page 23
Loading Paper Page 23 of 468 pages Contents > Loading Paper Advanced Guide Troubleshooting Loading Paper This section describes types of paper you can load and how to Load Paper Loading Paper in the Cassette Loading Paper in the Cassette or Rear Tray. Loading Paper Paper Sources to load printing paper in the Rear Tray Loading Photo Paper Loading Envelopes Media Types You Can Use Media Types You Cannot Use Page top
Loading Paper Page 23 of 468 pages Contents > Loading Paper Advanced Guide Troubleshooting Loading Paper This section describes types of paper you can load and how to Load Paper Loading Paper in the Cassette Loading Paper in the Cassette or Rear Tray. Loading Paper Paper Sources to load printing paper in the Rear Tray Loading Photo Paper Loading Envelopes Media Types You Can Use Media Types You Cannot Use Page top

On-Screen Manual
Page 24
... print settings with the printer driver when printing. Loading Paper Page 24 of 468 pages Contents > Loading Paper > Loading Paper C071 Loading Paper Paper Sources to Load Paper Loading Paper in the Cassette Loading Paper in the Rear Tray Media Types You Can Use Media Types You Cannot Use Advanced Guide Troubleshooting Paper Sources to Load Paper The printer has two paper sources to the on-screen manual: Advanced...
... print settings with the printer driver when printing. Loading Paper Page 24 of 468 pages Contents > Loading Paper > Loading Paper C071 Loading Paper Paper Sources to Load Paper Loading Paper in the Cassette Loading Paper in the Rear Tray Media Types You Can Use Media Types You Cannot Use Advanced Guide Troubleshooting Paper Sources to Load Paper The printer has two paper sources to the on-screen manual: Advanced...

On-Screen Manual
Page 25
Loading Paper Page 25 of 468 pages Page top
Loading Paper Page 25 of 468 pages Page top

On-Screen Manual
Page 26
... the Canon genuine paper, see Media Types You Can Use . 1. Align the edges of paper in the Cassette. Note Align the edges of paper neatly before loading. For the page size and paper weight you to " Troubleshooting " in the opposite direction until the paper becomes completely flat. Prepare paper. Loading paper without aligning the edges may cause paper jams. If paper is...
... the Canon genuine paper, see Media Types You Can Use . 1. Align the edges of paper in the Cassette. Note Align the edges of paper neatly before loading. For the page size and paper weight you to " Troubleshooting " in the opposite direction until the paper becomes completely flat. Prepare paper. Loading paper without aligning the edges may cause paper jams. If paper is...

On-Screen Manual
Page 27
... the Cassette. Loading Paper in the Cassette Page 27 of paper higher than the Load Limit Mark (D). Note There may be a little space between the Paper Guide (B) and the paper stack. (3) Slide the Paper Guide (C) on the left to align with the mark of the paper stack. Note Do not load sheets of 468 pages 3. Load paper. (1) Slide the Paper Guide (B) to...
... the Cassette. Loading Paper in the Cassette Page 27 of paper higher than the Load Limit Mark (D). Note There may be a little space between the Paper Guide (B) and the paper stack. (3) Slide the Paper Guide (C) on the left to align with the mark of the paper stack. Note Do not load sheets of 468 pages 3. Load paper. (1) Slide the Paper Guide (B) to...

On-Screen Manual
Page 28
Loading Paper in the Cassette Page 28 of 468 pages (4) Set the Cover on the Cassette. (5) Insert the Cassette into the printer. (E) The Cassette sticks out of the printer when correctly set. Push the Cassette all the way into the printer.
Loading Paper in the Cassette Page 28 of 468 pages (4) Set the Cover on the Cassette. (5) Insert the Cassette into the printer. (E) The Cassette sticks out of the printer when correctly set. Push the Cassette all the way into the printer.

On-Screen Manual
Page 29
See Printing Documents . Page top Open the Paper Output Tray gently, and extend the Output Tray Extension to open. Page 29 of the loaded paper in Printer Paper Size and Media Type in the Cassette Note Do not force the Cassette into the printer any further. Note After loading paper Select the size and type of 468 pages 4. This can damage the printer or Cassette. Loading Paper in the printer driver.
See Printing Documents . Page top Open the Paper Output Tray gently, and extend the Output Tray Extension to open. Page 29 of the loaded paper in Printer Paper Size and Media Type in the Cassette Note Do not force the Cassette into the printer any further. Note After loading paper Select the size and type of 468 pages 4. This can damage the printer or Cassette. Loading Paper in the printer driver.

On-Screen Manual
Page 30
... properly. Prepare paper. Align the edges of the paper stack. Load paper. (1) Open the Paper Support, and pull it . 2. Loading Paper in the Rear Tray Page 30 of 468 pages Contents > Loading Paper > Loading Paper > Loading Paper in the Rear Tray C073 Advanced Guide Troubleshooting Loading Paper in the Rear Tray You can cause paper jams. 1. Do not slide the Paper Guides too hard. Loading Photo Paper Important If...
... properly. Prepare paper. Align the edges of the paper stack. Load paper. (1) Open the Paper Support, and pull it . 2. Loading Paper in the Rear Tray Page 30 of 468 pages Contents > Loading Paper > Loading Paper > Loading Paper in the Rear Tray C073 Advanced Guide Troubleshooting Loading Paper in the Rear Tray You can cause paper jams. 1. Do not slide the Paper Guides too hard. Loading Photo Paper Important If...

On-Screen Manual
Page 31
See Printing Documents . Loading paper in the portrait orientation (B). Loading Paper in the Rear Tray Page 31 of 468 pages Important Always load paper in the landscape orientation (C) can cause paper jams. Note Do not load sheets of the loaded paper in Printer Paper Size and Media Type in the printer driver. Note After loading paper Select the size and type of paper higher than the Load Limit Mark (D).
See Printing Documents . Loading paper in the portrait orientation (B). Loading Paper in the Rear Tray Page 31 of 468 pages Important Always load paper in the landscape orientation (C) can cause paper jams. Note Do not load sheets of the loaded paper in Printer Paper Size and Media Type in the printer driver. Note After loading paper Select the size and type of paper higher than the Load Limit Mark (D).

On-Screen Manual
Page 32
Loading Paper in the Rear Tray Page 32 of 468 pages Page top
Loading Paper in the Rear Tray Page 32 of 468 pages Page top


