
Quick Start Guide
Page 5
... Nozzle Check Pattern ...........34 Print Head Cleaning 35 Print Head Deep Cleaning 38 Aligning the Print Head 40 Cleaning Your Printer 45 Troubleshooting 52 Cannot Install the Printer Driver 53 Cannot Connect to Computer Properly.........55 Print Results Not Satisfactory 56 Printer Does Not Start 59 Paper Does Not Feed Properly...
... Nozzle Check Pattern ...........34 Print Head Cleaning 35 Print Head Deep Cleaning 38 Aligning the Print Head 40 Cleaning Your Printer 45 Troubleshooting 52 Cannot Install the Printer Driver 53 Cannot Connect to Computer Properly.........55 Print Results Not Satisfactory 56 Printer Does Not Start 59 Paper Does Not Feed Properly...
Quick Start Guide
Page 6
... into place. Set this setting in the Maintenance sheet of the printer driver in Windows®, and in the Canon IJ Printer Utility on and off the printer when no print data is installed. The POWER lamp flashes green, and changes to complete them. 1 Press the POWER button. z The printer is connected...
... into place. Set this setting in the Maintenance sheet of the printer driver in Windows®, and in the Canon IJ Printer Utility on and off the printer when no print data is installed. The POWER lamp flashes green, and changes to complete them. 1 Press the POWER button. z The printer is connected...
Quick Start Guide
Page 13
... to the location of the printer. Before Printing 9 For details on loading paper, see "Loading Paper" on page 10. For example, if you intend to install the printer in a small place, such as plain paper, you can load photo paper in the Auto Sheet Feeder and plain paper in the Auto...
... to the location of the printer. Before Printing 9 For details on loading paper, see "Loading Paper" on page 10. For example, if you intend to install the printer in a small place, such as plain paper, you can load photo paper in the Auto Sheet Feeder and plain paper in the Auto...

Quick Start Guide
Page 19
... select Front for Plain Paper, the printer will automatically switch to the Front Feeder when Plain Paper is only displayed when the onscreen manuals are installed. 6 Click Print (or OK). Instructions is specified for basic printing. Basic Printing 15 See "Turning the Printer On and Off" on page 2 and "Loading Printing... other than A4, Letter, or B5-sized plain paper in the printer. Basic Printing This section describes the procedure for Media Type. Make sure that Canon iP3300 is selected in Paper Source.
... select Front for Plain Paper, the printer will automatically switch to the Front Feeder when Plain Paper is only displayed when the onscreen manuals are installed. 6 Click Print (or OK). Instructions is specified for basic printing. Basic Printing 15 See "Turning the Printer On and Off" on page 2 and "Loading Printing... other than A4, Letter, or B5-sized plain paper in the printer. Basic Printing This section describes the procedure for Media Type. Make sure that Canon iP3300 is selected in Paper Source.
Quick Start Guide
Page 20
z For details on other than A4, Letter, or B5-sized plain paper in the printer. If the on-screen manuals are not installed, the Printer Driver Guide on-screen manual is not displayed even if is selected in the pop-up menu. 9 Specify the required settings. Printing with ...Macintosh 1 Turn on the printer and load the paper in the Front Feeder. Make sure that iP3300 is specified for . 5 Select the desired paper size in Paper Size. 6 Click OK. 7 Select Print on the application software's File menu. 8 Select Quality & Media in...
z For details on other than A4, Letter, or B5-sized plain paper in the printer. If the on-screen manuals are not installed, the Printer Driver Guide on-screen manual is not displayed even if is selected in the pop-up menu. 9 Specify the required settings. Printing with ...Macintosh 1 Turn on the printer and load the paper in the Front Feeder. Make sure that iP3300 is specified for . 5 Select the desired paper size in Paper Size. 6 Click OK. 7 Select Print on the application software's File menu. 8 Select Quality & Media in...
Quick Start Guide
Page 25
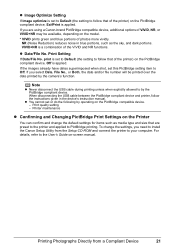
...Print Setting If Date/File No. When disconnecting the USB cable between the PictBridge compliant device and printer, follow that are using a Canon-brand PictBridge compatible device, additional options of the printer) on the PictBridge compliant device, Off is applied. Print quality setting - print ...is set this PictBridge setting item to by operating on the Printer You can confirm and change the settings, you need to install the Canon Setup Utility from a Compliant Device 21 Note z Never disconnect the USB cable during printing unless when explicitly allowed to Off. ...
...Print Setting If Date/File No. When disconnecting the USB cable between the PictBridge compliant device and printer, follow that are using a Canon-brand PictBridge compatible device, additional options of the printer) on the PictBridge compliant device, Off is applied. Print quality setting - print ...is set this PictBridge setting item to by operating on the Printer You can confirm and change the settings, you need to install the Canon Setup Utility from a Compliant Device 21 Note z Never disconnect the USB cable during printing unless when explicitly allowed to Off. ...
Quick Start Guide
Page 26
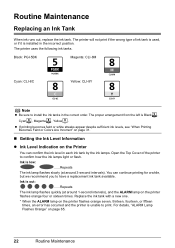
... page 31. „ Getting the Ink Level Information z Ink Level Indication on the Printer You can continue printing for a while, but we recommend you to install the ink tanks in the correct order. Ink is Black , Cyan , Magenta , Yellow . The printer will not print if the wrong type of the printer... ink lamps light or flash. The printer uses the following ink tanks. Open the Top Cover of ink tank is used, or if it is installed in each ink tank by the ink lamps. Replace the ink tank with a new one. * When the ALARM lamp on the printer flashes orange seven...
... page 31. „ Getting the Ink Level Information z Ink Level Indication on the Printer You can continue printing for a while, but we recommend you to install the ink tanks in the correct order. Ink is Black , Cyan , Magenta , Yellow . The printer will not print if the wrong type of the printer... ink lamps light or flash. The printer uses the following ink tanks. Open the Top Cover of ink tank is used, or if it is installed in each ink tank by the ink lamps. Replace the ink tank with a new one. * When the ALARM lamp on the printer flashes orange seven...

Quick Start Guide
Page 28
... „ Knowing When to continue printing, press the RESUME/CANCEL button with a new one of ink. Replace the ink tank with low ink in the Canon IJ Status Monitor. Replacing the ink tank is low, the "!" The printer may have run out of the following messages is continued under the ink...Cover to cancel printing. z Click Cancel Printing to resume printing. Then printing can continue. Confirm the empty tank and replace it with the ink tank installed. Ink is recommended after the printing. Obtain a replacement tank as soon as possible. Replacing the ink tank is low: The "!"
... „ Knowing When to continue printing, press the RESUME/CANCEL button with a new one of ink. Replace the ink tank with low ink in the Canon IJ Status Monitor. Replacing the ink tank is low, the "!" The printer may have run out of the following messages is continued under the ink...Cover to cancel printing. z Click Cancel Printing to resume printing. Then printing can continue. Confirm the empty tank and replace it with the ink tank installed. Ink is recommended after the printing. Obtain a replacement tank as soon as possible. Replacing the ink tank is low: The "!"
Quick Start Guide
Page 30
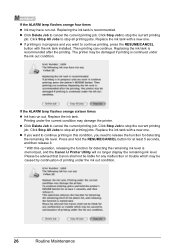
... jobs. z Click Delete Job to release the function for any malfunction or trouble which may be damaged if printing is memorized, and the Canon IJ Printer Utility will no longer display the remaining ink level. z If you want to stop the current printing job. Then printing can continue... RESUME/CANCEL button for detecting the remaining ink level is continued under the ink out condition. Replace the ink tank with the ink tank installed. Printing under the ink out condition. 26 Routine Maintenance Click Stop All Jobs to stop all printing jobs. If the ALARM lamp flashes...
... jobs. z Click Delete Job to release the function for any malfunction or trouble which may be damaged if printing is memorized, and the Canon IJ Printer Utility will no longer display the remaining ink level. z If you want to stop the current printing job. Then printing can continue... RESUME/CANCEL button for detecting the remaining ink level is continued under the ink out condition. Replace the ink tank with the ink tank installed. Printing under the ink out condition. 26 Routine Maintenance Click Stop All Jobs to stop all printing jobs. If the ALARM lamp flashes...
Quick Start Guide
Page 31
... ink lamp flashing speed, see "Getting the Ink Level Information" on , and then open . remove only the ink tank. z Once an ink tank has been installed, do not remove it from the printer and leave it . z Color ink may be consumed even when printing a black-and-white document or when blackand... is also consumed in the open the Top Cover. Be sure to the right. „ Replacing Ink Tanks When ink tanks run out of specified Canon brand ink tanks. Refilling ink is on page 22. *1 *1 Do NOT touch the Print Head Lock Lever;
... ink lamp flashing speed, see "Getting the Ink Level Information" on , and then open . remove only the ink tank. z Once an ink tank has been installed, do not remove it from the printer and leave it . z Color ink may be consumed even when printing a black-and-white document or when blackand... is also consumed in the open the Top Cover. Be sure to the right. „ Replacing Ink Tanks When ink tanks run out of specified Canon brand ink tanks. Refilling ink is on page 22. *1 *1 Do NOT touch the Print Head Lock Lever;
Quick Start Guide
Page 33
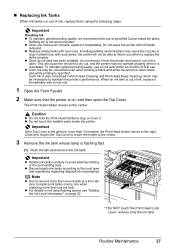
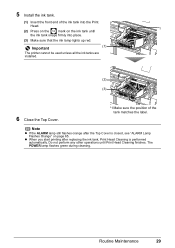
... ink tank. (1) Insert the front end of the tank matches the label. Important (1) The printer cannot be used unless all the ink tanks are installed. (2) (3) 6 Close the Top Cover. *1 Make sure the position of the ink tank into the Print Head. *1 (2) Press on the mark on page 65. Routine Maintenance ...
... ink tank. (1) Insert the front end of the tank matches the label. Important (1) The printer cannot be used unless all the ink tanks are installed. (2) (3) 6 Close the Top Cover. *1 Make sure the position of the ink tank into the Print Head. *1 (2) Press on the mark on page 65. Routine Maintenance ...
Quick Start Guide
Page 34
... seconds. (3) Unplug the power cord from drying. This takes a few seconds or as long as the uncapped tip of the Print Head. Numerous nozzles are installed in color, or perform Print Head Cleaning, about once a month to prevent degradation of a ballpoint pen or marker becomes dry and unusable if it off...
... seconds. (3) Unplug the power cord from drying. This takes a few seconds or as long as the uncapped tip of the Print Head. Numerous nozzles are installed in color, or perform Print Head Cleaning, about once a month to prevent degradation of a ballpoint pen or marker becomes dry and unusable if it off...
Quick Start Guide
Page 56
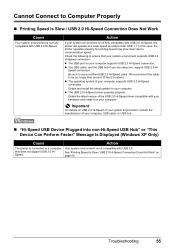
... is out of your problem, refer to the on-screen manuals. Troubleshooting This section describes troubleshooting tips for your Windows operating system. 52 Troubleshooting z "Cannot Install the Printer Driver" on page 53 z "Cannot Connect to Computer Properly" on page 55 z "Printing Speed Is Slow / USB 2.0 Hi-Speed Connection Does Not Work...
... is out of your problem, refer to the on-screen manuals. Troubleshooting This section describes troubleshooting tips for your Windows operating system. 52 Troubleshooting z "Cannot Install the Printer Driver" on page 53 z "Cannot Connect to Computer Properly" on page 55 z "Printing Speed Is Slow / USB 2.0 Hi-Speed Connection Does Not Work...

Quick Start Guide
Page 57
... the Printer Connection screen, follow the procedure below to reinstall the printer driver. (1)Click Cancel on the Printer Connection screen. (2)Click Start Over on the Installation Failure screen. (3)Click Back on the screen that appears next. (4)Click Exit on the Welcome screen, then remove the CD-ROM. (5)Turn the printer off...
... the Printer Connection screen, follow the procedure below to reinstall the printer driver. (1)Click Cancel on the Printer Connection screen. (2)Click Start Over on the Installation Failure screen. (3)Click Back on the screen that appears next. (4)Click Exit on the Welcome screen, then remove the CD-ROM. (5)Turn the printer off...
Quick Start Guide
Page 58
...there may be a problem with the Setup CD-ROM. Note If the installer was not installed correctly, uninstall the driver, restart your computer. If the CD-ROM icon is defective. Contact a Canon service representative. In non-XP Windows, double-click the My Computer icon and...click the CD-ROM icon. If the icon is not displayed on your computer, and then reinstall the driver. Installation procedure not followed correctly. Cause Action Installation does not start automatically when the Setup CD-ROM is inserted into your computer before reinstalling. Restart your computer's...
...there may be a problem with the Setup CD-ROM. Note If the installer was not installed correctly, uninstall the driver, restart your computer. If the CD-ROM icon is defective. Contact a Canon service representative. In non-XP Windows, double-click the My Computer icon and...click the CD-ROM icon. If the icon is not displayed on your computer, and then reinstall the driver. Installation procedure not followed correctly. Cause Action Installation does not start automatically when the Setup CD-ROM is inserted into your computer before reinstalling. Restart your computer's...
Quick Start Guide
Page 59
... Faster" Message Is Displayed (Windows XP Only) Cause Action The printer is connected to a computer Your system environment is not compatible with your hardware and install it on USB 2.0 Hi-Speed of your system environment, contact the manufacturer of your computer supports USB 2.0 Hi-Speed connection. Obtain the latest version of... speed may slow down due to communication speed. z The USB cable, and the USB hub if you are using one, support USB 2.0 Hi- Obtain and install the latest update for your system environment supports USB 2.0 Hi-Speed connection.
... Faster" Message Is Displayed (Windows XP Only) Cause Action The printer is connected to a computer Your system environment is not compatible with your hardware and install it on USB 2.0 Hi-Speed of your system environment, contact the manufacturer of your computer supports USB 2.0 Hi-Speed connection. Obtain the latest version of... speed may slow down due to communication speed. z The USB cable, and the USB hub if you are using one, support USB 2.0 Hi- Obtain and install the latest update for your system environment supports USB 2.0 Hi-Speed connection.
Quick Start Guide
Page 60
... is remaining. Make sure all of the orange parts. (A) (B) (A) Correct L-shaped air hole (B) Incorrect Part of the orange tape is empty. Ink tank is not installed securely. / Part of the orange tape is fully inserted. If the ink lamp is extremely large (Windows XP/Windows 2000 only). If any orange parts...
... is remaining. Make sure all of the orange parts. (A) (B) (A) Correct L-shaped air hole (B) Incorrect Part of the orange tape is empty. Ink tank is not installed securely. / Part of the orange tape is fully inserted. If the ink lamp is extremely large (Windows XP/Windows 2000 only). If any orange parts...

Quick Start Guide
Page 61
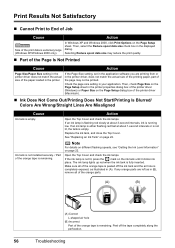
...Print Head Alignment. z If the nozzle check pattern does not print out properly Check if any of the loaded printing paper. Contact your Canon service representative. Print Head is not set appropriately. Print quality is misaligned. Set the Print Quality setting to "Printing Media" in the User... to High (Windows) or Fine (Macintosh). „ Printed Paper Curls or Has Ink Blots Cause Action Paper is still not resolved after installation, straight lines may be printed misaligned. z If the problem is not resolved after performing Print Head Deep Cleaning, turn off the printer and...
...Print Head Alignment. z If the nozzle check pattern does not print out properly Check if any of the loaded printing paper. Contact your Canon service representative. Print Head is not set appropriately. Print quality is misaligned. Set the Print Quality setting to "Printing Media" in the User... to High (Windows) or Fine (Macintosh). „ Printed Paper Curls or Has Ink Blots Cause Action Paper is still not resolved after installation, straight lines may be printed misaligned. z If the problem is not resolved after performing Print Head Deep Cleaning, turn off the printer and...

Quick Start Guide
Page 63
..."ALARM Lamp Flashes Orange" on . / The power cord is no connected. Ink tank not installed in a wrong position. The ink lamp lights up red when the ink tank is remaining. Ink tank is not... installed securely. / Part of the orange tape is remaining. Peel off the ink tank and the air... Cover. If there is still sufficient ink but its ink lamp is flashing red, an ink tank may be installed in proper position. Printer Does Not Start Cause Action The printer is not powered on page 65. Note If...
..."ALARM Lamp Flashes Orange" on . / The power cord is no connected. Ink tank not installed in a wrong position. The ink lamp lights up red when the ink tank is remaining. Ink tank is not... installed securely. / Part of the orange tape is remaining. Peel off the ink tank and the air... Cover. If there is still sufficient ink but its ink lamp is flashing red, an ink tank may be installed in proper position. Printer Does Not Start Cause Action The printer is not powered on page 65. Note If...
Quick Start Guide
Page 69
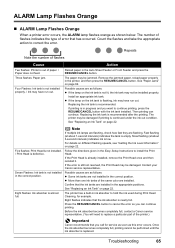
... full, contact a Canon service representative. (You will need to hold the ink used during Print Head Cleaning, for service as soon as follows: z If the lamp on page 22. Count the flashes and take the appropriate action to cancel the error so you want to install the Print Head.... 3-second intervals) indicates ink is continued under the ink out condition. z More than one ink tanks of the printer.) Important Canon recommends that the ink tanks are not installed in the correct position. See "Replacing an Ink Tank" on page 22. ALARM Lamp Flashes Orange „ ALARM Lamp Flashes ...
... full, contact a Canon service representative. (You will need to hold the ink used during Print Head Cleaning, for service as soon as follows: z If the lamp on page 22. Count the flashes and take the appropriate action to cancel the error so you want to install the Print Head.... 3-second intervals) indicates ink is continued under the ink out condition. z More than one ink tanks of the printer.) Important Canon recommends that the ink tanks are not installed in the correct position. See "Replacing an Ink Tank" on page 22. ALARM Lamp Flashes Orange „ ALARM Lamp Flashes ...


