
Setup Guide
Page 2
Network Connection Wireless Connection Preparation for Connection Connection Using WPS Wired Connection Preparation for the printer. Setup Guide This guide provides information for setting up a network connection for Connection Cable Connection Printer Setup Troubleshooting
Network Connection Wireless Connection Preparation for Connection Connection Using WPS Wired Connection Preparation for the printer. Setup Guide This guide provides information for setting up a network connection for Connection Cable Connection Printer Setup Troubleshooting
Setup Guide
Page 3
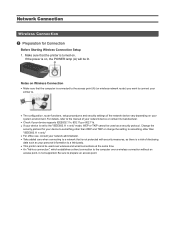
... POWER lamp (A) will be used as your device is connected to the access point (A) (or wireless network router) you want to connect your printer to. • The configuration, router functions, setup procedures and security settings of your network device or contact its manufacturer. •... if your device supports IEEE802.11n, 802.11g or 802.11b. • If your personal information to a third party. • This printer cannot be lit. Network Connection Wireless Connection a Preparation for your device to something other than WEP and TKIP or change the setting to something ...
... POWER lamp (A) will be used as your device is connected to the access point (A) (or wireless network router) you want to connect your printer to. • The configuration, router functions, setup procedures and security settings of your network device or contact its manufacturer. •... if your device supports IEEE802.11n, 802.11g or 802.11b. • If your personal information to a third party. • This printer cannot be lit. Network Connection Wireless Connection a Preparation for your device to something other than WEP and TKIP or change the setting to something ...
Setup Guide
Page 4
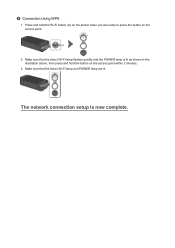
b Connection Using WPS 1. The network connection setup is lit as shown in the illustration above, then press and hold the Wi-Fi button (A) on the printer when you are lit. Press and hold the button on the access point. 2. Make sure that the (blue) Wi-Fi lamp flashes quickly and the POWER lamp is now complete. Make sure that the (blue) Wi-Fi lamp and POWER lamp are ready to press the button on the access point within 2 minutes. 3.
b Connection Using WPS 1. The network connection setup is lit as shown in the illustration above, then press and hold the Wi-Fi button (A) on the printer when you are lit. Press and hold the button on the access point. 2. Make sure that the (blue) Wi-Fi lamp flashes quickly and the POWER lamp is now complete. Make sure that the (blue) Wi-Fi lamp and POWER lamp are ready to press the button on the access point within 2 minutes. 3.
Setup Guide
Page 5
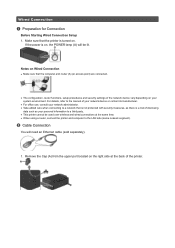
... computer and router (A) (or access point) are connected. • The configuration, router functions, setup procedures and security settings of the printer. b Cable Connection You will be used over wireless and wired connections at the back of the network device vary depending on , the POWER lamp ...(A) will need an Ethernet cable (sold separately). 1. Make sure that the printer is on your personal information to the LAN side (same network segment). Remove the Cap (A) from the upper port located on . If the...
... computer and router (A) (or access point) are connected. • The configuration, router functions, setup procedures and security settings of the printer. b Cable Connection You will be used over wireless and wired connections at the back of the network device vary depending on , the POWER lamp ...(A) will need an Ethernet cable (sold separately). 1. Make sure that the printer is on your personal information to the LAN side (same network segment). Remove the Cap (A) from the upper port located on . If the...
Setup Guide
Page 6
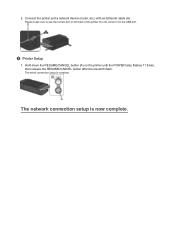
The network connection setup is complete. c Printer Setup 1. Hold down the RESUME/CANCEL button (A) on the back of the printer. Connect the printer and a network device (router, etc.) with an Ethernet cable (A). 2. Please make sure to the USB port. Do not connect it to use the correct port on the printer until the POWER lamp flashes 11 times, then release the RESUME/CANCEL button after the eleventh flash. The wired connection setup is now complete.
The network connection setup is complete. c Printer Setup 1. Hold down the RESUME/CANCEL button (A) on the back of the printer. Connect the printer and a network device (router, etc.) with an Ethernet cable (A). 2. Please make sure to the USB port. Do not connect it to use the correct port on the printer until the POWER lamp flashes 11 times, then release the RESUME/CANCEL button after the eleventh flash. The wired connection setup is now complete.
Setup Guide
Page 7
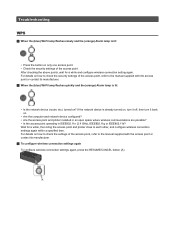
... and configure wireless connection setting again. After checking the above points, wait for a while, then bring the access point and printer close to the manual supplied with the access point or contact its manufacturer. To configure wireless connection settings again To ... device (router, etc.) turned on . • Are the computer and network device configured? • Are the access point and printer installed in an open space where wireless communications are possible? • Is the access point operating in IEEE802.11n (2.4 GHz), IEEE802.11g or IEEE802...
... and configure wireless connection setting again. After checking the above points, wait for a while, then bring the access point and printer close to the manual supplied with the access point or contact its manufacturer. To configure wireless connection settings again To ... device (router, etc.) turned on . • Are the computer and network device configured? • Are the access point and printer installed in an open space where wireless communications are possible? • Is the access point operating in IEEE802.11n (2.4 GHz), IEEE802.11g or IEEE802...


