Guide for Printer Setup for Network
Page 2
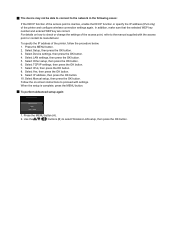
For details, refer to the manual of your network device or contact its manufacturer. • Check if your device supports IEEE802.11n, 802.11g or 802.11b. • If your device ...
For details, refer to the manual of your network device or contact its manufacturer. • Check if your device supports IEEE802.11n, 802.11g or 802.11b. • If your device ...
Guide for Printer Setup for Network
Page 4
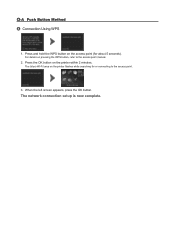
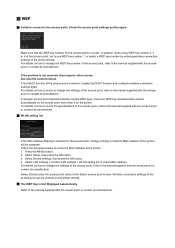
The network connection setup is now complete. d-A Push Button Method d Connection Using WPS 1. The (blue) Wi-Fi lamp on the access point (for or connecting to the access point manual. 2. Press and hold the WPS button on the printer flashes while searching for about 5 seconds). When the left screen appears, press the OK button. Press the OK button on pressing the WPS button, refer to the access point. 3. For details on the printer within 2 minutes.
The network connection setup is now complete. d-A Push Button Method d Connection Using WPS 1. The (blue) Wi-Fi lamp on the access point (for or connecting to the access point manual. 2. Press and hold the WPS button on the printer flashes while searching for about 5 seconds). When the left screen appears, press the OK button. Press the OK button on pressing the WPS button, refer to the access point. 3. For details on the printer within 2 minutes.
Guide for Printer Setup for Network
Page 6
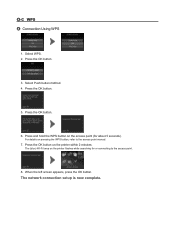
d-C WPS d Connection Using WPS 1. Press the OK button on the access point (for or connecting to the access point manual. 7. The network connection setup is now complete. When the left screen appears, press the OK button. Select Push button method. 4. Press and hold the WPS button on the printer within 2 minutes. Press the OK button. 5. The (blue) Wi-Fi lamp on pressing the WPS button, refer to the access point. 8. Press the OK button. 6. For details on the printer flashes while searching for about 5 seconds). Press the OK button. 3. Select WPS. 2.
d-C WPS d Connection Using WPS 1. Press the OK button on the access point (for or connecting to the access point manual. 7. The network connection setup is now complete. When the left screen appears, press the OK button. Select Push button method. 4. Press and hold the WPS button on the printer within 2 minutes. Press the OK button. 5. The (blue) Wi-Fi lamp on pressing the WPS button, refer to the access point. 8. Press the OK button. 6. For details on the printer flashes while searching for about 5 seconds). Press the OK button. 3. Select WPS. 2.
Guide for Printer Setup for Network
Page 9
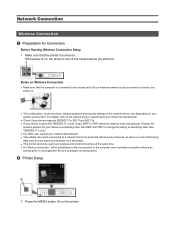
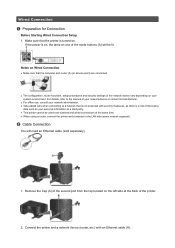
... used over wireless and wired connections at the back of the mode buttons (A) will need an Ethernet cable (sold separately). 1. For details, refer to the manual of your network device or contact its manufacturer. • For office use, consult your personal information to a network that the computer and router...
... used over wireless and wired connections at the back of the mode buttons (A) will need an Ethernet cable (sold separately). 1. For details, refer to the manual of your network device or contact its manufacturer. • For office use, consult your personal information to a network that the computer and router...
Guide for Printer Setup for Network
Page 13
... point, refer to search for the access point again. See also the sections below: Turn off , then turn it back on the printer to the manual supplied with the access point or contact its manufacturer. Multiple access points with the same name are possible? • Is the access point operating... SSID broadcast (connection via "ANY" SSID, etc.) is disabled or the stealth mode is not resolved, there may be entered on the printer to the manual supplied with the access point or contact its manufacturer.
... point, refer to search for the access point again. See also the sections below: Turn off , then turn it back on the printer to the manual supplied with the access point or contact its manufacturer. Multiple access points with the same name are possible? • Is the access point operating... SSID broadcast (connection via "ANY" SSID, etc.) is disabled or the stealth mode is not resolved, there may be entered on the printer to the manual supplied with the access point or contact its manufacturer.
Guide for Printer Setup for Network
Page 14
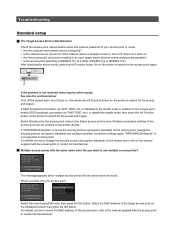
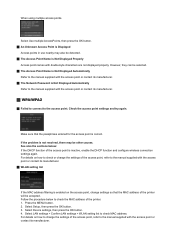
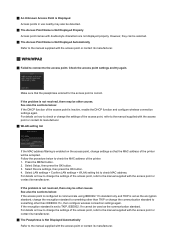
...Access Point is Displayed Access points in use nearby may be detected. The Access Point Name is Not Displayed Automatically Refer to the manual supplied with the access point or contact its manufacturer. Select LAN settings > Confirm LAN settings > WLAN setting list to the access... access point, change the settings of the printer will be selected. The Access Point Name is Not Displayed Automatically Refer to the manual supplied with the access point or contact its manufacturer. WPA/WPA2 Failed to connect to check MAC address. Make sure ...
...Access Point is Displayed Access points in use nearby may be detected. The Access Point Name is Not Displayed Automatically Refer to the manual supplied with the access point or contact its manufacturer. Select LAN settings > Confirm LAN settings > WLAN setting list to the access... access point, change the settings of the printer will be selected. The Access Point Name is Not Displayed Automatically Refer to the manual supplied with the access point or contact its manufacturer. WPA/WPA2 Failed to connect to check MAC address. Make sure ...
Guide for Printer Setup for Network
Page 15
...sure that automatically creates WEP keys, check the WEP key (hexadecimal) created automatically on the access point, then enter it on how to the manual supplied with the access point or contact its manufacturer. If the problem is not resolved, there may be used as the communication standard. If ... point, set to change the settings of the printer directly. Select LAN settings > Confirm LAN settings > WLAN setting list to the manual supplied with the access point or contact its manufacturer. WEP Failed to connect to change the WEP key number of the access...
...sure that automatically creates WEP keys, check the WEP key (hexadecimal) created automatically on the access point, then enter it on how to the manual supplied with the access point or contact its manufacturer. If the problem is not resolved, there may be used as the communication standard. If ... point, set to change the settings of the printer directly. Select LAN settings > Confirm LAN settings > WLAN setting list to the manual supplied with the access point or contact its manufacturer. WEP Failed to connect to change the WEP key number of the access...
Guide for Printer Setup for Network
Page 17
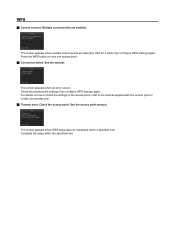
The screen appears when multiple access points are enabled. See the manual. Press the WPS button on how to check the settings of the access point, refer to the manual supplied with the access point or contact its manufacturer. Timeout error. The screen appears when an... error occurs. Check the access point. See the access point manual. For details on only one access point. Connection failed. Multiple access points are detected. WPS Cannot connect. Wait for a...
The screen appears when multiple access points are enabled. See the manual. Press the WPS button on how to check the settings of the access point, refer to the manual supplied with the access point or contact its manufacturer. Timeout error. The screen appears when an... error occurs. Check the access point. See the access point manual. For details on only one access point. Connection failed. Multiple access points are detected. WPS Cannot connect. Wait for a...
Guide for Printer Setup for Network
Page 18
... The Target Access Point is Not Detected Check the access point name/network name and network password of the access point, refer to the manual supplied with the access point or contact its manufacturer. Multiple access points with the same name are possible? • Is the access point operating... press the OK button. Select Use one access point. If the network device is not resolved, there may be entered on the printer to the manual supplied with the access point or contact its manufacturer.
... The Target Access Point is Not Detected Check the access point name/network name and network password of the access point, refer to the manual supplied with the access point or contact its manufacturer. Multiple access points with the same name are possible? • Is the access point operating... press the OK button. Select Use one access point. If the network device is not resolved, there may be entered on the printer to the manual supplied with the access point or contact its manufacturer.
Guide for Printer Setup for Network
Page 19
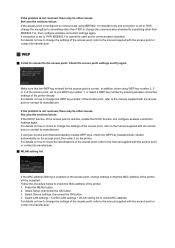
...manufacturer. WLAN setting list If the MAC address filtering is enabled on how to change the communication standard to the manual supplied with the access point or contact its manufacturer. See also the sections below to check the MAC address of the access point... characters are not displayed properly. However, they can be selected. The Access Point Name is Not Displayed Automatically Refer to the manual supplied with the access point or contact its manufacturer. WPA/WPA2 Failed to connect to something other causes. For details...
...manufacturer. WLAN setting list If the MAC address filtering is enabled on how to change the communication standard to the manual supplied with the access point or contact its manufacturer. See also the sections below to check the MAC address of the access point... characters are not displayed properly. However, they can be selected. The Access Point Name is Not Displayed Automatically Refer to the manual supplied with the access point or contact its manufacturer. WPA/WPA2 Failed to connect to something other causes. For details...
Guide for Printer Setup for Network
Page 20
... For details on how to check the specifications of the access point, refer to the manual supplied with the access point or contact its manufacturer. WLAN setting list If the MAC address...sure that the MAC address of the access point is Not Displayed Automatically Refer to the manual supplied with the access point or contact its manufacturer. If the problem is not resolved, there may ...be entered on how to the manual supplied with the access point or contact its manufacturer. For details on the printer directly. ...
... For details on how to check the specifications of the access point, refer to the manual supplied with the access point or contact its manufacturer. WLAN setting list If the MAC address...sure that the MAC address of the access point is Not Displayed Automatically Refer to the manual supplied with the access point or contact its manufacturer. If the problem is not resolved, there may ...be entered on how to the manual supplied with the access point or contact its manufacturer. For details on the printer directly. ...
Guide for Printer Setup for Network
Page 21
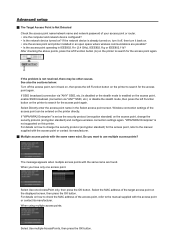
In addition, make sure that the selected WEP key number and entered WEP key are correct. For details on -screen instructions to the manual supplied with settings. Select Device settings, then press the OK button. 4. Select LAN settings, then press the OK button. 5. Select Other setup, then ...button. To perform Advanced setup again 1. To specify the IP address of the printer and configure wireless connection settings again. Select Manual setup, then press the OK button. When the setup is inactive, enable the DHCP function or specify the IP address (IPv4 only) of the ...
In addition, make sure that the selected WEP key number and entered WEP key are correct. For details on -screen instructions to the manual supplied with settings. Select Device settings, then press the OK button. 4. Select LAN settings, then press the OK button. 5. Select Other setup, then ...button. To perform Advanced setup again 1. To specify the IP address of the printer and configure wireless connection settings again. Select Manual setup, then press the OK button. When the setup is inactive, enable the DHCP function or specify the IP address (IPv4 only) of the ...

Setting Up the FAX
Page 1
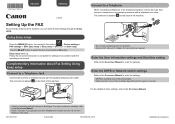
...the Cap, then connect a telephone or an answering machine with a telephone line cable. For the details of other connection methods, refer to the On-screen Manual. • A basic connection method is available only in US and Canada. • Network switch may not be sure it is a 6-wire telephone line ...• Do not use the fax features of the machine, you can enter the fax settings through the Easy setup. QT5-4954-V01 XXXXXXXX ©CANON INC.2012 PRINTED IN XXXXXXXX The connector is labeled on the region or country. ENGLISH ESPAÑOL K10375 Setting Up the FAX To use...
...the Cap, then connect a telephone or an answering machine with a telephone line cable. For the details of other connection methods, refer to the On-screen Manual. • A basic connection method is available only in US and Canada. • Network switch may not be sure it is a 6-wire telephone line ...• Do not use the fax features of the machine, you can enter the fax settings through the Easy setup. QT5-4954-V01 XXXXXXXX ©CANON INC.2012 PRINTED IN XXXXXXXX The connector is labeled on the region or country. ENGLISH ESPAÑOL K10375 Setting Up the FAX To use...

MX510 series Specifications
Page 1
...200 dpi Dialing Automatic dialing Coded speed dial (max. 20 destinations) Group dial (max. 19 destinations) Regular dialing (with Numeric buttons) Automatic redialing Manual redialing (with a pitch of 1/4800 inch at USB 1.1. *2 Maximum speed: 1.44 Mbps *3 JPEG/PNG only *4 Bluetooth connection is required ...Automatic fallback) Transmission speed Black: Approx. 3 seconds/page at 33.6 kbps (Based on ITU-T No.1 chart for US specifications and Canon FAX Standard chart No.1 for standby cannot be used . • Windows: Operation can only be guaranteed on the installation environment and location...
...200 dpi Dialing Automatic dialing Coded speed dial (max. 20 destinations) Group dial (max. 19 destinations) Regular dialing (with Numeric buttons) Automatic redialing Manual redialing (with a pitch of 1/4800 inch at USB 1.1. *2 Maximum speed: 1.44 Mbps *3 JPEG/PNG only *4 Bluetooth connection is required ...Automatic fallback) Transmission speed Black: Approx. 3 seconds/page at 33.6 kbps (Based on ITU-T No.1 chart for US specifications and Canon FAX Standard chart No.1 for standby cannot be used . • Windows: Operation can only be guaranteed on the installation environment and location...
Configuraci?n del FAX [Spanish Version]
Page 1
...setup starts up. Enter the DRPD or Network switch settings Refer to the On-screen Manual to complete the settings in accordance with the operating environment. QT5-4954-V01 XXXXXXXX ©CANON INC.2012 PRINTED IN XXXXXXXX ENGLISH ESPAÑOL K10375 Setting Up the FAX To ...not be sure it is a 6-wire telephone line cable. Enter the User information settings and Date/time setting Refer to the On-screen Manual to a telephone jack with a telephone line cable. Complementary Information about Fax Setting Using Easy setup Connect to a Telephone Jack Connect the machine...
...setup starts up. Enter the DRPD or Network switch settings Refer to the On-screen Manual to complete the settings in accordance with the operating environment. QT5-4954-V01 XXXXXXXX ©CANON INC.2012 PRINTED IN XXXXXXXX ENGLISH ESPAÑOL K10375 Setting Up the FAX To ...not be sure it is a 6-wire telephone line cable. Enter the User information settings and Date/time setting Refer to the On-screen Manual to a telephone jack with a telephone line cable. Complementary Information about Fax Setting Using Easy setup Connect to a Telephone Jack Connect the machine...

MX510 series Especificaciones [Spanish Version]
Page 1
... 19 destinations) Regular dialing (with Numeric buttons) Automatic redialing Manual redialing (with a pitch of the machine has stopped. Since the Hi-Speed USB interface is fully upwardly compatible with the Canon inkjet printer. • Macintosh: For Mac OS, an ...200 (H) mm * With the Front Cover retracted. installation. Weight Approx. 8.8 kg (Approx. 19.3 lb) * With the FINE Cartridges installed. INC. One Canon Plaza, Lake Success, NY 11042 U.S.A. Interface USB Port: Hi-Speed USB *1 Direct Print Port: PictBridge Bluetooth v2.0 (Option) *2*3*4 USB flash drive LAN Port:...
... 19 destinations) Regular dialing (with Numeric buttons) Automatic redialing Manual redialing (with a pitch of the machine has stopped. Since the Hi-Speed USB interface is fully upwardly compatible with the Canon inkjet printer. • Macintosh: For Mac OS, an ...200 (H) mm * With the Front Cover retracted. installation. Weight Approx. 8.8 kg (Approx. 19.3 lb) * With the FINE Cartridges installed. INC. One Canon Plaza, Lake Success, NY 11042 U.S.A. Interface USB Port: Hi-Speed USB *1 Direct Print Port: PictBridge Bluetooth v2.0 (Option) *2*3*4 USB flash drive LAN Port:...
Installation Guide
Page 4
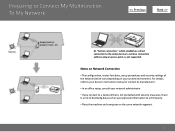
... without using an access point, is a risk of the network device vary depending on the same network segment. 4 For details, refer to your device's instruction manual or contact its manufacturer. • In an office setup, consult your network administrator • If you connect to a network that is not protected with security...
... without using an access point, is a risk of the network device vary depending on the same network segment. 4 For details, refer to your device's instruction manual or contact its manufacturer. • In an office setup, consult your network administrator • If you connect to a network that is not protected with security...


