
Guía de inicio [Spanish Version]
Page 41
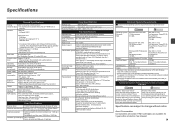
...may not be available with Windows Media Center • To upgrade from memory (Based on screen manual may not or later must be displayed properly depending on Canon COLOR FAX TEST SHEET.) Scanning image processing Halftones: 256 levels of 1/4800 inch at minimum. Additional... System Requirements for 5 years after every 20 transactions) Sequential broadcasting (max. 21 destinations) Manual redialing (max. 10 transactions) ...
...may not be available with Windows Media Center • To upgrade from memory (Based on screen manual may not or later must be displayed properly depending on Canon COLOR FAX TEST SHEET.) Scanning image processing Halftones: 256 levels of 1/4800 inch at minimum. Additional... System Requirements for 5 years after every 20 transactions) Sequential broadcasting (max. 21 destinations) Manual redialing (max. 10 transactions) ...

Getting Started
Page 1
Please keep it in hand for future reference. Office All-In-One series Getting Started =Read Me First= Make sure to read this manual before using the machine.
Please keep it in hand for future reference. Office All-In-One series Getting Started =Read Me First= Make sure to read this manual before using the machine.

Getting Started
Page 3
... tapes and the protective sheets. 12 3 4 5 6 7 8 □ Choosing a Location Color Black FINE cartridges power cord telephone line cable • Manuals • Setup CD-ROM (containing the drivers, applications and on-screen manuals) • Warranty • Do not install the machine where an object may fall into the Rear Tray, resulting in malfunction...
... tapes and the protective sheets. 12 3 4 5 6 7 8 □ Choosing a Location Color Black FINE cartridges power cord telephone line cable • Manuals • Setup CD-ROM (containing the drivers, applications and on-screen manuals) • Warranty • Do not install the machine where an object may fall into the Rear Tray, resulting in malfunction...

Getting Started
Page 5
...using as a fax, a telephone 1 line needs to be connected. For details, refer to "Confirming the Telephone Line Connection" in the on-screen manual: Basic Guide. • Do not connect the machine and a telephone in parallel to the same telephone line using as both a fax and telephone:... When using a distribution adapter. For other connection methods, refer to the onscreen manual: Basic Guide. 1 234 5 6 7 8 2 Only when connecting a telephone: B When not using as a fax: When using as a fax only: Go to ...
...using as a fax, a telephone 1 line needs to be connected. For details, refer to "Confirming the Telephone Line Connection" in the on-screen manual: Basic Guide. • Do not connect the machine and a telephone in parallel to the same telephone line using as both a fax and telephone:... When using a distribution adapter. For other connection methods, refer to the onscreen manual: Basic Guide. 1 234 5 6 7 8 2 Only when connecting a telephone: B When not using as a fax: When using as a fax only: Go to ...
Getting Started
Page 11
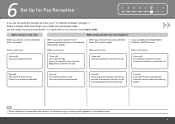
... priority mode) When you receive more voice calls than faxes (TEL priority mode) If you pick up the handset to "7 Install the Software" on -screen manual: Basic Guide. Select a receive mode according to your needs to the on page 11. For details, refer to receive faxes easily. Voice call: Pick up...
... priority mode) When you receive more voice calls than faxes (TEL priority mode) If you pick up the handset to "7 Install the Software" on -screen manual: Basic Guide. Select a receive mode according to your needs to the on page 11. For details, refer to receive faxes easily. Voice call: Pick up...

Getting Started
Page 16
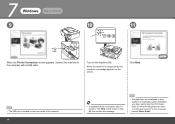
7 Windows Macintosh 5 6 Click Easy Install. Click Install. • If you want to select particular items to install, click Custom Install and follow the onscreen instructions to proceed with the installation. • Move the cursor over items to display explanations. 14 Drivers, application software, and on-screen manuals are installed automatically.
7 Windows Macintosh 5 6 Click Easy Install. Click Install. • If you want to select particular items to install, click Custom Install and follow the onscreen instructions to proceed with the installation. • Move the cursor over items to display explanations. 14 Drivers, application software, and on-screen manuals are installed automatically.
Getting Started
Page 18
... on the machine (A). Turn on the screen. When the machine is not satisfactory after 10 minutes, click Help on the screen in the on-screen manual: Basic Guide.
... on the machine (A). Turn on the screen. When the machine is not satisfactory after 10 minutes, click Help on the screen in the on-screen manual: Basic Guide.

Getting Started
Page 22
Drivers, application software, and on-screen manuals are installed automatically. • If you do not know your administrator name and password. Click OK. Click Easy Install. If you want to select particular items to proceed with the installation. 20 7 Windows Macintosh 4 5 Enter your administrator name or password, click Help, then follow the on -screen instructions to install, click Custom Install and follow the on -screen instructions.
Drivers, application software, and on-screen manuals are installed automatically. • If you do not know your administrator name and password. Click OK. Click Easy Install. If you want to select particular items to proceed with the installation. 20 7 Windows Macintosh 4 5 Enter your administrator name or password, click Help, then follow the on -screen instructions to install, click Custom Install and follow the on -screen instructions.

Getting Started
Page 23
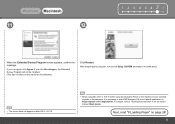
Installation starts. Refer to "When Printing Becomes Faint or Colors Are Incorrect" in the on -screen instructions to install the software. • If straight lines are misaligned or print quality is not satisfactory after installation, you may need to display explanations. • During installation, follow any on -screen manual: Basic Guide. 21 Read the License Agreement screen carefully and click Yes. Click Next. • Move the cursor over items to align the Print Head. Windows Macintosh 6 7 1 2 3 4 5 678 8 Click Install.
Installation starts. Refer to "When Printing Becomes Faint or Colors Are Incorrect" in the on -screen instructions to install the software. • If straight lines are misaligned or print quality is not satisfactory after installation, you may need to display explanations. • During installation, follow any on -screen manual: Basic Guide. 21 Read the License Agreement screen carefully and click Yes. Click Next. • Move the cursor over items to align the Print Head. Windows Macintosh 6 7 1 2 3 4 5 678 8 Click Install.
Getting Started
Page 25
... to "Saving Scanned Data" in the on Image Capture under Applications. For details, refer to select MP Navigator EX as the launch application on -screen manual: Basic Guide. Next, read "8 Loading Paper" on the machine's functionality.) Click Restart. Windows Macintosh 11 12 1 2 3 4 5 678 When the Extended Survey Program screen appears, confirm...
... to "Saving Scanned Data" in the on Image Capture under Applications. For details, refer to select MP Navigator EX as the launch application on -screen manual: Basic Guide. Next, read "8 Loading Paper" on the machine's functionality.) Click Restart. Windows Macintosh 11 12 1 2 3 4 5 678 When the Extended Survey Program screen appears, confirm...
Getting Started
Page 26
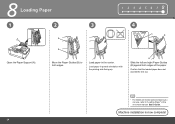
Confirm that the loaded paper does not exceed the line (C). • For details on -screen manual: Basic Guide. Load paper in the on media sizes and types you can use, refer to both edges of the paper. Machine installation is now complete! 24 B Move the Paper Guides (B) to "Loading Paper" in portrait orientation with the printing side facing up. Load paper in the center. 8 Loading Paper 1 2 A B 1 2 3 4 5 6 78 3 4 C B Open the Paper Support (A). B Slide the left and right Paper Guides (B) against both edges.
Confirm that the loaded paper does not exceed the line (C). • For details on -screen manual: Basic Guide. Load paper in the on media sizes and types you can use, refer to both edges of the paper. Machine installation is now complete! 24 B Move the Paper Guides (B) to "Loading Paper" in portrait orientation with the printing side facing up. Load paper in the center. 8 Loading Paper 1 2 A B 1 2 3 4 5 6 78 3 4 C B Open the Paper Support (A). B Slide the left and right Paper Guides (B) against both edges.
Getting Started
Page 27
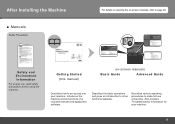
... use, read safety precautions before using the machine. Introduces the machine and its functions, the included manuals and application software. After Installing the Machine ■ Manuals Safety Precautions For details on opening the on -screen manuals Basic Guide Advanced Guide Describes how to other functions available. Describes various operating procedures to page 26...
... use, read safety precautions before using the machine. Introduces the machine and its functions, the included manuals and application software. After Installing the Machine ■ Manuals Safety Precautions For details on opening the on -screen manuals Basic Guide Advanced Guide Describes how to other functions available. Describes various operating procedures to page 26...
Getting Started
Page 28
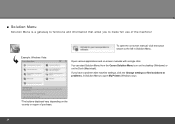
Open various applications and on the Dock (Macintosh). You can start Solution Menu from the Canon Solution Menu icon on the desktop (Windows) or on -screen manuals with machine settings, click the Change settings or find solutions to problems. in Solution Menu. If you to make full use of purchase. ...26 Example: Windows Vista To open My Printer (Windows only). *The buttons displayed vary depending on -screen manual, click the button shown to the left in Solution Menu to open the on the country or region of the machine! ■ Solution Menu ...
Open various applications and on the Dock (Macintosh). You can start Solution Menu from the Canon Solution Menu icon on the desktop (Windows) or on -screen manuals with machine settings, click the Change settings or find solutions to problems. in Solution Menu. If you to make full use of purchase. ...26 Example: Windows Vista To open My Printer (Windows only). *The buttons displayed vary depending on -screen manual, click the button shown to the left in Solution Menu to open the on the country or region of the machine! ■ Solution Menu ...

Getting Started
Page 29
Various application software are installed on the machine to print your own items easily. You can print creative items by correcting/ enhancing photos using the applications. Alternatively, use the application software and the machine, refer to use the Operation Panel on the computer along with the drivers. For details on how to the onscreen manuals: Basic Guide and Advanced Guide. 27 Try Using the Machine!
Various application software are installed on the machine to print your own items easily. You can print creative items by correcting/ enhancing photos using the applications. Alternatively, use the application software and the machine, refer to use the Operation Panel on the computer along with the drivers. For details on how to the onscreen manuals: Basic Guide and Advanced Guide. 27 Try Using the Machine!
Getting Started
Page 30
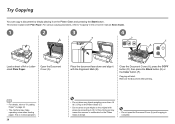
... • Do not place any objects weighing more than 4.4 lb / 2.0 kg on the Platen Glass (C). • Do not press or put weight on ‑screen manual: Basic Guide. 1 2 3 4 B D A E A Load a sheet of A4 or Lettersized Plain Paper. This section explains with Plain Paper. Try Copying You can copy a document by simply...
... • Do not place any objects weighing more than 4.4 lb / 2.0 kg on the Platen Glass (C). • Do not press or put weight on ‑screen manual: Basic Guide. 1 2 3 4 B D A E A Load a sheet of A4 or Lettersized Plain Paper. This section explains with Plain Paper. Try Copying You can copy a document by simply...
Getting Started
Page 31
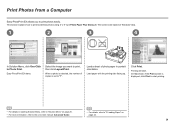
... start printing. • For details on starting Solution Menu, refer to "Solution Menu" on page 26. • For more information, refer to the on-screen manual: Advanced Guide. • For details, refer to "8 Loading Paper" on Windows Vista. 1 2 3 4 In Solution Menu, click One-Click to Photo Print. Print Photos from a Computer...
... start printing. • For details on starting Solution Menu, refer to "Solution Menu" on page 26. • For more information, refer to the on-screen manual: Advanced Guide. • For details, refer to "8 Loading Paper" on Windows Vista. 1 2 3 4 In Solution Menu, click One-Click to Photo Print. Print Photos from a Computer...
Getting Started
Page 32
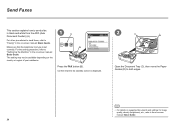
For other procedures to send faxes, refer to "Setting Up the Machine" in the on-screen manual: Basic Guide. Confirm that the telephone line type is displayed. 2 D C Open the Document Tray (C), then move the Paper Guides (D) to both edges. • For details... on the country or region of your residence. 1 B A Press the FAX button (B). For the setting procedure, refer to "Faxing" in the on-screen manual: Basic Guide. The setting may not be available depending on supported documents and settings for image quality, density (brightness), etc., refer to send a fax in...
For other procedures to send faxes, refer to "Setting Up the Machine" in the on-screen manual: Basic Guide. Confirm that the telephone line type is displayed. 2 D C Open the Document Tray (C), then move the Paper Guides (D) to both edges. • For details... on the country or region of your residence. 1 B A Press the FAX button (B). For the setting procedure, refer to "Faxing" in the on-screen manual: Basic Guide. The setting may not be available depending on supported documents and settings for image quality, density (brightness), etc., refer to send a fax in...
Getting Started
Page 33
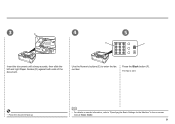
The fax is sent. • Place the document face-up. • For details on -screen manual: Basic Guide. 31 Press the Black button (F). Use the Numeric buttons (E) to "Specifying the Basic Settings for the Machine" in the on sender information, refer to enter the fax number. 3 D 4 5 E F Insert the document until a beep sounds, then slide the left and right Paper Guides (D) against both ends of the document.
The fax is sent. • Place the document face-up. • For details on -screen manual: Basic Guide. 31 Press the Black button (F). Use the Numeric buttons (E) to "Specifying the Basic Settings for the Machine" in the on sender information, refer to enter the fax number. 3 D 4 5 E F Insert the document until a beep sounds, then slide the left and right Paper Guides (D) against both ends of the document.
Getting Started
Page 35
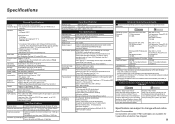
...Journaled) or Mac OS Extended. Additional System Requirements for 5 years after every 20 transactions) Sequential broadcasting (max. 21 destinations) Manual redialing (max. 10 transactions) Automatic reception Remote reception by telephone (Default ID: 25) DM Preventive Function etc. About Consumables ...* Ink droplets can be placed with a pitch of 1/4800 inch at 33.6 Kbps, ECM-JPEG, transmitting from memory (Based on Canon COLOR FAX TEST SHEET.) Scanning image processing Halftones: 256 levels of gray Density adjustment: 3 levels Memory Transmission/reception: 50 pages (Based...
...Journaled) or Mac OS Extended. Additional System Requirements for 5 years after every 20 transactions) Sequential broadcasting (max. 21 destinations) Manual redialing (max. 10 transactions) Automatic reception Remote reception by telephone (Default ID: 25) DM Preventive Function etc. About Consumables ...* Ink droplets can be placed with a pitch of 1/4800 inch at 33.6 Kbps, ECM-JPEG, transmitting from memory (Based on Canon COLOR FAX TEST SHEET.) Scanning image processing Halftones: 256 levels of gray Density adjustment: 3 levels Memory Transmission/reception: 50 pages (Based...


