PIXMA MP750/780 Quick Start Guide
Page 9
...guide. This could cause a fire. 8 Never attempt any of the noise emitted by the fluorescent lighting. • When turning OFF the power, be able to print later. z Others • This product emits low level magnetic flux. Installing in such a location may not be sure to 90% (condensation free). • ... machine contains high-voltage components. If you pull the power plug out of the wall outlet while the Alarm Lamp is lit or flashing, the print head is very humid or dusty, in a location with an ambient temperature range of 41°F to 95°F (5°C to 35°C) and ...
...guide. This could cause a fire. 8 Never attempt any of the noise emitted by the fluorescent lighting. • When turning OFF the power, be able to print later. z Others • This product emits low level magnetic flux. Installing in such a location may not be sure to 90% (condensation free). • ... machine contains high-voltage components. If you pull the power plug out of the wall outlet while the Alarm Lamp is lit or flashing, the print head is very humid or dusty, in a location with an ambient temperature range of 41°F to 95°F (5°C to 35°C) and ...
PIXMA MP750/780 Quick Start Guide
Page 10
...where you can easily unplug the power cord if necessary. If a child ingests any ink, consult a doctor immediately. • Do not shake print heads or ink tanks. Ink may leak out and stain clothing or the surrounding area. The operating requirement of this machine is as follows: 110-...to disconnect the power plug in case of small children. Ink may leak out and stain clothing or the surrounding area. • Never touch the print head. 9 Failing to do so may result in personal injury. • Do not press down hard on local electrical requirements) z Handling • Close...
...where you can easily unplug the power cord if necessary. If a child ingests any ink, consult a doctor immediately. • Do not shake print heads or ink tanks. Ink may leak out and stain clothing or the surrounding area. The operating requirement of this machine is as follows: 110-...to disconnect the power plug in case of small children. Ink may leak out and stain clothing or the surrounding area. • Never touch the print head. 9 Failing to do so may result in personal injury. • Do not press down hard on local electrical requirements) z Handling • Close...
PIXMA MP750/780 Quick Start Guide
Page 22
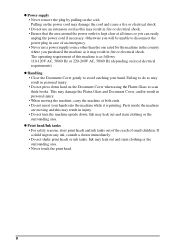
z Rear view and interior (16) (17) (18) (19) (20) (21) (22) (25) (24) (23) (16) Scanning Unit (Printer Cover) Lift this unit until it locks into place when the Inner Cover 2 needs to be opened. (17) Print Head Holder Used to install a print head. (18) Inner Cover 2 Open this cover when replacing the ink tanks, or clearing a paper jam. (19) Inner Cover 1 Open this cover when replacing the ink tanks, or clearing a paper jam. (20) Power Connector Used to connect the power cord to the machine. (21) Rear Cover Open when clearing jammed paper. 21 Introduction Chapter 1
z Rear view and interior (16) (17) (18) (19) (20) (21) (22) (25) (24) (23) (16) Scanning Unit (Printer Cover) Lift this unit until it locks into place when the Inner Cover 2 needs to be opened. (17) Print Head Holder Used to install a print head. (18) Inner Cover 2 Open this cover when replacing the ink tanks, or clearing a paper jam. (19) Inner Cover 1 Open this cover when replacing the ink tanks, or clearing a paper jam. (20) Power Connector Used to connect the power cord to the machine. (21) Rear Cover Open when clearing jammed paper. 21 Introduction Chapter 1
PIXMA MP750/780 Quick Start Guide
Page 46
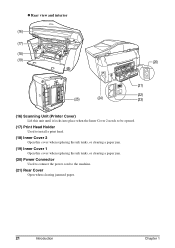
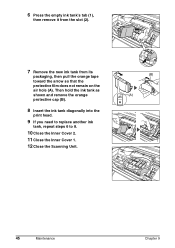
Then hold the ink tank as shown and remove the orange protective cap (B). 8 Insert the ink tank diagonally into the print head. 9 If you need to replace another ink tank, repeat steps 6 to 8. 10 Close the Inner Cover 2. 11 Close the Inner Cover 1. 12 Close the Scanning Unit. (1) (B) (A) 45 Maintenance Chapter 9 6 Press the empty ink tank's tab (1), then remove it from the slot (2). (2) 7 Remove the new ink tank from its packaging, then pull the orange tape toward the arrow so that the protective film does not remain on the air hole (A).
Then hold the ink tank as shown and remove the orange protective cap (B). 8 Insert the ink tank diagonally into the print head. 9 If you need to replace another ink tank, repeat steps 6 to 8. 10 Close the Inner Cover 2. 11 Close the Inner Cover 1. 12 Close the Scanning Unit. (1) (B) (A) 45 Maintenance Chapter 9 6 Press the empty ink tank's tab (1), then remove it from the slot (2). (2) 7 Remove the new ink tank from its packaging, then pull the orange tape toward the arrow so that the protective film does not remain on the air hole (A).
PIXMA MP750/780 Quick Start Guide
Page 47
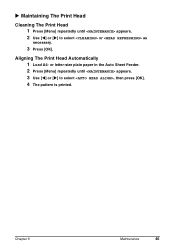
Chapter 9 Maintenance 46 or letter-size plain paper in the Auto Sheet Feeder. 2 Press [Menu] repeatedly until appears. 2 Use [W] or [X] to select , then press [OK]. 4 The pattern is printed. X Maintaining The Print Head Cleaning The Print Head 1 Press [Menu] repeatedly until appears. 3 Use [W] or [X] to select or as necessary. 3 Press [OK]. Aligning The Print Head Automatically 1 Load A4-
Chapter 9 Maintenance 46 or letter-size plain paper in the Auto Sheet Feeder. 2 Press [Menu] repeatedly until appears. 2 Use [W] or [X] to select , then press [OK]. 4 The pattern is printed. X Maintaining The Print Head Cleaning The Print Head 1 Press [Menu] repeatedly until appears. 3 Use [W] or [X] to select or as necessary. 3 Press [OK]. Aligning The Print Head Automatically 1 Load A4-
PIXMA MP750/780 Easy Setup Instructions
Page 1
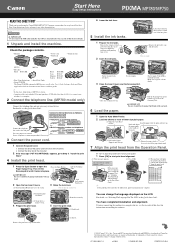
Check the package contents. • Machine • Power cord • Print head • Telephone line MP780 MP750 • Ink tanks Black BCI-3eBK Black BCI-6BK Cyan BCI-6C Magenta BCI-6M Yellow BCI-6Y • Easy ...Canon PIXMA MP780/750. You must purchase a USB cable (less than 16 3/8 ft.) to connect your machine for instructions on the LCD. HT7-0029-000-V.1.0 xx2004A © CANON INC. 2004 PRINTED IN CHINA Paper Output Tray. Push it in the Quick Start Guide. (3) The machine will print the print head position pattern and automatically align the print head...
Check the package contents. • Machine • Power cord • Print head • Telephone line MP780 MP750 • Ink tanks Black BCI-3eBK Black BCI-6BK Cyan BCI-6C Magenta BCI-6M Yellow BCI-6Y • Easy ...Canon PIXMA MP780/750. You must purchase a USB cable (less than 16 3/8 ft.) to connect your machine for instructions on the LCD. HT7-0029-000-V.1.0 xx2004A © CANON INC. 2004 PRINTED IN CHINA Paper Output Tray. Push it in the Quick Start Guide. (3) The machine will print the print head position pattern and automatically align the print head...


