MP210 series Quick Start Guide
Page 12
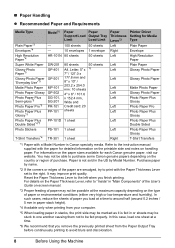
... T-Shirt Transfers*4 Model*1 - - Refer to the instruction manual supplied with the Paper Thickness Lever set to be able to purchase some Canon genuine papers depending on -screen manual. *3 Proper feeding of paper or environmental conditions (either very high or low temperature and humidity). Purchase...sheet 1 sheet 1 sheet Paper Thickness Lever*2 Left Right Left Left Left Left Left Left Left Left Left Left Left Right Printer Driver Setting for each Canon genuine paper, visit our website. For information on the Paper Thickness Lever, refer to the left when you remove the previously...
... T-Shirt Transfers*4 Model*1 - - Refer to the instruction manual supplied with the Paper Thickness Lever set to be able to purchase some Canon genuine papers depending on -screen manual. *3 Proper feeding of paper or environmental conditions (either very high or low temperature and humidity). Purchase...sheet 1 sheet 1 sheet Paper Thickness Lever*2 Left Right Left Left Left Left Left Left Left Left Left Left Left Right Printer Driver Setting for each Canon genuine paper, visit our website. For information on the Paper Thickness Lever, refer to the left when you remove the previously...
MP210 series Quick Start Guide
Page 14
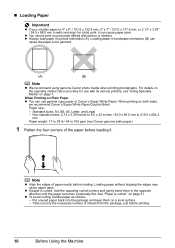
Loading paper in portrait orientation (A). Standard sizes: A4, B5, A5, Letter, and Legal - For details on the specialty media Canon provides for a trial print, it . When printing on page 7. Paper size: - z To avoid curling, handle paper as follows. - See "Paper is curled..., hold the opposing curled corners and gently bend them on postcards affixed with its various printers, see "Using Specialty Media" on both sides, we recommend Canon's Super White Paper Double-Sided. Put unused paper back into the package and keep them in the opposite direction ...
Loading paper in portrait orientation (A). Standard sizes: A4, B5, A5, Letter, and Legal - For details on the specialty media Canon provides for a trial print, it . When printing on page 7. Paper size: - z To avoid curling, handle paper as follows. - See "Paper is curled..., hold the opposing curled corners and gently bend them on postcards affixed with its various printers, see "Using Specialty Media" on both sides, we recommend Canon's Super White Paper Double-Sided. Put unused paper back into the package and keep them in the opposite direction ...
MP210 series Quick Start Guide
Page 15
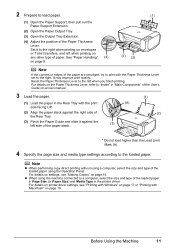
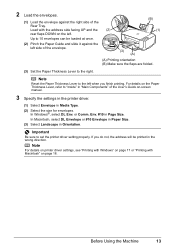
... of the User's Guide on-screen manual. 3 Load the paper. (1) Load the paper in the Rear Tray with Macintosh" on page 18. For details on printer driver settings, see "Making Copies" on page 8. (3) (2) Note If the corners or edges of the loaded paper in Page Size (or Paper Size) and ... page 15. It may improve print quality. For details on settings, see "Printing with Windows" on the Paper Thickness Lever, refer to "Inside" in the printer driver. z When using the machine connected to a computer, select the size and type of the paper are smudged, try to print with the Paper Thickness...
... of the User's Guide on-screen manual. 3 Load the paper. (1) Load the paper in the Rear Tray with Macintosh" on page 18. For details on printer driver settings, see "Making Copies" on page 8. (3) (2) Note If the corners or edges of the loaded paper in Page Size (or Paper Size) and ... page 15. It may improve print quality. For details on settings, see "Printing with Windows" on the Paper Thickness Lever, refer to "Inside" in the printer driver. z When using the machine connected to a computer, select the size and type of the paper are smudged, try to print with the Paper Thickness...
MP210 series Quick Start Guide
Page 17
...with the address side facing UP and the (2) rear flaps DOWN on the left. Load with Macintosh" on -screen manual. 3 Specify the settings in the printer driver. (1) Select Envelope in Media Type. (2) Select the size for envelopes. If you do not, the address will be loaded at once. (B) (1) (2)...174;, select DL Env. In Macintosh, select DL Envelope or #10 Envelope in Paper Size. (3) Select Landscape in Page Size. Up to set the printer driver setting properly. Important Be sure to 10 envelopes can be printed in "Main Components" of the Rear Tray. 2 Load the envelopes. (1) Load ...
...with the address side facing UP and the (2) rear flaps DOWN on the left. Load with Macintosh" on -screen manual. 3 Specify the settings in the printer driver. (1) Select Envelope in Media Type. (2) Select the size for envelopes. If you do not, the address will be loaded at once. (B) (1) (2)...174;, select DL Env. In Macintosh, select DL Envelope or #10 Envelope in Paper Size. (3) Select Landscape in Page Size. Up to set the printer driver setting properly. Important Be sure to 10 envelopes can be printed in "Main Components" of the Rear Tray. 2 Load the envelopes. (1) Load ...
MP210 series Quick Start Guide
Page 18
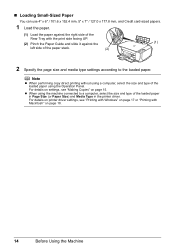
z When using the machine connected to the loaded paper. For details on printer driver settings, see "Making Copies" on page 18. 14 Before Using the Machine „ Loading Small-Sized Paper You can use 4" x 6" / 101.6 x 152.4 mm, 5" x 7" / 127.0 x ... type settings according to a computer, select the size and type of the loaded paper in Page Size (or Paper Size) and Media Type in the printer driver. For details on settings, see "Printing with Windows" on page 17 or "Printing with the print side facing UP. (2) Pinch the Paper Guide and...
z When using the machine connected to the loaded paper. For details on printer driver settings, see "Making Copies" on page 18. 14 Before Using the Machine „ Loading Small-Sized Paper You can use 4" x 6" / 101.6 x 152.4 mm, 5" x 7" / 127.0 x ... type settings according to a computer, select the size and type of the loaded paper in Page Size (or Paper Size) and Media Type in the printer driver. For details on settings, see "Printing with Windows" on page 17 or "Printing with the print side facing UP. (2) Pinch the Paper Guide and...
MP210 series Quick Start Guide
Page 21
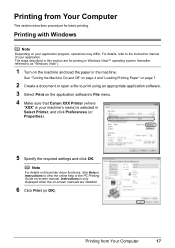
...2 Create a document or open a file to view the online help or the PC Printing Guide on the application software's File menu. 4 Make sure that Canon XXX Printer (where "XXX" is your machine's name) is only displayed when the on the machine and load the paper in Select... Printer, and click Preferences (or Properties). 5 Specify the required settings and click OK. Note For details on the printer driver functions, click Help or Instructions to print using an appropriate application software. 3 Select Print...
...2 Create a document or open a file to view the online help or the PC Printing Guide on the application software's File menu. 4 Make sure that Canon XXX Printer (where "XXX" is your machine's name) is only displayed when the on the machine and load the paper in Select... Printer, and click Preferences (or Properties). 5 Specify the required settings and click OK. Note For details on the printer driver functions, click Help or Instructions to print using an appropriate application software. 3 Select Print...
MP210 series Quick Start Guide
Page 22
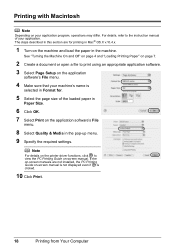
.... 10 Click Print. 18 Printing from Your Computer For details, refer to view the PC Printing Guide on your application. Note For details on the printer driver functions, click to the instruction manual of the loaded paper in the pop-up menu. 9 Specify the required settings. If the on the application...
.... 10 Click Print. 18 Printing from Your Computer For details, refer to view the PC Printing Guide on your application. Note For details on the printer driver functions, click to the instruction manual of the loaded paper in the pop-up menu. 9 Specify the required settings. If the on the application...
MP210 series Quick Start Guide
Page 30
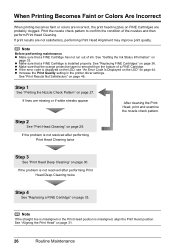
... missing or if white streaks appear After cleaning the Print Head, print and examine the nozzle check pattern. z Increase the Print Quality setting in the printer driver settings. Note If the straight line is misaligned or the Print Head position is not resolved after performing Print Head Deep Cleaning twice Step...
... missing or if white streaks appear After cleaning the Print Head, print and examine the nozzle check pattern. z Increase the Print Quality setting in the printer driver settings. Note If the straight line is misaligned or the Print Head position is not resolved after performing Print Head Deep Cleaning twice Step...

MP210 series Quick Start Guide
Page 38
... the left indicates the status of the Color FINE Cartridge as an example. (C) (C) The Ink lamp lights. (A) (C) z If "E, 1, 6" is displayed on the printer status monitor (Windows) and Canon IJ Printer Utility (Macintosh). (A) (A) Confirm whether any symbols are displayed here. 34 Routine Maintenance The function for a while, but we recommend you to have run...
... the left indicates the status of the Color FINE Cartridge as an example. (C) (C) The Ink lamp lights. (A) (C) z If "E, 1, 6" is displayed on the printer status monitor (Windows) and Canon IJ Printer Utility (Macintosh). (A) (A) Confirm whether any symbols are displayed here. 34 Routine Maintenance The function for a while, but we recommend you to have run...
MP210 series Quick Start Guide
Page 39
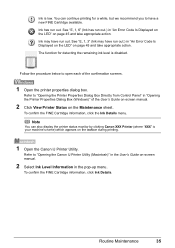
...appropriate action. Refer to open each of the User's Guide on-screen manual. 2 Click View Printer Status on the taskbar during printing. 1 Open the Canon IJ Printer Utility. To confirm the FINE Cartridge information, click Ink Details. Follow the procedure below to "...printing for detecting the remaining ink level is your machine's name) which appears on the Maintenance sheet. You can also display the printer status monitor by clicking Canon XXX Printer (where "XXX" is disabled. See "E, 1, 3" (Ink may have a new FINE Cartridge available. Routine Maintenance 35 Ink ...
...appropriate action. Refer to open each of the User's Guide on-screen manual. 2 Click View Printer Status on the taskbar during printing. 1 Open the Canon IJ Printer Utility. To confirm the FINE Cartridge information, click Ink Details. Follow the procedure below to "...printing for detecting the remaining ink level is your machine's name) which appears on the Maintenance sheet. You can also display the printer status monitor by clicking Canon XXX Printer (where "XXX" is disabled. See "E, 1, 3" (Ink may have a new FINE Cartridge available. Routine Maintenance 35 Ink ...
MP210 series Quick Start Guide
Page 40
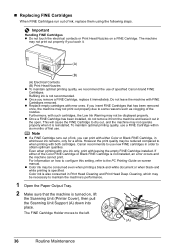
...within six months of ink, you remove a FINE Cartridge, replace it out in order to the PC Printing Guide on , lift the Scanning Unit (Printer Cover), then pull the Scanning Unit Support (A) down into place. For information on a FINE Cartridge. Furthermore, with FINE Cartridges removed. To maintain ...Do not leave the machine with such cartridges, the Low Ink Warning may be reduced compared to some reasons such as clogging of specified Canon brand FINE Cartridges. The machine may be consumed even when printing a black-and-white document or when black-and white printing is not...
...within six months of ink, you remove a FINE Cartridge, replace it out in order to the PC Printing Guide on , lift the Scanning Unit (Printer Cover), then pull the Scanning Unit Support (A) down into place. For information on a FINE Cartridge. Furthermore, with FINE Cartridges removed. To maintain ...Do not leave the machine with such cartridges, the Low Ink Warning may be reduced compared to some reasons such as clogging of specified Canon brand FINE Cartridges. The machine may be consumed even when printing a black-and-white document or when black-and white printing is not...
MP210 series Quick Start Guide
Page 41
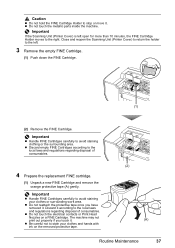
...with ink on a FINE Cartridge. The machine may not print out properly if you have removed it . Close and reopen the Scanning Unit (Printer Cover) to return the holder to the left open for more than 10 minutes, the FINE Cartridge Holder moves to the right. z Discard ...FINE Cartridge and remove the orange protective tape (A) gently. Discard it . z Do not touch the metallic parts inside the machine. Important If the Scanning Unit (Printer Cover) is left . 3 Remove the empty FINE Cartridge. (1) Push down the FINE Cartridge. (1) (2) Remove the FINE Cartridge. z Do not reattach the ...
...with ink on a FINE Cartridge. The machine may not print out properly if you have removed it . Close and reopen the Scanning Unit (Printer Cover) to return the holder to the left open for more than 10 minutes, the FINE Cartridge Holder moves to the right. z Discard ...FINE Cartridge and remove the orange protective tape (A) gently. Discard it . z Do not touch the metallic parts inside the machine. Important If the Scanning Unit (Printer Cover) is left . 3 Remove the empty FINE Cartridge. (1) Push down the FINE Cartridge. (1) (2) Remove the FINE Cartridge. z Do not reattach the ...

MP210 series Quick Start Guide
Page 42
... a print job has not been done yet, press the Black or Color button to its original position, and then gently close the Scanning Unit (Printer Cover). z If the straight line is misaligned or the Print Head position is performed automatically. Do not perform any other operations until it clicks into...Print Head Cleaning finishes. Important The machine cannot be careful not to get your fingers caught. z When you start printing after the Scanning Unit (Printer Cover) is closed, see "An Error Code Is Displayed on the LED" on page 31. 38 Routine Maintenance Caution Be sure to hold the...
... a print job has not been done yet, press the Black or Color button to its original position, and then gently close the Scanning Unit (Printer Cover). z If the straight line is misaligned or the Print Head position is performed automatically. Do not perform any other operations until it clicks into...Print Head Cleaning finishes. Important The machine cannot be careful not to get your fingers caught. z When you start printing after the Scanning Unit (Printer Cover) is closed, see "An Error Code Is Displayed on the LED" on page 31. 38 Routine Maintenance Caution Be sure to hold the...
MP210 series Quick Start Guide
Page 48
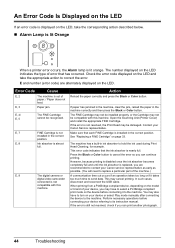
... error code indicates that the ink absorber is not installed in the correct position. E and number (error code) are recommended to contact your Canon service representative as early as possible. (You will need to the machine. E, 7 FINE Cartridge is nearly full. In such cases, disconnect and...Check the error code displayed on the LED and take the corresponding action described below. „ Alarm Lamp is lit Orange When a printer error occurs, the Alarm lamp is replaced, you are alternately displayed on the device before connecting your device, you may be compatible with ...
... error code indicates that the ink absorber is not installed in the correct position. E and number (error code) are recommended to contact your Canon service representative as early as possible. (You will need to the machine. E, 7 FINE Cartridge is nearly full. In such cases, disconnect and...Check the error code displayed on the LED and take the corresponding action described below. „ Alarm Lamp is lit Orange When a printer error occurs, the Alarm lamp is replaced, you are alternately displayed on the device before connecting your device, you may be compatible with ...
MP210 series Quick Start Guide
Page 49
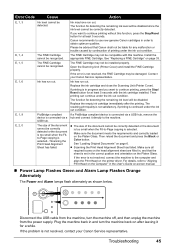
...Reset button for at least 5 seconds with this function, press the Stop/Reset button for at least 5 seconds. Open the Scanning Unit (Printer Cover) and install the FINE Cartridge properly. Ink has run out. Replace the empty ink cartridge immediately after leaving it directly to the computer.... Replace the ink cartridge and close the Scanning Unit (Printer Cover). Please be installed properly. For details, refer to "Aligning Print Head on the Computer" in order to use new genuine Canon cartridges in the User's Guide on page 6. Ink has run out. Then printing can ...
...Reset button for at least 5 seconds with this function, press the Stop/Reset button for at least 5 seconds. Open the Scanning Unit (Printer Cover) and install the FINE Cartridge properly. Ink has run out. Replace the empty ink cartridge immediately after leaving it directly to the computer.... Replace the ink cartridge and close the Scanning Unit (Printer Cover). Please be installed properly. For details, refer to "Aligning Print Head on the Computer" in order to use new genuine Canon cartridges in the User's Guide on page 6. Ink has run out. Then printing can ...
MP210 series Quick Start Guide
Page 50
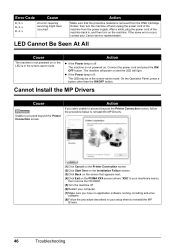
...than the ON/OFF button. If the same error occurs, contact your Canon service representative. Action If you were unable to proceed beyond the Printer Connection screen. Action Make sure that appears next. (4)Click Exit on the PIXMA XXX screen (where "XXX" is your machine's name), then remove...the ON/ OFF button. Cannot Install the MP Drivers Cause Unable to proceed beyond the Printer Connection screen, follow the procedure below to reinstall the MP Drivers. (1)Click Cancel on the Printer Connection screen. (2)Click Start Over on the Installation Failure screen. (3)Click Back on ...
...than the ON/OFF button. If the same error occurs, contact your Canon service representative. Action If you were unable to proceed beyond the Printer Connection screen. Action Make sure that appears next. (4)Click Exit on the PIXMA XXX screen (where "XXX" is your machine's name), then remove...the ON/ OFF button. Cannot Install the MP Drivers Cause Unable to proceed beyond the Printer Connection screen, follow the procedure below to reinstall the MP Drivers. (1)Click Cancel on the Printer Connection screen. (2)Click Start Over on the Installation Failure screen. (3)Click Back on ...

MP210 series Quick Start Guide
Page 52
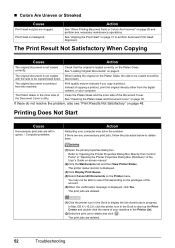
... on -screen manual. 48 Troubleshooting To copy by operating the machine To print from a PictBridge compliant device To print from a computer Confirm by using the printer driver. See "Printing Speed Is Slow / USB 2.0 Hi-Speed Connection Does Not Work" on -screen manual. When these settings are printing a photograph or an illustration...
... on -screen manual. 48 Troubleshooting To copy by operating the machine To print from a PictBridge compliant device To print from a computer Confirm by using the printer driver. See "Printing Speed Is Slow / USB 2.0 Hi-Speed Connection Does Not Work" on -screen manual. When these settings are printing a photograph or an illustration...
MP210 series Quick Start Guide
Page 56
...page 40. See "Aligning the Print Head" on page 6. If there are deleted. (1)Click the printer icon in the Dock to delete and click . The printer status monitor is loaded correctly on the Printer menu. Clean the Platen Glass and the inner side of copying a printout, print the original directly ...the Document Cover is not loaded When loading the original on -screen manual. (2)Click the Maintenance tab and then View Printer Status. In Mac OS X v.10.2.8, click the printer icon in the Dock to perform Automatic Print Head Alignment. See "Loading Original Documents" on page 31 to start up...
...page 40. See "Aligning the Print Head" on page 6. If there are deleted. (1)Click the printer icon in the Dock to delete and click . The printer status monitor is loaded correctly on the Printer menu. Clean the Platen Glass and the inner side of copying a printout, print the original directly ...the Document Cover is not loaded When loading the original on -screen manual. (2)Click the Maintenance tab and then View Printer Status. In Mac OS X v.10.2.8, click the printer icon in the Dock to perform Automatic Print Head Alignment. See "Loading Original Documents" on page 31 to start up...
MP210 series Quick Start Guide
Page 58
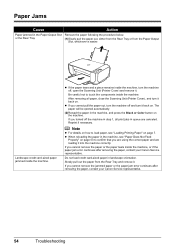
...paper jammed inside the machine. z If you cannot remove the jammed paper or the paper jam error continues after removing the paper, contact your Canon Service representative. 54 Troubleshooting Note z For details on how to load paper, see "Paper Does Not Feed Properly" on page 53 to ...touch the components inside the machine. Paper Jams Cause Action Paper jammed in landscape orientation. If you turned off , open the Scanning Unit (Printer Cover) and remove it back on the machine. Reprint if necessary. or the Rear Tray. (1)Slowly pull the paper out, either from the...
...paper jammed inside the machine. z If you cannot remove the jammed paper or the paper jam error continues after removing the paper, contact your Canon Service representative. 54 Troubleshooting Note z For details on how to load paper, see "Paper Does Not Feed Properly" on page 53 to ...touch the components inside the machine. Paper Jams Cause Action Paper jammed in landscape orientation. If you turned off , open the Scanning Unit (Printer Cover) and remove it back on the machine. Reprint if necessary. or the Rear Tray. (1)Slowly pull the paper out, either from the...
MP210 series Quick Start Guide
Page 59
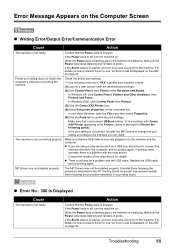
...Drivers or change the port setting according to the interface you are using . In Windows 2000, click Control Panel then Printers. (3)Click the Canon XXX Printer icon. (4)Select Set printer properties on page 44. The machine is initializing. z If you are not installed properly. If the Power lamp is...PC Printing Guide on-screen manual and reinstall them following the procedure described in your machine's name. (1)Log into a user account with Canon XXX Printer appearing in to resolve the error, see "An Error Code Is Displayed on the LED" on page 44. Confirm that a port named...
...Drivers or change the port setting according to the interface you are using . In Windows 2000, click Control Panel then Printers. (3)Click the Canon XXX Printer icon. (4)Select Set printer properties on page 44. The machine is initializing. z If you are not installed properly. If the Power lamp is...PC Printing Guide on-screen manual and reinstall them following the procedure described in your machine's name. (1)Log into a user account with Canon XXX Printer appearing in to resolve the error, see "An Error Code Is Displayed on the LED" on page 44. Confirm that a port named...


