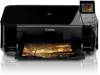
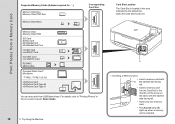
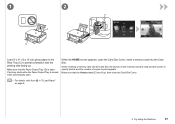
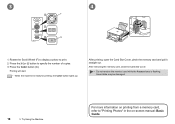
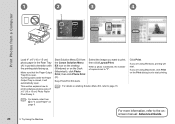
MG5120 series Getting Started
Page 1
... Tanks P.3 3 Load Paper P.7 4 Install the Software P.10 5 Try Using the Machine P.15 Print Photos from a Memory Card P.16 Try Copying P.19 Print Photos from a Computer P.20 6 Specifications P.21 Make sure to read this manual before using the machine. Canon Inkjet Photo All-In-One series Getting Started Read Me First Symbols Used in hand...
MG5120 series Getting Started
Page 9
To load specialty paper including photo paper, refer from on page 9. Move the left Paper Guide (C) to the edge. Pull out the Cassette (B). • The Cassette supports plain paper only. 31 2 3 C Load Paper A B Close the Paper Output Tray (A).
MG5120 series Getting Started
Page 11
... handle paper, refer to both edges of the paper. Load paper in portrait orientation with the printing side facing up. • Load specialty paper including photo paper in the center of the paper stack does not exceed the line (I H Prepare the Paper Support (F). 1. Slide the left and right Paper Guides against...
MG5120 series Getting Started
Page 17
... the on-screen manual Click Help & Settings, then click this icon to start Solution Menu EX. This toolbar can print creative items by correcting/enhancing photos using the application software. For details on Easy-WebPrint EX, refer to print your own items easily. Solution Menu EX Solution Menu EX is a gateway...
MG5120 series Getting Started
Page 18
Print Photos from a Memory Card Memory Stick Micro MS Duo SD MS Memory Stick Memory Stick PRO SD Card SDHC Card MultiMediaCard CF MultiMediaCard Plus miniSD Card ... xD-Picture Card Type M xD-Picture Card Type H MS Duo SD MS You can also print from USB flash drives. For details, refer to "Printing Photos" in the on-screen manual: Basic Guide. 16 5 Try Using the Machine A □ Inserting a Memory Card • Insert a memory card with B the labeled side facing...
MG5120 series Getting Started
Page 19
... in the Rear Tray (C) in "3 Load Paper" on the memory card are read and the screen to specify photos and the number of copies to print appears. When inserting a memory card into the Card Slot. Make sure that the Access lamp (E) has lit up, .... Make sure that the Paper Output Tray (D) is closed, it will automatically open the Card Slot Cover, insert a memory card into the Card Slot, the photos on page 9. 5 Try Using the Machine 17
MG5120 series Getting Started
Page 20
... For more information on printing from a memory card, refer to specify the number of copies. 3. Press the Color button (G). Press the [+] or [-] button to "Printing Photos" in the on-screen manual: Basic Guide. After removing the memory card, close the Card Slot Cover. • Do not remove the memory card while...
MG5120 series Getting Started
Page 22
... how to print, then click Layout/Print. If you want to print borderless photos using Macintosh, click Print on the Dock (Macintosh), click Photo Print, then click Photo Print (C). Start Solution Menu EX from the Canon Solution Menu EX icon on the desktop (Windows) or on the Print dialog ...box to the onscreen manual: Advanced Guide. Easy-PhotoPrint EX starts. When a photo is selected, the number of copies...