ZoomBrowser EX 6.5 for Windows Instruction Manual
Page 3
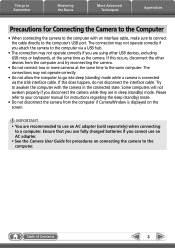
... cable. Some computers will not awaken properly if you are in the connected state. Please refer to the computer. Ensure that you use fully charged batteries if you attach the camera to a computer. IMPORTANT • You are recommended to use an AC adapter. • See the Camera User Guide for procedures...
... cable. Some computers will not awaken properly if you are in the connected state. Please refer to the computer. Ensure that you use fully charged batteries if you attach the camera to a computer. IMPORTANT • You are recommended to use an AC adapter. • See the Camera User Guide for procedures...
ZoomBrowser EX 6.5 for Windows Instruction Manual
Page 57
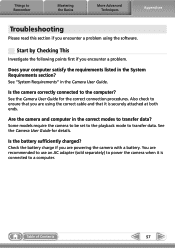
... correct connection procedures. Table of Contents 57 See "System Requirements" in the System Requirements section? Check the battery charge if you encounter a problem. Is the battery sufficiently charged? You are powering the camera with a battery. Start by Checking This Investigate the following points first if you are recommended to use an AC adapter...
... correct connection procedures. Table of Contents 57 See "System Requirements" in the System Requirements section? Check the battery charge if you encounter a problem. Is the battery sufficiently charged? You are powering the camera with a battery. Start by Checking This Investigate the following points first if you are recommended to use an AC adapter...
OPTURA40 OPTURA30 Instruction Manual
Page 3
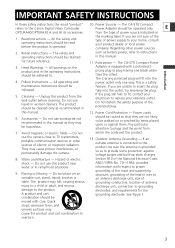
... you are unable to grounding electrodes, and requirements for future reference. 11. Power cords 6. use accessories not recommended in this manual as battery power, refer to the Canon Digital Video Camcorder Power Adapter should be retained such as they are not likely to replace your product dealer or local power company. Water and...
... you are unable to grounding electrodes, and requirements for future reference. 11. Power cords 6. use accessories not recommended in this manual as battery power, refer to the Canon Digital Video Camcorder Power Adapter should be retained such as they are not likely to replace your product dealer or local power company. Water and...
OPTURA40 OPTURA30 Instruction Manual
Page 4
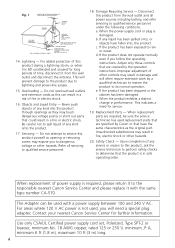
... 120 V AC power is in damage and will prevent damage to the product due to rain or water. Refer all power sources including battery, and refer servicing to qualified service personnel. 18. f. Replacement Parts - Overloading - When the power-supply cord or plug is required,... please return it to the responsible nearest Canon Service Center and please replace it from the wall outlet and all servicing to qualified service personnel under the following conditions: a. e. When ...
... 120 V AC power is in damage and will prevent damage to the product due to rain or water. Refer all power sources including battery, and refer servicing to qualified service personnel. 18. f. Replacement Parts - Overloading - When the power-supply cord or plug is required,... please return it to the responsible nearest Canon Service Center and please replace it from the wall outlet and all servicing to qualified service personnel under the following conditions: a. e. When ...
OPTURA40 OPTURA30 Instruction Manual
Page 5
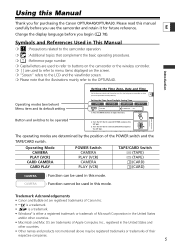
...are trademarks of the POWER switch and the TAPE/CARD switch. Please read this manual carefully before you use the camcorder and retain it for purchasing the Canon OPTURA40/OPTURA30. E Setting the Time Zone/Daylight Saving Time CAMERA PLAY (VCR) CARD CAMERA CARD PLAY ( ...the time zone, date and time when you first start using your camcorder, or when you for future reference. Using this Manual Thank you have replaced the backup battery. Trademark Acknowledgements • Canon and Bubble Jet are registered trademarks of Canon Inc. • D is a trademark. • is a ...
...are trademarks of the POWER switch and the TAPE/CARD switch. Please read this manual carefully before you use the camcorder and retain it for purchasing the Canon OPTURA40/OPTURA30. E Setting the Time Zone/Daylight Saving Time CAMERA PLAY (VCR) CARD CAMERA CARD PLAY ( ...the time zone, date and time when you first start using your camcorder, or when you for future reference. Using this Manual Thank you have replaced the backup battery. Trademark Acknowledgements • Canon and Bubble Jet are registered trademarks of Canon Inc. • D is a trademark. • is a ...
OPTURA40 OPTURA30 Instruction Manual
Page 6
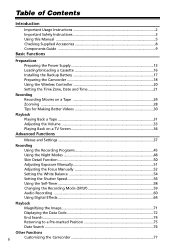
... Supplied Accessories 8 Components Guide ...9 Basic Functions Preparations Preparing the Power Supply 13 Loading/Unloading a Cassette 16 Installing the Backup Battery 17 Preparing the Camcorder 18 Using the Wireless Controller 20 Setting the Time Zone, Date and Time 21 Recording Recording Movies on a Tape 24 Zooming... ...28 Tips for Making Better Videos 30 Playback Playing Back a Tape ...31 Adjusting the Volume 33 Playing Back on a...
... Supplied Accessories 8 Components Guide ...9 Basic Functions Preparations Preparing the Power Supply 13 Loading/Unloading a Cassette 16 Installing the Backup Battery 17 Preparing the Camcorder 18 Using the Wireless Controller 20 Setting the Time Zone, Date and Time 21 Recording Recording Movies on a Tape 24 Zooming... ...28 Tips for Making Better Videos 30 Playback Playing Back a Tape ...31 Adjusting the Volume 33 Playing Back on a...
OPTURA40 OPTURA30 Instruction Manual
Page 8
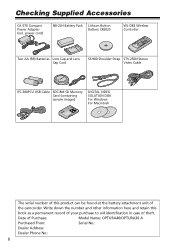
... information here and retain this product can be found at the battery attachment unit of the camcorder. Checking Supplied Accessories CA-570 Compact Power Adapter (incl. power cord) NB-2LH Battery Pack Lithium Button Battery CR2025 WL-D83 Wireless Controller Two AA (R6) Batteries Lens Cap and Lens Cap Cord SS-900 Shoulder Strap STV...
... information here and retain this product can be found at the battery attachment unit of the camcorder. Checking Supplied Accessories CA-570 Compact Power Adapter (incl. power cord) NB-2LH Battery Pack Lithium Button Battery CR2025 WL-D83 Wireless Controller Two AA (R6) Batteries Lens Cap and Lens Cap Cord SS-900 Shoulder Strap STV...
OPTURA40 OPTURA30 Instruction Manual
Page 9
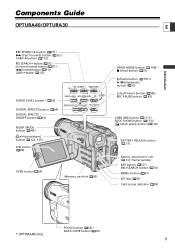
.../pause) button ( 31) (self-timer) button ( 58) / REC PAUSE button ( 85) CARD MIX button ( 117) / SLIDE SHOW button ( 113) / (stitch assist) button ( 110) BATTERY RELEASE button ( 13) Battery attachment unit ( 13) / Serial number EXP button ( 51) / END SEARCH button ( 74) MENU button ( 37) SET dial ( 37) Card access indicator ( 93) * OPTURA40 only...
.../pause) button ( 31) (self-timer) button ( 58) / REC PAUSE button ( 85) CARD MIX button ( 117) / SLIDE SHOW button ( 113) / (stitch assist) button ( 110) BATTERY RELEASE button ( 13) Battery attachment unit ( 13) / Serial number EXP button ( 51) / END SEARCH button ( 74) MENU button ( 37) SET dial ( 37) Card access indicator ( 93) * OPTURA40 only...
OPTURA40 OPTURA30 Instruction Manual
Page 11
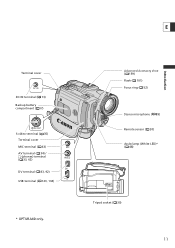
E Terminal cover DC IN terminal ( 13) Backup battery compartment ( 17) S S-video terminal ( 35) Terminal cover MIC terminal ( 63) AV terminal ( 34) / (phones) terminal ( 33, 62) DV terminal ( 83, 92) USB terminal ( 123, 134) * OPTURA40 only. Advanced Accessory shoe ( 159) Flash ( 101) Focus ring ( 52) Stereo microphone ( 89) Remote sensor ( 20) Assist lamp (White LED)* ( 48) Tripod socket ( 30) 11 Introduction
E Terminal cover DC IN terminal ( 13) Backup battery compartment ( 17) S S-video terminal ( 35) Terminal cover MIC terminal ( 63) AV terminal ( 34) / (phones) terminal ( 33, 62) DV terminal ( 83, 92) USB terminal ( 123, 134) * OPTURA40 only. Advanced Accessory shoe ( 159) Flash ( 101) Focus ring ( 52) Stereo microphone ( 89) Remote sensor ( 20) Assist lamp (White LED)* ( 48) Tripod socket ( 30) 11 Introduction
OPTURA40 OPTURA30 Instruction Manual
Page 13
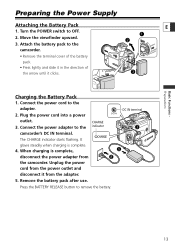
... terminal outlet. Connect the power adapter to remove the battery. 13 Unplug the power cord from the power outlet and disconnect it clicks. Attach the battery pack to the camcorder. • Remove the terminal cover of the battery pack. • Press lightly and slide it in ...the direction of the arrow until it from the camcorder. CHARGE 3. When charging is complete. 4. Remove the battery pack after use. Basic Functions Preparations Preparing the Power Supply Attaching the Battery Pack 1. It glows steadily when charging is complete, disconnect the power ...
... terminal outlet. Connect the power adapter to remove the battery. 13 Unplug the power cord from the power outlet and disconnect it clicks. Attach the battery pack to the camcorder. • Remove the terminal cover of the battery pack. • Press lightly and slide it in ...the direction of the arrow until it from the camcorder. CHARGE 3. When charging is complete. 4. Remove the battery pack after use. Basic Functions Preparations Preparing the Power Supply Attaching the Battery Pack 1. It glows steadily when charging is complete, disconnect the power ...
OPTURA40 OPTURA30 Instruction Manual
Page 14
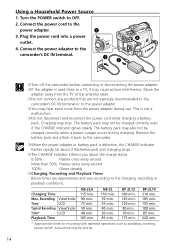
...camcorder. ❍ When the power adapter or battery pack is not a malfunction. ❍ Do not disconnect and reconnect the power cord while charging a battery pack. The battery... pack may also not be charged correctly when a power outage occurs during use. The battery...Turn the POWER switch to the camcorder's DC IN terminal. ew ...camcorder before connecting or disconnecting the power adapter. ❍ If the adapter is used close to the charging, recording or playback conditions. q 3. Remove the battery...camcorder's DC IN terminal or to the power adapter...
...camcorder. ❍ When the power adapter or battery pack is not a malfunction. ❍ Do not disconnect and reconnect the power cord while charging a battery pack. The battery... pack may also not be charged correctly when a power outage occurs during use. The battery...Turn the POWER switch to the camcorder's DC IN terminal. ew ...camcorder before connecting or disconnecting the power adapter. ❍ If the adapter is used close to the charging, recording or playback conditions. q 3. Remove the battery...camcorder's DC IN terminal or to the power adapter...
OPTURA40 OPTURA30 Instruction Manual
Page 15
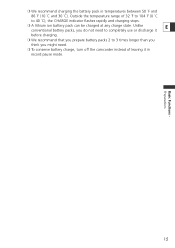
...˚F to 104 ˚F (0 ˚C to 3 times longer than you think you might need. ❍ To conserve battery charge, turn off the camcorder instead of leaving it before charging. ❍ We recommend that you do not need to completely use or discharge it in temperatures ...between 50 ˚F and 86 ˚F (10 ˚C and 30 ˚C). ❍ We recommend charging the battery pack in record pause mode. Unlike E conventional battery...
...˚F to 104 ˚F (0 ˚C to 3 times longer than you think you might need. ❍ To conserve battery charge, turn off the camcorder instead of leaving it before charging. ❍ We recommend that you do not need to completely use or discharge it in temperatures ...between 50 ˚F and 86 ˚F (10 ˚C and 30 ˚C). ❍ We recommend charging the battery pack in record pause mode. Unlike E conventional battery...
OPTURA40 OPTURA30 Instruction Manual
Page 17
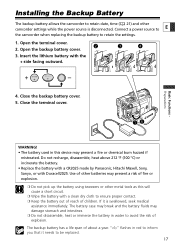
... risk of fire or explosion. ❍ Do not pick up the battery using tweezers or other camcorder settings while the power source is swallowed, seek medical assistance immediately. The battery case may break and the battery fluids may present a fire or chemical burn hazard if mistreated. Do ..."j" flashes in this will cause a short circuit. ❍ Wipe the battery with a clean dry cloth to be replaced. 17 Close the terminal cover. Connect a power source to E the camcorder when replacing the backup battery to retain date, time ( 21) and other metal tools as this device...
... risk of fire or explosion. ❍ Do not pick up the battery using tweezers or other camcorder settings while the power source is swallowed, seek medical assistance immediately. The battery case may break and the battery fluids may present a fire or chemical burn hazard if mistreated. Do ..."j" flashes in this will cause a short circuit. ❍ Wipe the battery with a clean dry cloth to be replaced. 17 Close the terminal cover. Connect a power source to E the camcorder when replacing the backup battery to retain date, time ( 21) and other metal tools as this device...
OPTURA40 OPTURA30 Instruction Manual
Page 20
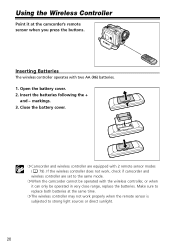
... be operated in very close range, replace the batteries. Inserting Batteries The wireless controller operates with two AA (R6) batteries. 1. Insert the batteries following the + and - Open the battery cover. 2. Close the battery cover. ❍ Camcorder and wireless controller are set to replace both batteries at the camcorder's remote sensor when you press the buttons. Using the Wireless Controller...
... be operated in very close range, replace the batteries. Inserting Batteries The wireless controller operates with two AA (R6) batteries. 1. Insert the batteries following the + and - Open the battery cover. 2. Close the battery cover. ❍ Camcorder and wireless controller are set to replace both batteries at the camcorder's remote sensor when you press the buttons. Using the Wireless Controller...
OPTURA40 OPTURA30 Instruction Manual
Page 21
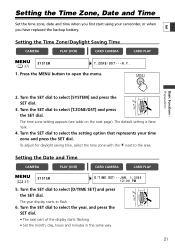
... start using your time zone and press the SET dial. Press the MENU button to select the setting option that represents your camcorder, or when you have replaced the backup battery. E Setting the Time Zone/Daylight Saving Time CAMERA PLAY (VCR) CARD CAMERA CARD PLAY ( 37) SYSTEM T.ZONE/DST•••...
... start using your time zone and press the SET dial. Press the MENU button to select the setting option that represents your camcorder, or when you have replaced the backup battery. E Setting the Time Zone/Daylight Saving Time CAMERA PLAY (VCR) CARD CAMERA CARD PLAY ( 37) SYSTEM T.ZONE/DST•••...
OPTURA40 OPTURA30 Instruction Manual
Page 26
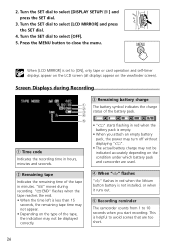
...appear on the LCD screen (all displays appear on the condition under which battery pack and camcorder are too short. 26 Turn the SET dial to close the menu. e Remaining battery charge The battery symbol indicates the charge status of the tape in red when the lithium ...MENU button to select [OFF]. 5. w Remaining tape Indicates the remaining time of the battery pack. • "k" starts flashing in hours, minutes and seconds. r When "j" flashes "j" flashes in minutes. t Recording reminder The camcorder counts from 1 to avoid scenes that are used. Turn the SET dial to select ...
...appear on the LCD screen (all displays appear on the condition under which battery pack and camcorder are too short. 26 Turn the SET dial to close the menu. e Remaining battery charge The battery symbol indicates the charge status of the tape in red when the lithium ...MENU button to select [OFF]. 5. w Remaining tape Indicates the remaining time of the battery pack. • "k" starts flashing in hours, minutes and seconds. r When "j" flashes "j" flashes in minutes. t Recording reminder The camcorder counts from 1 to avoid scenes that are used. Turn the SET dial to select ...

OPTURA40 OPTURA30 Instruction Manual
Page 79
...to prevent interference from other Canon wireless controllers being used nearby. Keep the button pressed for a few seconds. 2. Change the mode if necessary. ❍ Make sure that camcorder and wireless controller are available to the same mode. Display the camcorder's mode by pressing any ...wireless controller, press and hold the REMOTE SET button. Change the batteries if the wireless controller still does not work. 79 Select [WL. REMOTE], set the camcorder to [A 2] and close the menu. On the camcorder, open the menu and select [SYSTEM]. The selected mode appears ...
...to prevent interference from other Canon wireless controllers being used nearby. Keep the button pressed for a few seconds. 2. Change the mode if necessary. ❍ Make sure that camcorder and wireless controller are available to the same mode. Display the camcorder's mode by pressing any ...wireless controller, press and hold the REMOTE SET button. Change the batteries if the wireless controller still does not work. 79 Select [WL. REMOTE], set the camcorder to [A 2] and close the menu. On the camcorder, open the menu and select [SYSTEM]. The selected mode appears ...

OPTURA40 OPTURA30 Instruction Manual
Page 82
...set the backlight at battery use to start the demonstration mode. CAMERA PLAY (VCR) CARD CAMERA CARD PLAY ( 37) DISPLAY SETUP/ BACKLIGHT••••NORMAL Open the menu and select [DISPLAY SETUP/ ]. Demonstration Mode The demonstration mode displays the camcorder's main features. It... starts automatically when you can set the camcorder not to the same brightness. Select [DEMO MODE], set it to [OFF] and close the menu...
...set the backlight at battery use to start the demonstration mode. CAMERA PLAY (VCR) CARD CAMERA CARD PLAY ( 37) DISPLAY SETUP/ BACKLIGHT••••NORMAL Open the menu and select [DISPLAY SETUP/ ]. Demonstration Mode The demonstration mode displays the camcorder's main features. It... starts automatically when you can set the camcorder not to the same brightness. Select [DEMO MODE], set it to [OFF] and close the menu...
OPTURA40 OPTURA30 Instruction Manual
Page 141
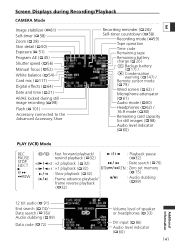
...) Accessory connected to the Advanced Accessory Shoe Recording reminder ( 26)/ E Self-timer countdown ( 58) Recording mode ( 59) Tape operation Time code Remaining tape Remaining battery charge ( 26) Backup battery ( 17) / Condensation warning ( 147) / Remote sensor mode ( 79) Wind screen ( 62) / Microphone attenuator ( 61) Audio mode ( 60) Headphones ( 62) / 16:9 mode ( 80) Remaining...
...) Accessory connected to the Advanced Accessory Shoe Recording reminder ( 26)/ E Self-timer countdown ( 58) Recording mode ( 59) Tape operation Time code Remaining tape Remaining battery charge ( 26) Backup battery ( 17) / Condensation warning ( 147) / Remote sensor mode ( 79) Wind screen ( 62) / Microphone attenuator ( 61) Audio mode ( 60) Headphones ( 62) / 16:9 mode ( 80) Remaining...

OPTURA40 OPTURA30 Instruction Manual
Page 143
...the 93 ERASURE PREVENTION card or change the 150 ERASURE PREVENTION position of the protect switch. NO IMAGES No images are dirty. The camcorder cannot record - NAMING ERROR File or folder number has reached the maximum value. 96 Additional Information 143 CONDENSATION HAS Condensation has been ... with a 89 [BLANK] blank section. This message 21 DATE AND TIME appears each time you can continue recording/playback. CHANGE THE BATTERY PACK Battery pack is protected. CHECK THE DV INPUT DV cable is not connected, or the connected digital device is 83 turned off , remove ...
...the 93 ERASURE PREVENTION card or change the 150 ERASURE PREVENTION position of the protect switch. NO IMAGES No images are dirty. The camcorder cannot record - NAMING ERROR File or folder number has reached the maximum value. 96 Additional Information 143 CONDENSATION HAS Condensation has been ... with a 89 [BLANK] blank section. This message 21 DATE AND TIME appears each time you can continue recording/playback. CHANGE THE BATTERY PACK Battery pack is protected. CHECK THE DV INPUT DV cable is not connected, or the connected digital device is 83 turned off , remove ...


