ZoomBrowser EX 6.5 for Windows Instruction Manual
Page 5
customers only 49 Registering...49 Available Services...50 Preference Settings...51 Customizing ZoomBrowser EX...51 Customizing the Task Buttons...51 Appendices...52 List of Available Functions...52 Supported Image Types...54 Uninstalling the ... Comparing Multiple Images...45 My Camera Settings...46 Changing the Shutter Sound and Start-Up Image 46 Transferring Images...48 Transferring Images to a Camera 48 CANON iMAGE GATEWAY...49 About CANON iMAGE GATEWAY (for U.S.A.
customers only 49 Registering...49 Available Services...50 Preference Settings...51 Customizing ZoomBrowser EX...51 Customizing the Task Buttons...51 Appendices...52 List of Available Functions...52 Supported Image Types...54 Uninstalling the ... Comparing Multiple Images...45 My Camera Settings...46 Changing the Shutter Sound and Start-Up Image 46 Transferring Images...48 Transferring Images to a Camera 48 CANON iMAGE GATEWAY...49 About CANON iMAGE GATEWAY (for U.S.A.
ZoomBrowser EX 6.5 for Windows Instruction Manual
Page 50
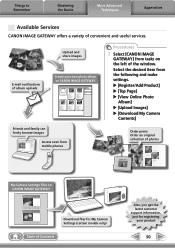
E-mail notifications of album uploads Upload and share images Create your own photo album on CANON iMAGE GATEWAY Procedures 1 Select [CANON iMAGE GATEWAY] from tasks on CANON iMAGE GATEWAY Download files for registering your product 50 u [Register/Add Product] u [Top Page] u [View Online Photo Album] u [Upload Images] u [Download My Camera Contents] Friends and family can...
E-mail notifications of album uploads Upload and share images Create your own photo album on CANON iMAGE GATEWAY Procedures 1 Select [CANON iMAGE GATEWAY] from tasks on CANON iMAGE GATEWAY Download files for registering your product 50 u [Register/Add Product] u [Top Page] u [View Online Photo Album] u [Upload Images] u [Download My Camera Contents] Friends and family can...
DV Messenger Ver 1.0 Instruction Manual
Page 4
Contents Read Carefully Before Using 2 CANON SOFTWARE LICENCE AGREEMENT 2 Read This First ...5 Required Accessories ...6 Requirements ... Uninstalling the DV Messenger 16 Uninstalling the AV/C Camera Storage Subunit-WIA Driver 16 Connecting the Camcorder to a Computer 22 AV/C Camera Storage Subunit-WIA Driver Downloading Still Images/Movies to a ...Camcorders with DV Messenger 43 In [CAMERA] Mode ...44 In [VCR] Mode ...45 In [CARD] Mode (File Transfer 47 Changing the Mode of the Camcorder 49 Ending DV Messenger 50 Ending the Communication with your Contact 50 Ending DV Messenger 50...
Contents Read Carefully Before Using 2 CANON SOFTWARE LICENCE AGREEMENT 2 Read This First ...5 Required Accessories ...6 Requirements ... Uninstalling the DV Messenger 16 Uninstalling the AV/C Camera Storage Subunit-WIA Driver 16 Connecting the Camcorder to a Computer 22 AV/C Camera Storage Subunit-WIA Driver Downloading Still Images/Movies to a ...Camcorders with DV Messenger 43 In [CAMERA] Mode ...44 In [VCR] Mode ...45 In [CARD] Mode (File Transfer 47 Changing the Mode of the Camcorder 49 Ending DV Messenger 50 Ending the Communication with your Contact 50 Ending DV Messenger 50...
DV Messenger Ver 1.0 Instruction Manual
Page 41
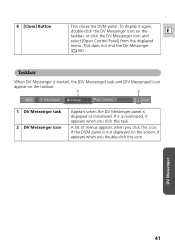
... Messenger] task and [DV Messenger] icon appear on the screen, it appears when you double-click this icon. This does not end the DV Messenger ( 50). Taskbar When DV Messenger is minimized, it again, double-click the DV Messenger icon on the E taskbar, or click the DV Messenger icon and select...
... Messenger] task and [DV Messenger] icon appear on the screen, it appears when you double-click this icon. This does not end the DV Messenger ( 50). Taskbar When DV Messenger is minimized, it again, double-click the DV Messenger icon on the E taskbar, or click the DV Messenger icon and select...
DV Messenger Ver 1.0 Instruction Manual
Page 50
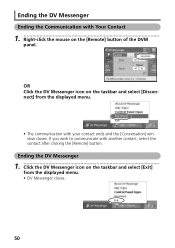
OR Click the DV Messenger icon on the taskbar and select [Disconnect] from the displayed menu. • DV Messenger closes. 50 Ending the DV Messenger 1 Click the DV Messenger icon on the [Remote] button of the DVM panel. If you wish to communicate with your contact ends and the [Conversation] window closes. Ending the DV Messenger Ending the Communication with Your Contact 1 Right-click the mouse on the taskbar and select [Exit] from the displayed menu. • The communication with another contact, select the contact after clicking the [Remote] button.
OR Click the DV Messenger icon on the taskbar and select [Disconnect] from the displayed menu. • DV Messenger closes. 50 Ending the DV Messenger 1 Click the DV Messenger icon on the [Remote] button of the DVM panel. If you wish to communicate with your contact ends and the [Conversation] window closes. Ending the DV Messenger Ending the Communication with Your Contact 1 Right-click the mouse on the taskbar and select [Exit] from the displayed menu. • The communication with another contact, select the contact after clicking the [Remote] button.

OPTURA Xi Instruction Manual
Page 6
...Introduction E Reference Guide ...5 Thank You for Choosing a Canon 9 Introducing the OPTURA Xi 10 Components Guide ...11 Mastering the Basics Introduction Preparations Using a Household Power Source 15 Attaching and Charging the Battery Pack 16 Installing the Backup Battery 19 Preparing the Camcorder 20 Loading a Cassette ...22 Using the Wireless Controller... ...75 Using the VL-3 Video Light (Optional 78 Using the VFL-1 Video Flash Light (Optional 79 Using the DM-50 Microphone (Optional 81 Manual Adjustments Adjusting the Focus Manually 82 6 Adjusting Exposure Manually 84
...Introduction E Reference Guide ...5 Thank You for Choosing a Canon 9 Introducing the OPTURA Xi 10 Components Guide ...11 Mastering the Basics Introduction Preparations Using a Household Power Source 15 Attaching and Charging the Battery Pack 16 Installing the Backup Battery 19 Preparing the Camcorder 20 Loading a Cassette ...22 Using the Wireless Controller... ...75 Using the VL-3 Video Light (Optional 78 Using the VFL-1 Video Flash Light (Optional 79 Using the DM-50 Microphone (Optional 81 Manual Adjustments Adjusting the Focus Manually 82 6 Adjusting Exposure Manually 84

OPTURA Xi Instruction Manual
Page 10
...allows high-quality transfer with built-in Recording/ Audio Dubbing/AV Insert Editing 10 Advanced Accessory Shoe Simply slide Canon's VFL-1 Video Flash Light, DM-50 Directional Stereo Microphone or VL-3 Video Light into one panoramic scene with the Night and Super Night mode. Manual... into the accessory shoe; Built-in Flash The OPTURA Xi has a built-in Stitch Assist mode can edit images by connecting to illuminate the subject. the camcorder provides power and connections. Images recorded in , pop-up to a Canon printer with IEEE1394 terminal. Night and Super Night Mode...
...allows high-quality transfer with built-in Recording/ Audio Dubbing/AV Insert Editing 10 Advanced Accessory Shoe Simply slide Canon's VFL-1 Video Flash Light, DM-50 Directional Stereo Microphone or VL-3 Video Light into one panoramic scene with the Night and Super Night mode. Manual... into the accessory shoe; Built-in Flash The OPTURA Xi has a built-in Stitch Assist mode can edit images by connecting to illuminate the subject. the camcorder provides power and connections. Images recorded in , pop-up to a Canon printer with IEEE1394 terminal. Night and Super Night Mode...

OPTURA Xi Instruction Manual
Page 15
...; Do not connect any products that are not expressly recommended to the camcorder's DC IN terminal or to the power adapter. ❍ You may cause picture interference. The power adapter converts current from a power outlet (100-240 V E AC, 50/60 Hz) to the DC current used close to the... camcorder's DC IN terminal. Connect the power adapter to a TV, it from a household power source using the supplied power adapter.
...; Do not connect any products that are not expressly recommended to the camcorder's DC IN terminal or to the power adapter. ❍ You may cause picture interference. The power adapter converts current from a power outlet (100-240 V E AC, 50/60 Hz) to the DC current used close to the... camcorder's DC IN terminal. Connect the power adapter to a TV, it from a household power source using the supplied power adapter.

OPTURA Xi Instruction Manual
Page 16
... the viewfinder and move it back to the camcorder. • Remove the terminal cover of the battery pack. • Align the end of the battery pack with the supplied power adapter before you about the charge status. 0-50%: Flashes once every second More than 50%: Flashes twice every second 100%: Glows steadily ❍...
... the viewfinder and move it back to the camcorder. • Remove the terminal cover of the battery pack. • Align the end of the battery pack with the supplied power adapter before you about the charge status. 0-50%: Flashes once every second More than 50%: Flashes twice every second 100%: Glows steadily ❍...

OPTURA Xi Instruction Manual
Page 17
...record pause mode. Actual time may be charged at any charge state. Typical Recording Time* Using the viewfinder Using the LCD 65 min. 50 min. 65 min. 50 min. 135 min. 105 min. 215 min. 165 min. * Approximate times for recording with repeated operations such as start/stop, zooming,... power on/off the camcorder instead of leaving it before charging. Recording Time Battery Pack BP-512 (Supplied) BP-511 (Optional) BP-522 (Optional) BP-535...
...record pause mode. Actual time may be charged at any charge state. Typical Recording Time* Using the viewfinder Using the LCD 65 min. 50 min. 65 min. 50 min. 135 min. 105 min. 215 min. 165 min. * Approximate times for recording with repeated operations such as start/stop, zooming,... power on/off the camcorder instead of leaving it before charging. Recording Time Battery Pack BP-512 (Supplied) BP-511 (Optional) BP-522 (Optional) BP-535...

OPTURA Xi Instruction Manual
Page 18
...; Charged battery packs continue to discharge naturally. If you have more than 1 battery pack, perform these precautions at normal temperatures. 18 Warm it away from 50˚ F to 86˚ F (10˚ C to temperature higher than 86˚ F (30˚ C). The battery charge indicators are used...º F (60º C). Therefore, charge them on the day of the battery pack. Contact to the condition under which battery pack and camcorder are not constant - If you do not use . At cold temperatures, performance will temporarily decline. E When the battery pack is left? they ...
...; Charged battery packs continue to discharge naturally. If you have more than 1 battery pack, perform these precautions at normal temperatures. 18 Warm it away from 50˚ F to 86˚ F (10˚ C to temperature higher than 86˚ F (30˚ C). The battery charge indicators are used...º F (60º C). Therefore, charge them on the day of the battery pack. Contact to the condition under which battery pack and camcorder are not constant - If you do not use . At cold temperatures, performance will temporarily decline. E When the battery pack is left? they ...

OPTURA Xi Instruction Manual
Page 50
REMOTE A1, A2, OFF A 51 TALLY LAMP ON, OFF 54 BEEP ON, OFF 54 USB CONNECT STANDARD, STORAGE 139 T.ZONE/DST See list of Features 50 DATE, TIME, DATE & TIME 93 SYSTEM WL. Using the Full Range of time zones 25 D/TIME SET 26 MY CAMERA SEL. S-UP IMG S-UP SOUND ...NO IMAGE, CANON LOGO, MY IMAGE1, 52 MY IMAGE2 OFF, DEFAULT, MY SOUND1, MY SOUND2 52 SHTR SOUND OFF, DEFAULT, MY SOUND1, MY SOUND2 52 OPER. SOUND OFF...
REMOTE A1, A2, OFF A 51 TALLY LAMP ON, OFF 54 BEEP ON, OFF 54 USB CONNECT STANDARD, STORAGE 139 T.ZONE/DST See list of Features 50 DATE, TIME, DATE & TIME 93 SYSTEM WL. Using the Full Range of time zones 25 D/TIME SET 26 MY CAMERA SEL. S-UP IMG S-UP SOUND ...NO IMAGE, CANON LOGO, MY IMAGE1, 52 MY IMAGE2 OFF, DEFAULT, MY SOUND1, MY SOUND2 52 SHTR SOUND OFF, DEFAULT, MY SOUND1, MY SOUND2 52 OPER. SOUND OFF...

OPTURA Xi Instruction Manual
Page 76
... recording. Recording with headphones. Audio Level Indicator ❍ In auto mode, you can be recorded not in the picture. ❍ See also Using the DM-50 Microphone ( 81). 76 Almost all stereo microphones with long microphones as fireworks, drums or concerts), E sound may become distorted or may appear in the actual...
... recording. Recording with headphones. Audio Level Indicator ❍ In auto mode, you can be recorded not in the picture. ❍ See also Using the DM-50 Microphone ( 81). 76 Almost all stereo microphones with long microphones as fireworks, drums or concerts), E sound may become distorted or may appear in the actual...

OPTURA Xi Instruction Manual
Page 77
... the volume with the wind noise. You can also be used when an external microphone is connected to the MIC terminal or when the DM-50 Microphone is set it to increase the volume again. Select [WIND SCREEN], set to [MIC. Wind Screen You can reduce the wind noise when recording...
... the volume with the wind noise. You can also be used when an external microphone is connected to the MIC terminal or when the DM-50 Microphone is set it to increase the volume again. Select [WIND SCREEN], set to [MIC. Wind Screen You can reduce the wind noise when recording...

OPTURA Xi Instruction Manual
Page 81
... before attaching/removing the microphone. ❍ Do not connect any microphone to the MIC terminal when the DM-50 Microphone is securely attached to the camcorder. 4. Tighten the shoe lock. " " (Connection) appears. 5. Set the microphone's directivity switch. • SHOTGUN: ...Make sure that the microphone is connected. ❍ Do not carry the camcorder by the camcorder's E power supply. Use it clicks. 3. Using the DM-50 Microphone (Optional) The high sensitive Directional Stereo Microphone DM-50 attaches to the advanced accessory shoe for recording or dubbing audio.
... before attaching/removing the microphone. ❍ Do not connect any microphone to the MIC terminal when the DM-50 Microphone is securely attached to the camcorder. 4. Tighten the shoe lock. " " (Connection) appears. 5. Set the microphone's directivity switch. • SHOTGUN: ...Make sure that the microphone is connected. ❍ Do not carry the camcorder by the camcorder's E power supply. Use it clicks. 3. Using the DM-50 Microphone (Optional) The high sensitive Directional Stereo Microphone DM-50 attaches to the advanced accessory shoe for recording or dubbing audio.

OPTURA Xi Instruction Manual
Page 106
...AUDIO DUB.•••AUDIO IN 1. Press the AUDIO DUB. button on the wireless controller. 5. and " a" appear. • If the optional DM-50 microphone is attached, " " ZERO SET MEMORY / STOP / AUDIO DUB. Open the menu and select [AUDIO SET UP]. ZERO SET MEMORY / STOP / AUDIO... controller. • "AUDIO DUB." Press the PAUSE a button on the TV screen and the sound with headphones connected to the microphone. Set the camcorder to [AUDIO IN] or [MIC. PAUSE SLOW ×2 AV INSERT AV DV MENU SET REMOTE SET (Connection) appears. 6. Select [AUDIO DUB.],...
...AUDIO DUB.•••AUDIO IN 1. Press the AUDIO DUB. button on the wireless controller. 5. and " a" appear. • If the optional DM-50 microphone is attached, " " ZERO SET MEMORY / STOP / AUDIO DUB. Open the menu and select [AUDIO SET UP]. ZERO SET MEMORY / STOP / AUDIO... controller. • "AUDIO DUB." Press the PAUSE a button on the TV screen and the sound with headphones connected to the microphone. Set the camcorder to [AUDIO IN] or [MIC. PAUSE SLOW ×2 AV INSERT AV DV MENU SET REMOTE SET (Connection) appears. 6. Select [AUDIO DUB.],...

OPTURA Xi Instruction Manual
Page 110
... in the total number. ❍ Remaining Image Capacity: flashing in red: No card in green: 6 or more images in yellow: 1 to be displayed correctly in a camcorder not supporting this size. ❍ Still images are compressed and recorded in red: No more images 110 CAMERA PLAY (VCR) CARD CAMERA CARD PLAY (VCR... × 480 pixels. of a 8 MB Memory Card and File Size per Image Superfine 3 1360 KB 5 850 KB 34 175 KB Fine 5 880 KB 9 550 KB 50 120 KB Normal 10 480 KB 16 300 KB 84 65 KB These figures are to 5 images in the JPEG (Joint Photographic Experts Group) format...
... in the total number. ❍ Remaining Image Capacity: flashing in red: No card in green: 6 or more images in yellow: 1 to be displayed correctly in a camcorder not supporting this size. ❍ Still images are compressed and recorded in red: No more images 110 CAMERA PLAY (VCR) CARD CAMERA CARD PLAY (VCR... × 480 pixels. of a 8 MB Memory Card and File Size per Image Superfine 3 1360 KB 5 850 KB 34 175 KB Fine 5 880 KB 9 550 KB 50 120 KB Normal 10 480 KB 16 300 KB 84 65 KB These figures are to 5 images in the JPEG (Joint Photographic Experts Group) format...

OPTURA Xi Instruction Manual
Page 117
...to select the frame to the right, down to select the frame to CARD CAMERA mode. FINE 50 A white focusing frame appears in the center of the screen. Set the camcorder to the left. In the Focuspriority mode, you can be recorded on the memory card. 117 CAMERA... PLAY (VCR) CARD CAMERA CARD PLAY (VCR) 1. FINE 50 Three focusing frames appear on the wireless controller, recording starts immediately...
...to select the frame to the right, down to select the frame to CARD CAMERA mode. FINE 50 A white focusing frame appears in the center of the screen. Set the camcorder to the left. In the Focuspriority mode, you can be recorded on the memory card. 117 CAMERA... PLAY (VCR) CARD CAMERA CARD PLAY (VCR) 1. FINE 50 Three focusing frames appear on the wireless controller, recording starts immediately...

OPTURA Xi Instruction Manual
Page 122
E ❍ Do not try to 50% of the adjoining image. Using a Memory Card 122 ❍ Compose each image so that it overlaps 30 to stitch images that include both distant and close subjects. They may appear warped or doubled up. ❍ The continuous shooting mode cannot be used in the overlapping portion. Try to keep the vertical misalignment within 10%. ❍ Do not include moving subject in Stitch Assist mode.
E ❍ Do not try to 50% of the adjoining image. Using a Memory Card 122 ❍ Compose each image so that it overlaps 30 to stitch images that include both distant and close subjects. They may appear warped or doubled up. ❍ The continuous shooting mode cannot be used in the overlapping portion. Try to keep the vertical misalignment within 10%. ❍ Do not include moving subject in Stitch Assist mode.

OPTURA Xi Instruction Manual
Page 156
... 84) ( 74) Card access display Still image quality ( 110) Remaining card capacity Backlight compensation ( 85) Manual focus ( 82) W E.LOCK 0 BLC MF T S.FINE 50 1sec 1632 352 for still images ( 110) Still image size ( 110) Movie size ( 111) Stitch assist ( 121) White balance ( 89) Custom key ( 53) Date...VCR) Mode Still image playback mode Print order ( 130) Protect mark ( 128) Slide show ( 127) Card access display SLIDE SHOW 101-0143 43/50 640 480 Folder numberFile number ( 111) Current image/ total images Data code ( 92) Movie playback mode Protect mark ( 128) Slide show ( 127)...
... 84) ( 74) Card access display Still image quality ( 110) Remaining card capacity Backlight compensation ( 85) Manual focus ( 82) W E.LOCK 0 BLC MF T S.FINE 50 1sec 1632 352 for still images ( 110) Still image size ( 110) Movie size ( 111) Stitch assist ( 121) White balance ( 89) Custom key ( 53) Date...VCR) Mode Still image playback mode Print order ( 130) Protect mark ( 128) Slide show ( 127) Card access display SLIDE SHOW 101-0143 43/50 640 480 Folder numberFile number ( 111) Current image/ total images Data code ( 92) Movie playback mode Protect mark ( 128) Slide show ( 127)...
