imageCLASS MF4690 Starter Guide
Page 3
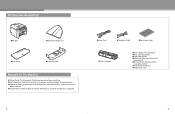
... ● Scanner Driver Guide (located on the User Software CD): Scanner settings from a computer 3 ●Power Cord ●Telephone Cable ●Destination Labels ●Toner Cartridge ●Starter Guide (This Document) ●Basic Operation Guide ●User Software CD ●Reference Guide (located on User Software CD) ●Scanner Driver Guide...
... ● Scanner Driver Guide (located on the User Software CD): Scanner settings from a computer 3 ●Power Cord ●Telephone Cable ●Destination Labels ●Toner Cartridge ●Starter Guide (This Document) ●Basic Operation Guide ●User Software CD ●Reference Guide (located on User Software CD) ●Scanner Driver Guide...
imageCLASS MF4690 Starter Guide
Page 4
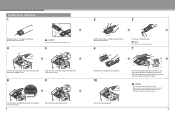
...that the protrusion on the right side of the toner cartridge (A) fits into the guide (B) located on dent. 8 9 Push the toner cartridge to make sure the toner cartridge is properly set in the machine. 6 If you cannot close . Install Toner Cartridge 1 Remove the toner cartridge from the bag. CAUTION - Keep the bag for future.... Open the cover and make sure it is properly set in the machine. 5 Close the toner cover using the tab. 2 3 Gently rock the toner cartridge several times to get your fingers caught. - NOTE Do not pull the seal out at an angle. 7 Hold the toner...
...that the protrusion on the right side of the toner cartridge (A) fits into the guide (B) located on dent. 8 9 Push the toner cartridge to make sure the toner cartridge is properly set in the machine. 6 If you cannot close . Install Toner Cartridge 1 Remove the toner cartridge from the bag. CAUTION - Keep the bag for future.... Open the cover and make sure it is properly set in the machine. 5 Close the toner cover using the tab. 2 3 Gently rock the toner cartridge several times to get your fingers caught. - NOTE Do not pull the seal out at an angle. 7 Hold the toner...
imageCLASS MF4690 Starter Guide
Page 7
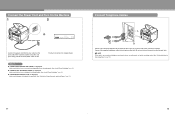
...... ● is displayed: Make sure that the toner cover and scanning platform are closed properly. (See "Install Toner Cartridge," on p. 5.) ● is displayed: Make sure that the toner cartridge is installed properly. (See "Install Toner Cartridge," on p. 5.) ● is displayed: Make sure that paper is loaded in the machine. (See "Set Up the...
...... ● is displayed: Make sure that the toner cover and scanning platform are closed properly. (See "Install Toner Cartridge," on p. 5.) ● is displayed: Make sure that the toner cartridge is installed properly. (See "Install Toner Cartridge," on p. 5.) ● is displayed: Make sure that paper is loaded in the machine. (See "Set Up the...
Service Manual
Page 8
... of Fault of the Scanner Motor ...5- 3 5.5 Parts Replacement Procedure ...5- 4 5.5.1 Laser/Scanner Unit ...5- 4 5.5.1.1 Preparation for Removing the Laser Scanner Unit ...5- 4 5.5.1.2 Removing the Laser Scanner Unit ...5- 4 Chapter 6 Image Formation 6.1 Overview/Configuration ...6- 1 6.1.1 Configuration...6- 1 6.1.2 Print Process...6- 1 6.2 Driving and Controlling the High-Voltage System 6- 3 6.2.1 Generation of Transfer Charging Bias ...6- 3 6.3 Toner Cartridge ...6- 3 6.3.1 Toner Level Detection...6- 3 6.4 Parts Replacement Procedure ...6- 4 6.4.1 Transfer Charging...
... of Fault of the Scanner Motor ...5- 3 5.5 Parts Replacement Procedure ...5- 4 5.5.1 Laser/Scanner Unit ...5- 4 5.5.1.1 Preparation for Removing the Laser Scanner Unit ...5- 4 5.5.1.2 Removing the Laser Scanner Unit ...5- 4 Chapter 6 Image Formation 6.1 Overview/Configuration ...6- 1 6.1.1 Configuration...6- 1 6.1.2 Print Process...6- 1 6.2 Driving and Controlling the High-Voltage System 6- 3 6.2.1 Generation of Transfer Charging Bias ...6- 3 6.3 Toner Cartridge ...6- 3 6.3.1 Toner Level Detection...6- 3 6.4 Parts Replacement Procedure ...6- 4 6.4.1 Transfer Charging...

Service Manual
Page 9
... Cover ...9- 2 9.3.3 Right Cover...9- 2 9.3.3.1 Removing the Right Cover...9- 2 9.3.4 Left Cover ...9- 2 9.3.4.1 Removing the Left Cover ...9- 2 9.3.5 Upper Cover ...9- 3 9.3.5.1 Preparation for Removing the Upper Cover...9- 3 9.3.5.2 Removing the Upper Cover ...9- 3 9.3.6 Cartridge Cover ...9- 3
... Cover ...9- 2 9.3.3 Right Cover...9- 2 9.3.3.1 Removing the Right Cover...9- 2 9.3.4 Left Cover ...9- 2 9.3.4.1 Removing the Left Cover ...9- 2 9.3.5 Upper Cover ...9- 3 9.3.5.1 Preparation for Removing the Upper Cover...9- 3 9.3.5.2 Removing the Upper Cover ...9- 3 9.3.6 Cartridge Cover ...9- 3
Service Manual
Page 24
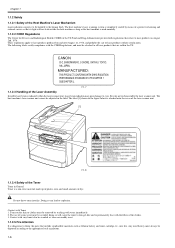
... warm water must be avoided, doing so will cause the toner to turn gel-like and to all laser products that include combustible materials such as lithium battery and toner cartridge etc., into fire. CANON 30-2, SHIMOMARUKO, 3-CHOME, OHTAKU, TOKYO, 146, JAPAN. Any used normally. 1.1.2.2 CDRH Regulations 0016-1802 The Center for Devices...
... warm water must be avoided, doing so will cause the toner to turn gel-like and to all laser products that include combustible materials such as lithium battery and toner cartridge etc., into fire. CANON 30-2, SHIMOMARUKO, 3-CHOME, OHTAKU, TOKYO, 146, JAPAN. Any used normally. 1.1.2.2 CDRH Regulations 0016-1802 The Center for Devices...
Service Manual
Page 25
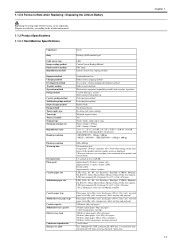
...up: 1 cassette Multi manual feeding pick-up Pad separation method Pad separation method Rubber blade On-demand fixing By drum style toner cartridge Magnetic negative toner Yes Sheets, books, solids (up time may cause explosion. From when turning on the main power of battery ... stack Continuous reproduction Energy save mode Fixed Desktop (ADF standard type) LED Contact Sensor Reading Method OPC drum Indirect electrostatic copying method Semiconductor laser Roller contact charging method Dry system - Dispose used battery according to 99 sheets Yes. (Manual ON / OFF, automatically OFF after a...
...up: 1 cassette Multi manual feeding pick-up Pad separation method Pad separation method Rubber blade On-demand fixing By drum style toner cartridge Magnetic negative toner Yes Sheets, books, solids (up time may cause explosion. From when turning on the main power of battery ... stack Continuous reproduction Energy save mode Fixed Desktop (ADF standard type) LED Contact Sensor Reading Method OPC drum Indirect electrostatic copying method Semiconductor laser Roller contact charging method Dry system - Dispose used battery according to 99 sheets Yes. (Manual ON / OFF, automatically OFF after a...
Service Manual
Page 26
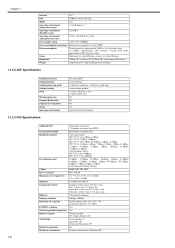
... Maximum: less than 0.05 ppm, average: less than 0.02 ppm Dimensions 390mm (W) x 442mm (D) x 470mm (H) (with original pick-up tray) Weight Approximately 13.4kg (including toner cartridges) 1.1.3.2 ADF Specifications 0016-1762 Original orientation Original position Original processing mode Original reading Stack Mixed original sizes Original AE detection Original size recognition Stamp Operating...
... Maximum: less than 0.05 ppm, average: less than 0.02 ppm Dimensions 390mm (W) x 442mm (D) x 470mm (H) (with original pick-up tray) Weight Approximately 13.4kg (including toner cartridges) 1.1.3.2 ADF Specifications 0016-1762 Original orientation Original position Original processing mode Original reading Stack Mixed original sizes Original AE detection Original size recognition Stamp Operating...

Service Manual
Page 35
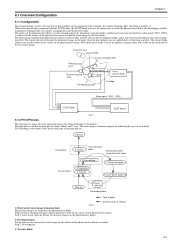
...between turnon of the power supply and the end of the initial drive To clear the drum surface potential Presence/absence of cartridge is the block diagram. Below is detected during this interval. However, depending on the conditions shown below shows the purpose of...1810 The operations of this host machine are mainly composed of the 7 blocks: System Control System, Scanning Control System, Printer Control System, Laser Scanner System, Image Formation System, Fixing System, Pickup/Feeding System. 2.1 Construction Chapter 2 2.1.1 Function Configuration 0016-1809 The functions of this...
...between turnon of the power supply and the end of the initial drive To clear the drum surface potential Presence/absence of cartridge is the block diagram. Below is detected during this interval. However, depending on the conditions shown below shows the purpose of...1810 The operations of this host machine are mainly composed of the 7 blocks: System Control System, Scanning Control System, Printer Control System, Laser Scanner System, Image Formation System, Fixing System, Pickup/Feeding System. 2.1 Construction Chapter 2 2.1.1 Function Configuration 0016-1809 The functions of this...

Service Manual
Page 67
Contents Contents 6.1 Overview/Configuration ...6-1 6.1.1 Configuration ...6-1 6.1.2 Print Process...6-1 6.2 Driving and Controlling the High-Voltage System ...6-3 6.2.1 Generation of Transfer Charging Bias ...6-3 6.3 Toner Cartridge ...6-3 6.3.1 Toner Level Detection ...6-3 6.4 Parts Replacement Procedure...6-4 6.4.1 Transfer Charging Roller ...6-4 6.4.1.1 Removing the Transfer Charging Roller...6-4
Contents Contents 6.1 Overview/Configuration ...6-1 6.1.1 Configuration ...6-1 6.1.2 Print Process...6-1 6.2 Driving and Controlling the High-Voltage System ...6-3 6.2.1 Generation of Transfer Charging Bias ...6-3 6.3 Toner Cartridge ...6-3 6.3.1 Toner Level Detection ...6-3 6.4 Parts Replacement Procedure...6-4 6.4.1 Transfer Charging Roller ...6-4 6.4.1.1 Removing the Transfer Charging Roller...6-4
Service Manual
Page 69
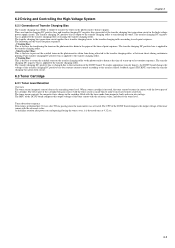
... the surface of the print process. Fixing film area Cleaner blade Primary charging roller Photosensitive drum Transfer charging roller Laser beam Blade Laser / scanner block Developing cylinder Cartridge Video signal VDO /VDO PR1 TRS DEV DCNT board Print command SCNT board F-6-1 6.1.2 Print Process 0016-1840 ...part of this machine, and is composed of this machine has the main 5 blocks and 7 steps. The print process of the cartridge, the transfer charging roller, the fixing assembly, etc. The following the steps of the photosensitive drum to rotate the photosensitive drum, the...
... the surface of the print process. Fixing film area Cleaner blade Primary charging roller Photosensitive drum Transfer charging roller Laser beam Blade Laser / scanner block Developing cylinder Cartridge Video signal VDO /VDO PR1 TRS DEV DCNT board Print command SCNT board F-6-1 6.1.2 Print Process 0016-1840 ...part of this machine, and is composed of this machine has the main 5 blocks and 7 steps. The print process of the cartridge, the transfer charging roller, the fixing assembly, etc. The following the steps of the photosensitive drum to rotate the photosensitive drum, the...
Service Manual
Page 71
...the transfer charging roller according to the transfer current feedback signal (TRCRNT) sent from the transfer charging bias generation circuit. 6.3 Toner Cartridge 6.3.1 Toner Level Detection 0016-1842 Overview The toner sensor (magnetic sensor) detects the remaining toner level. When a toner... to the instruction of the DCNT board. The lower part of the cartridge being attracted to the paper at the transfer charging bias generation circuit in the cartridge filled with the lower part of the cartridge. Toner detections sequence Detection is made from being in contact with the ...
...the transfer charging roller according to the transfer current feedback signal (TRCRNT) sent from the transfer charging bias generation circuit. 6.3 Toner Cartridge 6.3.1 Toner Level Detection 0016-1842 Overview The toner sensor (magnetic sensor) detects the remaining toner level. When a toner... to the instruction of the DCNT board. The lower part of the cartridge being attracted to the paper at the transfer charging bias generation circuit in the cartridge filled with the lower part of the cartridge. Toner detections sequence Detection is made from being in contact with the ...

Service Manual
Page 97
... Cover ...9-2 9.3.3 Right Cover ...9-2 9.3.3.1 Removing the Right Cover...9-2 9.3.4 Left Cover ...9-2 9.3.4.1 Removing the Left Cover...9-2 9.3.5 Upper Cover...9-3 9.3.5.1 Preparation for Removing the Upper Cover ...9-3 9.3.5.2 Removing the Upper Cover ...9-3 9.3.6 Cartridge Cover...9-3 9.3.6.1 Preparation for Removing the Printer Cover ...9-3 9.3.6.2 Removing the Printer Cover...9-3 9.3.7 Operation Panel Unit...9-4 9.3.7.1 Removing the Control Panel Unit ...9-4 9.3.8 SCNT Board...9-4 9.3.8.1 Preparation for Removing the...
... Cover ...9-2 9.3.3 Right Cover ...9-2 9.3.3.1 Removing the Right Cover...9-2 9.3.4 Left Cover ...9-2 9.3.4.1 Removing the Left Cover...9-2 9.3.5 Upper Cover...9-3 9.3.5.1 Preparation for Removing the Upper Cover ...9-3 9.3.5.2 Removing the Upper Cover ...9-3 9.3.6 Cartridge Cover...9-3 9.3.6.1 Preparation for Removing the Printer Cover ...9-3 9.3.6.2 Removing the Printer Cover...9-3 9.3.7 Operation Panel Unit...9-4 9.3.7.1 Removing the Control Panel Unit ...9-4 9.3.8 SCNT Board...9-4 9.3.8.1 Preparation for Removing the...

Service Manual
Page 101
.... 6) Remove the printer cover. 9.3.5.2 Removing the Upper Cover 0016-4981 1) Remove the 4 screws [1], and detach the upper cover [2]. 7) Remove the damper rail [3]. -2 screws [1] -1 claw [2] F-9-10 9.3.6 Cartridge Cover F-9-13 9.3.6.1 Preparation for Removing the Printer Cover 0016-4982 1) Remove the front cover. 2) Remove the right cover. 3) Remove the left cover [3]. F-9-11 8) Open the...
.... 6) Remove the printer cover. 9.3.5.2 Removing the Upper Cover 0016-4981 1) Remove the 4 screws [1], and detach the upper cover [2]. 7) Remove the damper rail [3]. -2 screws [1] -1 claw [2] F-9-10 9.3.6 Cartridge Cover F-9-13 9.3.6.1 Preparation for Removing the Printer Cover 0016-4982 1) Remove the front cover. 2) Remove the right cover. 3) Remove the left cover [3]. F-9-11 8) Open the...
Service Manual
Page 111
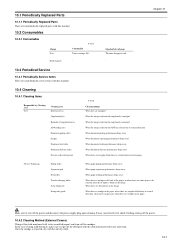
....1 Periodically Replaced Parts 10.1.1 Periodically Replaced Parts There are no periodically service items with this machine. 10.2 Consumables 10.2.1 Consumable Charge User T-10-1 Consumable Toner cartridge 104 Field engineer - In the case of exchange The toner disappears and. - Chapter 10 0016-1869 0016-1871 10.3 Periodical Service 10.3.1 Periodically Service Items...
....1 Periodically Replaced Parts 10.1.1 Periodically Replaced Parts There are no periodically service items with this machine. 10.2 Consumables 10.2.1 Consumable Charge User T-10-1 Consumable Toner cartridge 104 Field engineer - In the case of exchange The toner disappears and. - Chapter 10 0016-1869 0016-1871 10.3 Periodical Service 10.3.1 Periodically Service Items...
Service Manual
Page 172
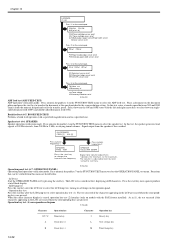
... characters appearing in the LCD are erased when the corresponding keys are pressed. CRG ON FCV ON ALS [of of of] CRG:Toner cartridge sensor: on/of FCV:Toner cartridge cover: on/of ALS:Multi-purpass paper sensor/Paper width sensor /Delivery sensor: on/of Press '2' on /of Press '4' on the numeric...
... characters appearing in the LCD are erased when the corresponding keys are pressed. CRG ON FCV ON ALS [of of of] CRG:Toner cartridge sensor: on/of FCV:Toner cartridge cover: on/of ALS:Multi-purpass paper sensor/Paper width sensor /Delivery sensor: on/of Press '2' on /of Press '4' on the numeric...


