imageCLASS D480 Starter Guide
Page 11
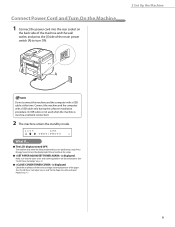
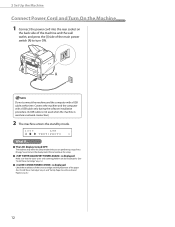
... machine and the computer with a USB cable only during the software installation procedure. (A USB cable is not used when the machine is used via a network connection.) 2 The machine enters the standby mode. 100% LTR TEXT/PHOTO 1 ● The LCD display turned OFF: The machine may enter the Sleep... the [I] side of the main power switch (A) to turn the display back ON and continue the setup. ● is displayed: Make sure that the toner cover and scanning platform are performing setup. Connect the machine and the computer with a USB cable at this time. Connect Power Cord and Turn...
... machine and the computer with a USB cable only during the software installation procedure. (A USB cable is not used when the machine is used via a network connection.) 2 The machine enters the standby mode. 100% LTR TEXT/PHOTO 1 ● The LCD display turned OFF: The machine may enter the Sleep... the [I] side of the main power switch (A) to turn the display back ON and continue the setup. ● is displayed: Make sure that the toner cover and scanning platform are performing setup. Connect the machine and the computer with a USB cable at this time. Connect Power Cord and Turn...
imageCLASS D480 Starter Guide
Page 21
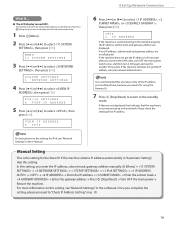
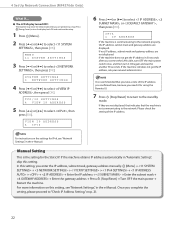
...Setting", skip this setting. Once you complete the setting, please proceed to the standby mode. MENU 11 SYSTEM SETTINGS 3 Press [ ] or [ ] to the network. If they are displayed. Press [Energy Saver] to turn it for using the Remote UI. 7 Press [Stop/Reset] to return to "Check IP Address Setting...," on the settings for another 90 seconds. If not, IP address, subnet mask and gateway address are performing setup. ● The LCD display turned OFF: The machine may enter the Sleep mode while you are not displayed. TCP/IP SETTINGS 4 VIEW IP ...
...Setting", skip this setting. Once you complete the setting, please proceed to the standby mode. MENU 11 SYSTEM SETTINGS 3 Press [ ] or [ ] to the network. If they are displayed. Press [Energy Saver] to turn it for using the Remote UI. 7 Press [Stop/Reset] to return to "Check IP Address Setting...," on the settings for another 90 seconds. If not, IP address, subnet mask and gateway address are performing setup. ● The LCD display turned OFF: The machine may enter the Sleep mode while you are not displayed. TCP/IP SETTINGS 4 VIEW IP ...
imageCLASS D480 Starter Guide
Page 24
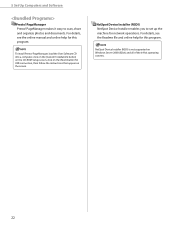
PageManager, load the User Software CD into a computer, click on the [Custom Installation] button on the CD-ROM Setup screen, click on the [Next] button for network operations. To install Presto! NetSpot Device Installer (NSDI) is not supported on the screen. For details, see the Readme file and online help for this ...
PageManager, load the User Software CD into a computer, click on the [Custom Installation] button on the CD-ROM Setup screen, click on the [Next] button for network operations. To install Presto! NetSpot Device Installer (NSDI) is not supported on the screen. For details, see the Readme file and online help for this ...
imageCLASS D480 Starter Guide
Page 25
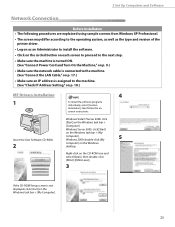
Right-click on the CD-ROM icon and select [Open], then double-click [MInst] ([MInst.exe]). 3 If the CD-ROM Setup screen is assigned to the machine. (See "Check IP Address Setting," on the Windows desktop. Windows Server 2003: click [Start] on the ...Windows task bar → [My Computer]. 23 5 Set Up Computers and Software Network Connection Before Installation • The following procedures are explained using sample screens from Windows XP Professional. • The screen may differ according to the operating...
Right-click on the CD-ROM icon and select [Open], then double-click [MInst] ([MInst.exe]). 3 If the CD-ROM Setup screen is assigned to the machine. (See "Check IP Address Setting," on the Windows desktop. Windows Server 2003: click [Start] on the ...Windows task bar → [My Computer]. 23 5 Set Up Computers and Software Network Connection Before Installation • The following procedures are explained using sample screens from Windows XP Professional. • The screen may differ according to the operating...
imageCLASS D480 Starter Guide
Page 27
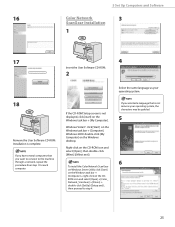
...] → right-click on the Windows task bar → [Computer]. If you want to connect to step 4. 5 Set Up Computers and Software 16 Color Network 3 ScanGear Installation 1 17 4 Insert the User Software CD-ROM. 2 Select the same language as your operating system. 18 Remove the User Software CD-ROM.... Windows Vista/7: click [Start] on the CDROM icon and select [Open] → [Color_ Network_ScanGear] → [Driver] → double-click [SetUp] ([Setup.exe]), then proceed to the machine through a network, repeat the procedure from step 1 for each computer.
...] → right-click on the Windows task bar → [Computer]. If you want to connect to step 4. 5 Set Up Computers and Software 16 Color Network 3 ScanGear Installation 1 17 4 Insert the User Software CD-ROM. 2 Select the same language as your operating system. 18 Remove the User Software CD-ROM.... Windows Vista/7: click [Start] on the CDROM icon and select [Open] → [Color_ Network_ScanGear] → [Driver] → double-click [SetUp] ([Setup.exe]), then proceed to the machine through a network, repeat the procedure from step 1 for each computer.
imageCLASS MF4370dn/MF4350d Starter Guide
Page 14
...and "Set Up Paper Cassette and Load Paper," on p. 5.) ● is displayed: Make sure that the toner cover and scanning platform are performing setup. Do not connect the machine and the computer with a USB cable only during the software installation procedure. (A USB cable is not used when the machine... is used via a network connection.) 2 The machine enters the standby mode. 100% LTR TEXT/PHOTO 1 ● The LCD display turned OFF: The machine may enter the...
...and "Set Up Paper Cassette and Load Paper," on p. 5.) ● is displayed: Make sure that the toner cover and scanning platform are performing setup. Do not connect the machine and the computer with a USB cable only during the software installation procedure. (A USB cable is not used when the machine... is used via a network connection.) 2 The machine enters the standby mode. 100% LTR TEXT/PHOTO 1 ● The LCD display turned OFF: The machine may enter the...
imageCLASS MF4370dn/MF4350d Starter Guide
Page 24
... gateway address are not displayed, that indicates that you take a note of the IP address. For instructions on p. 21. 22 In this setting. SYSTEM SETTINGS 3 NETWORK SETTINGS 4 Press [ ] or [ ] to select , then press [OK]. It is the setting for the Static IP. MENU 11 SYSTEM SETTINGS 3 Press [ ].... 4 Set Up Network Connection (MF4370dn Only) ● The LCD display turned OFF: The machine may enter the Sleep mode while you connect the LAN cable, turn OFF the main power switch once, and then turn the display back ON and continue the setup. 1 Press [Menu]. 2 Press [ ] or [ ]...
... gateway address are not displayed, that indicates that you take a note of the IP address. For instructions on p. 21. 22 In this setting. SYSTEM SETTINGS 3 NETWORK SETTINGS 4 Press [ ] or [ ] to select , then press [OK]. It is the setting for the Static IP. MENU 11 SYSTEM SETTINGS 3 Press [ ].... 4 Set Up Network Connection (MF4370dn Only) ● The LCD display turned OFF: The machine may enter the Sleep mode while you connect the LAN cable, turn OFF the main power switch once, and then turn the display back ON and continue the setup. 1 Press [Menu]. 2 Press [ ] or [ ]...
imageCLASS MF4370dn/MF4350d Starter Guide
Page 27
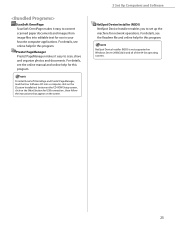
... makes it easy to convert scanned paper documents and images from image files into a computer, click on the [Custom Installation] button on the CD-ROM Setup screen, click on the [Next] button for USB connection , then follow the instructions that appear on Windows Server 2008(32bit) and all of the 64.... For details, see the Readme file and online help for this program. ScanSoft OmniPage ScanSoft OmniPage makes it easy to set up the machine for network operations. For details, see online help for this program.
... makes it easy to convert scanned paper documents and images from image files into a computer, click on the [Custom Installation] button on the CD-ROM Setup screen, click on the [Next] button for USB connection , then follow the instructions that appear on Windows Server 2008(32bit) and all of the 64.... For details, see the Readme file and online help for this program. ScanSoft OmniPage ScanSoft OmniPage makes it easy to set up the machine for network operations. For details, see online help for this program.
imageCLASS MF4370dn/MF4350d Starter Guide
Page 28
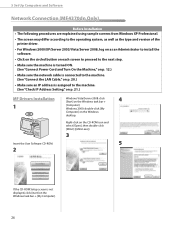
...[My Computer]. 26 Right-click on the CD-ROM icon and select [Open], then double-click [MInst] ([MInst.exe]). 3 5 If the CD-ROM Setup screen is assigned to the machine. (See "Connect the LAN Cable," on p. 20.) • Make sure an IP address is not displayed, click [...start] on the Windows desktop. 5 Set Up Computers and Software Network Connection (MF4370dn Only) Before Installation • The following procedures are explained using sample screens from Windows XP Professional. • The screen may differ according...
...[My Computer]. 26 Right-click on the CD-ROM icon and select [Open], then double-click [MInst] ([MInst.exe]). 3 5 If the CD-ROM Setup screen is assigned to the machine. (See "Connect the LAN Cable," on p. 20.) • Make sure an IP address is not displayed, click [...start] on the Windows desktop. 5 Set Up Computers and Software Network Connection (MF4370dn Only) Before Installation • The following procedures are explained using sample screens from Windows XP Professional. • The screen may differ according...
imageCLASS MF4370dn/MF4350d Starter Guide
Page 30
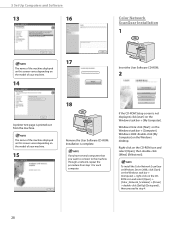
...1 for each computer. To install the Color Network ScanGear on Windows Server 2008, click [Start] on the Windows task bar → [Computer] → right-click on the Windows task bar → [My Computer]. If the CD-ROM Setup screen is not displayed, click [start] on... the CDROM icon and select [Open], → [Color_Network_ScanGear] → [Driver] → double-click [SetUp] ([Setup.exe]), then proceed to the machine through a network, repeat the procedure from the machine. Windows 2000: double-click [My Computer] on the model of your machine. 14 17 ...
...1 for each computer. To install the Color Network ScanGear on Windows Server 2008, click [Start] on the Windows task bar → [Computer] → right-click on the Windows task bar → [My Computer]. If the CD-ROM Setup screen is not displayed, click [start] on... the CDROM icon and select [Open], → [Color_Network_ScanGear] → [Driver] → double-click [SetUp] ([Setup.exe]), then proceed to the machine through a network, repeat the procedure from the machine. Windows 2000: double-click [My Computer] on the model of your machine. 14 17 ...


