User Manual
Page 2
...Operation is subject to the effective usage of this type of the FCC Rules. This equipment generates, uses, and can radiate radio frequency energy and, if not installed and used in which case the user will contribute to the following two conditions: (1) This device may cause ... to cause harmful interference in accordance with your household waste disposal service or visit www.canon-europe.com/weee, or www.canon-europe.com/battery. FCC NOTICE Multi-Purpose Camera, ME20F-SH Systems. This device complies with EEE. For more information about the recycling of natural resources...
...Operation is subject to the effective usage of this type of the FCC Rules. This equipment generates, uses, and can radiate radio frequency energy and, if not installed and used in which case the user will contribute to the following two conditions: (1) This device may cause ... to cause harmful interference in accordance with your household waste disposal service or visit www.canon-europe.com/weee, or www.canon-europe.com/battery. FCC NOTICE Multi-Purpose Camera, ME20F-SH Systems. This device complies with EEE. For more information about the recycling of natural resources...
User Manual
Page 3
Important Safety Instructions In these safety instructions the word "apparatus" refers to the Canon Multi-Purpose Camera ME20F-SH and all instructions. 5. CAN ICES-3 (A)/NMB-3(A) Warning This is required when the apparatus has been damaged in ... dropped. Follow all its accessories. 1. Keep these instructions. 2. Heed all servicing to qualified service personnel. Refer all warnings. 3 4. Do not use this product may cause radio interference in any heat sources such as radiators, heat registers, stoves, or other apparatus (including amplifiers) that produce heat...
Important Safety Instructions In these safety instructions the word "apparatus" refers to the Canon Multi-Purpose Camera ME20F-SH and all instructions. 5. CAN ICES-3 (A)/NMB-3(A) Warning This is required when the apparatus has been damaged in ... dropped. Follow all its accessories. 1. Keep these instructions. 2. Heed all servicing to qualified service personnel. Refer all warnings. 3 4. Do not use this product may cause radio interference in any heat sources such as radiators, heat registers, stoves, or other apparatus (including amplifiers) that produce heat...

User Manual
Page 4
Consult a Canon Service Center as soon as possible. 4 • Be careful to the lens. • Have the cooling fan replaced after the [Total] hour meter displayed in the [Other Functions] > [Reset Hour Meter] submenu reaches approximately 30,000 hours. When you finish using the camera, make sure to ...Do not point the camera toward an intense light source, such as the sun on a sunny day or an intense artificial light source. Consult a Canon Service Center to high temperatures (60 °C (140 °F) or higher) or the inside of their respective companies. After removing the lens, make...
Consult a Canon Service Center as soon as possible. 4 • Be careful to the lens. • Have the cooling fan replaced after the [Total] hour meter displayed in the [Other Functions] > [Reset Hour Meter] submenu reaches approximately 30,000 hours. When you finish using the camera, make sure to ...Do not point the camera toward an intense light source, such as the sun on a sunny day or an intense artificial light source. Consult a Canon Service Center to high temperatures (60 °C (140 °F) or higher) or the inside of their respective companies. After removing the lens, make...
User Manual
Page 5
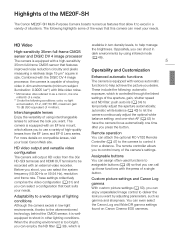
...help manage the brightness. automatic white balance (A 40) to temporarily adjust the aperture automatically; Interchangeable lenses Enjoy the versatility of using infrared mode (A 46). 5 Operability and Customization Enhanced automatic functions The camera is too bright, you can call up those ... measuring a relatively large 19 µm* square in other lighting conditions. For more details on Canon Cinema EOS cameras. Highlights of the ME20F-SH The Canon ME20F-SH Multi-Purpose Camera boasts numerous features that allow it to excel in dim environments (minimum subject ...
...help manage the brightness. automatic white balance (A 40) to temporarily adjust the aperture automatically; Interchangeable lenses Enjoy the versatility of using infrared mode (A 46). 5 Operability and Customization Enhanced automatic functions The camera is too bright, you can call up those ... measuring a relatively large 19 µm* square in other lighting conditions. For more details on Canon Cinema EOS cameras. Highlights of the ME20F-SH The Canon ME20F-SH Multi-Purpose Camera boasts numerous features that allow it to excel in dim environments (minimum subject ...
User Manual
Page 6
... Terminal 17 Turning the Camera On and Off 17 Connecting to an External Monitor 18 Connection Diagram 18 Date and Time Settings 19 Using the Menu 20 Selecting an Option from the Menu 20 Preparing the Camera 22 Adjusting the Black Balance 22 Preparing the Lens 22 ...and Manual Modes 33 Adjusting the Aperture 34 Manual Aperture 34 Momentary Automatic Aperture - Customization 48 Assignable Buttons 48 Changing the Assigned Function 48 Using an Assignable Button 49 Custom Picture Settings 50 Selecting Custom Picture Files 50 Editing a Custom Picture File's Settings 51 Available Custom Picture Settings...
... Terminal 17 Turning the Camera On and Off 17 Connecting to an External Monitor 18 Connection Diagram 18 Date and Time Settings 19 Using the Menu 20 Selecting an Option from the Menu 20 Preparing the Camera 22 Adjusting the Black Balance 22 Preparing the Lens 22 ...and Manual Modes 33 Adjusting the Aperture 34 Manual Aperture 34 Momentary Automatic Aperture - Customization 48 Assignable Buttons 48 Changing the Assigned Function 48 Using an Assignable Button 49 Custom Picture Settings 50 Selecting Custom Picture Files 50 Editing a Custom Picture File's Settings 51 Available Custom Picture Settings...
User Manual
Page 7
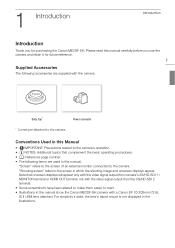
...the lens's tripod mount is not displayed in the illustrations. Please read . • Illustrations in the manual show the Canon ME20F-SH camera with a Canon EF 70-200mm f/2.8L IS II USM lens attached. Note that complement the basic operating procedures. • A: Reference page... number. • The following accessories are used in this manual carefully before you use the camera and retain it for purchasing the Canon ME20F-SH. Body Cap* Power connector * Comes pre-attached to the camera. Conventions Used in this Manual • IMPORTANT: Precautions related to...
...the lens's tripod mount is not displayed in the illustrations. Please read . • Illustrations in the manual show the Canon ME20F-SH camera with a Canon EF 70-200mm f/2.8L IS II USM lens attached. Note that complement the basic operating procedures. • A: Reference page... number. • The following accessories are used in this manual carefully before you use the camera and retain it for purchasing the Canon ME20F-SH. Body Cap* Power connector * Comes pre-attached to the camera. Conventions Used in this Manual • IMPORTANT: Precautions related to...

User Manual
Page 8
...refer to match the shooting conditions. For a concise summary of the picture is lit, for the menu item. The example illustration indicates that you are using push auto iris. 1 Open the [Light Metering] submenu. [Camera Setup] > [Light Metering] 2 Select the desired option and then press the... shooting backlit scenes. [Standard]: Averages the light metered from the entire screen, giving more weight to the subject in the center. [Spotlight]: Use this option when shooting a scene in which only a certain part of all available menu options and settings, refer to Menu Options (A 59)....
...refer to match the shooting conditions. For a concise summary of the picture is lit, for the menu item. The example illustration indicates that you are using push auto iris. 1 Open the [Light Metering] submenu. [Camera Setup] > [Light Metering] 2 Select the desired option and then press the... shooting backlit scenes. [Standard]: Averages the light metered from the entire screen, giving more weight to the subject in the center. [Spotlight]: Use this option when shooting a scene in which only a certain part of all available menu options and settings, refer to Menu Options (A 59)....
User Manual
Page 9
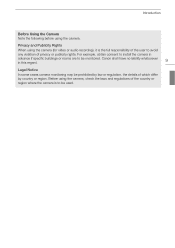
...9 Legal Notice In some cases camera monitoring may be prohibited by law or regulation, the details of privacy or publicity rights. Before using the camera, check the laws and regulations of the country or region where the camera is the full responsibility of the user to avoid...violation of which differ by country or region. Canon shall have no liability whatsoever in advance if specific buildings or rooms are to be used. Privacy and Publicity Rights When using the camera. Introduction Before Using the Camera Note the following before using the camera (for video or audio recording), it...
...9 Legal Notice In some cases camera monitoring may be prohibited by law or regulation, the details of privacy or publicity rights. Before using the camera, check the laws and regulations of the country or region where the camera is the full responsibility of the user to avoid...violation of which differ by country or region. Canon shall have no liability whatsoever in advance if specific buildings or rooms are to be used. Privacy and Publicity Rights When using the camera. Introduction Before Using the Camera Note the following before using the camera (for video or audio recording), it...

User Manual
Page 11
Lens operational control will be made available in a future firmware update. 2 Lens mount handle (A 22) 6 3 EF lens mount index (A 22) 4 EF-S lens mount index (A 22) 5 EF lens contacts (A 22) 6 EF lens mount (A 22) Front view 1 2 Names of Parts 11 3 4 5 1 LENS terminal Currently, not yet available for use.
Lens operational control will be made available in a future firmware update. 2 Lens mount handle (A 22) 6 3 EF lens mount index (A 22) 4 EF-S lens mount index (A 22) 5 EF lens contacts (A 22) 6 EF lens mount (A 22) Front view 1 2 Names of Parts 11 3 4 5 1 LENS terminal Currently, not yet available for use.
User Manual
Page 15
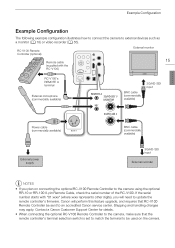
... to update the remote controller's firmware. Contact a Canon Customer Support Center for details. • When connecting the optional RC-V100 Remote Controller to the camera, make sure that RC-V100 Remote Controller be sent to be used on connecting the optional RC-V100 Remote Controller to ...'s terminal selection switch is set to match the terminal to an accredited Canon service center. Example Configuration Example Configuration The following example configuration illustrates how to connect the camera to the camera using the optional RR-10 or RR-100 8-pin Remote Cable, check the...
... to update the remote controller's firmware. Contact a Canon Customer Support Center for details. • When connecting the optional RC-V100 Remote Controller to the camera, make sure that RC-V100 Remote Controller be sent to be used on connecting the optional RC-V100 Remote Controller to ...'s terminal selection switch is set to match the terminal to an accredited Canon service center. Example Configuration Example Configuration The following example configuration illustrates how to connect the camera to the camera using the optional RR-10 or RR-100 8-pin Remote Cable, check the...
User Manual
Page 16
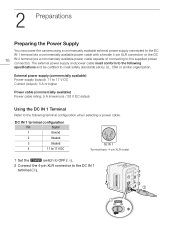
...V DC Current (output): 3 A or higher Power cable (commercially available) Power cable rating: 5 A (maximum) / 30 V DC (rated) Using the DC IN 1 Terminal Refer to the DC IN 1 terminal (2). The external power supply and power cable must conform to the following terminal configuration when... selecting a power cable. 2Preparing the PPowreer pSuapprlyations Preparing the Power Supply You can power the camera using a commercially available external power supply connected to the DC IN 1 terminal (via a commercially available power cable with a female ...
...V DC Current (output): 3 A or higher Power cable (commercially available) Power cable rating: 5 A (maximum) / 30 V DC (rated) Using the DC IN 1 Terminal Refer to the DC IN 1 terminal (2). The external power supply and power cable must conform to the following terminal configuration when... selecting a power cable. 2Preparing the PPowreer pSuapprlyations Preparing the Power Supply You can power the camera using a commercially available external power supply connected to the DC IN 1 terminal (via a commercially available power cable with a female ...
User Manual
Page 17
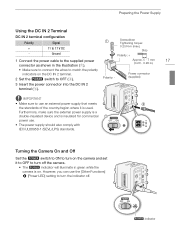
...to OFF (2). Q indicator Polarity: - IMPORTANT • Make sure to the supplied power connector as shown in the illustration (1). Preparing the Power Supply Using the DC IN 2 Terminal DC IN 2 terminal configuration Polarity Signal + 11 to turn the indicator off the camera. • The Q indicator ...will illuminate in green while the camera is on the camera and set it is insulated for commercial power use the [Other Functions] > [Power LED] setting to 17 V DC - Power connector (supplied) 3 Insert the power connector into the DC IN 2...
...to OFF (2). Q indicator Polarity: - IMPORTANT • Make sure to the supplied power connector as shown in the illustration (1). Preparing the Power Supply Using the DC IN 2 Terminal DC IN 2 terminal configuration Polarity Signal + 11 to turn the indicator off the camera. • The Q indicator ...will illuminate in green while the camera is on the camera and set it is insulated for commercial power use the [Other Functions] > [Power LED] setting to 17 V DC - Power connector (supplied) 3 Insert the power connector into the DC IN 2...
User Manual
Page 18
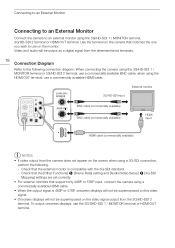
...Setup] > [3G-SDI Mapping] settings are set correctly. • For external monitors that support only 480P or 576P input, connect the camera using the 3G/HD-SDI 1 / MONITOR terminal, 3G/HD-SDI 2 terminal or HDMI OUT terminal. To output onscreen displays... the video signal output from the 3G/HD-SDI 2 terminal. When connecting the camera using a 3G-SDI connection, perform the following connection diagram. when using the HDMI OUT terminal, use a commercially available HDMI cable. 3G/HD-SDI input External monitor BNC cable (commercially available) BNC cable (commercially available) HDMI ...
...Setup] > [3G-SDI Mapping] settings are set correctly. • For external monitors that support only 480P or 576P input, connect the camera using the 3G/HD-SDI 1 / MONITOR terminal, 3G/HD-SDI 2 terminal or HDMI OUT terminal. To output onscreen displays... the video signal output from the 3G/HD-SDI 2 terminal. When connecting the camera using a 3G-SDI connection, perform the following connection diagram. when using the HDMI OUT terminal, use a commercially available HDMI cable. 3G/HD-SDI input External monitor BNC cable (commercially available) BNC cable (commercially available) HDMI ...
User Manual
Page 19
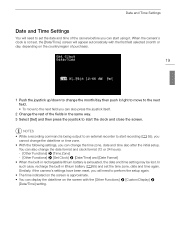
... Functions] > [Set Clock] > [Date/Time] and [Date Format] • When the built-in the same way. 3 Select [Set] and then press the joystick to start using it. In such case, recharge the built-in lithium battery (A 65) and set the date and time of the fields in rechargeable lithium battery is...
... Functions] > [Set Clock] > [Date/Time] and [Date Format] • When the built-in the same way. 3 Select [Set] and then press the joystick to start using it. In such case, recharge the built-in lithium battery (A 65) and set the date and time of the fields in rechargeable lithium battery is...
User Manual
Page 20
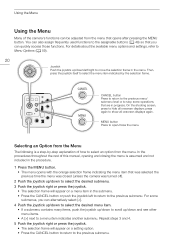
.... 1 Press the MENU button. • The menu opens with the orange selection frame indicating the menu item that you can also assign frequently used functions to the assignable buttons (A 48) so that was selected the previous time the menu was closed (unless the camera was turned off). 2...joystick. • The selection frame will appear on a menu item in progress. For some operations that opens after pressing the MENU button. Using the Menu Using the Menu Many of how to a menu item indicates another submenu. You can alternatively select [] next to select an option from the menu....
.... 1 Press the MENU button. • The menu opens with the orange selection frame indicating the menu item that you can also assign frequently used functions to the assignable buttons (A 48) so that was selected the previous time the menu was closed (unless the camera was turned off). 2...joystick. • The selection frame will appear on a menu item in progress. For some operations that opens after pressing the MENU button. Using the Menu Using the Menu Many of how to a menu item indicates another submenu. You can alternatively select [] next to select an option from the menu....

User Manual
Page 21
...joystick on the camera, respectively. Similarly, pressing the MENU or CANCEL button is equivalent to pressing the MENU or CANCEL button on the camera. Using the Menu 6 Push the joystick up /down to select the desired setting option and then press the joystick. • Depending on the menu ...for the [Other Functions] > [Camera Name] setting screen). • When an optional RC-V100 Remote Controller is connected to the camera, you can use the remote controller's up /down /left/right/SET buttons in the same way as the camera's joystick. NOTES 21 • Unavailable items may be ...
...joystick on the camera, respectively. Similarly, pressing the MENU or CANCEL button is equivalent to pressing the MENU or CANCEL button on the camera. Using the Menu 6 Push the joystick up /down to select the desired setting option and then press the joystick. • Depending on the menu ...for the [Other Functions] > [Camera Name] setting screen). • When an optional RC-V100 Remote Controller is connected to the camera, you can use the remote controller's up /down /left/right/SET buttons in the same way as the camera's joystick. NOTES 21 • Unavailable items may be ...
User Manual
Page 22
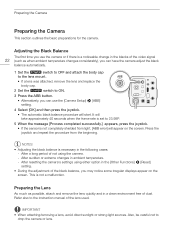
...[ABB] setting. 4 Select [OK] and then press the joystick. • The automatic black balance procedure will start. After a long period of not using either option in the [Other Functions] > [Reset] setting. • During the adjustment of dust. Preparing the Lens As much as when ambient temperature ...changes considerably), you can use the camera or if there is not a malfunction. After sudden or extreme changes in the following cases: - It will appear on the screen....
...[ABB] setting. 4 Select [OK] and then press the joystick. • The automatic black balance procedure will start. After a long period of not using either option in the [Other Functions] > [Reset] setting. • During the adjustment of dust. Preparing the Lens As much as when ambient temperature ...changes considerably), you can use the camera or if there is not a malfunction. After sudden or extreme changes in the following cases: - It will appear on the screen....

User Manual
Page 23
... sure not to drop the lens when removing it is tightened firmly (5). Clean any dust or dirt from the body cap and dust caps before using them. 23 Attaching an EF Lens 1 Set the Q switch to OFF. 2 Turn the lens mount handle clockwise until it stops (2). 3 Remove the body cap from...
... sure not to drop the lens when removing it is tightened firmly (5). Clean any dust or dirt from the body cap and dust caps before using them. 23 Attaching an EF Lens 1 Set the Q switch to OFF. 2 Turn the lens mount handle clockwise until it stops (2). 3 Remove the body cap from...
User Manual
Page 24
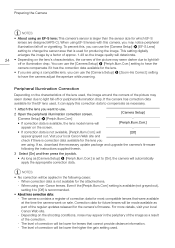
...darker due to compensate as part of the picture may notice peripheral illumination fall - When using non-Canon lenses. NOTES • No correction will automatically apply the appropriate correction data. When using EF-S lenses with this correction data to light fall -off or illumination drop. Visit... your local Canon Web site. - If the camera has correction data available for the EF lens used , the image around the corners of the regular updates released for future lenses will [Off...
...darker due to compensate as part of the picture may notice peripheral illumination fall - When using non-Canon lenses. NOTES • No correction will automatically apply the appropriate correction data. When using EF-S lenses with this correction data to light fall -off or illumination drop. Visit... your local Canon Web site. - If the camera has correction data available for the EF lens used , the image around the corners of the regular updates released for future lenses will [Off...
User Manual
Page 25
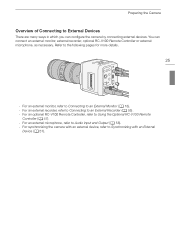
... RC-V100 Remote Controller or external microphone, as necessary. For an optional RC-V100 Remote Controller, refer to Synchronizing with an external device, refer to Using the Optional RC-V100 Remote Controller (A 47). - You can configure the camera by connecting external devices. Refer to Audio Input and Output (A 58). - For an...
... RC-V100 Remote Controller or external microphone, as necessary. For an optional RC-V100 Remote Controller, refer to Synchronizing with an external device, refer to Using the Optional RC-V100 Remote Controller (A 47). - You can configure the camera by connecting external devices. Refer to Audio Input and Output (A 58). - For an...
