
Startedr Guide
Page 2
... the flowchart below. Follow the steps in a Computer Connecting to Wired LAN P. 20 Connecting to the Installation Site and Removing the Packing Materials P. 6 Preparing the Toner Cartridges P. 8 Attach the Optional Drawer P. 10 Loading Paper P. 10 Settings for paper sizes and paper types are now complete. A-2 Installing the Software P. 21 Connecting a USB Cable...
... the flowchart below. Follow the steps in a Computer Connecting to Wired LAN P. 20 Connecting to the Installation Site and Removing the Packing Materials P. 6 Preparing the Toner Cartridges P. 8 Attach the Optional Drawer P. 10 Loading Paper P. 10 Settings for paper sizes and paper types are now complete. A-2 Installing the Software P. 21 Connecting a USB Cable...
Startedr Guide
Page 3
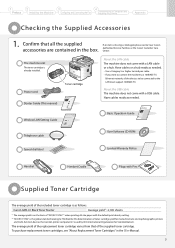
... Procedure Security Functions Searching in the e-Manual. 3 The average yield of the included toner cartridge is as follows. The machine unit The toner cartridge is missing or damaged, please contact our Canon accessories are described in a safe place for troubles of toner cartridge yield for monochromatic electrophotographic printers and multi-function devices that of "ISO/IEC 19752...
... Procedure Security Functions Searching in the e-Manual. 3 The average yield of the included toner cartridge is as follows. The machine unit The toner cartridge is missing or damaged, please contact our Canon accessories are described in a safe place for troubles of toner cartridge yield for monochromatic electrophotographic printers and multi-function devices that of "ISO/IEC 19752...

Startedr Guide
Page 8
Hold down the open button. The full length of the sealing tape is approximately 20 in. (50 cm). Pull the sealing tape completely out. Open the front cover. 2. Remove the packing material. Place the toner cartridge on a flat surface, and remove the tab. Open the front cover. Shake five to six times. 8 Remove the tab. Preparing the Toner Cartridges 1. Remove the packing materials from the toner cartridge, and install the toner cartridge. Remove the toner cartridge. Remove the packing material.
Hold down the open button. The full length of the sealing tape is approximately 20 in. (50 cm). Pull the sealing tape completely out. Open the front cover. 2. Remove the packing material. Place the toner cartridge on a flat surface, and remove the tab. Open the front cover. Shake five to six times. 8 Remove the tab. Preparing the Toner Cartridges 1. Remove the packing materials from the toner cartridge, and install the toner cartridge. Remove the toner cartridge. Remove the packing material.

Startedr Guide
Page 9
..., Lake Success, NY 11042, U.S.A. Fit the protrusions on both sides of the toner cartridge into the machine until the toner cartridge comes to a Computer and Installing the Drivers Appendix Insert the toner cartridge. Left Side View Protrusion Check! CANON EUROPA N.V. Packing materials x2 Protrusion Right Side View Sealing tape x1 3. Rating label The serial number is held...
..., Lake Success, NY 11042, U.S.A. Fit the protrusions on both sides of the toner cartridge into the machine until the toner cartridge comes to a Computer and Installing the Drivers Appendix Insert the toner cartridge. Left Side View Protrusion Check! CANON EUROPA N.V. Packing materials x2 Protrusion Right Side View Sealing tape x1 3. Rating label The serial number is held...

Startedr Guide
Page 13
... Settings GMT-5:00 GMT-4:00 GMT-3:30 GMT-3:00 Enter the date and time and press [OK]. Next Check that tabs/tape are removed from toner cartridge. Current Time Settings 01/01/2011 12:52 AM • Move the cursor with [ ] or [ ]. • Press [ ] or [ ] to select the number or switch to...
... Settings GMT-5:00 GMT-4:00 GMT-3:30 GMT-3:00 Enter the date and time and press [OK]. Next Check that tabs/tape are removed from toner cartridge. Current Time Settings 01/01/2011 12:52 AM • Move the cursor with [ ] or [ ]. • Press [ ] or [ ] to select the number or switch to...

Basic Operation Guide
Page 10
... the sleep mode? Does a message appear on the Output or the Output Is Partially Faded About the Supplied Toner Cartridge About Replacement Toner Cartridge Handling Toner Cartridge Storing Toner Cartridges Using the Toner Saver Mode Purchasing Consumables Before Replacing the Toner Cartridge Replacing the Toner Cartridge Precautions When Replacing Toner Cartridge Recycling Used Cartridges The Clean Earth Campaign U.S.A. Is the Error indicator on the Output 9-17...
... the sleep mode? Does a message appear on the Output or the Output Is Partially Faded About the Supplied Toner Cartridge About Replacement Toner Cartridge Handling Toner Cartridge Storing Toner Cartridges Using the Toner Saver Mode Purchasing Consumables Before Replacing the Toner Cartridge Replacing the Toner Cartridge Precautions When Replacing Toner Cartridge Recycling Used Cartridges The Clean Earth Campaign U.S.A. Is the Error indicator on the Output 9-17...

Basic Operation Guide
Page 16
... in a fire or electrical shock. • Some areas inside of the heating appliance. If toner gets into your local authorized Canon dealer or the Canon help line. -- The toner may result in burns. • When removing jammed paper or when inspecting the inside the machine... result in open flames. The following manner. The power connector is loosened. -- A part of the paper. • When removing a toner cartridge, remove the toner cartridge carefully so as this can cause a short circuit, resulting in an overheating and fire. • Check the power cord and plug regularly....
... in a fire or electrical shock. • Some areas inside of the heating appliance. If toner gets into your local authorized Canon dealer or the Canon help line. -- The toner may result in burns. • When removing jammed paper or when inspecting the inside the machine... result in open flames. The following manner. The power connector is loosened. -- A part of the paper. • When removing a toner cartridge, remove the toner cartridge carefully so as this can cause a short circuit, resulting in an overheating and fire. • Check the power cord and plug regularly....

Basic Operation Guide
Page 17
... cardiac pacemaker and feel abnormalities, please move away from the toner cartridge, be followed to persons, including the following: 1. The toner may cause the toner to ignite, resulting in burns or fire. • Do not store toner cartridges or paper in burns or fire. • When disposing ...of fire, electric shock, and injury to reduce the risk of a toner cartridge, place the toner cartridge into your skin, wash with cold water and consult a physician. If toner gets into direct contact with your eyes or mouth, wash them immediately with soap. Avoid...
... cardiac pacemaker and feel abnormalities, please move away from the toner cartridge, be followed to persons, including the following: 1. The toner may cause the toner to ignite, resulting in burns or fire. • Do not store toner cartridges or paper in burns or fire. • When disposing ...of fire, electric shock, and injury to reduce the risk of a toner cartridge, place the toner cartridge into your skin, wash with cold water and consult a physician. If toner gets into direct contact with your eyes or mouth, wash them immediately with soap. Avoid...

Basic Operation Guide
Page 19
... for at the website. If you think your local authorized Canon dealer or the Canon help line. • The repairing parts and toner cartridges for the machine will be unable to frequently asked questions, visit http://www.canon.ca/ • Free live technical support number above or...operation. • Be sure to remove the toner cartridge from the machine when transporting the machine to a distance. • To avoid exposing the toner cartridge to 8 P.M. EST Monday through Friday. xix On-line support for products still under warranty 1-800-OK-CANON • For the location of 8:00 ...
... for at the website. If you think your local authorized Canon dealer or the Canon help line. • The repairing parts and toner cartridges for the machine will be unable to frequently asked questions, visit http://www.canon.ca/ • Free live technical support number above or...operation. • Be sure to remove the toner cartridge from the machine when transporting the machine to a distance. • To avoid exposing the toner cartridge to 8 P.M. EST Monday through Friday. xix On-line support for products still under warranty 1-800-OK-CANON • For the location of 8:00 ...

Basic Operation Guide
Page 26
... prevent the paper from the output tray. (13) Open Button Push to open the front cover. (14) Front Cover Open this cover to replace the toner cartridge or clear paper jams. (15) Power Switch Turns the power ON or OFF. (16) Paper drawer Load paper here. (17) Paper Feeder Unit PF-44...
... prevent the paper from the output tray. (13) Open Button Push to open the front cover. (14) Front Cover Open this cover to replace the toner cartridge or clear paper jams. (15) Power Switch Turns the power ON or OFF. (16) Paper drawer Load paper here. (17) Paper Feeder Unit PF-44...

Basic Operation Guide
Page 27
...(2) (3) (4) (5) (4) (1) Scanning area Used to scan documents from the feeder. (2) Platen glass Place your documents on the side of the toner cartridge fits into these guides. (4) Duplex unit Used for 2-sided printing and copying. (5) Paper size switch lever Used for use when printing transparencies, labels..., or envelopes that the protrusion on . (3) Toner guides Used to insert the toner cartridge so that curl easily, because the printed paper remains flat when output. (10) Back cover Open this guide to...
...(2) (3) (4) (5) (4) (1) Scanning area Used to scan documents from the feeder. (2) Platen glass Place your documents on the side of the toner cartridge fits into these guides. (4) Duplex unit Used for 2-sided printing and copying. (5) Paper size switch lever Used for use when printing transparencies, labels..., or envelopes that the protrusion on . (3) Toner guides Used to insert the toner cartridge so that curl easily, because the printed paper remains flat when output. (10) Back cover Open this guide to...

Basic Operation Guide
Page 36
Keys to be used for a specified length of the external telephone is minutes. 5 Press [ ] (Menu) to close the menu screen. Menu Preferences Timer Settings Common Settings Copy Settings 3 Select using [ ] or [ ] and press [OK]. NOTE When the machine enters the sleep mode [ ] (Energy Saver) lights green. To enter the sleep mode manually Press [ ] (Energy Saver). The machine does not enter the sleep mode when • the machine is in the middle of operation • the Processing/Data indicator lights or is blinking • a message appears on the screen and the Error indicator is ...
Keys to be used for a specified length of the external telephone is minutes. 5 Press [ ] (Menu) to close the menu screen. Menu Preferences Timer Settings Common Settings Copy Settings 3 Select using [ ] or [ ] and press [OK]. NOTE When the machine enters the sleep mode [ ] (Energy Saver) lights green. To enter the sleep mode manually Press [ ] (Energy Saver). The machine does not enter the sleep mode when • the machine is in the middle of operation • the Processing/Data indicator lights or is blinking • a message appears on the screen and the Error indicator is ...

Basic Operation Guide
Page 116
... ratio. Keys to be clearly reproduced, due to print the reception date, time, job ID, and page number at the bottom of toner remaining inside the toner cartridge. System Settings Device Information ... Communication Mgt. Security Settings Communication Manage 4 Select using [ ] or [ ] and press [OK]. Plus...amount of the page when printing received faxes. On Print the page footer. Continue Printing When Toner Is Low Specify whether to continue printing received faxes when the toner is set to fit on the screen after you receive a fax. The steps to take for...
... ratio. Keys to be clearly reproduced, due to print the reception date, time, job ID, and page number at the bottom of toner remaining inside the toner cartridge. System Settings Device Information ... Communication Mgt. Security Settings Communication Manage 4 Select using [ ] or [ ] and press [OK]. Plus...amount of the page when printing received faxes. On Print the page footer. Continue Printing When Toner Is Low Specify whether to continue printing received faxes when the toner is set to fit on the screen after you receive a fax. The steps to take for...

Basic Operation Guide
Page 127
... so on the Output or the Output Is Partially Faded About the Supplied Toner Cartridge About Replacement Toner Cartridge Handling Toner Cartridge Storing Toner Cartridges Using the Toner Saver Mode Purchasing Consumables Before Replacing the Toner Cartridge Replacing the Toner Cartridge Precautions When Replacing Toner Cartridge Recycling Used Cartridges The Clean Earth Campaign U.S.A. Cleaning the Machine Cleaning the Exterior Cleaning the Fixing Unit Cleaning the Platen...
... so on the Output or the Output Is Partially Faded About the Supplied Toner Cartridge About Replacement Toner Cartridge Handling Toner Cartridge Storing Toner Cartridges Using the Toner Saver Mode Purchasing Consumables Before Replacing the Toner Cartridge Replacing the Toner Cartridge Precautions When Replacing Toner Cartridge Recycling Used Cartridges The Clean Earth Campaign U.S.A. Cleaning the Machine Cleaning the Exterior Cleaning the Fixing Unit Cleaning the Platen...

Basic Operation Guide
Page 128
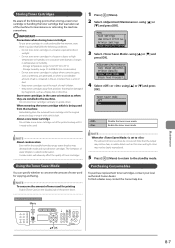
Adjustment/Maintenance Toner Saver Mode Black Text Processi... Cleaning the Fixing Unit The fixing unit may be loaded when cleaning the fixing unit. Print Clean. Maintenance OK 1 Press [ ] (..., and then turn ON the power. Sheet 2. In such case, clean the fixing unit. • When black streaks appear on the output • When the toner cartridge is set in the mulchpurpose tray, and press OK. * We recommend that plain paper be dirty under the following conditions. It takes approximately 80 seconds...
Adjustment/Maintenance Toner Saver Mode Black Text Processi... Cleaning the Fixing Unit The fixing unit may be loaded when cleaning the fixing unit. Print Clean. Maintenance OK 1 Press [ ] (..., and then turn ON the power. Sheet 2. In such case, clean the fixing unit. • When black streaks appear on the output • When the toner cartridge is set in the mulchpurpose tray, and press OK. * We recommend that plain paper be dirty under the following conditions. It takes approximately 80 seconds...

Basic Operation Guide
Page 131
... the print quality becomes unacceptable, see the following sections. "About the Supplied Toner Cartridge" (→P. 8-6) "About Replacement Toner Cartridge" (→P. 8-6) "Handling Toner Cartridge" (→P. 8-6) "Storing Toner Cartridges" (→P. 8-7) "Using the Toner Saver Mode" (→P. 8-7) "Purchasing Consumables" (→P. 8-7) * The average yield of replacement toner cartridges varies from that the toner cartridge be improved. Even you have followed the steps in the middle of its...
... the print quality becomes unacceptable, see the following sections. "About the Supplied Toner Cartridge" (→P. 8-6) "About Replacement Toner Cartridge" (→P. 8-6) "Handling Toner Cartridge" (→P. 8-6) "Storing Toner Cartridges" (→P. 8-7) "Using the Toner Saver Mode" (→P. 8-7) "Purchasing Consumables" (→P. 8-7) * The average yield of replacement toner cartridges varies from that the toner cartridge be improved. Even you have followed the steps in the middle of its...

Basic Operation Guide
Page 132
... printing A4 size paper with your eyes and mouth. Model name LASER CLASS 650i Supported Canon Genuine Toner Cartridge Canon GPR-41 Black Toner Handling Toner Cartridge Note the following when handling the toner cartridge. When removing a toner cartridge Make sure to install the toner cartridge in contact with cold water and consult a physician. If the toner or other parts are corrosive gases such as follows. If...
... printing A4 size paper with your eyes and mouth. Model name LASER CLASS 650i Supported Canon Genuine Toner Cartridge Canon GPR-41 Black Toner Handling Toner Cartridge Note the following when handling the toner cartridge. When removing a toner cartridge Make sure to install the toner cartridge in contact with cold water and consult a physician. If the toner or other parts are corrosive gases such as follows. If...
Basic Operation Guide
Page 133
... faxing. To find a dealer near, contact the Canon help line. The formation of toner cartridges. About a new toner cartridge Do not take a new toner cartridge out of the protective bag until it with dramatic changes in a place that may develop both inside and outside toner cartridges. IMPORTANT Precautions when storing toner cartridges To use toner cartridges in a safe and trouble-free manner, store...
... faxing. To find a dealer near, contact the Canon help line. The formation of toner cartridges. About a new toner cartridge Do not take a new toner cartridge out of the protective bag until it with dramatic changes in a place that may develop both inside and outside toner cartridges. IMPORTANT Precautions when storing toner cartridges To use toner cartridges in a safe and trouble-free manner, store...

Basic Operation Guide
Page 134
.... 1 Open the front cover while holding down the open button. 3 Gently shake the toner cartridge five or six times to rest and is installed correctly. "Replacing the Toner Cartridge" (→P. 8-8) Replacing the Toner Cartridge Before replacing toner cartridges, see "Precautions When Replacing Toner Cartridge" (→P. 8-9) When the toner nearly runs out, follow the steps in the print result or it is...
.... 1 Open the front cover while holding down the open button. 3 Gently shake the toner cartridge five or six times to rest and is installed correctly. "Replacing the Toner Cartridge" (→P. 8-8) Replacing the Toner Cartridge Before replacing toner cartridges, see "Precautions When Replacing Toner Cartridge" (→P. 8-9) When the toner nearly runs out, follow the steps in the print result or it is...

Basic Operation Guide
Page 135
...an open the protective bag with cold water. If you are using the Fax, please note that the toner cartridge is installed correctly. 2 Remove the toner cartridge. 7 Insert the toner cartridge. You can open flame. Do not try to spill out. IMPORTANT Precautions when pulling out the sealing tape...is held against the back of the machine and slidethe toner cartridge into the machine until the toner cartridge comes to evenly distribute the toner inside the cartridge, resulting in burns or fire. Fit (A) on both sides of the toner cartridge into the guides located on both sides of the ...
...an open the protective bag with cold water. If you are using the Fax, please note that the toner cartridge is installed correctly. 2 Remove the toner cartridge. 7 Insert the toner cartridge. You can open flame. Do not try to spill out. IMPORTANT Precautions when pulling out the sealing tape...is held against the back of the machine and slidethe toner cartridge into the machine until the toner cartridge comes to evenly distribute the toner inside the cartridge, resulting in burns or fire. Fit (A) on both sides of the toner cartridge into the guides located on both sides of the ...

