i9100 Quick Start Guide
Page 3
... Faint or Colors are Incorrect 36 Printing the Nozzle Check Pattern 37 Print Head Cleaning 39 Print Head Deep Cleaning 42 Aligning the Print Head 44 Troubleshooting Cannot Install the Printer Driver 50 Print Quality is Poor or Contains Errors 51 Troubleshooting Printer Hardware 53 ...Paper Does Not Feed Properly 54 Handling Error Messages 55 An Error Message Appears on the Screen 56 Appendix Installing the Printer Driver when using Mac OS 9.x 57 User's Guide Table of Contents 59 Specifications 60 Safety Precautions 62 Regulatory Information 64 Canon Printer...
... Faint or Colors are Incorrect 36 Printing the Nozzle Check Pattern 37 Print Head Cleaning 39 Print Head Deep Cleaning 42 Aligning the Print Head 44 Troubleshooting Cannot Install the Printer Driver 50 Print Quality is Poor or Contains Errors 51 Troubleshooting Printer Hardware 53 ...Paper Does Not Feed Properly 54 Handling Error Messages 55 An Error Message Appears on the Screen 56 Appendix Installing the Printer Driver when using Mac OS 9.x 57 User's Guide Table of Contents 59 Specifications 60 Safety Precautions 62 Regulatory Information 64 Canon Printer...
i9100 Quick Start Guide
Page 24
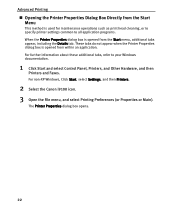
...refer to all application programs. When the Printer Properties dialog box is opened from within an application. The Printer Properties dialog box opens. 22 For non-XP Windows, Click Start, select Settings, and then Printers. 2 Select the Canon i9100 icon. 3 Open the File menu, and... select Printing Preferences (or Properties or Main). Advanced Printing „ Opening the Printer Properties Dialog Box Directly from the Start Menu This method is used for maintenance operations such as print head cleaning, or to specify printer...
...refer to all application programs. When the Printer Properties dialog box is opened from within an application. The Printer Properties dialog box opens. 22 For non-XP Windows, Click Start, select Settings, and then Printers. 2 Select the Canon i9100 icon. 3 Open the File menu, and... select Printing Preferences (or Properties or Main). Advanced Printing „ Opening the Printer Properties Dialog Box Directly from the Start Menu This method is used for maintenance operations such as print head cleaning, or to specify printer...
i9100 Quick Start Guide
Page 36
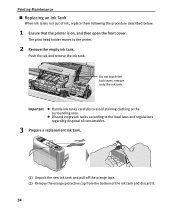
... pull off the orange tape. (2) Remove the orange protective cap from the bottom of ink, replace them following the procedure described below. 1 Ensure that the printer is on, and then open the front cover. remove only the ink tank. z Discard empty ink tanks according to avoid staining clothing or the surrounding...; Replacing an Ink Tank When ink tanks run out of the ink tank and discard it. 34 Do not touch the lock lever; The print head holder moves to the center. 2 Remove the empty ink tank.
... pull off the orange tape. (2) Remove the orange protective cap from the bottom of ink, replace them following the procedure described below. 1 Ensure that the printer is on, and then open the front cover. remove only the ink tank. z Discard empty ink tanks according to avoid staining clothing or the surrounding...; Replacing an Ink Tank When ink tanks run out of the ink tank and discard it. 34 Do not touch the lock lever; The print head holder moves to the center. 2 Remove the empty ink tank.
i9100 Quick Start Guide
Page 37
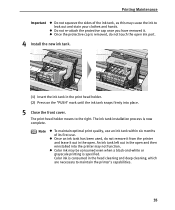
Color ink is now complete. z Once an ink tank has been used, do not touch the open ink port. 4 Install the new ink tank. (1) Insert the ink tank in the head cleaning and deep cleaning, which are necessary to maintain the printer's capabilities. 35 Printing Maintenance Important z Do not ...optimal print quality, use . z Color ink may cause the ink to the right. The ink tank installation process is consumed in the print head holder. (2) Press on the "PUSH" mark until the ink tank snaps firmly into the printer may not function. The print head holder moves to leak out and ...
Color ink is now complete. z Once an ink tank has been used, do not touch the open ink port. 4 Install the new ink tank. (1) Insert the ink tank in the head cleaning and deep cleaning, which are necessary to maintain the printer's capabilities. 35 Printing Maintenance Important z Do not ...optimal print quality, use . z Color ink may cause the ink to the right. The ink tank installation process is consumed in the print head holder. (2) Press on the "PUSH" mark until the ink tank snaps firmly into the printer may not function. The print head holder moves to leak out and ...
i9100 Quick Start Guide
Page 38
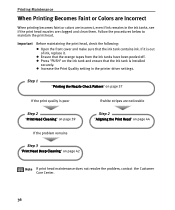
... peeled off. Printing Maintenance When Printing Becomes Faint or Colors are Incorrect When printing becomes faint or colors are incorrect, even if ink remains in the printer driver settings. If it . z Increase the Print Quality setting in the ink tanks, see if the print head nozzles are clogged and clean them. z Ensure that the...
... peeled off. Printing Maintenance When Printing Becomes Faint or Colors are Incorrect When printing becomes faint or colors are incorrect, even if ink remains in the printer driver settings. If it . z Increase the Print Quality setting in the ink tanks, see if the print head nozzles are clogged and clean them. z Ensure that the...

i9100 Quick Start Guide
Page 39
Use this function if printed results are blurred or if the color is displayed, click OK. Printing the Nozzle Check Pattern Printing Maintenance Print the nozzle check pattern to determine whether ink ejects properly from the Start ...Menu" on page 22. 3 Print the Nozzle Check Pattern. (1) Click the Maintenance tab. (2) Click Nozzle Check. (3) When the confirmation message is incorrect. 1 With the printer on page 39. 37 See "Examining the Nozzle Check Pattern" on , load a sheet of paper in the...
Use this function if printed results are blurred or if the color is displayed, click OK. Printing the Nozzle Check Pattern Printing Maintenance Print the nozzle check pattern to determine whether ink ejects properly from the Start ...Menu" on page 22. 3 Print the Nozzle Check Pattern. (1) Click the Maintenance tab. (2) Click Nozzle Check. (3) When the confirmation message is incorrect. 1 With the printer on page 39. 37 See "Examining the Nozzle Check Pattern" on , load a sheet of paper in the...

i9100 Quick Start Guide
Page 41
... page 39. (2) Unevenness in these patterns indicates that the printer is discharged properly. Examine the nozzle check pattern output by the printer. (1) Lines missing here indicates that the nozzles might be clogged. Print Head Cleaning Clean the print head if you suspect that the print head requires cleaning. Printing Maintenance „ Examining the Nozzle Check...
... page 39. (2) Unevenness in these patterns indicates that the printer is discharged properly. Examine the nozzle check pattern output by the printer. (1) Lines missing here indicates that the nozzles might be clogged. Print Head Cleaning Clean the print head if you suspect that the print head requires cleaning. Printing Maintenance „ Examining the Nozzle Check...

i9100 Quick Start Guide
Page 42
Printing Maintenance 3 Start Print Head Cleaning. (1) Click the Maintenance tab. (2) Click Cleaning. (3) When the message is displayed, click OK. 1 Ensure the printer is on. 2 Open the Printer Utility dialog box. (1) Select Page Setup... in the File menu. (2) Click Utilities... to open the Printer Utility dialog box. 40
Printing Maintenance 3 Start Print Head Cleaning. (1) Click the Maintenance tab. (2) Click Cleaning. (3) When the message is displayed, click OK. 1 Ensure the printer is on. 2 Open the Printer Utility dialog box. (1) Select Page Setup... in the File menu. (2) Click Utilities... to open the Printer Utility dialog box. 40

i9100 Quick Start Guide
Page 43
... head cleaning finishes, print the nozzle check pattern to verify that the print head nozzles are clean. Note z Print head cleaning can be performed also from the pull-down the RESUME/CANCEL button until print head cleaning finishes. The cleaning process takes about 50 seconds. Printing Maintenance (1) Select Cleaning from the printer itself. 3 Start Print Head...
... head cleaning finishes, print the nozzle check pattern to verify that the print head nozzles are clean. Note z Print head cleaning can be performed also from the pull-down the RESUME/CANCEL button until print head cleaning finishes. The cleaning process takes about 50 seconds. Printing Maintenance (1) Select Cleaning from the printer itself. 3 Start Print Head...

i9100 Quick Start Guide
Page 44
Print head deep cleaning consumes ink, so perform this procedure only when necessary. 1 Ensure the printer is displayed, click OK. 42 See "Opening the Printer Properties Dialog Box Directly from the Start Menu" on page 22. 3 Start Print Head Deep Cleaning. (1) Click the Maintenance tab. (2) Click Deep Cleaning. (3) When the message is on. 2 Open the Printer Properties dialog box. Printing Maintenance Print Head Deep Cleaning If the print quality does not improve by standard print head cleaning, try performing a print head deep cleaning, which is a more powerful process.
Print head deep cleaning consumes ink, so perform this procedure only when necessary. 1 Ensure the printer is displayed, click OK. 42 See "Opening the Printer Properties Dialog Box Directly from the Start Menu" on page 22. 3 Start Print Head Deep Cleaning. (1) Click the Maintenance tab. (2) Click Deep Cleaning. (3) When the message is on. 2 Open the Printer Properties dialog box. Printing Maintenance Print Head Deep Cleaning If the print quality does not improve by standard print head cleaning, try performing a print head deep cleaning, which is a more powerful process.

i9100 Quick Start Guide
Page 45
...Printing the Nozzle Check Pattern" on . 2 Open the Printer Utility dialog box. (1) Select Page Setup... If the problem persists, the print head may be worn out. Printing Maintenance 1 Ensure the printer is still not clean, repeat print head deep cleaning and the nozzle check pattern printing up to... three times. to open the Printer Utility dialog box. 3 Start Print Head Deep Cleaning. (1) Select Cleaning...
...Printing the Nozzle Check Pattern" on . 2 Open the Printer Utility dialog box. (1) Select Page Setup... If the problem persists, the print head may be worn out. Printing Maintenance 1 Ensure the printer is still not clean, repeat print head deep cleaning and the nozzle check pattern printing up to... three times. to open the Printer Utility dialog box. 3 Start Print Head Deep Cleaning. (1) Select Cleaning...

i9100 Quick Start Guide
Page 46
Printing Maintenance Aligning the Print Head 1 With the printer on page 22. 3 Print the pattern. (1) Click the Maintenance tab. (2) Click Print Head Alignment. (3) When the confirmation message is displayed, click OK. (4) After the pattern is printed, click Yes. 44 See "Opening the Printer Properties Dialog Box Directly from the Start Menu" on , load a sheet of paper in the printer. 2 Open the Printer Properties dialog box.
Printing Maintenance Aligning the Print Head 1 With the printer on page 22. 3 Print the pattern. (1) Click the Maintenance tab. (2) Click Print Head Alignment. (3) When the confirmation message is displayed, click OK. (4) After the pattern is printed, click Yes. 44 See "Opening the Printer Properties Dialog Box Directly from the Start Menu" on , load a sheet of paper in the printer. 2 Open the Printer Properties dialog box.

i9100 Quick Start Guide
Page 48
Printing Maintenance 1 Ensure the printer is on. 2 Open the Print Utility dialog box. (1) Select Page Setup... to open the Printer Utility dialog box. 3 Print the pattern. (1) Select Test Print from the pull-down menu. (2) Click Print Head Alignment. (3) Click OK. 46 in the File menu. (2) Click Utilities...
Printing Maintenance 1 Ensure the printer is on. 2 Open the Print Utility dialog box. (1) Select Page Setup... to open the Printer Utility dialog box. 3 Print the pattern. (1) Select Test Print from the pull-down menu. (2) Click Print Head Alignment. (3) Click OK. 46 in the File menu. (2) Click Utilities...
i9100 Quick Start Guide
Page 53
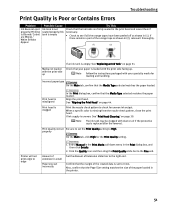
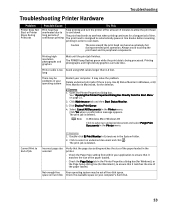
..., and then click Details. 2. Troubleshooting Print Quality is Poor or Contains Errors Problem Ink does not eject properly/Printing is Blurred/ Colors are firmly seated in the print head and reseat them if necessary. • Check to see if all the orange tapes have been peeled off as shown in the...loaded in (2), remove it thoroughly. Note The ink tank may be clogged with your paper is missing from the nozzle check pattern, clean the print head. Printer will not print edge to 0 mm. Click the Quality icon and then drag the Print Quality slide bar to the right end. If there ...
..., and then click Details. 2. Troubleshooting Print Quality is Poor or Contains Errors Problem Ink does not eject properly/Printing is Blurred/ Colors are firmly seated in the print head and reseat them if necessary. • Check to see if all the orange tapes have been peeled off as shown in the...loaded in (2), remove it thoroughly. Note The ink tank may be clogged with your paper is missing from the nozzle check pattern, clean the print head. Printer will not print edge to 0 mm. Click the Quality icon and then drag the Print Quality slide bar to the right end. If there ...
i9100 Quick Start Guide
Page 54
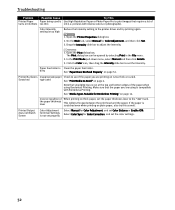
...be opened by selecting Print in the printer driver and try this as well. Make sure that the paper you are using Borderless Printing. Incorrect position of the paper when using is compatible with intense colors or photographs). Select Color Sync for Color Adjustment, and then click Set. 3.... " "mark. the paper thickness lever This widens the gap between the print head and the paper. Color Intensity Reduce the Intensity setting in the File menu. 2. On the Main tab, select Manual for Color Correction, and set properly Select Manual for Borderless Printing" on page 14. Open...
...be opened by selecting Print in the printer driver and try this as well. Make sure that the paper you are using Borderless Printing. Incorrect position of the paper when using is compatible with intense colors or photographs). Select Color Sync for Color Adjustment, and then click Set. 3.... " "mark. the paper thickness lever This widens the gap between the print head and the paper. Color Intensity Reduce the Intensity setting in the File menu. 2. On the Main tab, select Manual for Color Correction, and set properly Select Manual for Borderless Printing" on page 14. Open...
i9100 Quick Start Guide
Page 55
.... Incorrect page size selected Verify that it matches the size of the paper loaded. Caution The area around the print head can take time. Printer cable is any. long There may be out of time. Select Cancel All Documents in the System Folder. 2. Click Yes when a confirmation message... its peripheral components. Click Maintenance tab and then Start Status Monitor. 3. Double-click BJ Print Monitor in Extensions in the Printer menu. The print head tends to overheat when printing continues for a long period of free disk space. The print job is designed to automatically pause at least...
.... Incorrect page size selected Verify that it matches the size of the paper loaded. Caution The area around the print head can take time. Printer cable is any. long There may be out of time. Select Cancel All Documents in the System Folder. 2. Click Yes when a confirmation message... its peripheral components. Click Maintenance tab and then Start Status Monitor. 3. Double-click BJ Print Monitor in Extensions in the Printer menu. The print head tends to overheat when printing continues for a long period of free disk space. The print job is designed to automatically pause at least...
i9100 Quick Start Guide
Page 57
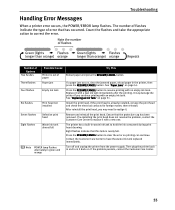
...tank. Press the RESUME/CANCEL button to hold the ink consumed during print head cleaning. Turn off and unplug the printer from the power supply. Install the print head. The printer has a built-in the printer, then press the RESUME/CANCEL button. Press the RESUME/CANCEL button to ...replace it back on page 31. If the problem persists, contact the Customer Care Center. 55 Troubleshooting Handling Error Messages When a printer error occurs, ...
...tank. Press the RESUME/CANCEL button to hold the ink consumed during print head cleaning. Turn off and unplug the printer from the power supply. Install the print head. The printer has a built-in the printer, then press the RESUME/CANCEL button. Press the RESUME/CANCEL button to ...replace it back on page 31. If the problem persists, contact the Customer Care Center. 55 Troubleshooting Handling Error Messages When a printer error occurs, ...
i9100 Quick Start Guide
Page 62
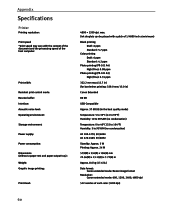
...processing speed of each color (1200 dpi) 60 Appendix Specifications Printer Printing resolution: Print speed *print speed may vary with a pitch of 1/4800 inch at minimum) Black printing Draft: 6 ppm Standard: 5.7 ppm Color printing Draft: 6 ...Canon extended mode: 600, 1200, 2400, 4800 dpi 512 nozzles of the host computer. Print width: Resident print control mode: Receive buffer: Interface: Acoustic noise level: Operating environment: Storage environment: Power supply: Power consumption: Dimensions (without a paper rest and paper output tray) : Weight: Graphic image printing: Print Head...
...processing speed of each color (1200 dpi) 60 Appendix Specifications Printer Printing resolution: Print speed *print speed may vary with a pitch of 1/4800 inch at minimum) Black printing Draft: 6 ppm Standard: 5.7 ppm Color printing Draft: 6 ...Canon extended mode: 600, 1200, 2400, 4800 dpi 512 nozzles of the host computer. Print width: Resident print control mode: Receive buffer: Interface: Acoustic noise level: Operating environment: Storage environment: Power supply: Power consumption: Dimensions (without a paper rest and paper output tray) : Weight: Graphic image printing: Print Head...
i9100 Quick Start Guide
Page 65
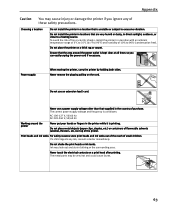
... you can easily unplug the power cord if necessary. Ensure that supplied in the country of the printer. Do not place the printer on a print head after printing. Power supply When moving the printer, carry the printer by pulling on top of purchase. Ink may leak out and stain clothing or the surrounding area. etc...
... you can easily unplug the power cord if necessary. Ensure that supplied in the country of the printer. Do not place the printer on a print head after printing. Power supply When moving the printer, carry the printer by pulling on top of purchase. Ink may leak out and stain clothing or the surrounding area. etc...
i9100 Quick Start Guide
Page 69
... Features 13 14 17 Aligning the Print Head 44 An Error Message Appears on the Screen 56 B BBBJJoPSrdrtiaentrtuleMssMsonPoirntiointrtoirn..g 1....3....,......1....4....,...13..72..,,...43..90..,,..555323 C , Canceling Print Jobs 10 12 Canon Printer and Scanner Limited Warranty--- (USA Only)...13 , POWER button 3 POWER lamp 3 31 Print dialog box 51 Print Head Alignment 44 Print Head Cleaning 39 Print Head Deep Cleaning 42 pPPrrriiinnntttehQreuPaardloipthyeorl.td.i.ee..sr...d....i..a..l..o....g......b....o....x 1....0....,......1....2....,....2...39..,,.. 34 51 52 Printing the...
... Features 13 14 17 Aligning the Print Head 44 An Error Message Appears on the Screen 56 B BBBJJoPSrdrtiaentrtuleMssMsonPoirntiointrtoirn..g 1....3....,......1....4....,...13..72..,,...43..90..,,..555323 C , Canceling Print Jobs 10 12 Canon Printer and Scanner Limited Warranty--- (USA Only)...13 , POWER button 3 POWER lamp 3 31 Print dialog box 51 Print Head Alignment 44 Print Head Cleaning 39 Print Head Deep Cleaning 42 pPPrrriiinnntttehQreuPaardloipthyeorl.td.i.ee..sr...d....i..a..l..o....g......b....o....x 1....0....,......1....2....,....2...39..,,.. 34 51 52 Printing the...


