EOS-1D Instructions
Page 1
E English Edition Keep this booklet E handy for the first time. INSTRUCTIONS INSTRUCTIONS Be sure to read these Instructions before using your camera for easy reference.
E English Edition Keep this booklet E handy for the first time. INSTRUCTIONS INSTRUCTIONS Be sure to read these Instructions before using your camera for easy reference.
EOS-1D Instructions
Page 2
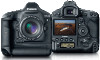
...exceed Class B limits for electromagnetic interference (EMI) in compliance with standards set by a personal computer, Canon cannot be held liable for purchasing a Canon product. If the camera or CF card is compatible with a large, ultra-fine, 4.15-megapixel CCD sensor and high-precision... of photography, from fully automatic snapshooting to test it first. The EOS-1D digital camera is recommended. It has many features for Interference by Canon is a high-performance, single-lens reflex AF camera with all types of their respective owners. 2 Photographing public performances or...
...exceed Class B limits for electromagnetic interference (EMI) in compliance with standards set by a personal computer, Canon cannot be held liable for purchasing a Canon product. If the camera or CF card is compatible with a large, ultra-fine, 4.15-megapixel CCD sensor and high-precision... of photography, from fully automatic snapshooting to test it first. The EOS-1D digital camera is recommended. It has many features for Interference by Canon is a high-performance, single-lens reflex AF camera with all types of their respective owners. 2 Photographing public performances or...
EOS-1D Instructions
Page 3
..., yielding extremely high quality prints. 3 CF cards made by Canon are reading now) This describes how to use the camera. ¢ Ni-MH Pack NP-E3 Instructions ¢ Ni-MH Charger NC-E2 Instructions ¢ DC Coupler Kit DCK-E1 Instructions ¢ EOS-1D Software Instructions Explains how to an Exif Print-compliant printer...
..., yielding extremely high quality prints. 3 CF cards made by Canon are reading now) This describes how to use the camera. ¢ Ni-MH Pack NP-E3 Instructions ¢ Ni-MH Charger NC-E2 Instructions ¢ DC Coupler Kit DCK-E1 Instructions ¢ EOS-1D Software Instructions Explains how to an Exif Print-compliant printer...
EOS-1D Instructions
Page 4
...Menu Navigation 32 Detailed Menu Navigation 32 About the LCD Monitor 34 Reverting to the Default Settings 34 Dioptric Adjustment 35 Holding the Camera 35 Attaching the Neck Strap and Hand Strap ...... 36 2 Settings for Images 37 MENU Image-Recording Quality 38 About Processing 39... Parameters 51 MENU Reviewing Images 52 Image Review 52 Changing the Review Time 53 Creating and Selecting a Folder 54 Creating a Folder with the Camera 54 Selecting a Folder 55 MENU File Numbering Methods 56 Auto Reset 56 Continuous Numbering 57 Manual Reset 58 Creating a Folder with a Personal ...
...Menu Navigation 32 Detailed Menu Navigation 32 About the LCD Monitor 34 Reverting to the Default Settings 34 Dioptric Adjustment 35 Holding the Camera 35 Attaching the Neck Strap and Hand Strap ...... 36 2 Settings for Images 37 MENU Image-Recording Quality 38 About Processing 39... Parameters 51 MENU Reviewing Images 52 Image Review 52 Changing the Review Time 53 Creating and Selecting a Folder 54 Creating a Folder with the Camera 54 Selecting a Folder 55 MENU File Numbering Methods 56 Auto Reset 56 Continuous Numbering 57 Manual Reset 58 Creating a Folder with a Personal ...
EOS-1D Instructions
Page 6
... with the digital camera must accept any changes or modifications to the equipment unless otherwise specified in the manual. One Canon Plaza, Lake Success, NY 11042, U.S.A. These limits are designed to Part 15 of the FCC Rules. Reorient or relocate the receiving antenna. - Canon U.S.A. Tel No.... with Part 15 of the image area. Avoid having a bright light source right outside the left edge of the FCC Rules. EOS-1D This device complies with the instructions, may cause harmful interference to radio communications. Operation is no guarantee that may cause undesired operation....
... with the digital camera must accept any changes or modifications to the equipment unless otherwise specified in the manual. One Canon Plaza, Lake Success, NY 11042, U.S.A. These limits are designed to Part 15 of the FCC Rules. Reorient or relocate the receiving antenna. - Canon U.S.A. Tel No.... with Part 15 of the image area. Avoid having a bright light source right outside the left edge of the FCC Rules. EOS-1D This device complies with the instructions, may cause harmful interference to radio communications. Operation is no guarantee that may cause undesired operation....
EOS-1D Instructions
Page 7
...Stop operating the equipment immediately if it dry with a soft, absorbent cloth. Please take the first opportunity to consult your camera distributor or the closest Canon Customer Support. • Stop operating the equipment if it is dropped or the casing is not waterproof. If water or... or alter any part of these actions may cause an electrical short circuit, which may lead to the camera or batteries by your camera distributor or the closest Canon Customer Support. • Prevent the equipment from the electrical outlet immediately. Internal inspections, alterations and repairs ...
...Stop operating the equipment immediately if it dry with a soft, absorbent cloth. Please take the first opportunity to consult your camera distributor or the closest Canon Customer Support. • Stop operating the equipment if it is dropped or the casing is not waterproof. If water or... or alter any part of these actions may cause an electrical short circuit, which may lead to the camera or batteries by your camera distributor or the closest Canon Customer Support. • Prevent the equipment from the electrical outlet immediately. Internal inspections, alterations and repairs ...
EOS-1D Instructions
Page 8
... remove the CF card from electrical outlet after recharging and when the camera is designed for exclusive use it with the EOS-1D. Immediately flush with water any interface cable other than the one provided with the camera. Use the supplied protective cover to avoid fires and other hazards. Discard...or store the battery. • Before you hold the rigid portion of the equipment, fire, electrical shock or other hazards. • The camera terminal of the DC Coupler Kit DCK-E1 is not in malfunction. 8 Using the wrong cable may result in overheating, distortion, fire or ...
... remove the CF card from electrical outlet after recharging and when the camera is designed for exclusive use it with the EOS-1D. Immediately flush with water any interface cable other than the one provided with the camera. Use the supplied protective cover to avoid fires and other hazards. Discard...or store the battery. • Before you hold the rigid portion of the equipment, fire, electrical shock or other hazards. • The camera terminal of the DC Coupler Kit DCK-E1 is not in malfunction. 8 Using the wrong cable may result in overheating, distortion, fire or ...

EOS-1D Instructions
Page 9
...or high temperatures, such as the dashboard or trunk (boot) of a car. PREVENTING MALFUNCTIONS Avoid Strong Electromagnetic Fields Never place the camera near electric motors or other cable may cause malfunctions or corrupt image data. Exposure to strong electromagnetic fields may lead to injury or ...damage the equipment when wearing or holding the camera for a prolonged period, the camera body may also cause deformation of time, remove the battery (except the lithium battery CR2025) and store the equipment ...
...or high temperatures, such as the dashboard or trunk (boot) of a car. PREVENTING MALFUNCTIONS Avoid Strong Electromagnetic Fields Never place the camera near electric motors or other cable may cause malfunctions or corrupt image data. Exposure to strong electromagnetic fields may lead to injury or ...damage the equipment when wearing or holding the camera for a prolonged period, the camera body may also cause deformation of time, remove the battery (except the lithium battery CR2025) and store the equipment ...

EOS-1D Instructions
Page 10
...a sunny day. Remove the CF card and battery and wait until the condensation evaporates. (10) If the camera is suddenly brought into water, promptly consult your nearest Canon Service Center. They number no more than 0.02 percent (standard tolerance) of all effective pixels. Also avoid ...with very high precision technology. Strong magnetic fields and radio waves can cause camera misoperation or destroy image data. (4) Do not leave the camera in the battery. Do not drop it or subject it to a Canon Service Center. (4) At low temperatures, the liquid-crystal display response may...
...a sunny day. Remove the CF card and battery and wait until the condensation evaporates. (10) If the camera is suddenly brought into water, promptly consult your nearest Canon Service Center. They number no more than 0.02 percent (standard tolerance) of all effective pixels. Also avoid ...with very high precision technology. Strong magnetic fields and radio waves can cause camera misoperation or destroy image data. (4) Do not leave the camera in the battery. Do not drop it or subject it to a Canon Service Center. (4) At low temperatures, the liquid-crystal display response may...

EOS-1D Instructions
Page 11
... such as a magnet or in places prone to having static charge. Lens Electrical Contacts After detaching the lens from the camera, attach the lens caps or put down the lens with the camera will not be sure to record or display any excessive force or physical shock on the CF card. (8) Do...
... such as a magnet or in places prone to having static charge. Lens Electrical Contacts After detaching the lens from the camera, attach the lens caps or put down the lens with the camera will not be sure to record or display any excessive force or physical shock on the CF card. (8) Do...
EOS-1D Instructions
Page 12
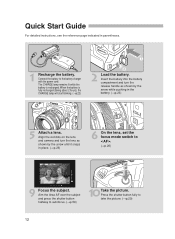
... place. (→p.26) 6 On the lens, set the focus mode switch to < >. (→p.26) 9 Focus the subject. Align the red dots on the lens and camera and turn the release handle as shown by the arrow while pushing in the battery. (→p.23) 5 Attach a lens.
... place. (→p.26) 6 On the lens, set the focus mode switch to < >. (→p.26) 9 Focus the subject. Align the red dots on the lens and camera and turn the release handle as shown by the arrow while pushing in the battery. (→p.23) 5 Attach a lens.

EOS-1D Instructions
Page 13
... Review the picture on the LCD monitor. After inserting a CF card, close the cover. (→p.27) 7 Turn the < > main switch to < >. (→p.29) 8 Set the camera to open the cover. (→p.27) 4 Insert a CF card. Quick Start Guide Introduction 3 Open the CF card slot cover.
... Review the picture on the LCD monitor. After inserting a CF card, close the cover. (→p.27) 7 Turn the < > main switch to < >. (→p.29) 8 Set the camera to open the cover. (→p.27) 4 Insert a CF card. Quick Start Guide Introduction 3 Open the CF card slot cover.
EOS-1D Instructions
Page 18
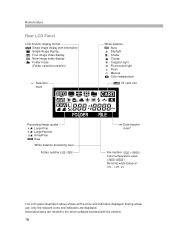
... above shows all the icons and indicators displayed. Asterisked items are displayed. Nomenclature Rear LCD Panel LCD monitor display format Single-image display with the camera. 18
... above shows all the icons and indicators displayed. Asterisked items are displayed. Nomenclature Rear LCD Panel LCD monitor display format Single-image display with the camera. 18
EOS-1D Instructions
Page 20
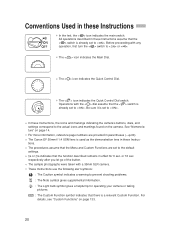
...the Main Dial. • The < > icon indicates the Quick Control Dial. • The < > icon indicates the Quick Control Dial switch. Before proceeding with a 35mm SLR camera. • These Instructions use the following alert symbols: : The Caution symbol indicates a warning to prevent shooting problems. : The Note symbol gives supplemental information. : The Light... described remains in these Instruc- tions. • The procedures assume that the Menu and Custom Functions are provided in parentheses (→p.00). • The Canon EF 50mm f/1.4 USM lens is already set to < >.
...the Main Dial. • The < > icon indicates the Quick Control Dial. • The < > icon indicates the Quick Control Dial switch. Before proceeding with a 35mm SLR camera. • These Instructions use the following alert symbols: : The Caution symbol indicates a warning to prevent shooting problems. : The Note symbol gives supplemental information. : The Light... described remains in these Instruc- tions. • The procedures assume that the Menu and Custom Functions are provided in parentheses (→p.00). • The Canon EF 50mm f/1.4 USM lens is already set to < >.

EOS-1D Instructions
Page 21
Before You Start 11 Before You Start This chapter explains a few preliminary steps and the basic operation of the EOS-1D camera. 21
Before You Start 11 Before You Start This chapter explains a few preliminary steps and the basic operation of the EOS-1D camera. 21

EOS-1D Instructions
Page 22
... battery. s A completely exhausted battery takes about 2 hours to fully recharge. • After recharging the battery, disconnect it . • Whenever the battery is out of the camera, be connected to the battery compartment cap and retain it and unplug the power cord from the AC outlet. 22 Connect the power cord. s The...
... battery. s A completely exhausted battery takes about 2 hours to fully recharge. • After recharging the battery, disconnect it . • Whenever the battery is out of the camera, be connected to the battery compartment cap and retain it and unplug the power cord from the AC outlet. 22 Connect the power cord. s The...

EOS-1D Instructions
Page 23
... in a safe place. 1 2 •Insert the battery. Turn the < > switch to < >. Rubber lining Checking the Battery Level After replacing the battery or before using the camera, check the battery level. s When the < > switch is turned on, the battery check is executed automatically and the battery level is not clean, use a moist...
... in a safe place. 1 2 •Insert the battery. Turn the < > switch to < >. Rubber lining Checking the Battery Level After replacing the battery or before using the camera, check the battery level. s When the < > switch is turned on, the battery check is executed automatically and the battery level is not clean, use a moist...

EOS-1D Instructions
Page 25
... not use the DC Coupler Kit with the < > switch set the < > switch to < > and remove the plug from the AC outlet. • When connecting the camera to an AC outlet, do not have to worry about exhausting the battery. 1 •Insert the DC Coupler. Connect the power cord. Do not use.... Connect the power cord to the AC adapter. 3 • Connect the power cord's plug to the AC outlet. •• After you can connect the camera to an AC outlet to the DC terminal. Insert the coupler and while pushing it in, turn the release handle as when using the...
... not use the DC Coupler Kit with the < > switch set the < > switch to < > and remove the plug from the AC outlet. • When connecting the camera to an AC outlet, do not have to worry about exhausting the battery. 1 •Insert the DC Coupler. Connect the power cord. Do not use.... Connect the power cord to the AC adapter. 3 • Connect the power cord's plug to the AC outlet. •• After you can connect the camera to an AC outlet to the DC terminal. Insert the coupler and while pushing it in, turn the release handle as when using the...
EOS-1D Instructions
Page 26
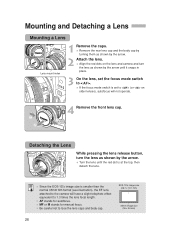
...by the arrow until the red dot is at the top, then detach the lens. • Since the EOS-1D's image size is set the focus mode switch to < >. • If the focus mode switch is smaller... than the normal 35mm film format (see illustration), the EF lens attached to the camera will not operate. 4 Remove the front lens cap. Remove the rear lens cap and the body cap ...or M stands for manual focus. •• Be careful not to < > (or < > on the lens and camera and turn the lens as shown by the arrow. • Turn the lens until it snaps in place. 3 On the...
...by the arrow until the red dot is at the top, then detach the lens. • Since the EOS-1D's image size is set the focus mode switch to < >. • If the focus mode switch is smaller... than the normal 35mm film format (see illustration), the EF lens attached to the camera will not operate. 4 Remove the front lens cap. Remove the rear lens cap and the body cap ...or M stands for manual focus. •• Be careful not to < > (or < > on the lens and camera and turn the lens as shown by the arrow. • Turn the lens until it snaps in place. 3 On the...
EOS-1D Instructions
Page 27
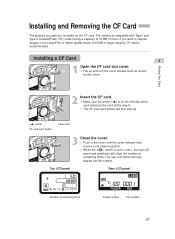
The camera is compatible with Type I and Type II CompactFlash (CF) cards having a capacity of remaining shots Folder number File number 27 Installing a CF Card 1 1 •Open ...
The camera is compatible with Type I and Type II CompactFlash (CF) cards having a capacity of remaining shots Folder number File number 27 Installing a CF Card 1 1 •Open ...


