
Instruction Manual
Page 2
...for damage resulting from digital apparatus as computers, monitors, printers, fax machines, copiers and scanners. International ENERGY STAR® Office Equipment Program As an ENERGY STAR partner, Canon Electronics Inc. has determined that ef fectively reduce energy consumption. NOTICE q Copyright© 1999... by any form or by CANON ELECTRONICS INC. RADIO INTERFERENCE REGULATIONS (For 120V models) This digital apparatus does not exceed the Class A limits for identification purposes only and may cause harmful interference to radio communications. No part of the FCC Rules. The ...
...for damage resulting from digital apparatus as computers, monitors, printers, fax machines, copiers and scanners. International ENERGY STAR® Office Equipment Program As an ENERGY STAR partner, Canon Electronics Inc. has determined that ef fectively reduce energy consumption. NOTICE q Copyright© 1999... by any form or by CANON ELECTRONICS INC. RADIO INTERFERENCE REGULATIONS (For 120V models) This digital apparatus does not exceed the Class A limits for identification purposes only and may cause harmful interference to radio communications. No part of the FCC Rules. The ...

Instruction Manual
Page 5
CONTENTS INTRODUCTION 1 CONVENTIONS 2 Safety Precautions 6 Chapter 1 About DR-5020/5080C 11 1.1 Features of DR-5020/5080C 12 1.2 Packaging: What's in the Box 14 1.3 Part Names 15 N Front view 15 N Rear view 16 N Operation panel 17 N Removable tray 20 N Document eject support plate 20 N Function key labels 20 Chapter 2 Preparation Before Use 21 2.1 System Requirements 22 2.2 Installation and...
CONTENTS INTRODUCTION 1 CONVENTIONS 2 Safety Precautions 6 Chapter 1 About DR-5020/5080C 11 1.1 Features of DR-5020/5080C 12 1.2 Packaging: What's in the Box 14 1.3 Part Names 15 N Front view 15 N Rear view 16 N Operation panel 17 N Removable tray 20 N Document eject support plate 20 N Function key labels 20 Chapter 2 Preparation Before Use 21 2.1 System Requirements 22 2.2 Installation and...
Instruction Manual
Page 9
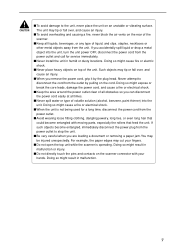
...from the power outlet and call for a long time, disconnect the power cord from the outlet by the plug head. I When you are loading a document or removing a paper jam. I Never place heavy objects on top of all times. I Avoid wearing loose fitting clothing, dangling jewelry, long ties, ...hair that could become entangled, immediately disconnect the power plug from the power outlet to the unit, never place the unit on the scanner connector with moving parts, especially the rollers that feed the unit. I Keep the area around the power outlet clear of the unit. I To avoid overheating...
...from the power outlet and call for a long time, disconnect the power cord from the outlet by the plug head. I When you are loading a document or removing a paper jam. I Never place heavy objects on top of all times. I Avoid wearing loose fitting clothing, dangling jewelry, long ties, ...hair that could become entangled, immediately disconnect the power plug from the power outlet to the unit, never place the unit on the scanner connector with moving parts, especially the rollers that feed the unit. I Keep the area around the power outlet clear of the unit. I To avoid overheating...

Instruction Manual
Page 12
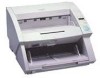
Chapter 1 About DR-5020/5080C This chapter describes the features of the scanner, what's in the box, and the names and functions of parts on the scanner. 1.1 Features of DR-5020/5080C 12 1.2 Packaging: What's in the Box? ........ 14 1.3 Part Names 15
Chapter 1 About DR-5020/5080C This chapter describes the features of the scanner, what's in the box, and the names and functions of parts on the scanner. 1.1 Features of DR-5020/5080C 12 1.2 Packaging: What's in the Box? ........ 14 1.3 Part Names 15
Instruction Manual
Page 16
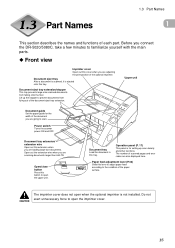
... this cover when you connect the DR-5020/5080C, take a few minutes to the condition of each part. Before you are also displayed here. Power switch Turns the scanner power ON and OFF. Part Names 1.3 Part Names 1 This section describes the names and functions of the paper surface. Document eject tray After a document is scanned, it is not...
... this cover when you connect the DR-5020/5080C, take a few minutes to the condition of each part. Before you are also displayed here. Power switch Turns the scanner power ON and OFF. Part Names 1.3 Part Names 1 This section describes the names and functions of the paper surface. Document eject tray After a document is scanned, it is not...

Instruction Manual
Page 18
N Operation panel 1 2 3 4 (1)Function keys (P. 60) 1.3 Part Names 1 (2)Simplex/Duplex key (3)Mode Selection keys (4)Brightness keys (5)Counter display (6)Feeding Option key (7)Count Only key (8)New File key C (9)Stop key (10)Start key (1)Function keys (P.60) Frequently used functions can be registered to these keys so that they can be called up later by one side of the document. Duplex: Light to scan only one -touch operation. (2)Simplex/Duplex key Selects whether to scan both sides. Simplex: Light to scan only side of the document or both sides of the document. 17
N Operation panel 1 2 3 4 (1)Function keys (P. 60) 1.3 Part Names 1 (2)Simplex/Duplex key (3)Mode Selection keys (4)Brightness keys (5)Counter display (6)Feeding Option key (7)Count Only key (8)New File key C (9)Stop key (10)Start key (1)Function keys (P.60) Frequently used functions can be registered to these keys so that they can be called up later by one side of the document. Duplex: Light to scan only one -touch operation. (2)Simplex/Duplex key Selects whether to scan both sides. Simplex: Light to scan only side of the document or both sides of the document. 17

Instruction Manual
Page 20
...scanning midway. When you scan the next document in the application, this key lights automatically when each document stack has finished being scanned. (9)Stop key Press this key, it will light. 1.3 Part Names (7)Count Only key (P.53) Sets the scanner to the Count Only mode for just ...counting the number of pages. (The document will not be scanned.) The document page count is...
...scanning midway. When you scan the next document in the application, this key lights automatically when each document stack has finished being scanned. (9)Stop key Press this key, it will light. 1.3 Part Names (7)Count Only key (P.53) Sets the scanner to the Count Only mode for just ...counting the number of pages. (The document will not be scanned.) The document page count is...

Instruction Manual
Page 39
... moving parts, especially the rollers that feed the unit. Failure to stop the unit. • Be very careful when you are loading a document or removing a paper jam. This section describes the following items: • Scan procedure (according to feed mode) • Counting of pages in documents •...long hair that could become entangled, immediately disconnect the power plug from the power outlet to do so might damage the document, or cause a paper jam or scanner malfunction. 38 For example, the paper edges may be injured unexpectedly. You may cut your fingers. • Check the...
... moving parts, especially the rollers that feed the unit. Failure to stop the unit. • Be very careful when you are loading a document or removing a paper jam. This section describes the following items: • Scan procedure (according to feed mode) • Counting of pages in documents •...long hair that could become entangled, immediately disconnect the power plug from the power outlet to do so might damage the document, or cause a paper jam or scanner malfunction. 38 For example, the paper edges may be injured unexpectedly. You may cut your fingers. • Check the...

Instruction Manual
Page 85
... at the positions indicated in the figure below. Fit into the deeper 2. Turn these rollers in Figure B. • Before you wipe them clean. If the document is scanned with water or mild detergent. Lower the lever. 1. A B • If a roller becomes loose (Figure A), re-attach it as you return ...the upper unit to its original position, be sure to wipe off any water from the rollers. 85 Press this part. of the arrows as shown in the direction of the two grooves. Rollers HINT Roller 5 3. Rollers are located at the up position, a ...
... at the positions indicated in the figure below. Fit into the deeper 2. Turn these rollers in Figure B. • Before you wipe them clean. If the document is scanned with water or mild detergent. Lower the lever. 1. A B • If a roller becomes loose (Figure A), re-attach it as you return ...the upper unit to its original position, be sure to wipe off any water from the rollers. 85 Press this part. of the arrows as shown in the direction of the two grooves. Rollers HINT Roller 5 3. Rollers are located at the up position, a ...
Instruction Manual
Page 93
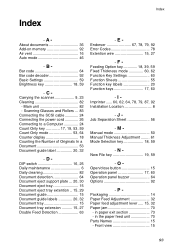
... Counter display 18 Manual Thickness Adjustment ........ 61 Counting the Number of Originals In a Mode Selection key 18, 59 Document 53 Document guide label 20, 32 - P - in paper exit section 73 - Carrying the scanner 9, 23 - M - N - 5 New File key 19, 59 - DIP switch 16, 25 - Index... cleaning 82 Operation panel 17, 60 Document detection 64 Operation panel buzzer 64 Document eject support plate ... 20, 30 Options 92 Document eject tray 15 Document eject tray extention .. 15, 29 - in the paper feed unit 70 Parts Names 15 - Feeding Option key 18...
... Counter display 18 Manual Thickness Adjustment ........ 61 Counting the Number of Originals In a Mode Selection key 18, 59 Document 53 Document guide label 20, 32 - P - in paper exit section 73 - Carrying the scanner 9, 23 - M - N - 5 New File key 19, 59 - DIP switch 16, 25 - Index... cleaning 82 Operation panel 17, 60 Document detection 64 Operation panel buzzer 64 Document eject support plate ... 20, 30 Options 92 Document eject tray 15 Document eject tray extention .. 15, 29 - in the paper feed unit 70 Parts Names 15 - Feeding Option key 18...

Quick Reference Guide
Page 10
... procedure below to descend slowly. Close the document eject tray guide if it is open the upper unit. If it stops and holds position. To close button to open . L STEP 3 Remove the jammed paper from the scanner's upper and lower trays, and remove any extra parts attached to the upper (eject) tray. L STEP... will begin to clear the paper jam; Do not push the unit down firmly on both sides until you hear it can go . L STEP 1 Remove documents from inside the scanner,* raise the upper unit until it clicks into place. * If...
... procedure below to descend slowly. Close the document eject tray guide if it is open the upper unit. If it stops and holds position. To close button to open . L STEP 3 Remove the jammed paper from the scanner's upper and lower trays, and remove any extra parts attached to the upper (eject) tray. L STEP... will begin to clear the paper jam; Do not push the unit down firmly on both sides until you hear it can go . L STEP 1 Remove documents from inside the scanner,* raise the upper unit until it clicks into place. * If...


