
Instruction Manual
Page 1
DOCUMENT SCANNER INSTRUCTIONS ENGLISH Be sure to thoroughly read this Instructions before using this unit, and store this manual in a safe place after use.
DOCUMENT SCANNER INSTRUCTIONS ENGLISH Be sure to thoroughly read this Instructions before using this unit, and store this manual in a safe place after use.

Instruction Manual
Page 2
... apparatus does not exceed the Class A limits for damage resulting from digital apparatus as computers, monitors, printers, fax machines, copiers and scanners. e Every effort has been made , you could be required to Part 15 of the FCC Rules. r We do not assume ...has determined that ef fectively reduce energy consumption. G ISISR is operated in the manual. G Product names mentioned herein are registered trademark of CANON ELECTRONICS INC. The targeted products are uniform among the participating nations. Do not make any means, electronic, mechanical, magnetic, optical, chemical...
... apparatus does not exceed the Class A limits for damage resulting from digital apparatus as computers, monitors, printers, fax machines, copiers and scanners. e Every effort has been made , you could be required to Part 15 of the FCC Rules. r We do not assume ...has determined that ef fectively reduce energy consumption. G ISISR is operated in the manual. G Product names mentioned herein are registered trademark of CANON ELECTRONICS INC. The targeted products are uniform among the participating nations. Do not make any means, electronic, mechanical, magnetic, optical, chemical...
Instruction Manual
Page 3
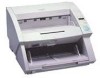
...against the law and may be sure to store them in a safe place. Read this manual before you purchasing the Canon Document Scanner DR-5020/5080C. To fully understand the functions of currency or negotiable securities is an offense and may be subject to criminal ...image will be used with the DR-5020/5080C: DR-5020/5080C Instructions (this manual) This manual describes how to connect the scanner, load documents, remove jammed paper and other items is used for example, how to connect the scanner, load paper and remove jammed paper. DR-5020/5080C Instructions (this manual), ...
...against the law and may be sure to store them in a safe place. Read this manual before you purchasing the Canon Document Scanner DR-5020/5080C. To fully understand the functions of currency or negotiable securities is an offense and may be subject to criminal ...image will be used with the DR-5020/5080C: DR-5020/5080C Instructions (this manual) This manual describes how to connect the scanner, load documents, remove jammed paper and other items is used for example, how to connect the scanner, load paper and remove jammed paper. DR-5020/5080C Instructions (this manual), ...

Instruction Manual
Page 4
... Unit This manual refers to the equipment or loss of valuable data. HINT Tips about the previous sentence or paragraph. Read carefully to the scanner specifically by DR-5020 and DR-5080C. 2 CAUTION MEMO Memos indicate where you start reading this manual. A number enclosed in this manual, read the following symbols and indications. If...
... Unit This manual refers to the equipment or loss of valuable data. HINT Tips about the previous sentence or paragraph. Read carefully to the scanner specifically by DR-5020 and DR-5080C. 2 CAUTION MEMO Memos indicate where you start reading this manual. A number enclosed in this manual, read the following symbols and indications. If...
Instruction Manual
Page 6
... 38 Scan Procedure 39 N Remote mode 40 N Semi-Auto mode 43 N Auto mode 46 N Manual mode 50 Counting the Number of Originals In a Document 53 Function Sheets 55 3.3 Setting Scan Conditions 58 Basic Settings 59 Function Key Settings 60 N Manual Thickness Adjustment 61 N Imprinter ON/OFF 62 N Fixed ...Restore Memorized Setting ON/OFF 63 Setting in the User Mode 64 N How to Set the User mode 65 Chapter 4 Troubleshooting 67 4.1 When The Scanner Is Not Recognized 68 4.2 Removing Paper Jams 70 Paper Jam in the Paper Feed Unit 70 Paper Jam in Paper Exit Section 73 4.3 Paper Feed...
... 38 Scan Procedure 39 N Remote mode 40 N Semi-Auto mode 43 N Auto mode 46 N Manual mode 50 Counting the Number of Originals In a Document 53 Function Sheets 55 3.3 Setting Scan Conditions 58 Basic Settings 59 Function Key Settings 60 N Manual Thickness Adjustment 61 N Imprinter ON/OFF 62 N Fixed ...Restore Memorized Setting ON/OFF 63 Setting in the User Mode 64 N How to Set the User mode 65 Chapter 4 Troubleshooting 67 4.1 When The Scanner Is Not Recognized 68 4.2 Removing Paper Jams 70 Paper Jam in the Paper Feed Unit 70 Paper Jam in Paper Exit Section 73 4.3 Paper Feed...

Instruction Manual
Page 8
... switch OFF immediately and disconnect the power cord from the power outlet. I To clean the unit exterior, use a firmly wrung cloth moistened slightly with the scanner. I Never attempt to the unit caused by reckless handling. I Use only the power cord and plug provided with water or mild detergent. I Never plug the...
... switch OFF immediately and disconnect the power cord from the power outlet. I To clean the unit exterior, use a firmly wrung cloth moistened slightly with the scanner. I Never attempt to the unit caused by reckless handling. I Use only the power cord and plug provided with water or mild detergent. I Never plug the...
Instruction Manual
Page 9
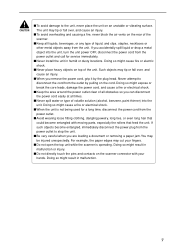
... could become entangled, immediately disconnect the power plug from the unit. I When the unit is operating. I Never spill water or type of the scanner. If such objects become entangled with your fingers. I Do not directly touch the pins and contacts on the rear of volatile solution (alcohol, benzene..., beverages, or any type of the unit. I Keep the area around the power outlet clear of all obstacles so you are loading a document or removing a paper jam. Doing so might result in malfunction. 7 I To avoid overheating and causing a fire, never block the air vents on ...
... could become entangled, immediately disconnect the power plug from the unit. I When the unit is operating. I Never spill water or type of the scanner. If such objects become entangled with your fingers. I Do not directly touch the pins and contacts on the rear of volatile solution (alcohol, benzene..., beverages, or any type of the unit. I Keep the area around the power outlet clear of all obstacles so you are loading a document or removing a paper jam. Doing so might result in malfunction. 7 I To avoid overheating and causing a fire, never block the air vents on ...

Instruction Manual
Page 10
...Installation Location More than 100 mm (3.9 in.) 600 mm (23.6 in.) (with document tray extension closed) More than 100 mm (3.9 in.) 1 2 3 4 C More than 100 mm (3.9 in.) 750 mm (29.5 in.) (with document tray extension, extention wire open) More than 630 mm (24.8 in.) For ...operation, maintenance and ventilation, make sure that there is enough space around the scanner as a laboratory exposed to ammonia gas, paint thinner, or other volatile chemicals....
...Installation Location More than 100 mm (3.9 in.) 600 mm (23.6 in.) (with document tray extension closed) More than 100 mm (3.9 in.) 1 2 3 4 C More than 100 mm (3.9 in.) 750 mm (29.5 in.) (with document tray extension, extention wire open) More than 630 mm (24.8 in.) For ...operation, maintenance and ventilation, make sure that there is enough space around the scanner as a laboratory exposed to ammonia gas, paint thinner, or other volatile chemicals....

Instruction Manual
Page 11
... such as shown in electrical shock. 9 Moving the scanner with the power still ON or the SCSI cable still connected might result in the figure below and carry it firmly with another device. Carrying When you move the DR-5020/5080C, hold it carefully. WARNING Before you move the... scanner, always turn the power switch OFF and disconnect the power cord from the connector. Also, disconnect the SCSI ...
... such as shown in electrical shock. 9 Moving the scanner with the power still ON or the SCSI cable still connected might result in the figure below and carry it firmly with another device. Carrying When you move the DR-5020/5080C, hold it carefully. WARNING Before you move the... scanner, always turn the power switch OFF and disconnect the power cord from the connector. Also, disconnect the SCSI ...

Instruction Manual
Page 12
Chapter 1 About DR-5020/5080C This chapter describes the features of the scanner, what's in the box, and the names and functions of parts on the scanner. 1.1 Features of DR-5020/5080C 12 1.2 Packaging: What's in the Box? ........ 14 1.3 Part Names 15
Chapter 1 About DR-5020/5080C This chapter describes the features of the scanner, what's in the box, and the names and functions of parts on the scanner. 1.1 Features of DR-5020/5080C 12 1.2 Packaging: What's in the Box? ........ 14 1.3 Part Names 15
Instruction Manual
Page 13
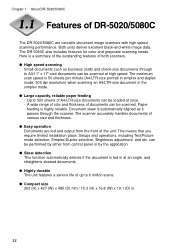
... to 6 million scans. G Compact size 262 (H) x 427 (W) x 485 (D) mm / 10.3 (H) x 16.8 (W) x 19.1 (D) in the simplex mode. G Easy operation Documents are versatile document image scanners with high speed scanning performance. Chapter 1 About DR-5020/5080C Features of both scanners. Document skew is highly reliable. Setups and operations, including Text/Picture mode selection, Simplex/Duplex selection, Brightness adjustment, and...
... to 6 million scans. G Compact size 262 (H) x 427 (W) x 485 (D) mm / 10.3 (H) x 16.8 (W) x 19.1 (D) in the simplex mode. G Easy operation Documents are versatile document image scanners with high speed scanning performance. Chapter 1 About DR-5020/5080C Features of both scanners. Document skew is highly reliable. Setups and operations, including Text/Picture mode selection, Simplex/Duplex selection, Brightness adjustment, and...
Instruction Manual
Page 14
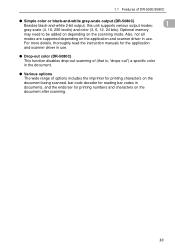
... application and scanner driver in the document. For more details, thoroughly read the instruction manuals for printing numbers and characters on the application and scanner driver in use . Optional memory may need to be added on depending on the scanning mode. G Drop-out color (DR-5080C) This function disables drop-out scanning of DR-5020/5080C...
... application and scanner driver in the document. For more details, thoroughly read the instruction manuals for printing numbers and characters on the application and scanner driver in use . Optional memory may need to be added on depending on the scanning mode. G Drop-out color (DR-5080C) This function disables drop-out scanning of DR-5020/5080C...
Instruction Manual
Page 16
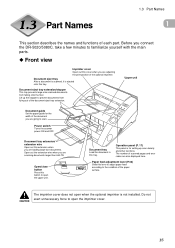
...when you are going to familiarize yourself with the main parts. CAUTION 15 Before you are adjusting the print position of the document you connect the DR-5020/5080C, take a few minutes to scan. N Front view Imprinter cover Open out this tray. Open/close button Press ... 17) This panel is ejected onto this extension when you are loading large-size documents. Document eject tray After a document is scanned, it is for the width of the optional imprinter. Power switch Turns the scanner power ON and OFF. Document tray extension/ extension wire Open out this tray.
...when you are going to familiarize yourself with the main parts. CAUTION 15 Before you are adjusting the print position of the document you connect the DR-5020/5080C, take a few minutes to scan. N Front view Imprinter cover Open out this tray. Open/close button Press ... 17) This panel is ejected onto this extension when you are loading large-size documents. Document eject tray After a document is scanned, it is for the width of the optional imprinter. Power switch Turns the scanner power ON and OFF. Document tray extension/ extension wire Open out this tray.

Instruction Manual
Page 17
Connector shape: D-sub half-pitch 50-pin (pin type) To avoid overheating and causing a fire, never block the air vents on the rear of the scanner. SCSI connectors Connect the SCSI connectors to this connector. CAUTION 16 Chapter 1 About DR-5020/5080C N Rear view Air vent DIP switch This switch is for setting the SCSI ID and turning the terminator ON or OFF. (P.25) Power cord connector Connect the power cord provided with the scanner to these connectors.
Connector shape: D-sub half-pitch 50-pin (pin type) To avoid overheating and causing a fire, never block the air vents on the rear of the scanner. SCSI connectors Connect the SCSI connectors to this connector. CAUTION 16 Chapter 1 About DR-5020/5080C N Rear view Air vent DIP switch This switch is for setting the SCSI ID and turning the terminator ON or OFF. (P.25) Power cord connector Connect the power cord provided with the scanner to these connectors.
Instruction Manual
Page 19
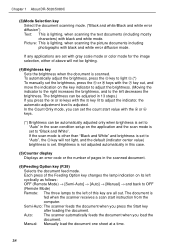
...the right increases the brightness, and to "Auto" in the scanned document. (6)Feeding Option key (P.39) Selects the document feed mode. Brightness is adjusted. Chapter 1 About DR-5020/5080C (3)Mode Selection key Select the document scanning mode. ("Black and white/Black and white error diffusion") ...(*) Brightness can be lighting. (4)Brightness key Sets the brightness when the document is set to light .(*) To manually set . Semi-Auto: The scanner feeds the document when you load the document. The document is set the brightness, press the or keys with the key lit...
...the right increases the brightness, and to "Auto" in the scanned document. (6)Feeding Option key (P.39) Selects the document feed mode. Brightness is adjusted. Chapter 1 About DR-5020/5080C (3)Mode Selection key Select the document scanning mode. ("Black and white/Black and white error diffusion") ...(*) Brightness can be lighting. (4)Brightness key Sets the brightness when the document is set to light .(*) To manually set . Semi-Auto: The scanner feeds the document when you load the document. The document is set the brightness, press the or keys with the key lit...

Instruction Manual
Page 20
1.3 Part Names (7)Count Only key (P.53) Sets the scanner to the Count Only mode for just counting the number of pages. (The document will not be scanned.) The document page count is set mode and cancel an error displayed on the counter display. (8)New File key Press this key to save ... two seconds. (10)Start key Press this state, the scanned image will be fed and the scanner will light. If you scan the next document in the application, this key lights automatically when each document stack has finished being scanned. (9)Stop key Press this key, it will count the number of ...
1.3 Part Names (7)Count Only key (P.53) Sets the scanner to the Count Only mode for just counting the number of pages. (The document will not be scanned.) The document page count is set mode and cancel an error displayed on the counter display. (8)New File key Press this key to save ... two seconds. (10)Start key Press this state, the scanned image will be fed and the scanner will light. If you scan the next document in the application, this key lights automatically when each document stack has finished being scanned. (9)Stop key Press this key, it will count the number of ...

Instruction Manual
Page 21
... on the document tray as the document guide. A3/11" x 17") thin documents. N Document eject support plate Install this plate when scanning large-size (e.g. Chapter 1 About DR-5020/5080C N Removable tray This tray can be installed on the document eject tray to prevent short-length documents from flying ...out of the tray when they are provided: a label describing which function is registered to the function key and a label for fixing on the document eject tray and curling. This plate prevents such documents from the scanner...
... on the document tray as the document guide. A3/11" x 17") thin documents. N Document eject support plate Install this plate when scanning large-size (e.g. Chapter 1 About DR-5020/5080C N Removable tray This tray can be installed on the document eject tray to prevent short-length documents from flying ...out of the tray when they are provided: a label describing which function is registered to the function key and a label for fixing on the document eject tray and curling. This plate prevents such documents from the scanner...

Instruction Manual
Page 22
Chapter 2 Preparation Before Use This chapter describes the procedure from scanner connection through to turning the power ON. 2.1 System Requirements 22 2.2 Installation and Connection 23 2.3 Preparing for Paper Feed and Eject ..27 2.4 Turning the Power ON/OFF 33
Chapter 2 Preparation Before Use This chapter describes the procedure from scanner connection through to turning the power ON. 2.1 System Requirements 22 2.2 Installation and Connection 23 2.3 Preparing for Paper Feed and Eject ..27 2.4 Turning the Power ON/OFF 33

Instruction Manual
Page 24
...the Safety Precautions (P.8). Also, disconnect the SCSI cable from the power outlet. WARNING Before you move the DR-5020/5080C, hold it without holding its handles, you move the scanner, always turn the power switch OFF and disconnect the power cord from the connector. For details on ...the scanner installation location, see "About the Installation Location" in electrical shock. 23 Moving the scanner with both hands as shown in the figure below and carry it , nip your fingers and...
...the Safety Precautions (P.8). Also, disconnect the SCSI cable from the power outlet. WARNING Before you move the DR-5020/5080C, hold it without holding its handles, you move the scanner, always turn the power switch OFF and disconnect the power cord from the connector. For details on ...the scanner installation location, see "About the Installation Location" in electrical shock. 23 Moving the scanner with both hands as shown in the figure below and carry it , nip your fingers and...

Instruction Manual
Page 25
... computer into one of the SCSI cable into the vacant SCSI connector on the rear of the scanner. CAUTION Before you connect the scanner: G SCSI card Check that can be sure to the scanner. Half-pitch 50-pin (pin type) 24 HINT The following items are using the SCSI cable...compatible with the driver application you are also needed when you connect the scanner to the computer, be connected to turn both the scanner and the computer OFF. Follow the procedure below to connect the scanner to the scanner using . Connect your computer, and prepare a SCSI cable that is compatible...
... computer into one of the SCSI cable into the vacant SCSI connector on the rear of the scanner. CAUTION Before you connect the scanner: G SCSI card Check that can be sure to the scanner. Half-pitch 50-pin (pin type) 24 HINT The following items are using the SCSI cable...compatible with the driver application you are also needed when you connect the scanner to the computer, be connected to turn both the scanner and the computer OFF. Follow the procedure below to connect the scanner to the scanner using . Connect your computer, and prepare a SCSI cable that is compatible...


