User Manual
Page 6
... Regular Maintenance 61 Cleaning the Scanner 61 Cleaning inside the Scanner 61 Cleaning the Sensor Glass and the Rollers 62 Cleaning the Shading Boards 65 Removing and Attaching the Rollers 67 Roller Replacement Message 67 Resetting the Counter 68 Removing and Attaching the Pickup Roller 70 Removing and Attaching the Feed Roller 73 Removing and Attaching the Retard...
... Regular Maintenance 61 Cleaning the Scanner 61 Cleaning inside the Scanner 61 Cleaning the Sensor Glass and the Rollers 62 Cleaning the Shading Boards 65 Removing and Attaching the Rollers 67 Roller Replacement Message 67 Resetting the Counter 68 Removing and Attaching the Pickup Roller 70 Removing and Attaching the Feed Roller 73 Removing and Attaching the Retard...
User Manual
Page 14
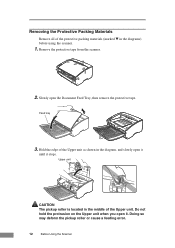
... it until it . Upper unit CAUTION The pickup roller is located in the diagrams) before using the scanner. 1. Hold the edge of the Upper unit. Doing so may deform the pickup roller or cause a feeding error. 12 Before Using the Scanner Removing the Protective Packing Materials Remove all of ...the protective packing materials (marked ▼ in the middle of the Upper unit as shown in the diagram, and slowly open the Document Feed Tray, ...
... it until it . Upper unit CAUTION The pickup roller is located in the diagrams) before using the scanner. 1. Hold the edge of the Upper unit. Doing so may deform the pickup roller or cause a feeding error. 12 Before Using the Scanner Removing the Protective Packing Materials Remove all of ...the protective packing materials (marked ▼ in the middle of the Upper unit as shown in the diagram, and slowly open the Document Feed Tray, ...

User Manual
Page 15
Pickup Roller 5. Be sure that the Upper unit is completely closed by pushing on both edges with both hands until you hear a click. Remove the protective sheet then the protective material securing the pickup roller. Replace the roller cover. Roller Cover Retard Roller 6. Before Using the Scanner 13 Remove the roller cover, then remove the protective material securing the retard roller. Gently close the Upper unit. 4.
Pickup Roller 5. Be sure that the Upper unit is completely closed by pushing on both edges with both hands until you hear a click. Remove the protective sheet then the protective material securing the pickup roller. Replace the roller cover. Roller Cover Retard Roller 6. Before Using the Scanner 13 Remove the roller cover, then remove the protective material securing the retard roller. Gently close the Upper unit. 4.

User Manual
Page 55
... the Document Feed Tray and the Document Eject Tray Extension to prevent damage to get your fingers stuck in the pickup roller. In this , be fed very well. IMPORTANT • When scanning documents that are not fastened together on the leading edge of the documents when you place several documents that is not being used. Using the Scanner...
... the Document Feed Tray and the Document Eject Tray Extension to prevent damage to get your fingers stuck in the pickup roller. In this , be fed very well. IMPORTANT • When scanning documents that are not fastened together on the leading edge of the documents when you place several documents that is not being used. Using the Scanner...

User Manual
Page 59
... the jammed document. Hold the Upper unit as shown in the diagram, and open it to clear them. Do not hold the protrusion on the edge of a sheet of the Upper unit. Using the Scanner 57 Close the Document Eject Tray Extention. 3. Doing so may deform the pickup roller or cause ...a feeding error. Remove any documents that have been left in the middle of paper. 1. It is located in the eject...
... the jammed document. Hold the Upper unit as shown in the diagram, and open it to clear them. Do not hold the protrusion on the edge of a sheet of the Upper unit. Using the Scanner 57 Close the Document Eject Tray Extention. 3. Doing so may deform the pickup roller or cause ...a feeding error. Remove any documents that have been left in the middle of paper. 1. It is located in the eject...

User Manual
Page 64
... sensor glass and various rollers are dirty, then the sensor glass or rollers inside the scanner may deform the pickup roller or cause a feeding error. Doing so may be dirty. Do not hold the protrusion on the Upper unit when you open it slowly until it . Platen Rollers Sensor Glasses Pickup Roller Feed Roller Rollers Retard Roller 62 Regular Maintenance Note...
... sensor glass and various rollers are dirty, then the sensor glass or rollers inside the scanner may deform the pickup roller or cause a feeding error. Doing so may be dirty. Do not hold the protrusion on the Upper unit when you open it slowly until it . Platen Rollers Sensor Glasses Pickup Roller Feed Roller Rollers Retard Roller 62 Regular Maintenance Note...
User Manual
Page 66
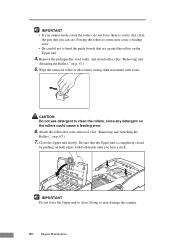
... rotate may damage the scanner. 64 Regular Maintenance Remove the pickup roller, feed roller, and retard roller. (See "Removing and Attaching the Rollers," on the Upper unit. 4. Wipe the removed rollers with a firmly wrung cloth moistened with both hands until you hear a click. Close the Upper unit slowly. IMPORTANT...them to close. CAUTION Do not use detergent to bend the guide boards that were removed. (See "Removing and Attaching the Rollers," on the rollers could cause a feeding error. 6. Be sure that you can see. Just clean the part that the Upper unit is ...
... rotate may damage the scanner. 64 Regular Maintenance Remove the pickup roller, feed roller, and retard roller. (See "Removing and Attaching the Rollers," on the Upper unit. 4. Wipe the removed rollers with a firmly wrung cloth moistened with both hands until you hear a click. Close the Upper unit slowly. IMPORTANT...them to close. CAUTION Do not use detergent to bend the guide boards that were removed. (See "Removing and Attaching the Rollers," on the rollers could cause a feeding error. 6. Be sure that you can see. Just clean the part that the Upper unit is ...

User Manual
Page 67
... boards are the white standard boards located behind the platen rollers. CAUTION The pickup roller is not opened all the way, the shading boards cannot come out above the platen rollers (upper and lower). Turn ON the power. 2. A dirty shading board may deform the pickup roller or cause a feeding error. Press the Start Button for about...
... boards are the white standard boards located behind the platen rollers. CAUTION The pickup roller is not opened all the way, the shading boards cannot come out above the platen rollers (upper and lower). Turn ON the power. 2. A dirty shading board may deform the pickup roller or cause a feeding error. Press the Start Button for about...

User Manual
Page 69
... when you clean them or replace them. Removing and Attaching the Rollers Follow the relevant procedure to remove or attach the pickup roller. CAUTION • Turn ON the power to the scanner to remove and attach the pickup roller, feed roller, and retard roller when you replace the rollers. (See "Resetting the Counter," on p. 68.) • Windows NT does...
... when you clean them or replace them. Removing and Attaching the Rollers Follow the relevant procedure to remove or attach the pickup roller. CAUTION • Turn ON the power to the scanner to remove and attach the pickup roller, feed roller, and retard roller when you replace the rollers. (See "Resetting the Counter," on p. 68.) • Windows NT does...
User Manual
Page 70
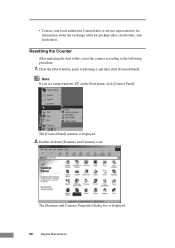
• Contact your local authorized Canon dealer or service representative for information about the exchange roller kit (pickup roller, retard roller, and feed roller). Note If you are using windows XP, on the Start menu, click [Control Panel]. Resetting the Counter After replacing the feed rollers, reset the counter according to [Settings], and then click [Control Panel]. Click...
• Contact your local authorized Canon dealer or service representative for information about the exchange roller kit (pickup roller, retard roller, and feed roller). Note If you are using windows XP, on the Start menu, click [Control Panel]. Resetting the Counter After replacing the feed rollers, reset the counter according to [Settings], and then click [Control Panel]. Click...

User Manual
Page 72
CAUTION • Turn ON the power to the scanner to remove and attach the pickup roller for cleaning or replacement. Turn ON the power. Doing so may damage them. Removing the Pickup Roller 1. Hold the Upper unit as shown in the diagram, and open it slowly until it will... when removing or attaching the rollers. Note Because the pickup roller locks when the power is OFF, it stops. 70 Regular Maintenance Removing and Attaching the Pickup Roller Follow the procedures below to remove or attach the pickup roller. Be careful when working on the scanner when the power is opened....
CAUTION • Turn ON the power to the scanner to remove and attach the pickup roller for cleaning or replacement. Turn ON the power. Doing so may damage them. Removing the Pickup Roller 1. Hold the Upper unit as shown in the diagram, and open it slowly until it will... when removing or attaching the rollers. Note Because the pickup roller locks when the power is OFF, it stops. 70 Regular Maintenance Removing and Attaching the Pickup Roller Follow the procedures below to remove or attach the pickup roller. Be careful when working on the scanner when the power is opened....

User Manual
Page 73
Doing so may damage the scanner. Putting it in the middle of the pickup roller. Do not hold the protrusion on the pickup roller to open it. Push up on the Upper unit when you removed) by both sides of its shaft, and place it on the hooks. Regular Maintenance 71 Hold the new pickup roller (or the one you open the hook, and then remove the pickup roller. IMPORTANT Take note of the orientation of the Upper unit. CAUTION The pickup roller is located in backward and forcing it may deform the pickup roller or cause a feeding error. 3. Attaching the Pickup Roller 1.
Doing so may damage the scanner. Putting it in the middle of the pickup roller. Do not hold the protrusion on the pickup roller to open it. Push up on the Upper unit when you removed) by both sides of its shaft, and place it on the hooks. Regular Maintenance 71 Hold the new pickup roller (or the one you open the hook, and then remove the pickup roller. IMPORTANT Take note of the orientation of the Upper unit. CAUTION The pickup roller is located in backward and forcing it may deform the pickup roller or cause a feeding error. 3. Attaching the Pickup Roller 1.

User Manual
Page 74
2. Doing so may damage the scanner. 72 Regular Maintenance Be sure that the shaft of the pickup roller on both edges with both hands until you hear a click. IMPORTANT Do not force the Upper unit to close. Make sure that the Upper unit is correctly inserted. 4. Place the shaft of the pickup roller is completely closed by pushing on the hooks, and then press it into place. 3. Close the Upper unit slowly.
2. Doing so may damage the scanner. 72 Regular Maintenance Be sure that the shaft of the pickup roller on both edges with both hands until you hear a click. IMPORTANT Do not force the Upper unit to close. Make sure that the Upper unit is correctly inserted. 4. Place the shaft of the pickup roller is completely closed by pushing on the hooks, and then press it into place. 3. Close the Upper unit slowly.
User Manual
Page 75
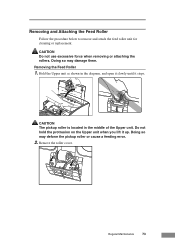
... it stops. Doing so may damage them. Regular Maintenance 73 Removing and Attaching the Feed Roller Follow the procedure below to remove and attach the feed roller unit for cleaning or replacement. Doing so may deform the pickup roller or cause a feeding error. 2. CAUTION Do not use excessive force when removing or attaching the...
... it stops. Doing so may damage them. Regular Maintenance 73 Removing and Attaching the Feed Roller Follow the procedure below to remove and attach the feed roller unit for cleaning or replacement. Doing so may deform the pickup roller or cause a feeding error. 2. CAUTION Do not use excessive force when removing or attaching the...

User Manual
Page 79
...the Upper unit. Regular Maintenance 77 CAUTION The pickup roller is located in the diagram, and open it. Removing the Retard Roller 1. CAUTION Do not use excessive force when removing or attaching the rollers. Removing and Attaching the Retard Roller Follow the procedure below to remove and attach... the retard roller when you open it slowly until it . Doing so may deform the pickup roller or cause a feed error. 2. Do not ...
...the Upper unit. Regular Maintenance 77 CAUTION The pickup roller is located in the diagram, and open it. Removing the Retard Roller 1. CAUTION Do not use excessive force when removing or attaching the rollers. Removing and Attaching the Retard Roller Follow the procedure below to remove and attach... the retard roller when you open it slowly until it . Doing so may deform the pickup roller or cause a feed error. 2. Do not ...
User Manual
Page 90
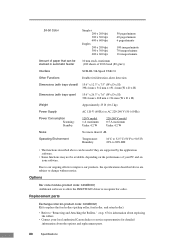
...replace the feed rollers (pickup roller, feed roller, and retard roller). • Refer to change without notice. Due to our ongoing efforts to improve our products, the specifications described above can be used if they are subject to "Removing and Attaching the Rollers," on your local authorized Canon dealer or ...can be stacked in automatic feeder 10 mm stack, maximum (100 sheets of your PC and on p. 67 for information about replacing the rollers. • Contact your software. Options Bar code module (product code: 0434B003) Additional software to allow the ISIS/TWAIN driver to 80...
...replace the feed rollers (pickup roller, feed roller, and retard roller). • Refer to change without notice. Due to our ongoing efforts to improve our products, the specifications described above can be used if they are subject to "Removing and Attaching the Rollers," on your local authorized Canon dealer or ...can be stacked in automatic feeder 10 mm stack, maximum (100 sheets of your PC and on p. 67 for information about replacing the rollers. • Contact your software. Options Bar code module (product code: 0434B003) Additional software to allow the ISIS/TWAIN driver to 80...

User Manual
Page 92
...Rollers 62 Scanner 61 Shading Board 65 Connections Power Cord 24 SCSI 15,21 USB 2.0 15,23 D DIP Switches 15 Disposal 8 Documents 42 Documents Eject Guide 14,47 Documents Stopper 14 Document Eject Tray 45 Document Eject Tray1 14 Document Eject Tray2 15,45,46 Document Feed Tray 14,44 Document...14 Power OFF 27 Power ON 25 Power Switch 14,25 R Regular Maintenance 61 Rollers 67 Counter 68 Feed Roller 73 Pickup Roller 70 Replacement Message 67 Retard Roller 77 S Scanner Installation Procedure 18 Moving 6 Recognizing 25 Skew Detection Function 60 Specifications 87 Start ...
...Rollers 62 Scanner 61 Shading Board 65 Connections Power Cord 24 SCSI 15,21 USB 2.0 15,23 D DIP Switches 15 Disposal 8 Documents 42 Documents Eject Guide 14,47 Documents Stopper 14 Document Eject Tray 45 Document Eject Tray1 14 Document Eject Tray2 15,45,46 Document Feed Tray 14,44 Document...14 Power OFF 27 Power ON 25 Power Switch 14,25 R Regular Maintenance 61 Rollers 67 Counter 68 Feed Roller 73 Pickup Roller 70 Replacement Message 67 Retard Roller 77 S Scanner Installation Procedure 18 Moving 6 Recognizing 25 Skew Detection Function 60 Specifications 87 Start ...
Easy Start Guide
Page 1
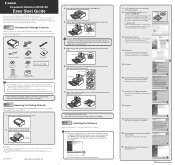
...this package are registered trademarks of the upper unit holds the pickup roller. Read the software license agreement, and click [Yes] if you connect the scanner and turn the scanner OFF. Document Scanner DR-5010C Easy Start Guide Thank you start up, run the setup....using Windows Vista, the "User Account Control" screen may appear. Pickup Roller 6. Warning ❏ Do not connect the scanner to change without notice. ● Keep the package and packing materials for purchasing the Canon DR-5010C Document Scanner. Wizard Screen (Windows 2000) ❏ Close all the places ...
...this package are registered trademarks of the upper unit holds the pickup roller. Read the software license agreement, and click [Yes] if you connect the scanner and turn the scanner OFF. Document Scanner DR-5010C Easy Start Guide Thank you start up, run the setup....using Windows Vista, the "User Account Control" screen may appear. Pickup Roller 6. Warning ❏ Do not connect the scanner to change without notice. ● Keep the package and packing materials for purchasing the Canon DR-5010C Document Scanner. Wizard Screen (Windows 2000) ❏ Close all the places ...


