User Manual
Page 6
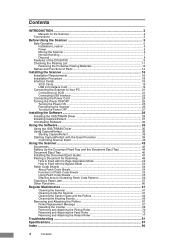
...the Scanner 2 Conventions ...3 Before Using the Scanner 5 Safe Operation ...5 Installation Location ...5 Power ...6 Moving the Scanner ...6 Normal Handling ...7 Disposal ...8 Features of the DR-5010C 9 Checking the Packing List 11 Removing the Protective Packing Matarials 12 Names and Functions of Parts 14 Installing the Scanner ...the Event Function 39 Confirming Scanner Event 39 Using the Scanner 42 Documents ...42 Setting Up the Document Feed Tray and the Document Eject Tray 44 Document Eject Tray 45 Installing the Document Eject Guide 47 Placing a Document for Scanning 49 How to...
...the Scanner 2 Conventions ...3 Before Using the Scanner 5 Safe Operation ...5 Installation Location ...5 Power ...6 Moving the Scanner ...6 Normal Handling ...7 Disposal ...8 Features of the DR-5010C 9 Checking the Packing List 11 Removing the Protective Packing Matarials 12 Names and Functions of Parts 14 Installing the Scanner ...the Event Function 39 Confirming Scanner Event 39 Using the Scanner 42 Documents ...42 Setting Up the Document Feed Tray and the Document Eject Tray 44 Document Eject Tray 45 Installing the Document Eject Guide 47 Placing a Document for Scanning 49 How to...
User Manual
Page 14
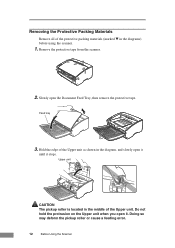
... the Upper unit. Slowly open it stops. Feed tray 3. Upper unit CAUTION The pickup roller is located in the diagrams) before using the scanner. 1. Do not hold the protrusion on the Upper unit when you open the Document Feed Tray, then remove the protective tape. Removing the Protective Packing Materials Remove all of... ▼ in the middle of the Upper unit as shown in the diagram, and slowly open it until it . Remove the protective tape from the scanner. 2. Doing so may deform the pickup roller or cause a feeding error. 12 Before Using the...
... the Upper unit. Slowly open it stops. Feed tray 3. Upper unit CAUTION The pickup roller is located in the diagrams) before using the scanner. 1. Do not hold the protrusion on the Upper unit when you open the Document Feed Tray, then remove the protective tape. Removing the Protective Packing Materials Remove all of... ▼ in the middle of the Upper unit as shown in the diagram, and slowly open it until it . Remove the protective tape from the scanner. 2. Doing so may deform the pickup roller or cause a feeding error. 12 Before Using the...

User Manual
Page 15
Remove the roller cover, then remove the protective material securing the retard roller. Replace the roller cover. Before Using the Scanner 13 4. Be sure that the Upper unit is completely closed by pushing on both edges with both hands until you hear a click. Pickup Roller 5. Roller Cover Retard Roller 6. Gently close the Upper unit. Remove the protective sheet then the protective material securing the pickup roller.
Remove the roller cover, then remove the protective material securing the retard roller. Replace the roller cover. Before Using the Scanner 13 4. Be sure that the Upper unit is completely closed by pushing on both edges with both hands until you hear a click. Pickup Roller 5. Roller Cover Retard Roller 6. Gently close the Upper unit. Remove the protective sheet then the protective material securing the pickup roller.
User Manual
Page 45
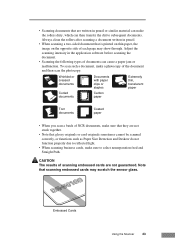
Embossed Cards Using the Scanner 43 To scan such a document, make a photocopy of documents can then transfer the dirt to select nonseparation feed and Straight Path. CAUTION The results of each page may scratch the sensor glass. • Scanning documents that are not guaranteed. Adjust the ... and Deskew do not function properly due to reflected light. • When scanning business cards, make the rollers dirty, which can cause a paper jam or malfunction. Always clean the rollers after scanning a document written in pencil or similar material can make sure to subsequent...
Embossed Cards Using the Scanner 43 To scan such a document, make a photocopy of documents can then transfer the dirt to select nonseparation feed and Straight Path. CAUTION The results of each page may scratch the sensor glass. • Scanning documents that are not guaranteed. Adjust the ... and Deskew do not function properly due to reflected light. • When scanning business cards, make the rollers dirty, which can cause a paper jam or malfunction. Always clean the rollers after scanning a document written in pencil or similar material can make sure to subsequent...

User Manual
Page 55
... feed tray at one time, they will be fed together. • Particularly, very thin or curled documents will not be careful not to the scanner while it is not being used. Pickup Roller • After you set them. In this , be fed very well. IMPORTANT • When scanning...scanning with nonseparated feed, if you place several documents that are not fastened together on the leading edge of the documents when you finish scanning, close the Document Feed Tray and the Document Eject Tray Extension to prevent damage to get your fingers stuck in the pickup roller. Using the Scanner 53
... feed tray at one time, they will be fed together. • Particularly, very thin or curled documents will not be careful not to the scanner while it is not being used. Pickup Roller • After you set them. In this , be fed very well. IMPORTANT • When scanning...scanning with nonseparated feed, if you place several documents that are not fastened together on the leading edge of the documents when you finish scanning, close the Document Feed Tray and the Document Eject Tray Extension to prevent damage to get your fingers stuck in the pickup roller. Using the Scanner 53

User Manual
Page 59
... Jam When paper jams occur during scanning, use the following procedure to cut your hand on the Upper unit when you can remove the jammed document. Using the Scanner 57 CAUTION Be careful when removing jammed paper. It is located in the middle of paper. 1. Remove any... documents that have been left in the diagram, and open it to the point where you open it . Hold the Upper unit as shown in the eject tray. 2. Doing so may deform the pickup roller or cause a feeding error. CAUTION The pickup roller is possible to clear them.
... Jam When paper jams occur during scanning, use the following procedure to cut your hand on the Upper unit when you can remove the jammed document. Using the Scanner 57 CAUTION Be careful when removing jammed paper. It is located in the middle of paper. 1. Remove any... documents that have been left in the diagram, and open it to the point where you open it . Hold the Upper unit as shown in the eject tray. 2. Doing so may deform the pickup roller or cause a feeding error. CAUTION The pickup roller is possible to clear them.

User Manual
Page 63
... or leave marks on the scanner while the power is ON. Then use a blower to clean dust from inside of the scanner. CAUTION • When cleaning the scanner or inside the scanner. Periodically use a dry, soft cloth to be ON when cleaning the rollers and the shading boards. They... also create a risk of the scanner, dampen a cloth with water or a mild detergent...
... or leave marks on the scanner while the power is ON. Then use a blower to clean dust from inside of the scanner. CAUTION • When cleaning the scanner or inside the scanner. Periodically use a dry, soft cloth to be ON when cleaning the rollers and the shading boards. They... also create a risk of the scanner, dampen a cloth with water or a mild detergent...

User Manual
Page 64
.... Cleaning the Sensor Glass and the Rollers If scanned images have extraneous marks, or if the scanned documents are shown below. Doing so may be dirty. Platen Rollers Sensor Glasses Pickup Roller Feed Roller Rollers Retard Roller 62 Regular Maintenance Hold the Upper unit... as shown in the middle of the sensor glass and various rollers are dirty, then the sensor glass or rollers inside the scanner...
.... Cleaning the Sensor Glass and the Rollers If scanned images have extraneous marks, or if the scanned documents are shown below. Doing so may be dirty. Platen Rollers Sensor Glasses Pickup Roller Feed Roller Rollers Retard Roller 62 Regular Maintenance Hold the Upper unit... as shown in the middle of the sensor glass and various rollers are dirty, then the sensor glass or rollers inside the scanner...

User Manual
Page 65
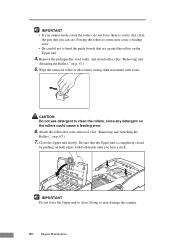
...firmly wrung cloth moistened with water. Precision mechanisms, such as the light source, may cause marks on the rollers, could cause feeding errors. 2. CAUTION Do not use detergent to clean the scanner. Use a clean, dry cloth to replace the sensor glass. 3. Guide Board CAUTION Do not use ...spray type cleaners to clean the rollers, since any detergent on the images and could cause a feeding error. If there are scratches on the sensor glass, contact your local authorized Canon dealer or service representative to wipe dirt off the sensor glass.
...firmly wrung cloth moistened with water. Precision mechanisms, such as the light source, may cause marks on the rollers, could cause feeding errors. 2. CAUTION Do not use detergent to clean the scanner. Use a clean, dry cloth to replace the sensor glass. 3. Guide Board CAUTION Do not use ...spray type cleaners to clean the rollers, since any detergent on the images and could cause a feeding error. If there are scratches on the sensor glass, contact your local authorized Canon dealer or service representative to wipe dirt off the sensor glass.
User Manual
Page 66
... them to rotate may damage the scanner. 64 Regular Maintenance Close the Upper unit slowly. IMPORTANT Do not force the Upper unit to clean the rollers, since any detergent on the rollers could cause a feeding error. 6. Remove the pickup roller, feed roller, and retard roller. (See "Removing and Attaching the Rollers," on the Upper unit. 4. Attach the...
... them to rotate may damage the scanner. 64 Regular Maintenance Close the Upper unit slowly. IMPORTANT Do not force the Upper unit to clean the rollers, since any detergent on the rollers could cause a feeding error. 6. Remove the pickup roller, feed roller, and retard roller. (See "Removing and Attaching the Rollers," on the Upper unit. 4. Attach the...

User Manual
Page 67
... is located in the diagram, and open the Upper unit until it stops. CAUTION The pickup roller is not opened all the way, the shading boards cannot come out above the platen rollers (upper and lower). Turn ON the power. 2. If it . Shading Boards Regular Maintenance 65... Cleaning the Shading Boards The shading boards are the white standard boards located behind the platen rollers. A dirty shading board may deform the pickup...
... is located in the diagram, and open the Upper unit until it stops. CAUTION The pickup roller is not opened all the way, the shading boards cannot come out above the platen rollers (upper and lower). Turn ON the power. 2. If it . Shading Boards Regular Maintenance 65... Cleaning the Shading Boards The shading boards are the white standard boards located behind the platen rollers. A dirty shading board may deform the pickup...

User Manual
Page 69
...the power to the scanner to wear out, paper jams and misfeeds may damage them . Regular Maintenance 67 IMPORTANT Feed rollers are consumable parts. IMPORTANT • If misfeeds happen often, check the rollers for replacing the rollers. When the rollers start to remove or attach the pickup roller. Removing and Attaching the Rollers Follow the relevant ...8226; Be sure to reset the counter when you clean them or replace them . Check the number of pages scanned has exceeded 250,000 pages, a roller replacement message appears on the scanner when the power is started.
...the power to the scanner to wear out, paper jams and misfeeds may damage them . Regular Maintenance 67 IMPORTANT Feed rollers are consumable parts. IMPORTANT • If misfeeds happen often, check the rollers for replacing the rollers. When the rollers start to remove or attach the pickup roller. Removing and Attaching the Rollers Follow the relevant ...8226; Be sure to reset the counter when you clean them or replace them . Check the number of pages scanned has exceeded 250,000 pages, a roller replacement message appears on the scanner when the power is started.
User Manual
Page 70
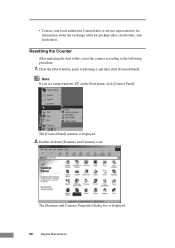
...Scanners and Cameras Properties] dialog box is displayed. 2. Note If you are using windows XP, on the Start menu, click [Control Panel]. The [Control Panel] window is displayed. 68 Regular Maintenance • Contact your local authorized Canon dealer or service representative for information about the exchange roller kit (pickup roller, retard roller, and feed roller...). Resetting the Counter After replacing the feed rollers, reset the...
...Scanners and Cameras Properties] dialog box is displayed. 2. Note If you are using windows XP, on the Start menu, click [Control Panel]. The [Control Panel] window is displayed. 68 Regular Maintenance • Contact your local authorized Canon dealer or service representative for information about the exchange roller kit (pickup roller, retard roller, and feed roller...). Resetting the Counter After replacing the feed rollers, reset the...

User Manual
Page 71
3. Click the [Counter] tab. 5. Regular Maintenance 69 Click on [Properties] for the Roller being used is set to 0. Press the [Reset] button, and then make sure that the counter for the scanner you are using. 4.
3. Click the [Counter] tab. 5. Regular Maintenance 69 Click on [Properties] for the Roller being used is set to 0. Press the [Reset] button, and then make sure that the counter for the scanner you are using. 4.

User Manual
Page 72
... use excessive force when removing or attaching the rollers. Removing the Pickup Roller 1. Doing so may damage them. Removing and Attaching the Pickup Roller Follow the procedures below to remove or attach the pickup roller. Be careful when working on the scanner when the power is ON 2. Note Because the... pickup roller locks when the power is opened. Hold the Upper unit...
... use excessive force when removing or attaching the rollers. Removing the Pickup Roller 1. Doing so may damage them. Removing and Attaching the Pickup Roller Follow the procedures below to remove or attach the pickup roller. Be careful when working on the scanner when the power is ON 2. Note Because the... pickup roller locks when the power is opened. Hold the Upper unit...

User Manual
Page 73
Push up on the pickup roller to open it. Hold the new pickup roller (or the one you open the hook, and then remove the pickup roller. IMPORTANT Take note of the orientation of the Upper unit. Attaching the Pickup Roller 1. Regular Maintenance 71 Putting it in the middle of the pickup roller. CAUTION The pickup roller is located in backward and forcing it on the Upper unit when you removed) by both sides of its shaft, and place it may deform the pickup roller or cause a feeding error. 3. Do not hold the protrusion on the hooks. Doing so may damage the scanner.
Push up on the pickup roller to open it. Hold the new pickup roller (or the one you open the hook, and then remove the pickup roller. IMPORTANT Take note of the orientation of the Upper unit. Attaching the Pickup Roller 1. Regular Maintenance 71 Putting it in the middle of the pickup roller. CAUTION The pickup roller is located in backward and forcing it on the Upper unit when you removed) by both sides of its shaft, and place it may deform the pickup roller or cause a feeding error. 3. Do not hold the protrusion on the hooks. Doing so may damage the scanner.

User Manual
Page 74
Be sure that the shaft of the pickup roller on both edges with both hands until you hear a click. 2. Close the Upper unit slowly. Place the shaft of the pickup roller is completely closed by pushing on the hooks, and then press it into place. 3. Make sure that the Upper unit is correctly inserted. 4. IMPORTANT Do not force the Upper unit to close. Doing so may damage the scanner. 72 Regular Maintenance
Be sure that the shaft of the pickup roller on both edges with both hands until you hear a click. 2. Close the Upper unit slowly. Place the shaft of the pickup roller is completely closed by pushing on the hooks, and then press it into place. 3. Make sure that the Upper unit is correctly inserted. 4. IMPORTANT Do not force the Upper unit to close. Doing so may damage the scanner. 72 Regular Maintenance
User Manual
Page 75
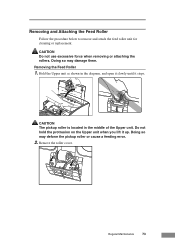
... it slowly until it up. Regular Maintenance 73 Do not hold the protrusion on the Upper unit when you lift it stops. Removing the Feed Roller 1. Remove the roller cover. Hold the Upper unit as shown in the middle of the Upper unit. Removing and Attaching the Feed... Roller Follow the procedure below to remove and attach the feed roller unit for cleaning or replacement. Doing so may damage them. Doing so may deform the pickup roller or cause a feeding ...
... it slowly until it up. Regular Maintenance 73 Do not hold the protrusion on the Upper unit when you lift it stops. Removing the Feed Roller 1. Remove the roller cover. Hold the Upper unit as shown in the middle of the Upper unit. Removing and Attaching the Feed... Roller Follow the procedure below to remove and attach the feed roller unit for cleaning or replacement. Doing so may damage them. Doing so may deform the pickup roller or cause a feeding ...
User Manual
Page 76
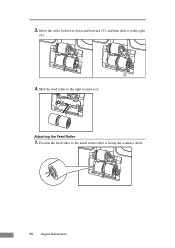
Shift the feed roller to the right to the right (➁). 4. Attaching the Feed Roller 1. Move the roller lock lever down and forward (➀), and then slide it to remove it. Position the feed roller so the notch in the roller is facing the scanner's shaft. 74 Regular Maintenance 3.
Shift the feed roller to the right to the right (➁). 4. Attaching the Feed Roller 1. Move the roller lock lever down and forward (➀), and then slide it to remove it. Position the feed roller so the notch in the roller is facing the scanner's shaft. 74 Regular Maintenance 3.

User Manual
Page 77
Regular Maintenance 75 Attach the roller cover. Slide the roller lock lever to the left, and insert it into the feed roller hole. 3. 2. Lift up the roller lock lever and lock the feed roller. 4.
Regular Maintenance 75 Attach the roller cover. Slide the roller lock lever to the left, and insert it into the feed roller hole. 3. 2. Lift up the roller lock lever and lock the feed roller. 4.


