
User Manual
Page 4
...USE OR NON-INFRINGEMENT. Trademarks • Canon and the Canon logo are uniform among participating nations. registered mark. • Adobe is the registered trademark of Adobe Systems Incorporated in this document is a trademark of this machine meets ...CANON ELECTRONICS INC. in the United States and may be trademarks or registered trademarks in other countries. • Microsoft and Windows are registered trademarks of Microsoft Corporation in the United States. • Intel and Pentium are office equipment, such as computers, monitors, printers, fax, machine, copiers, and scanners...
...USE OR NON-INFRINGEMENT. Trademarks • Canon and the Canon logo are uniform among participating nations. registered mark. • Adobe is the registered trademark of Adobe Systems Incorporated in this document is a trademark of this machine meets ...CANON ELECTRONICS INC. in the United States and may be trademarks or registered trademarks in other countries. • Microsoft and Windows are registered trademarks of Microsoft Corporation in the United States. • Intel and Pentium are office equipment, such as computers, monitors, printers, fax, machine, copiers, and scanners...

User Manual
Page 18
...the following operating systems: - Contact your local authorized Canon dealer or service representative for more detailed information. • Not all USB interfaces provided as shown below. - Microsoft Windows 98SE - Installation Requirements To use the DR-2580C, your computer system, contact the store where you... the recommended specifications, the scanning speed may vary, depending on the scan settings. 14 Before Using the Scanner Microsoft Windows 2000 Professional SP4 or later - Windows 2000/XP: Hi-Speed USB 2.0/USB Full-Speed (equal to USB 1.1). • Use the USB cable...
...the following operating systems: - Contact your local authorized Canon dealer or service representative for more detailed information. • Not all USB interfaces provided as shown below. - Microsoft Windows 98SE - Installation Requirements To use the DR-2580C, your computer system, contact the store where you... the recommended specifications, the scanning speed may vary, depending on the scan settings. 14 Before Using the Scanner Microsoft Windows 2000 Professional SP4 or later - Windows 2000/XP: Hi-Speed USB 2.0/USB Full-Speed (equal to USB 1.1). • Use the USB cable...

User Manual
Page 36
Click the Windows [Start] button, and then click [Programs] ([All Programs] for Windows XP) Æ [CapturePerfect 3.0] Æ [CapturePerfect 3.0]. For details, see the CapturePerfect 3.0 Operation Guide and CapturePerfect Help. 1. CapturePerfect 3.0 Operation Procedure This section describes how to File. CapturePerfect 3.0 starts up to scanning with Scan Batch to start up CapturePerfect 3.0, select the scanner, and the procedure up . (CapturePerfect 3.0 Operation Guide) 32 Using the Scanner
Click the Windows [Start] button, and then click [Programs] ([All Programs] for Windows XP) Æ [CapturePerfect 3.0] Æ [CapturePerfect 3.0]. For details, see the CapturePerfect 3.0 Operation Guide and CapturePerfect Help. 1. CapturePerfect 3.0 Operation Procedure This section describes how to File. CapturePerfect 3.0 starts up to scanning with Scan Batch to start up CapturePerfect 3.0, select the scanner, and the procedure up . (CapturePerfect 3.0 Operation Guide) 32 Using the Scanner

User Manual
Page 41
...The Job Function has the following four functions and also functions as file Image files are saved to a specified folder. (network) Job button DR-2580C Attach to E-mail E-mail software is started up . Launcher The specified application is started up and image files are attached to a new e-...mail massage. These functions are used by assigning them to set the Windows event before using the Launcher. (See "About the Launcher," on a specified printer. Note You need to a Job button with the Job Registration...
...The Job Function has the following four functions and also functions as file Image files are saved to a specified folder. (network) Job button DR-2580C Attach to E-mail E-mail software is started up . Launcher The specified application is started up and image files are attached to a new e-...mail massage. These functions are used by assigning them to set the Windows event before using the Launcher. (See "About the Launcher," on a specified printer. Note You need to a Job button with the Job Registration...

User Manual
Page 42
...-assigned to the My Pictures folder. • To start up the Job Registration Tool, click the Windows [Start] button, and then click [Programs] ([All Programs] for Windows XP) Æ [DR-2580C] Æ [Job Registration Tool]. 38 Using the Scanner Job button settings For details on the settings in Job Registration Tool, see "Job Registration Tool...
...-assigned to the My Pictures folder. • To start up the Job Registration Tool, click the Windows [Start] button, and then click [Programs] ([All Programs] for Windows XP) Æ [DR-2580C] Æ [Job Registration Tool]. 38 Using the Scanner Job button settings For details on the settings in Job Registration Tool, see "Job Registration Tool...

User Manual
Page 44
About the Launcher Only applications supported by the Windows event function can either select and start an application or click [Cancel] to change the event settings. 40 Using the Scanner Click [Close] to the event settings. At this dialog box is transferred according to be started according... DR2580C." 4. When this point, if no event settings are no more document sheets, the image data is displayed, you can be started with the [Launcher]. • In the initial status of the DR-2580C immediately after setup, all the applications the event function supported are enabled. To...
About the Launcher Only applications supported by the Windows event function can either select and start an application or click [Cancel] to change the event settings. 40 Using the Scanner Click [Close] to the event settings. At this dialog box is transferred according to be started according... DR2580C." 4. When this point, if no event settings are no more document sheets, the image data is displayed, you can be started with the [Launcher]. • In the initial status of the DR-2580C immediately after setup, all the applications the event function supported are enabled. To...

User Manual
Page 45
For Windows XP, switch the Control Panel to open the [Event settings] dialog box. 1. Click the [Start] button, and then click [Settings] on the [Start] menu Æ click [Control Panel]. (For Windows XP, click the [Start] button Æ click [Control Panel].) Chapter 2 2. Control Panel (category view) Printers and Other Hardware Control Panel (classic view) Using the Scanner 41 Use the following procedure to Classic View, or select [Printers and Other Hardware] in the working field. Setting the Event Function Follow the procedure below to set an event. 1.
For Windows XP, switch the Control Panel to open the [Event settings] dialog box. 1. Click the [Start] button, and then click [Settings] on the [Start] menu Æ click [Control Panel]. (For Windows XP, click the [Start] button Æ click [Control Panel].) Chapter 2 2. Control Panel (category view) Printers and Other Hardware Control Panel (classic view) Using the Scanner 41 Use the following procedure to Classic View, or select [Printers and Other Hardware] in the working field. Setting the Event Function Follow the procedure below to set an event. 1.

User Manual
Page 49
4. Chapter 2 Using the Scanner 45 Click [OK] to enable the new settings for the event function. Restart Windows to close [CANON DR-2580C USB Properties]. 5.
4. Chapter 2 Using the Scanner 45 Click [OK] to enable the new settings for the event function. Restart Windows to close [CANON DR-2580C USB Properties]. 5.

User Manual
Page 55
...Hardware] in the working field. Long Document Mode Settings 1. Chapter 2 • When using the Long Document mode, the paper jam detection may react slowly resulting in damage to open the [Event settings] dialog box. 1. Use the following procedure to the document. Click the [Start] button, and ...then click [Settings] on the [Start] menu Æ click [Control Panel]. (For Windows XP, click the [Start] button Æ click [Control Panel].) 2. Control Panel (...
...Hardware] in the working field. Long Document Mode Settings 1. Chapter 2 • When using the Long Document mode, the paper jam detection may react slowly resulting in damage to open the [Event settings] dialog box. 1. Use the following procedure to the document. Click the [Start] button, and ...then click [Settings] on the [Start] menu Æ click [Control Panel]. (For Windows XP, click the [Start] button Æ click [Control Panel].) 2. Control Panel (...

User Manual
Page 64
... If the flatbed unit is not connected, [Flatbed] and [Auto] do not appear in the preview window displayed on the [Flatbed] is scanned when there is scanned so you set to [Auto], the document on the scanning panel. See "ISIS Driver Settings g," on p. 62, and "TWAIN Driver Settings g,"... on p. 64. See "ISIS Driver Settings a," on p. 62, and "TWAIN Driver Settings a," on p. 64. 60 Using the Scanner Prescan Function • I want to ...
... If the flatbed unit is not connected, [Flatbed] and [Auto] do not appear in the preview window displayed on the [Flatbed] is scanned when there is scanned so you set to [Auto], the document on the scanning panel. See "ISIS Driver Settings g," on p. 62, and "TWAIN Driver Settings g,"... on p. 64. See "ISIS Driver Settings a," on p. 62, and "TWAIN Driver Settings a," on p. 64. 60 Using the Scanner Prescan Function • I want to ...
User Manual
Page 65
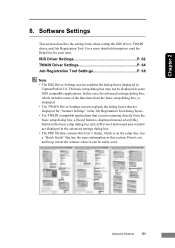
...the same information as this section. Print it out and keep it near the scanner where it can be displayed in some of an [OK] button in the basic setup dialog box and, a [Preview] button and area window are displayed in CapturePerfect 3.0. The basic setup dialog box may not be easily... dialog box, which is displayed. • The TWAIN Driver Settings section explains the dialog boxes that are displayed for each item. Using the Scanner 61 Software Settings This section describes the setting items when setting the ISIS driver, TWAIN driver, and Job Registration Tool. Chapter 2 8.
...the same information as this section. Print it out and keep it near the scanner where it can be displayed in some of an [OK] button in the basic setup dialog box and, a [Preview] button and area window are displayed in CapturePerfect 3.0. The basic setup dialog box may not be easily... dialog box, which is displayed. • The TWAIN Driver Settings section explains the dialog boxes that are displayed for each item. Using the Scanner 61 Software Settings This section describes the setting items when setting the ISIS driver, TWAIN driver, and Job Registration Tool. Chapter 2 8.

User Manual
Page 67
... enabled when the [Panel Feeding] or [Automatic Feeding] Feeding Option is placed. ) [Automatic Feeding] starts scanning whenever the scanner detects a loaded document. q Text Orientation Recognition Detects the text orientation in scanned images and rotates the images in density between the front and back sides...that two or more pages of black areas (0 to be quickly resumed with standard operations. t Edge emphasis Enhances contours in the Prescan window. For details on the [Ratio of black pixels] value. ) When [Folio] is selected, both sides of the interruption, scanning...
... enabled when the [Panel Feeding] or [Automatic Feeding] Feeding Option is placed. ) [Automatic Feeding] starts scanning whenever the scanner detects a loaded document. q Text Orientation Recognition Detects the text orientation in scanned images and rotates the images in density between the front and back sides...that two or more pages of black areas (0 to be quickly resumed with standard operations. t Edge emphasis Enhances contours in the Prescan window. For details on the [Ratio of black pixels] value. ) When [Folio] is selected, both sides of the interruption, scanning...

User Manual
Page 68
Opens the Gamma Settings dialog box to detect bar codes in documents open the BarCode dialog box. v w Color drop-out 64 Using the Scanner Custom Page Size registration Advanced Settings Dialog Box n o p q r Document Orientation Filter Settings Dialog Box s t u The optional BarCode module is enabled when it is installed, to adjust ...is selected, [Brightness] and [Contrast] are set automatically when Advanced Text Enhancement is displayed instead of the [OK] button, and the [Area window] and [Preview] button are added to see details of the settings in the Scan Area dialog box.
Opens the Gamma Settings dialog box to detect bar codes in documents open the BarCode dialog box. v w Color drop-out 64 Using the Scanner Custom Page Size registration Advanced Settings Dialog Box n o p q r Document Orientation Filter Settings Dialog Box s t u The optional BarCode module is enabled when it is installed, to adjust ...is selected, [Brightness] and [Contrast] are set automatically when Advanced Text Enhancement is displayed instead of the [OK] button, and the [Area window] and [Preview] button are added to see details of the settings in the Scan Area dialog box.

User Manual
Page 69
.... ) [Contrast] is set and fixed at a slant, the scanned image is selected. Using the Scanner 65 f Contrast Adjusts the contrast of back side The scanner checks the difference in the Prescan window. i Prescan When scanning starts, a page of the document and adjusts the contrast and the brightness for the Page Size. m Area Specifies the...
.... ) [Contrast] is set and fixed at a slant, the scanned image is selected. Using the Scanner 65 f Contrast Adjusts the contrast of back side The scanner checks the difference in the Prescan window. i Prescan When scanning starts, a page of the document and adjusts the contrast and the brightness for the Page Size. m Area Specifies the...

User Manual
Page 70
Access setting (Windows 2000/XP) Admin Dialog Box t u v w x Monitor for DR2580C Function PDF/TIFF Settings p q Print m Attach to E-mail r s Stop o Launcher n Start No Scan Job Language for OCR 66 Using the Scanner Job Registration Tool Settings Job Registration Tool Dialog Box a b d c New/Editing dialog box The dialog box changes according the Function selection. Save as file e f g h i k j l File type * The [Setting] button is enabled when [PDF] or [TIFF] is selected.
Access setting (Windows 2000/XP) Admin Dialog Box t u v w x Monitor for DR2580C Function PDF/TIFF Settings p q Print m Attach to E-mail r s Stop o Launcher n Start No Scan Job Language for OCR 66 Using the Scanner Job Registration Tool Settings Job Registration Tool Dialog Box a b d c New/Editing dialog box The dialog box changes according the Function selection. Save as file e f g h i k j l File type * The [Setting] button is enabled when [PDF] or [TIFF] is selected.

User Manual
Page 71
... Black and white images are compressed as CCITT Group 4 images, while grayscale and color images are compressed as one page with the Windows event function. u Register Folder/Display Warning Dialog The [Capacity Observed Folder] and [Warning Size] items are created by appending a .... m Printer Shows the default printer. o Launcher Starts applications set with the number of TIFF files corresponding to the Job Buttons on another DR-2580C document scanner. l [Access setting] button This button is displayed. b Job Button (1-3) Correspond to the number of pages. ) [Multi pages] saves...
... Black and white images are compressed as CCITT Group 4 images, while grayscale and color images are compressed as one page with the Windows event function. u Register Folder/Display Warning Dialog The [Capacity Observed Folder] and [Warning Size] items are created by appending a .... m Printer Shows the default printer. o Launcher Starts applications set with the number of TIFF files corresponding to the Job Buttons on another DR-2580C document scanner. l [Access setting] button This button is displayed. b Job Button (1-3) Correspond to the number of pages. ) [Multi pages] saves...

User Manual
Page 79
..., or select [Printers and Other Hardware] in the working field. Control Panel (category view) Printers and Other Hardware Control Panel (classic view) Appendices 75 For Windows XP, switch the Control Panel to open the [Counter setup] dialog box and reset the counter. 1. Click the [Start] button, and then click [Settings] on...
..., or select [Printers and Other Hardware] in the working field. Control Panel (category view) Printers and Other Hardware Control Panel (classic view) Appendices 75 For Windows XP, switch the Control Panel to open the [Counter setup] dialog box and reset the counter. 1. Click the [Start] button, and then click [Settings] on...

User Manual
Page 98
4. The [Control Panel] window appears. 2. Installing the Software," in the Easy Start Guide.) IMPORTANT Be sure to uninstall them. Double-click the [Add/Remove Programs]. Then, re-install the software from the DR-2580C setup disc. (See "Step 3. Note If you are not operating normally, follow the ...procedure below to log on as an administrator when using Windows XP, double-click the [Add or Remove Programs]. 94 Appendices Click...
4. The [Control Panel] window appears. 2. Installing the Software," in the Easy Start Guide.) IMPORTANT Be sure to uninstall them. Double-click the [Add/Remove Programs]. Then, re-install the software from the DR-2580C setup disc. (See "Step 3. Note If you are not operating normally, follow the ...procedure below to log on as an administrator when using Windows XP, double-click the [Add or Remove Programs]. 94 Appendices Click...

User Manual
Page 99
For more information on uninstalling each application, see the following: See "Uninstalling the ISIS/TWAIN Driver/Job Registration Tool," on p. 98. From the list in the dialog box, select the application you want to delete Æ click [Change/Remove]. Chapter 3 The [Add/Remove Programs Properties] dialog box appears. Note For Windows XP, the [Add or Remove Programs] dialog box appears. 3. See "Uninstalling CapturePerfect 3.0," on p. 96. Appendices 95
For more information on uninstalling each application, see the following: See "Uninstalling the ISIS/TWAIN Driver/Job Registration Tool," on p. 98. From the list in the dialog box, select the application you want to delete Æ click [Change/Remove]. Chapter 3 The [Add/Remove Programs Properties] dialog box appears. Note For Windows XP, the [Add or Remove Programs] dialog box appears. 3. See "Uninstalling CapturePerfect 3.0," on p. 96. Appendices 95

User Manual
Page 112
... Detects the text orientation in scanned images and rotates the images in scanned images. Advanced Settings Dialog Box E Double Feed Detection The scanner stops feeding when it detects that may not be scanned. ☞ Click [Custom] to normalize text orientation. ISIS Driver Quick Guide...application program, the basic setup dialog box may be scanned. ☞ These settings are combined into one image. D Area Window The appearance of the document have holes punched for the Page Size. H Rapid recovery system Select this function to prevent error reporting to a paper ...
... Detects the text orientation in scanned images and rotates the images in scanned images. Advanced Settings Dialog Box E Double Feed Detection The scanner stops feeding when it detects that may not be scanned. ☞ Click [Custom] to normalize text orientation. ISIS Driver Quick Guide...application program, the basic setup dialog box may be scanned. ☞ These settings are combined into one image. D Area Window The appearance of the document have holes punched for the Page Size. H Rapid recovery system Select this function to prevent error reporting to a paper ...

