
Startup Guide
Page 2
... sowie in a particular installation. Model DR-2080C is connected. • Consult the dealer or an experienced radio/TV technician for radio noise emissions from digital apparatus as computers, monitors, printers, fax machines, copiers and Scanners. MODEL NAMES Model DR-2080C is no guarantee that promotes... NMB-003 édictée par l'Industrie Canada. International ENERGY STAR® Office Equipment Program As an ENERGY STAR partner, Canon Electronics Inc. If this product meets the ENERGY STAR guidelines for a Class B digital device, pursuant to model M11044. However, there...
... sowie in a particular installation. Model DR-2080C is connected. • Consult the dealer or an experienced radio/TV technician for radio noise emissions from digital apparatus as computers, monitors, printers, fax machines, copiers and Scanners. MODEL NAMES Model DR-2080C is no guarantee that promotes... NMB-003 édictée par l'Industrie Canada. International ENERGY STAR® Office Equipment Program As an ENERGY STAR partner, Canon Electronics Inc. If this product meets the ENERGY STAR guidelines for a Class B digital device, pursuant to model M11044. However, there...

Startup Guide
Page 6
... of the DR-2080C 9 Checking the Packing List 11 Removing Protective Tape and Protective Sheet 12 Names and Functions of Parts 14 Installing the Scanner 16 Before Setting Up the Scanner 16 Extending the stand 16 Installing the Feed Roller 16 Installation Requirements 20 Installation Procedure 22 ...44 Verifying the "Scanner Event 44 Using the Scanner 47 Documents ...47 Loading a Document for Scanning 48 Preparing for Scanning 48 Scanning Long Documents 49 Loading a Document for Scanning 50 Clearing Paper Jams 53 Regular Maintenance 55 Cleaning the Scanner 55 Cleaning the ...
... of the DR-2080C 9 Checking the Packing List 11 Removing Protective Tape and Protective Sheet 12 Names and Functions of Parts 14 Installing the Scanner 16 Before Setting Up the Scanner 16 Extending the stand 16 Installing the Feed Roller 16 Installation Requirements 20 Installation Procedure 22 ...44 Verifying the "Scanner Event 44 Using the Scanner 47 Documents ...47 Loading a Document for Scanning 48 Preparing for Scanning 48 Scanning Long Documents 49 Loading a Document for Scanning 50 Clearing Paper Jams 53 Regular Maintenance 55 Cleaning the Scanner 55 Cleaning the ...

Startup Guide
Page 7
...the unit on a non-slip surface that the location where the unit is installed. Installation Location At least 4 in. (100 mm) At least 4 in. (100 mm) At least 4 in. (100 mm) Longer than the document size (Document stop) The performance of a water faucet, water heater, humidifier, etc., ...and avoid locations where there fumes from ammonia, paint thinner, etc., may affect document output. ● Provide adequate space around the unit (as indicated in the above diagram) for operation, maintenance and ventilation purposes. ●...
...the unit on a non-slip surface that the location where the unit is installed. Installation Location At least 4 in. (100 mm) At least 4 in. (100 mm) At least 4 in. (100 mm) Longer than the document size (Document stop) The performance of a water faucet, water heater, humidifier, etc., ...and avoid locations where there fumes from ammonia, paint thinner, etc., may affect document output. ● Provide adequate space around the unit (as indicated in the above diagram) for operation, maintenance and ventilation purposes. ●...

Startup Guide
Page 18
Notice Make sure that you do not use the unit with the stand extended. Lift the edge of the unit to open it from toppling. Installing the Scanner Before Setting Up the Scanner Extending the stand Extend the stand located at the rear of the paper feed tray to prevent it . 16 Installing the Scanner If you use the stand, the unit may topple and be damaged. Installing the Feed Roller Open the front unit and install the provided feed roller. 1.
Notice Make sure that you do not use the unit with the stand extended. Lift the edge of the unit to open it from toppling. Installing the Scanner Before Setting Up the Scanner Extending the stand Extend the stand located at the rear of the paper feed tray to prevent it . 16 Installing the Scanner If you use the stand, the unit may topple and be damaged. Installing the Feed Roller Open the front unit and install the provided feed roller. 1.

Startup Guide
Page 19
2. Raise the roller lock lever (➀), and slide it in the groove and lift. 4. To open the front unit towards you (➁). 3. Installing the Scanner 17 Open the roller cover inside the roller cover, and align the notch in the roller with the spindle in the front unit. Insert the feed roller into the groove inside the scanner. While squeezing the OPEN release (➀), open the cover, set your finger in the direction of the arrow (➁). 5.
2. Raise the roller lock lever (➀), and slide it in the groove and lift. 4. To open the front unit towards you (➁). 3. Installing the Scanner 17 Open the roller cover inside the roller cover, and align the notch in the roller with the spindle in the front unit. Insert the feed roller into the groove inside the scanner. While squeezing the OPEN release (➀), open the cover, set your finger in the direction of the arrow (➁). 5.

Startup Guide
Page 20
Slide the roller lock lever to the right, and set it into place and is returned to its original position. 18 Installing the Scanner Make sure that the cover clicks into the hollow to fasten the feed roller spindle. 8. 6. Lower the lever to the left of the roller. 7. Close the roller cover.
Slide the roller lock lever to the right, and set it into place and is returned to its original position. 18 Installing the Scanner Make sure that the cover clicks into the hollow to fasten the feed roller spindle. 8. 6. Lower the lever to the left of the roller. 7. Close the roller cover.

Startup Guide
Page 21
Make sure that the cover clicks into place and is returned to its original position. 10.Close the paper feed tray. 11.Close the top cover. 9. Installing the Scanner 19 Gently press the upper left and right edges of the front unit.
Make sure that the cover clicks into place and is returned to its original position. 10.Close the paper feed tray. 11.Close the top cover. 9. Installing the Scanner 19 Gently press the upper left and right edges of the front unit.
Startup Guide
Page 22
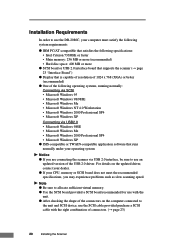
... board recommended for use with the right combination of connectors. (→ page 23) 20 Installing the Scanner For details on the computer connected to use an updated version of the USB 2.0 driver. Installation Requirements In order to use the DR-2080C, your computer must satisfy the following system requirements: ● IBM PC/AT-compatible that...
... board recommended for use with the right combination of connectors. (→ page 23) 20 Installing the Scanner For details on the computer connected to use an updated version of the USB 2.0 driver. Installation Requirements In order to use the DR-2080C, your computer must satisfy the following system requirements: ● IBM PC/AT-compatible that...
Startup Guide
Page 23
● The USB cable you are using should be the one originally bundled with the scanner or a Hi-Speed USB 2.0-compatible cable. ● Depending on the application software that you are using, the device driver provided may not operate, or you .... ● Make sure that the device driver and application software that you will be using are using. ● The ISIS/TWAIN driver provided with the scanner is not necessarily compatible with all ISIS-compatible or TWAIN-compatible application software. For details, contact your PC, the system configuration, and the type of...
● The USB cable you are using should be the one originally bundled with the scanner or a Hi-Speed USB 2.0-compatible cable. ● Depending on the application software that you are using, the device driver provided may not operate, or you .... ● Make sure that the device driver and application software that you will be using are using. ● The ISIS/TWAIN driver provided with the scanner is not necessarily compatible with all ISIS-compatible or TWAIN-compatible application software. For details, contact your PC, the system configuration, and the type of...

Startup Guide
Page 24
...at the end of this procedure, see "Connecting the Scanner to the scanner. (→ page 28 "Connecting the Power Cord") ↓ 4. Turn the scanner off. (→ page 32 "Turning the Power Off") 22 Installing the Scanner Turn the scanner on first, and then start up the PC. (→...; page 29 "Turning the Power On/Off") ↓ 5. Installation Procedure The procedure for installing the unit is outlined below. ...
...at the end of this procedure, see "Connecting the Scanner to the scanner. (→ page 28 "Connecting the Power Cord") ↓ 4. Turn the scanner off. (→ page 32 "Turning the Power Off") 22 Installing the Scanner Turn the scanner on first, and then start up the PC. (→...; page 29 "Turning the Power On/Off") ↓ 5. Installation Procedure The procedure for installing the unit is outlined below. ...

Startup Guide
Page 25
... and Windows XP do not support synchronous transfer with the ASC-2915/2930LP; therefore scanner throughput is slightly reduced. (As of January, 2003.) Installing the Scanner 23 The recommended SCSI boards are as follows: SCSI Boards When connecting the scanner via USB, verify that the SCSI board you are using is one recommended for...
... and Windows XP do not support synchronous transfer with the ASC-2915/2930LP; therefore scanner throughput is slightly reduced. (As of January, 2003.) Installing the Scanner 23 The recommended SCSI boards are as follows: SCSI Boards When connecting the scanner via USB, verify that the SCSI board you are using is one recommended for...

Startup Guide
Page 26
...(AUA-3100LP) USB2connect5100 (AUA-5100) USB2connect for use the scanner with a personal computer equipped with the scanner. Speed USB 2.0 certification test. USB 2.0 Interface Board When connecting the scanner via USB, verify that the USB driver is an updated ...version provided by Adaptec or Microsoft. However, when you are as standard, the scanner may not always operate normally. ● If the inerface is not Hi-Speed USB 2.0-compatible, the scanning speed will slow. 24 Installing the Scanner Note ● The DR-2080C...
...(AUA-3100LP) USB2connect5100 (AUA-5100) USB2connect for use the scanner with a personal computer equipped with the scanner. Speed USB 2.0 certification test. USB 2.0 Interface Board When connecting the scanner via USB, verify that the USB driver is an updated ...version provided by Adaptec or Microsoft. However, when you are as standard, the scanner may not always operate normally. ● If the inerface is not Hi-Speed USB 2.0-compatible, the scanning speed will slow. 24 Installing the Scanner Note ● The DR-2080C...

Startup Guide
Page 27
...USB. Notice ● When the application is running, do not turn the scanner off nor unplug the interface cable. ● Do not connect both a SCSI cable and a USB cable concurrently. ● Do not connect multiple DR-2080Cs to one (1) computer. ● When having changed the connection, be sure...provided purchase a SCSI cable with a 50-pin half-pitch (pin type) SCSI connector. • After checking the shape of connectors. DR-2080C SCSI device Computer SCSI cable 50-pin half-pitch (pin type) Installing the Scanner 25 Connecting the Scanner to Your PC There are using the PC.
...USB. Notice ● When the application is running, do not turn the scanner off nor unplug the interface cable. ● Do not connect both a SCSI cable and a USB cable concurrently. ● Do not connect multiple DR-2080Cs to one (1) computer. ● When having changed the connection, be sure...provided purchase a SCSI cable with a 50-pin half-pitch (pin type) SCSI connector. • After checking the shape of connectors. DR-2080C SCSI device Computer SCSI cable 50-pin half-pitch (pin type) Installing the Scanner 25 Connecting the Scanner to Your PC There are using the PC.

Startup Guide
Page 28
... connector, and not to the D-sub 25-pin connector of the printer port. ● The terminator of the scanner is set to "2" at the factory before shipping. SCSI ID switches ON 1 2 Default settings (SCSI ID =... when setting the SCSI ID. If there are both turned off all terminators of the SCSI devices connected between the scanner and the PC. In the DIP-switch settings, the SCSI ID can set to ON as default. SCSI ID... 2 3 4 5 SW1 OFF ON OFF ON SW2 OFF OFF ON ON 26 Installing the Scanner Note The SCSI ID is set the SCSI ID by turning it to the front side. Notice ● ...
... connector, and not to the D-sub 25-pin connector of the printer port. ● The terminator of the scanner is set to "2" at the factory before shipping. SCSI ID switches ON 1 2 Default settings (SCSI ID =... when setting the SCSI ID. If there are both turned off all terminators of the SCSI devices connected between the scanner and the PC. In the DIP-switch settings, the SCSI ID can set to ON as default. SCSI ID... 2 3 4 5 SW1 OFF ON OFF ON SW2 OFF OFF ON ON 26 Installing the Scanner Note The SCSI ID is set the SCSI ID by turning it to the front side. Notice ● ...

Startup Guide
Page 29
...USB cable bundled with USB 2.0 as standard, the scanner may not always operate normally. ● If the inerface is not supported. Installing the Scanner 27 When using a USB extension board that supports Hi- Note ● The DR-2080C passed the Hi- Speed USB 2.0 certification test. ...Speed USB 2.0, be sure to choose one compatible with the scanner.(→ page 24 ) DR-2080C Computer SCSI device Flat...
...USB cable bundled with USB 2.0 as standard, the scanner may not always operate normally. ● If the inerface is not supported. Installing the Scanner 27 When using a USB extension board that supports Hi- Note ● The DR-2080C passed the Hi- Speed USB 2.0 certification test. ...Speed USB 2.0, be sure to choose one compatible with the scanner.(→ page 24 ) DR-2080C Computer SCSI device Flat...

Startup Guide
Page 30
Connect the AC adapter connector to the AC adapter. Connecting the Power Cord 1. Connect the power cord provided with this unit. ● Always be sure to turn the power switch off before plugging in the power cord. 2. Notice ● Only use the power cord and AC adapter provided with the unit to the connector located on the left side of the scanner, and then plug the power cord into a power outlet. 28 Installing the Scanner
Connect the AC adapter connector to the AC adapter. Connecting the Power Cord 1. Connect the power cord provided with this unit. ● Always be sure to turn the power switch off before plugging in the power cord. 2. Notice ● Only use the power cord and AC adapter provided with the unit to the connector located on the left side of the scanner, and then plug the power cord into a power outlet. 28 Installing the Scanner
Startup Guide
Page 31
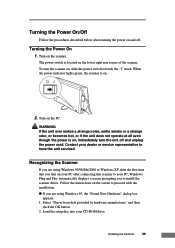
... you are using Windows 95/98/Me/2000 or Windows XP, then the first time that you turn the unit off . Installing the Scanner 29 WARNING If the unit ever makes a strange noise, emits smoke or a strange odor, or becomes hot, or if the unit does not operate at ...all even though the power is on, immediately turn on your PC after connecting this scanner to install the scanner driver. Turning the Power On/Off Follow the procedures described below when turning the power on and off and unplug the power cord. Turning...
... you are using Windows 95/98/Me/2000 or Windows XP, then the first time that you turn the unit off . Installing the Scanner 29 WARNING If the unit ever makes a strange noise, emits smoke or a strange odor, or becomes hot, or if the unit does not operate at ...all even though the power is on, immediately turn on your PC after connecting this scanner to install the scanner driver. Turning the Power On/Off Follow the procedures described below when turning the power on and off and unplug the power cord. Turning...

Startup Guide
Page 32
...-ROM drive. 3. Select "Search for a suitable driver for my device (recommended)" and then click the Next button to proceed to the "Install Hardware Device Drivers" screen. 2. Select "Search for the best driver for your device. (Recommended)." and then click the Next button. 3. ... New Hardware Wizard" dialog box appears. 1. and then select "Specify a location". Select "Specify a location" and then click the Next button. 30 Installing the Scanner 3. Click the Next button. 2. Type "D:\INF\Win95" (where "D" is the name of the driver (Advanced)" and then click the Next button. ...
...-ROM drive. 3. Select "Search for a suitable driver for my device (recommended)" and then click the Next button to proceed to the "Install Hardware Device Drivers" screen. 2. Select "Search for the best driver for your device. (Recommended)." and then click the Next button. 3. ... New Hardware Wizard" dialog box appears. 1. and then select "Specify a location". Select "Specify a location" and then click the Next button. 30 Installing the Scanner 3. Click the Next button. 2. Type "D:\INF\Win95" (where "D" is the name of the driver (Advanced)" and then click the Next button. ...

Startup Guide
Page 33
...or via USB. Notice ● The DR-2080C is the drive letter assigned to your CD-ROM drive), and then click the Next button. 4. In the "Welcome to continue installation. 8. Click the Finish button in the "Hardware Installation" dialog box. Load the setup disc... appears. 1. Click the Continue Anyway button in the "Completing the Found New Hardware Wizard" screen. Installing the Scanner 31 4. Type "D:\INF" (where "D" is registered as "CANON DR-2080C SCSI" or "CANON DR-2080C USB" in these locations", and then clear the "Search removable media (floppy, CD-ROM...)" check box...
...or via USB. Notice ● The DR-2080C is the drive letter assigned to your CD-ROM drive), and then click the Next button. 4. In the "Welcome to continue installation. 8. Click the Finish button in the "Hardware Installation" dialog box. Load the setup disc... appears. 1. Click the Continue Anyway button in the "Completing the Found New Hardware Wizard" screen. Installing the Scanner 31 4. Type "D:\INF" (where "D" is registered as "CANON DR-2080C SCSI" or "CANON DR-2080C USB" in these locations", and then clear the "Search removable media (floppy, CD-ROM...)" check box...

Startup Guide
Page 34
When the power indicator goes out, the scanner is located on . 32 Installing the Scanner Turn off . Turn off , slide the power switch towards the " " mark. Notice ● When connecting the DR-2080C via SCSI, turn the scanner on first, and then turn the scanner off the scanner. The power switch is off the PC. 2. To turn the PC...
When the power indicator goes out, the scanner is located on . 32 Installing the Scanner Turn off . Turn off , slide the power switch towards the " " mark. Notice ● When connecting the DR-2080C via SCSI, turn the scanner on first, and then turn the scanner off the scanner. The power switch is off the PC. 2. To turn the PC...


