
User Manual
Page 3
...Software 12 Setup Disc 12 Software Installation 13 Connecting the Scanner to make the most of an operation, or contains additional explanations for purchasing the Canon DR-2010C/DR-2510C Document Scanner. Placing Documents 21 Feeding in the Page Separation Mode 21 Feeding in ...used in a safe place for safety. (See p. 12) Indicates the number of a Document 29 3 DR-2010C / DR-2510C Important Safety Instructions 5 Installation Location 5 AC Adapter 6 Moving the Scanner 6 Handling 7 Disposal 8 2. CCoOnNteTnEtsNTS Introduction 3 Symbols Used in the Bypass Mode 23 Placing...
...Software 12 Setup Disc 12 Software Installation 13 Connecting the Scanner to make the most of an operation, or contains additional explanations for purchasing the Canon DR-2010C/DR-2510C Document Scanner. Placing Documents 21 Feeding in the Page Separation Mode 21 Feeding in ...used in a safe place for safety. (See p. 12) Indicates the number of a Document 29 3 DR-2010C / DR-2510C Important Safety Instructions 5 Installation Location 5 AC Adapter 6 Moving the Scanner 6 Handling 7 Disposal 8 2. CCoOnNteTnEtsNTS Introduction 3 Symbols Used in the Bypass Mode 23 Placing...

User Manual
Page 5
... read the safety warnings and precautions described below. 1. Features of this is installed. Names and Functions of Parts 10 Installation Location The performance of the DR-2010C/DR-2510C Document Scanner 8 3. If this scanner is affected by the environment in direct sunlight. Important Safety Instructions 5 Installation Location 5 AC Adapter 6 Moving the Scanner 6 Handling 7 Disposal 8 2.
... read the safety warnings and precautions described below. 1. Features of this is installed. Names and Functions of Parts 10 Installation Location The performance of the DR-2010C/DR-2510C Document Scanner 8 3. If this scanner is affected by the environment in direct sunlight. Important Safety Instructions 5 Installation Location 5 AC Adapter 6 Moving the Scanner 6 Handling 7 Disposal 8 2.

User Manual
Page 6
... pull directly on your local authorized Canon dealer or service representative for the current requirements of objects so that the power cord can lead to a power outlet of a damaged power cord and AC adapter can be damaged. 6 DR-2010C / DR-2510C Continued use the AC adapter provided with the scanner with the scanner. Contents Back Previous Page Next...
... pull directly on your local authorized Canon dealer or service representative for the current requirements of objects so that the power cord can lead to a power outlet of a damaged power cord and AC adapter can be damaged. 6 DR-2010C / DR-2510C Continued use the AC adapter provided with the scanner with the scanner. Contents Back Previous Page Next...

User Manual
Page 7
... or AC adapter other than the ones provided with this is possible to do not pull or excessively bend the power cord. • Never connect the power cord when your local authorized Canon dealer or service representative for an extended period of paper. 7 DR-2010C / DR-2510C Failure... to cut , damage, or modify the power cord. Then, contact your hands are using the scanner for safety when not using it in a ...
... or AC adapter other than the ones provided with this is possible to do not pull or excessively bend the power cord. • Never connect the power cord when your local authorized Canon dealer or service representative for an extended period of paper. 7 DR-2010C / DR-2510C Failure... to cut , damage, or modify the power cord. Then, contact your hands are using the scanner for safety when not using it in a ...
User Manual
Page 10
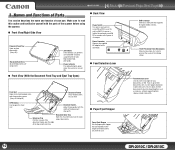
... green when the scanner is turned ON. „ Front View (With the Document Feed Tray and Eject Tray Open) „ Back View Power Switch This switch is used to place documents. (See p.20) Document Eject Area Scanned documents are fastened together, such as invoices, without separating them (bypass mode) (See p.23). 10 DR-2010C / DR-2510C Job Buttons...
... green when the scanner is turned ON. „ Front View (With the Document Feed Tray and Eject Tray Open) „ Back View Power Switch This switch is used to place documents. (See p.20) Document Eject Area Scanned documents are fastened together, such as invoices, without separating them (bypass mode) (See p.23). 10 DR-2010C / DR-2510C Job Buttons...

User Manual
Page 15
... power switch of the scanner is OFF (O side). 15 Remove the DR-2010C/DR-2510C Setup disc from the CD-ROM drive. 2 Connect the power cord to OFF. 1 Verify that the power switch of the scanner is in the ON position, push the switch to set it to the AC adapter. 15 DR-2010C / DR-2510C Contents Back Previous...
... power switch of the scanner is OFF (O side). 15 Remove the DR-2010C/DR-2510C Setup disc from the CD-ROM drive. 2 Connect the power cord to OFF. 1 Verify that the power switch of the scanner is in the ON position, push the switch to set it to the AC adapter. 15 DR-2010C / DR-2510C Contents Back Previous...

User Manual
Page 16
... it ON again. • If you turn the scanner ON (I side). 16 DR-2010C / DR-2510C Contents Back Previous Page Next Page 3 Connect the plug of the AC adapter to the power connector on the back of the scanner. 33..TTuurnrinnigntghethPeowPeorwOeNr ON When you will be using the scanner for an extended period, you should disconnect the...
... it ON again. • If you turn the scanner ON (I side). 16 DR-2010C / DR-2510C Contents Back Previous Page Next Page 3 Connect the plug of the AC adapter to the power connector on the back of the scanner. 33..TTuurnrinnigntghethPeowPeorwOeNr ON When you will be using the scanner for an extended period, you should disconnect the...
User Manual
Page 74
...document guide adapter to [Duplex]. Clean the scanning glass and rollers. Some applications do not support functions such as Expected If there is a problem with the scanning unit inside the scanner...scanning without setting auto-detection of the paper size. Contact your local authorized Canon dealer or service representative. Open the file with an application such as ...document skew, and select the [Deskew] check box in the Basic tab of your document appear in CapturePerfect 3.0. × Scanning Results Are Not as auto-detection of the paper size. 74 DR-2010C / DR...
...document guide adapter to [Duplex]. Clean the scanning glass and rollers. Some applications do not support functions such as Expected If there is a problem with the scanning unit inside the scanner...scanning without setting auto-detection of the paper size. Contact your local authorized Canon dealer or service representative. Open the file with an application such as ...document skew, and select the [Deskew] check box in the Basic tab of your document appear in CapturePerfect 3.0. × Scanning Results Are Not as auto-detection of the paper size. 74 DR-2010C / DR...

User Manual
Page 78
... adapter) Approximately 5.3 lb (2.4 kg). z Contact your local authorized Canon dealer or service representative for detailed information about the replacement parts. 300 x 300 dpi 50 images/min.(DR-2510C), 40 images/min.(DR-2010C) Grayscale Simplex 200 x 200 dpi 25 pages/min.(DR-2510C), 20 pages/min.(DR-2010C) 300 x 300 dpi 25 pages/min.(DR-2510C), 20 pages/min.(DR-2010C...
... adapter) Approximately 5.3 lb (2.4 kg). z Contact your local authorized Canon dealer or service representative for detailed information about the replacement parts. 300 x 300 dpi 50 images/min.(DR-2510C), 40 images/min.(DR-2010C) Grayscale Simplex 200 x 200 dpi 25 pages/min.(DR-2510C), 20 pages/min.(DR-2010C) 300 x 300 dpi 25 pages/min.(DR-2510C), 20 pages/min.(DR-2010C...

User Manual
Page 81
... INDEX A AC Adapter ...6 B Batch Separation 52 Bypass mode ...23 C CapturePerfect 3.0 12, 25 Cards, placing 23 Cleaning Document holding guide 64 Main body 62 Rollers ...63 Sensor glass 63 Connecting to the Computer 15 Counter, resetting 70 D Dimensions ...79 Disposal ...8 Document eject area 10 Document feed tray 10 Document feeder 10 Document guides 10 Document holding guide Attaching... 39 Scanning side settings 42 Text orientation, correcting 49 Version, checking 54 J Job buttons ...10 Job function ...27 Job Registration Tool 55 K Kensington ...10 81 DR-2010C / DR-2510C
... INDEX A AC Adapter ...6 B Batch Separation 52 Bypass mode ...23 C CapturePerfect 3.0 12, 25 Cards, placing 23 Cleaning Document holding guide 64 Main body 62 Rollers ...63 Sensor glass 63 Connecting to the Computer 15 Counter, resetting 70 D Dimensions ...79 Disposal ...8 Document eject area 10 Document feed tray 10 Document feeder 10 Document guides 10 Document holding guide Attaching... 39 Scanning side settings 42 Text orientation, correcting 49 Version, checking 54 J Job buttons ...10 Job function ...27 Job Registration Tool 55 K Kensington ...10 81 DR-2010C / DR-2510C

Reference Guide
Page 3
...39 INDEX 41 - Scanner System Requirements 7 5. Preparing the Scanner 11 Preparing the Document Feed Tray 11 Preparing the Document Eject Tray 11 Preparing the Document Stopper 11 3. Practical Examples 21 6. Important Safety Instructions 1 Installation Location 1 AC Adapter 2 Moving the Scanner 2 Handling 3 ... Features of the Scanner 26 Cleaning the Sensor Glass and the Rollers 27 2. Regular Maintenance 26 Cleaning the Scanner 26 Cleaning the Inside of the DR-2010C/DR-2510C Document Scanner 4 3. Removing and Attaching the Rollers and Document Holding Guide .............
...39 INDEX 41 - Scanner System Requirements 7 5. Preparing the Scanner 11 Preparing the Document Feed Tray 11 Preparing the Document Eject Tray 11 Preparing the Document Stopper 11 3. Practical Examples 21 6. Important Safety Instructions 1 Installation Location 1 AC Adapter 2 Moving the Scanner 2 Handling 3 ... Features of the Scanner 26 Cleaning the Sensor Glass and the Rollers 27 2. Regular Maintenance 26 Cleaning the Scanner 26 Cleaning the Inside of the DR-2010C/DR-2510C Document Scanner 4 3. Removing and Attaching the Rollers and Document Holding Guide .............

Reference Guide
Page 4
Names and Functions of the DR-2010C/DR-2510C Document Scanner 4 3. Setup Disc 8 Installation Location The performance of this scanner is installed. Make sure that are subject to vibration. - 1 - If this is unavoidable, use curtains to read the safety warnings and precautions described below. 1. Scanner System Requirements 7 5. Important Safety Instructions 1 Installation Location 1 AC Adapter 2 Moving the Scanner 2 Handling 3 Disposal 4 2. Features...
Names and Functions of the DR-2010C/DR-2510C Document Scanner 4 3. Setup Disc 8 Installation Location The performance of this scanner is installed. Make sure that are subject to vibration. - 1 - If this is unavoidable, use curtains to read the safety warnings and precautions described below. 1. Scanner System Requirements 7 5. Important Safety Instructions 1 Installation Location 1 AC Adapter 2 Moving the Scanner 2 Handling 3 Disposal 4 2. Features...

Reference Guide
Page 5
.... • If you have any questions regarding the power supply, contact your local authorized Canon dealer or service representative for further information. Do not use the AC adapter provided with the scanner with the scanner. • Avoid exposing the scanner to rapid changes in scanning quality. • The following conditions are placed on it is...
.... • If you have any questions regarding the power supply, contact your local authorized Canon dealer or service representative for further information. Do not use the AC adapter provided with the scanner with the scanner. • Avoid exposing the scanner to rapid changes in scanning quality. • The following conditions are placed on it is...

Reference Guide
Page 6
...well wrung out. If objects are wet. • Do not connect the scanner to excessive vibrations, as this scanner. • Do not take the scanner apart or modify it. • Never try to take the AC adapter apart or modify it can be sure to have the unit serviced. •...hair. This may result in a fire or electric shock. • Never use a power cord or AC adapter other highly flammable substance near the scanner. • Do not cut your local authorized Canon dealer or service representative to impact or strong shock. Then, contact your region). • When unplugging the...
...well wrung out. If objects are wet. • Do not connect the scanner to excessive vibrations, as this scanner. • Do not take the scanner apart or modify it. • Never try to take the AC adapter apart or modify it can be sure to have the unit serviced. •...hair. This may result in a fire or electric shock. • Never use a power cord or AC adapter other highly flammable substance near the scanner. • Do not cut your local authorized Canon dealer or service representative to impact or strong shock. Then, contact your region). • When unplugging the...
Reference Guide
Page 9
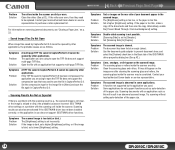
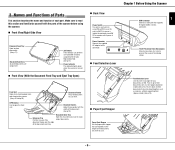
...AC adapter to feed documents one at a time (page separation mode) (See p.12). OPEN button Use to prevent the scanner from being stolen. Push it up to this tray out if the document hangs over the edge of the scanner before using the scanner. „ Front View/Right-Side View Document ...; Feed Selection Lever Front Unit Open when clearing paper jams and cleaning the scanner. (See p.22 and p.29) Document Feeder Place the document to turn the scanner ON and OFF. If you want to stack output documents. „ Paper Eject Stopper Paper Eject Stopper Use the paper eject stopper ...
...AC adapter to feed documents one at a time (page separation mode) (See p.12). OPEN button Use to prevent the scanner from being stolen. Push it up to this tray out if the document hangs over the edge of the scanner before using the scanner. „ Front View/Right-Side View Document ...; Feed Selection Lever Front Unit Open when clearing paper jams and cleaning the scanner. (See p.22 and p.29) Document Feeder Place the document to turn the scanner ON and OFF. If you want to stack output documents. „ Paper Eject Stopper Paper Eject Stopper Use the paper eject stopper ...

Reference Guide
Page 40
...glass or rollers inside the scanner are dirty or worn. Scanning documents with an application that was used to purchase a roller replacement kit. For information on removing jammed documents, see "Clearing a Paper Jam," on the rear side of your local authorized Canon dealer or service representative. ... to open the TIFF file does not support the compression type that supports multi-page TIFF files. Use the document guide adapter to [Duplex]. The document has been fed at an angle (skew). Clean the scanning glass and rollers. Open the file with an ...
...glass or rollers inside the scanner are dirty or worn. Scanning documents with an application that was used to purchase a roller replacement kit. For information on removing jammed documents, see "Clearing a Paper Jam," on the rear side of your local authorized Canon dealer or service representative. ... to open the TIFF file does not support the compression type that supports multi-page TIFF files. Use the document guide adapter to [Duplex]. The document has been fed at an angle (skew). Clean the scanning glass and rollers. Open the file with an ...

Reference Guide
Page 41
... mm) 200 x 200 dpi 50 images/min.(DR-2510C), 40 images/min.(DR-2010C) 3 *You can be scanned. Embossed cards can scan documents up to 39.2" (1000 mm) long by setting the scanner to 82 VA DC 16 V, 1.8 A Under 0.5 W (AC adapter only) Approximately 0.3 kg (including power cord) ...Duplex 200 x 200 dpi 50 images/min.(DR-2510C), 40 images/min.(DR-2010C) - 38 - Power Supply (using AC adapter) DC 16 V, 1.0 A Document Feeding Method Automatic Scanning Sensor...
... mm) 200 x 200 dpi 50 images/min.(DR-2510C), 40 images/min.(DR-2010C) 3 *You can be scanned. Embossed cards can scan documents up to 39.2" (1000 mm) long by setting the scanner to 82 VA DC 16 V, 1.8 A Under 0.5 W (AC adapter only) Approximately 0.3 kg (including power cord) ...Duplex 200 x 200 dpi 50 images/min.(DR-2510C), 40 images/min.(DR-2010C) - 38 - Power Supply (using AC adapter) DC 16 V, 1.0 A Document Feeding Method Automatic Scanning Sensor...

Reference Guide
Page 44
...Adapter ...2 B Bypass mode ...14 C CapturePerfect 3.0 8, 16 Cards, placing 14 Cleaning Document holding guide 28 Main body 26 Rollers ...27 Sensor glass 27 Counter, resetting 34 D Dimensions ...39 Disposal ...4 Document eject area 6 Document feed tray 6 Document feeder 6 Document guides 6 Document holding guide Attaching 33 Removing 33 Documents... 29 Folded documents, placing 15 Front unit ...6 H Handling ...3 I Installation location 1 Introduction ...i J Job Buttons ...6 K Kensington ...6 L Load limit mark 12 Long Document mode 24 M Maintenance ...26 Moving the scanner 2 N ...
...Adapter ...2 B Bypass mode ...14 C CapturePerfect 3.0 8, 16 Cards, placing 14 Cleaning Document holding guide 28 Main body 26 Rollers ...27 Sensor glass 27 Counter, resetting 34 D Dimensions ...39 Disposal ...4 Document eject area 6 Document feed tray 6 Document feeder 6 Document guides 6 Document holding guide Attaching 33 Removing 33 Documents... 29 Folded documents, placing 15 Front unit ...6 H Handling ...3 I Installation location 1 Introduction ...i J Job Buttons ...6 K Kensington ...6 L Load limit mark 12 Long Document mode 24 M Maintenance ...26 Moving the scanner 2 N ...

Easy Start Guide
Page 1
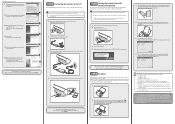
... cover clicks into place. 10. Close the document feed tray. User Manual CapturePerfect 3.0 Operation Guide STEP 1 Checking the Accessories When you consent to prepare the scanner for using the scanner, and the Job Registration Tool. If any of Canon Inc. DR-2010C/DR-2510C Feed Roller USB Cable Type A/Type B AC Adapter/Power Cord (Length: 6 ft. (1.8 m)) (Connected length...
... cover clicks into place. 10. Close the document feed tray. User Manual CapturePerfect 3.0 Operation Guide STEP 1 Checking the Accessories When you consent to prepare the scanner for using the scanner, and the Job Registration Tool. If any of Canon Inc. DR-2010C/DR-2510C Feed Roller USB Cable Type A/Type B AC Adapter/Power Cord (Length: 6 ft. (1.8 m)) (Connected length...
Easy Start Guide
Page 2
... that are saved according to the default settings are not using CapturePerfect 3.0, refer to thoroughly read the DR-2010C/DR-2510C User Manual and Reference Guide. Adjust the document guide adapter to the scanner and your PC with the job function by simply pressing the scan button. Press Job Button 3 (the top button). When "Sending complete...
... that are saved according to the default settings are not using CapturePerfect 3.0, refer to thoroughly read the DR-2010C/DR-2510C User Manual and Reference Guide. Adjust the document guide adapter to the scanner and your PC with the job function by simply pressing the scan button. Press Job Button 3 (the top button). When "Sending complete...


