
User Manual
Page 3
...DR-2010C / DR-2510C Installing the Software 12 Setup Disc 12 Software Installation 13 Connecting the Scanner to the machine. Contents Back Previous Page Next Page IInNtrToRdOucDtUioCnTION Thank you for future reference. After reading this manual to persons if not performed correctly. Reading these cautions. Turning the Power ON 16 Scanner...purchasing the Canon DR-2010C/DR-2510C Document Scanner. Scanner System Requirements 11 2. Documents 18 2. Placing Documents 21 Feeding in the Page Separation Mode 21 Feeding in This Manual 3 Chapter 1 Before Using the Scanner 5 1. ...
...DR-2010C / DR-2510C Installing the Software 12 Setup Disc 12 Software Installation 13 Connecting the Scanner to the machine. Contents Back Previous Page Next Page IInNtrToRdOucDtUioCnTION Thank you for future reference. After reading this manual to persons if not performed correctly. Reading these cautions. Turning the Power ON 16 Scanner...purchasing the Canon DR-2010C/DR-2510C Document Scanner. Scanner System Requirements 11 2. Documents 18 2. Placing Documents 21 Feeding in the Page Separation Mode 21 Feeding in This Manual 3 Chapter 1 Before Using the Scanner 5 1. ...

User Manual
Page 7
... or modify it. • Never try to have the unit serviced. • Before moving the scanner, be used for an extended period of the scanner. Then, contact your local authorized Canon dealer or service representative for a long period of the rated voltage and power supply frequency (120 V, 60... and long hair. Do not pull directly on the scanner. Should such objects ever fall , resulting in a fire or electric shock. • Turn OFF the power switch for safety when not using a slightly dampened cloth which has been well wrung out. Be extra careful of paper. 7 DR-2010C / DR-2510C
... or modify it. • Never try to have the unit serviced. • Before moving the scanner, be used for an extended period of the scanner. Then, contact your local authorized Canon dealer or service representative for a long period of the rated voltage and power supply frequency (120 V, 60... and long hair. Do not pull directly on the scanner. Should such objects ever fall , resulting in a fire or electric shock. • Turn OFF the power switch for safety when not using a slightly dampened cloth which has been well wrung out. Be extra careful of paper. 7 DR-2010C / DR-2510C
User Manual
Page 8
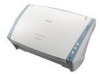
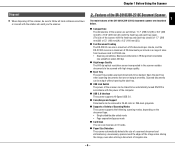
... mm)(D)). „ Fast Document Feeding The DR-2510C can scan a maximum of 25 documents per minute, and the DR-2010C can scan a maximum of 20 documents per minute in a range of sizes from business card to be automatically turned ON/OFF in accordance with the power of the computer. „ USB 2.0 Interface The scanner supports Hi-Speed USB...
... mm)(D)). „ Fast Document Feeding The DR-2510C can scan a maximum of 25 documents per minute, and the DR-2010C can scan a maximum of 20 documents per minute in a range of sizes from business card to be automatically turned ON/OFF in accordance with the power of the computer. „ USB 2.0 Interface The scanner supports Hi-Speed USB...
User Manual
Page 10
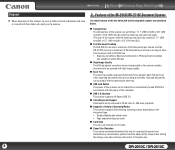
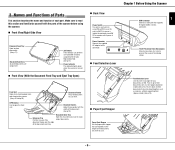
...when you want to this section and familiarize yourself with the power of the document eject tray. Make sure to turn the scanner ON and OFF. If you want to stack output documents. „ Paper Eject Stopper Paper Eject Stopper Use the paper eject stopper... without separating them (bypass mode) (See p.23). 10 DR-2010C / DR-2510C Contents Back 33..NNaammesesanadnFdunFcutinocntsioofnPsaortfsParts This section describes the name and function of the scanner before using the scanner. „ Front View/Right-Side View Document Feed Tray Open to open the front unit. Job Buttons ...
...when you want to this section and familiarize yourself with the power of the document eject tray. Make sure to turn the scanner ON and OFF. If you want to stack output documents. „ Paper Eject Stopper Paper Eject Stopper Use the paper eject stopper... without separating them (bypass mode) (See p.23). 10 DR-2010C / DR-2510C Contents Back 33..NNaammesesanadnFdunFcutinocntsioofnPsaortfsParts This section describes the name and function of the scanner before using the scanner. „ Front View/Right-Side View Document Feed Tray Open to open the front unit. Job Buttons ...

User Manual
Page 11
... the Software 12 Setup Disc 12 Software Installation 13 Connecting the Scanner to the Computer 15 3. Contents Back Previous Page Next Page Chapter 2 Setup 1. Turning the Power ON 16 Scanner Recognition 16 11..SSccanannenreSrysStyesmteRmeqRuiereqmueirnetms ents To use the DR-2010C/DR-2510C scanner, your computer must satisfy the following system requirements. • ...) or better recommended. • An ISIS-compatible application or a TWAIN-compatible application that is compatible with the above operating systems. 11 DR-2010C / DR-2510C Scanner System Requirements 11 2.
... the Software 12 Setup Disc 12 Software Installation 13 Connecting the Scanner to the Computer 15 3. Contents Back Previous Page Next Page Chapter 2 Setup 1. Turning the Power ON 16 Scanner Recognition 16 11..SSccanannenreSrysStyesmteRmeqRuiereqmueirnetms ents To use the DR-2010C/DR-2510C scanner, your computer must satisfy the following system requirements. • ...) or better recommended. • An ISIS-compatible application or a TWAIN-compatible application that is compatible with the above operating systems. 11 DR-2010C / DR-2510C Scanner System Requirements 11 2.

User Manual
Page 13
...have previously uninstalled, select [Custom Installation] and specify the software. 13 DR-2010C / DR-2510C If you want to reinstall only specific software that you select [Typical Installation], all other applications before connecting the scanner to the computer. • Log on to Windows as an Administrator.... the software. Previous Page Next Page IMPORTANT • Install the software before installing the software. 1 Turn the power of the computer ON. 2 Insert the DR-2010C/DR-2510C Setup disc into the CD-ROM drive of the displayed software and the User Manual will be installed...
...have previously uninstalled, select [Custom Installation] and specify the software. 13 DR-2010C / DR-2510C If you want to reinstall only specific software that you select [Typical Installation], all other applications before connecting the scanner to the computer. • Log on to Windows as an Administrator.... the software. Previous Page Next Page IMPORTANT • Install the software before installing the software. 1 Turn the power of the computer ON. 2 Insert the DR-2010C/DR-2510C Setup disc into the CD-ROM drive of the displayed software and the User Manual will be installed...

User Manual
Page 16
... at least 10 seconds before turning it is connected to the computer. 1 Make sure that the scanner and computer are connected properly. 2 Press the power switch on the back of the scanner. 33..TTuurnrinnigntghethPeowPeorwOeNr ON When you turn the computer and the scanner ON for safety. IMPORTANT &#... the first time, the Plug and Play function of the scanner to the computer. Scanner Recognition The scanner will not be recognized the first time it ON again. • If you will be using the scanner for an extended period, you turn the scanner ON (I side). 16 DR-2010C / DR-2510C
... at least 10 seconds before turning it is connected to the computer. 1 Make sure that the scanner and computer are connected properly. 2 Press the power switch on the back of the scanner. 33..TTuurnrinnigntghethPeowPeorwOeNr ON When you turn the computer and the scanner ON for safety. IMPORTANT &#... the first time, the Plug and Play function of the scanner to the computer. Scanner Recognition The scanner will not be recognized the first time it ON again. • If you will be using the scanner for an extended period, you turn the scanner ON (I side). 16 DR-2010C / DR-2510C

User Manual
Page 17
3 Windows automatically recognizes the DR-2010C/DR-2510C as new hardware. Contents Back Previous Page Next Page NOTE If you set the power switch on the back of the scanner to [AUTO], the scanner is linked to be automatically turned ON/OFF in accordance with the power of the computer. 17 DR-2010C / DR-2510C
3 Windows automatically recognizes the DR-2010C/DR-2510C as new hardware. Contents Back Previous Page Next Page NOTE If you set the power switch on the back of the scanner to [AUTO], the scanner is linked to be automatically turned ON/OFF in accordance with the power of the computer. 17 DR-2010C / DR-2510C

User Manual
Page 22
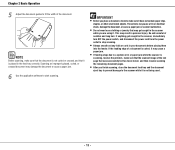
...gets caught in the scanner, immediately turn OFF the power switch, and disconnect the power cord from the power outlet to fit the width of a document is curled, it . These items may cause a fire or electrical shock, damage the document, or cause a paper jam or scanner malfunction. •...application software to make sure it is not being used. 22 DR-2010C / DR-2510C Contents Back Previous Page Next Page 5 Adjust the document guides to stop scanning. • Always smooth out any folds or curls in your documents before placing them into the feeder. Scanning an improperly placed, ...
...gets caught in the scanner, immediately turn OFF the power switch, and disconnect the power cord from the power outlet to fit the width of a document is curled, it . These items may cause a fire or electrical shock, damage the document, or cause a paper jam or scanner malfunction. •...application software to make sure it is not being used. 22 DR-2010C / DR-2510C Contents Back Previous Page Next Page 5 Adjust the document guides to stop scanning. • Always smooth out any folds or curls in your documents before placing them into the feeder. Scanning an improperly placed, ...

User Manual
Page 36
Contents Back Previous Page Next Page 5 Click [Apply] → [OK]. 6 Turn the scanner OFF and then ON again. 36 DR-2010C / DR-2510C 4 Click the [Maintenance] tab → [Long Document Mode (1,000 mm)].
Contents Back Previous Page Next Page 5 Click [Apply] → [OK]. 6 Turn the scanner OFF and then ON again. 36 DR-2010C / DR-2510C 4 Click the [Maintenance] tab → [Long Document Mode (1,000 mm)].
User Manual
Page 62
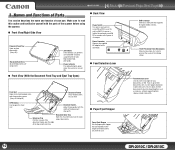
... electrical shock. After finishing a large scanning job, turn OFF the power switch and disconnect the power cord from the document feed opening and the inside the scanner. 62 DR-2010C / DR-2510C Regular Maintenance 62 Cleaning the Scanner 62 Cleaning the Inside of the scanner. Removing and Attaching the Rollers and Document Holding Guide ........ 65 Roller Replacement Cycle 65...
... electrical shock. After finishing a large scanning job, turn OFF the power switch and disconnect the power cord from the document feed opening and the inside the scanner. 62 DR-2010C / DR-2510C Regular Maintenance 62 Cleaning the Scanner 62 Cleaning the Inside of the scanner. Removing and Attaching the Rollers and Document Holding Guide ........ 65 Roller Replacement Cycle 65...

User Manual
Page 63
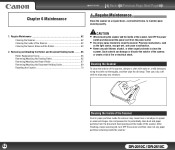
...light source, may cause marks on the scanner. If there are scratches on the sensor glass, contact your local c authorized Canon dealer or service representative. 3 Use compressed air to wipe away any moisture. 63 DR-2010C / DR-2510C Contents Back Previous Page Next Page ...4 Use a clean dry cloth to open it (d). Retard roller d c Feeding roller Clean the d rollers while turning them periodically. 1 Open the document feed...
...light source, may cause marks on the scanner. If there are scratches on the sensor glass, contact your local c authorized Canon dealer or service representative. 3 Use compressed air to wipe away any moisture. 63 DR-2010C / DR-2510C Contents Back Previous Page Next Page ...4 Use a clean dry cloth to open it (d). Retard roller d c Feeding roller Clean the d rollers while turning them periodically. 1 Open the document feed...

User Manual
Page 64
...turning them to reattach them . Contents Back Previous Page Next Page 9 Wipe the removed rollers with a cloth that has been dampened with water and thoroughly wrung out. e 7 Wipe the document holding guide with a cloth that the front unit is finished. 12 Close the document feed tray. 64 DR-2010C / DR...-2510C Make sure that has been dampened with water and thoroughly wrung out. IMPORTANT Remove the retard roller and feeding roller from the scanner to clean them, and make sure to the scanner when cleaning is completely...
...turning them to reattach them . Contents Back Previous Page Next Page 9 Wipe the removed rollers with a cloth that has been dampened with water and thoroughly wrung out. e 7 Wipe the document holding guide with a cloth that the front unit is finished. 12 Close the document feed tray. 64 DR-2010C / DR...-2510C Make sure that has been dampened with water and thoroughly wrung out. IMPORTANT Remove the retard roller and feeding roller from the scanner to clean them, and make sure to the scanner when cleaning is completely...
User Manual
Page 72
... Is Not Performed P. 73) Documents Do Not Feed Properly P. 73) Saved Image Files Do Not Open P. 74) Scanning Results Are Not as Expected P. 74) If, after consulting this section, you still cannot resolve the problem, contact your local authorized Canon dealer or service representative. × The Scanner Does Not Turn ON Check the following...
... Is Not Performed P. 73) Documents Do Not Feed Properly P. 73) Saved Image Files Do Not Open P. 74) Scanning Results Are Not as Expected P. 74) If, after consulting this section, you still cannot resolve the problem, contact your local authorized Canon dealer or service representative. × The Scanner Does Not Turn ON Check the following...

User Manual
Page 73
...cause the scanning speed to increase free space on the hard disk. Quit all , turn the scanner ON. (See "Chapter 2 Setup - Use the USB cable provided with all other... the error continues to operate with the scanner. This product is not enough free space on your local authorized Canon dealer or service representative for more information....scanner power is switched ON. Make sure that the scanner cannot scan. Before you can use with Hi-Speed USB 2.0 as standard. Documents," on the hard disk to be created in the PC system? Delete unwanted files on p. 18. 73 DR-2010C / DR...
...cause the scanning speed to increase free space on the hard disk. Quit all , turn the scanner ON. (See "Chapter 2 Setup - Use the USB cable provided with all other... the error continues to operate with the scanner. This product is not enough free space on your local authorized Canon dealer or service representative for more information....scanner power is switched ON. Make sure that the scanner cannot scan. Before you can use with Hi-Speed USB 2.0 as standard. Documents," on the hard disk to be created in the PC system? Delete unwanted files on p. 18. 73 DR-2010C / DR...

User Manual
Page 80
...does cause harmful interference to radio or television reception, which can be determined by turning the equipment OFF and ON, the user is encouraged to try to correct ...www.canon-europe.com. (EEA: Norway, Iceland and Liechtenstein) MODEL NAMES Model DR-2010C is identical to the equipment unless otherwise specified in the correct disposal of model M11064. 80 DR-2010C / DR-...of the equipment. Contents Back Previous Page Next Page FCC REGULATIONS (For 120 V model) Document Scanner, Model M11065/M11064 This device complies with class B limits in a residential installation. This ...
...does cause harmful interference to radio or television reception, which can be determined by turning the equipment OFF and ON, the user is encouraged to try to correct ...www.canon-europe.com. (EEA: Norway, Iceland and Liechtenstein) MODEL NAMES Model DR-2010C is identical to the equipment unless otherwise specified in the correct disposal of model M11064. 80 DR-2010C / DR-...of the equipment. Contents Back Previous Page Next Page FCC REGULATIONS (For 120 V model) Document Scanner, Model M11065/M11064 This device complies with class B limits in a residential installation. This ...

Reference Guide
Page 6
... power plug from the power supply. • Clean the scanner using the scanner. Should the scanner ever become damaged, immediately turn the power switch OFF, and disconnect the power plug from the power outlet. Be extra careful of the scanner. Then, contact your local authorized Canon dealer or service representative to have the unit serviced. •...
... power plug from the power supply. • Clean the scanner using the scanner. Should the scanner ever become damaged, immediately turn the power switch OFF, and disconnect the power plug from the power outlet. Be extra careful of the scanner. Then, contact your local authorized Canon dealer or service representative to have the unit serviced. •...
Reference Guide
Page 7
... Switch The power of the scanner can be linked to be automatically turned ON/OFF in accordance with the feed tray and eject tray closed is 11.7" (298 mm)(W) x 6.3" (160 mm)(H) x 6.3" (160 mm)(D)). „ Fast Document Feeding The DR-2510C can scan a maximum of 25 documents per minute, and the DR-2010C can scan a maximum of 20...
... Switch The power of the scanner can be linked to be automatically turned ON/OFF in accordance with the feed tray and eject tray closed is 11.7" (298 mm)(W) x 6.3" (160 mm)(H) x 6.3" (160 mm)(D)). „ Fast Document Feeding The DR-2510C can scan a maximum of 25 documents per minute, and the DR-2010C can scan a maximum of 20...
Reference Guide
Page 9
... p.12) Extension Tray Pull this section and familiarize yourself with the power of the documents you set the switch to [AUTO], the scanner is used to turn the scanner ON and OFF. Job Buttons These buttons can perform user-specified functions assigned with the Job Registration Tool. (See p.17) ...Power Indicator This indicator lights green when the scanner is turned ON. „ Front View (With the Document Feed Tray and Eject Tray Open) „ Back View Power Switch This switch is linked to this tray when you...
... p.12) Extension Tray Pull this section and familiarize yourself with the power of the documents you set the switch to [AUTO], the scanner is used to turn the scanner ON and OFF. Job Buttons These buttons can perform user-specified functions assigned with the Job Registration Tool. (See p.17) ...Power Indicator This indicator lights green when the scanner is turned ON. „ Front View (With the Document Feed Tray and Eject Tray Open) „ Back View Power Switch This switch is linked to this tray when you...
Reference Guide
Page 16
IMPORTANT • Before you finish scanning, close the document feed tray and the document eject tray to prevent damage to the scanner while it . If anything gets caught in the scanner, immediately turn OFF the power switch, and disconnect the power cord from the power outlet to start scanning. Scanning an improperly placed, curled, or creased...
IMPORTANT • Before you finish scanning, close the document feed tray and the document eject tray to prevent damage to the scanner while it . If anything gets caught in the scanner, immediately turn OFF the power switch, and disconnect the power cord from the power outlet to start scanning. Scanning an improperly placed, curled, or creased...


