8800F Quick Start Guide Instructions
Page 1
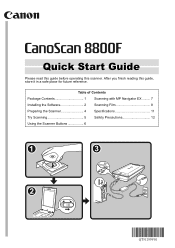
Quick Start Guide Please read this guide before operating this guide, store it in a safe place for future reference. After you finish reading this scanner. Table of Contents Package Contents 1 Scanning with MP Navigator EX......... 7 Installing the Software 2 Scanning Film 8 Preparing the Scanner 4 Specifications 11 Try Scanning 5 Safety Precautions 12 Using the Scanner Buttons 6
Quick Start Guide Please read this guide before operating this guide, store it in a safe place for future reference. After you finish reading this scanner. Table of Contents Package Contents 1 Scanning with MP Navigator EX......... 7 Installing the Software 2 Scanning Film 8 Preparing the Scanner 4 Specifications 11 Try Scanning 5 Safety Precautions 12 Using the Scanner Buttons 6
8800F Quick Start Guide Instructions
Page 3
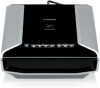
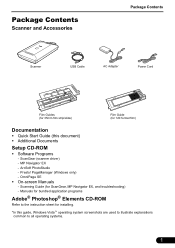
...ROM Refer to the instruction sheet for ScanGear, MP Navigator EX, and troubleshooting) - OmniPage SE • On-screen Manuals - Scanning Guide (for installing. *In this document) • Additional Documents Setup CD-ROM • Software Programs - Presto! Package Contents Scanner ...and Accessories Package Contents Scanner USB Cable AC Adapter Power Cord Film Guides (for 35mm film strip/slide) Film Guide (for 120 format film) Documentation • Quick Start Guide (this guide, Windows Vista™ operating system screenshots are used to illustrate explanations common ...
...ROM Refer to the instruction sheet for ScanGear, MP Navigator EX, and troubleshooting) - OmniPage SE • On-screen Manuals - Scanning Guide (for installing. *In this document) • Additional Documents Setup CD-ROM • Software Programs - Presto! Package Contents Scanner ...and Accessories Package Contents Scanner USB Cable AC Adapter Power Cord Film Guides (for 35mm film strip/slide) Film Guide (for 120 format film) Documentation • Quick Start Guide (this guide, Windows Vista™ operating system screenshots are used to illustrate explanations common ...
8800F Quick Start Guide Instructions
Page 5
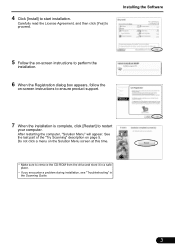
... remove the CD-ROM from the drive and store it in a safe place. • If you encounter a problem during installation, see "Troubleshooting" in the Scanning Guide. 3 After restarting the computer, "Solution Menu" will appear. 4 Click [Install] to proceed. Do not click a menu on the Solution Menu screen at this time. •...
... remove the CD-ROM from the drive and store it in a safe place. • If you encounter a problem during installation, see "Troubleshooting" in the Scanning Guide. 3 After restarting the computer, "Solution Menu" will appear. 4 Click [Install] to proceed. Do not click a menu on the Solution Menu screen at this time. •...
8800F Quick Start Guide Instructions
Page 7
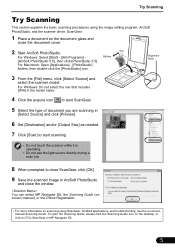
...in ScanGear or MP Navigator EX. 5 You can select MP Navigator EX, the Scanning Guide (onscreen manual), or the Online Registration. • For more information on -screen manual Scanning Guide. Bottom [ArcSoft PhotoStudio 5.5], then click [PhotoStudio 5.5]. Try Scanning Try Scanning This section ... the scanner driver, ScanGear. 1 Place a document on in ArcSoft PhotoStudio and close the window. To open the Scanning Guide, double-click the Scanning Guide icon on the desktop, or click on the document glass and close the document cover. 2 Start ArcSoft PhotoStudio. Top...
...in ScanGear or MP Navigator EX. 5 You can select MP Navigator EX, the Scanning Guide (onscreen manual), or the Online Registration. • For more information on -screen manual Scanning Guide. Bottom [ArcSoft PhotoStudio 5.5], then click [PhotoStudio 5.5]. Try Scanning Try Scanning This section ... the scanner driver, ScanGear. 1 Place a document on in ArcSoft PhotoStudio and close the window. To open the Scanning Guide, double-click the Scanning Guide icon on the desktop, or click on the document glass and close the document cover. 2 Start ArcSoft PhotoStudio. Top...
8800F Quick Start Guide Instructions
Page 8
... scanned image to a new email message. If the scanner buttons do not work properly, see the Scanning Guide. Start Image Capture, and then perform the following. - For more information, see "Troubleshooting" in the Scanning Guide. • For Mac OS X v.10.3.x and v.10.2.x (v.10.2.8 or later): Before using the scanner buttons, you will...
... scanned image to a new email message. If the scanner buttons do not work properly, see the Scanning Guide. Start Image Capture, and then perform the following. - For more information, see "Troubleshooting" in the Scanning Guide. • For Mac OS X v.10.3.x and v.10.2.x (v.10.2.8 or later): Before using the scanner buttons, you will...
8800F Quick Start Guide Instructions
Page 9
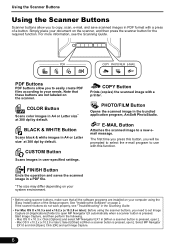
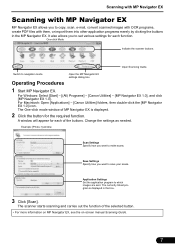
...Specify how you want to save your scans. The currently linked program is displayed. 2 Click the button for each function. Open Scanning Guide. Application Settings Set the application program to navigation mode. Operating Procedures Open the MP Navigator EX settings dialog box. 1 Start MP ...Navigator EX. A window will appear for the required function. For Windows: Select [Start] - [(All) Programs] - [Canon Utilities] - [MP Navigator EX 1.0], and click [MP Navigator EX 1.0]. One-click Mode Indicate the scanner buttons. Save Settings Specify how you want ...
...Specify how you want to save your scans. The currently linked program is displayed. 2 Click the button for each function. Open Scanning Guide. Application Settings Set the application program to navigation mode. Operating Procedures Open the MP Navigator EX settings dialog box. 1 Start MP ...Navigator EX. A window will appear for the required function. For Windows: Select [Start] - [(All) Programs] - [Canon Utilities] - [MP Navigator EX 1.0], and click [MP Navigator EX 1.0]. One-click Mode Indicate the scanner buttons. Save Settings Specify how you want ...
8800F Quick Start Guide Instructions
Page 10
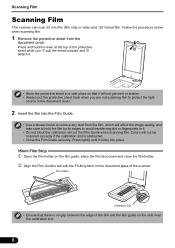
...35 mm film (film strip or slide) and 120 format film. Press lightly until it . • Do not block the calibration slot on the film guide, place the film face down and close the film holder. Film Holder Calibration Slot • Ensure that it . • Store the protective sheet in ...the document cover. 2 Insert the film into place. 35mm Film Strip c Open the film holder on the Film Guide when scanning film. Follow the procedure below when scanning film. 1 Remove the protective sheet from the film, which will not get bent or broken. •...
...35 mm film (film strip or slide) and 120 format film. Press lightly until it . • Do not block the calibration slot on the film guide, place the film face down and close the film holder. Film Holder Calibration Slot • Ensure that it . • Store the protective sheet in ...the document cover. 2 Insert the film into place. 35mm Film Strip c Open the film holder on the Film Guide when scanning film. Follow the procedure below when scanning film. 1 Remove the protective sheet from the film, which will not get bent or broken. •...
8800F Quick Start Guide Instructions
Page 11
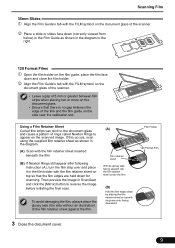
... (the side without an illustration) of the film retainer sheet against the film. (A) Film retainer sheet With its glossy side facing downward. d Align the Film Guide's tab with its glossy side facing upward, slip the film retainer sheet under the film. (B) Hold the film edges down by placing the film retainer... glass and cause a pattern of rings called Newton Rings to reverse the image before initiating the final scan. Scanning Film 35mm Slides c Align the Film Guide's tab with the film retainer sheet on top so that there is no gap between the edge of the film and the film...
... (the side without an illustration) of the film retainer sheet against the film. (A) Film retainer sheet With its glossy side facing downward. d Align the Film Guide's tab with its glossy side facing upward, slip the film retainer sheet under the film. (B) Hold the film edges down by placing the film retainer... glass and cause a pattern of rings called Newton Rings to reverse the image before initiating the final scan. Scanning Film 35mm Slides c Align the Film Guide's tab with the film retainer sheet on top so that there is no gap between the edge of the film and the film...
8800F Quick Start Guide Instructions
Page 12
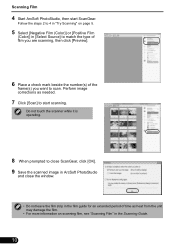
... the unit may damage the film. • For more information on page 5. 5 Select [Negative Film (Color)] or [Positive Film (Color)] in the film guide for an extended period of the frame(s) you want to match the type of film you are scanning, then click [Preview]. 6 Place a check mark beside...time as needed. 7 Click [Scan] to start ScanGear. Follow the steps 2 to 4 in "Try Scanning" on scanning film, see "Scanning Film" in the Scanning Guide. 10 Do not touch the scanner while it is operating. 8 When prompted to close ScanGear, click [OK]. 9 Save the scanned image in ArcSoft PhotoStudio and...
... the unit may damage the film. • For more information on page 5. 5 Select [Negative Film (Color)] or [Positive Film (Color)] in the film guide for an extended period of the frame(s) you want to match the type of film you are scanning, then click [Preview]. 6 Place a check mark beside...time as needed. 7 Click [Scan] to start ScanGear. Follow the steps 2 to 4 in "Try Scanning" on scanning film, see "Scanning Film" in the Scanning Guide. 10 Do not touch the scanner while it is operating. 8 When prompted to close ScanGear, click [OK]. 9 Save the scanned image in ArcSoft PhotoStudio and...


