
Quick Start Guide Instructions
Page 2
... 6 Preparing the Scanner 3 Specifications 9 Try Scanning 4 Package Contents Scanner and Accessories Scanner USB Cable AC Adapter Film Guide* (for Windows 98 First Edition) - Scanning Guide (for bundled application programs *In this document) • Additional Documents CanoScan Setup Utility CD-ROM • Software Programs - CanoScan Toolbox - ArcSoft PhotoStudio - Presto! PageManager (Windows only) - Manuals for ScanGear, CanoScan Toolbox, and...
... 6 Preparing the Scanner 3 Specifications 9 Try Scanning 4 Package Contents Scanner and Accessories Scanner USB Cable AC Adapter Film Guide* (for Windows 98 First Edition) - Scanning Guide (for bundled application programs *In this document) • Additional Documents CanoScan Setup Utility CD-ROM • Software Programs - CanoScan Toolbox - ArcSoft PhotoStudio - Presto! PageManager (Windows only) - Manuals for ScanGear, CanoScan Toolbox, and...
Quick Start Guide Instructions
Page 5
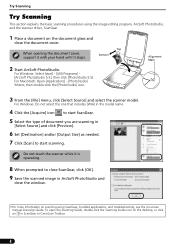
... in [Select Source] and click [Preview]. 6 Set [Destination] and/or [Output Size] as needed. 7 Click [Scan] to close ScanGear, click [OK]. 9 Save the scanned image in ScanGear or CanoScan Toolbox. 4 Do not touch the scanner while it stops. For Windows: Select [start scanning. Top Bottom 2 Start ArcSoft PhotoStudio. Try Scanning Try Scanning This section...
... in [Select Source] and click [Preview]. 6 Set [Destination] and/or [Output Size] as needed. 7 Click [Scan] to close ScanGear, click [OK]. 9 Save the scanned image in ScanGear or CanoScan Toolbox. 4 Do not touch the scanner while it stops. For Windows: Select [start scanning. Top Bottom 2 Start ArcSoft PhotoStudio. Try Scanning Try Scanning This section...
Quick Start Guide Instructions
Page 9
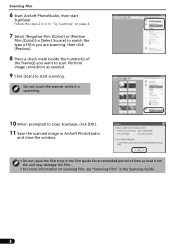
...information on page 4. 7 Select [Negative Film (Color)] or [Positive Film (Color)] in [Select Source] to match the type of film you want to close ScanGear, click [OK]. 11 Save the scanned image in ArcSoft PhotoStudio and close the window. • Do not leave the film strip in the Scanning Guide.... 8 Do not touch the scanner while it is operating. 10 When prompted to scan. Scanning Film 6 Start ArcSoft PhotoStudio, then start scanning. Follow the steps 2 to 4 in "Try ...
...information on page 4. 7 Select [Negative Film (Color)] or [Positive Film (Color)] in [Select Source] to match the type of film you want to close ScanGear, click [OK]. 11 Save the scanned image in ArcSoft PhotoStudio and close the window. • Do not leave the film strip in the Scanning Guide.... 8 Do not touch the scanner while it is operating. 10 When prompted to scan. Scanning Film 6 Start ArcSoft PhotoStudio, then start scanning. Follow the steps 2 to 4 in "Try ...
Quick Start Guide Instructions
Page 10
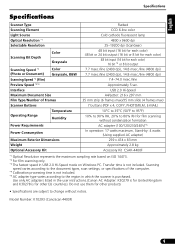
English Specifications Specifications Scanner Type Flatbed Scanning Element CCD 6-line color Light Source Cold cathode fluorescent lamp Optical Resolution *1 4800 x 9600 dpi Selectable Resolution 25-19200 dpi (ScanGear) Scanning Bit Depth Color Grayscale 48 bit input (16 bit for each color) 48 bit or 24 bit output (16 bit or... for other EU countries). Transfer time is for film scanning without notice. Use only AC adapters listed in the user instructions.(Canon AC Adapter: K30279 is for United Kingdom and K30278 is not included. Model Number: K10293 (CanoScan 4400F) 9
English Specifications Specifications Scanner Type Flatbed Scanning Element CCD 6-line color Light Source Cold cathode fluorescent lamp Optical Resolution *1 4800 x 9600 dpi Selectable Resolution 25-19200 dpi (ScanGear) Scanning Bit Depth Color Grayscale 48 bit input (16 bit for each color) 48 bit or 24 bit output (16 bit or... for other EU countries). Transfer time is for film scanning without notice. Use only AC adapters listed in the user instructions.(Canon AC Adapter: K30279 is for United Kingdom and K30278 is not included. Model Number: K10293 (CanoScan 4400F) 9

