
Users Manual - English
Page 7
..., needle, or other parts • A power failure occurs during use • Maintaining the machine • Leaving the machine unattended. 3. Use only neutral soaps or detergents to inspect and adjust the machine yourself. For a longer service life 1. Do not drop or hit the machine. 4. Do not store anything on the needle while sewing. Do not use or...
..., needle, or other parts • A power failure occurs during use • Maintaining the machine • Leaving the machine unattended. 3. Use only neutral soaps or detergents to inspect and adjust the machine yourself. For a longer service life 1. Do not drop or hit the machine. 4. Do not store anything on the needle while sewing. Do not use or...
Users Manual - English
Page 10
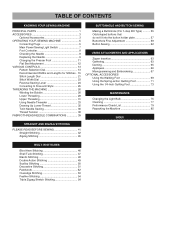
TABLE OF CONTENTS KNOWING YOUR SEWING MACHINE PRINCIPAL PARTS 1 ACCESSORIES 3 Optional Accessories 3 OPERATING YOUR SEWING MACHINE 5 Connecting Plugs 5 Main Power/Sewing Light Switch 7 Foot Controller 8 Checking the Needle 9 Replacing the Needle 9 Changing the Presser Foot 11 Flat Bed...ZIGZAG STITCHING PLEASE READ BEFORE SEWING 41 Straight Stitching 42 Zigzag Stitching 45 BUILT-IN STITCHES Blind Hem Stitching 46 Shell Tuck Stitching 47 Elastic Stitching 48 Double Action Stitching 49 Scallop Stitching 50 Decorative Stitching 51 Patchwork 52 Overedge Stitching 53 Feather ...
TABLE OF CONTENTS KNOWING YOUR SEWING MACHINE PRINCIPAL PARTS 1 ACCESSORIES 3 Optional Accessories 3 OPERATING YOUR SEWING MACHINE 5 Connecting Plugs 5 Main Power/Sewing Light Switch 7 Foot Controller 8 Checking the Needle 9 Replacing the Needle 9 Changing the Presser Foot 11 Flat Bed...ZIGZAG STITCHING PLEASE READ BEFORE SEWING 41 Straight Stitching 42 Zigzag Stitching 45 BUILT-IN STITCHES Blind Hem Stitching 46 Shell Tuck Stitching 47 Elastic Stitching 48 Double Action Stitching 49 Scallop Stitching 50 Decorative Stitching 51 Patchwork 52 Overedge Stitching 53 Feather ...
Users Manual - English
Page 13
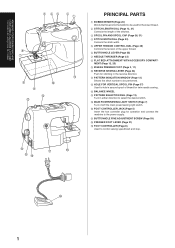
KNOWING YOUR SEWING MACHINE CONNAITRE SA MACHINE A COUDRE CONOZCA SU MÁQUINA DE COSER 5 43 2 1 6 7 A 8 : 9 B C PRINCIPAL PARTS 1 BOBBIN WINDER (Page 26) Winds the thread onto the bobbin to be performed. A PATTERN INDICATION WINDOW (Page 13) Shows the ...foot controller plug for stitching in either direction to the power supply. MENT (Page 12, 25) 9 ZIGZAG PRESSER FOOT (Page 3, 11) : REVERSE SEWING LEVER (Page 24) Push for operation and connect the machine to select the desired stitch. G BUTTONHOLE FINE ADJUSTMENT SCREW (Page 59) H PRESSER FOOT LEVER (Page 31) I 1
KNOWING YOUR SEWING MACHINE CONNAITRE SA MACHINE A COUDRE CONOZCA SU MÁQUINA DE COSER 5 43 2 1 6 7 A 8 : 9 B C PRINCIPAL PARTS 1 BOBBIN WINDER (Page 26) Winds the thread onto the bobbin to be performed. A PATTERN INDICATION WINDOW (Page 13) Shows the ...foot controller plug for stitching in either direction to the power supply. MENT (Page 12, 25) 9 ZIGZAG PRESSER FOOT (Page 3, 11) : REVERSE SEWING LEVER (Page 24) Push for operation and connect the machine to select the desired stitch. G BUTTONHOLE FINE ADJUSTMENT SCREW (Page 59) H PRESSER FOOT LEVER (Page 31) I 1
Users Manual - English
Page 15
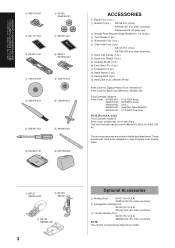
The above accessories are stored in the flat bed attachment. KNOWING YOUR SEWING MACHINE CONNAITRE SA MACHINE A COUDRE CONOZCA SU MÁQUINA DE COSER 1 X59370-051 2 SA156 XA5539-051 3 X57117-051 4 X57521-001 5 XA4911-151 6 SA144 XA7650-002 7 130012-054 8 130013-054 9 ... (Large) (1 pc.) 8 Spool Cap (Small) (1 pc.) 9 Cleaning Brush (1 pc.) 0 Extra Spool Pin (1 pc.) A Screwdriver (1 pc.) B Seam Ripper (1 pc.) C Darning Plate (1pc.) D Hard Case (1 pc.) (Model XR-46) Parts Code for Zigzag Presser Foot: X51953-051 Parts Code for Model XL-6562, XL-6452, XR46.
The above accessories are stored in the flat bed attachment. KNOWING YOUR SEWING MACHINE CONNAITRE SA MACHINE A COUDRE CONOZCA SU MÁQUINA DE COSER 1 X59370-051 2 SA156 XA5539-051 3 X57117-051 4 X57521-001 5 XA4911-151 6 SA144 XA7650-002 7 130012-054 8 130013-054 9 ... (Large) (1 pc.) 8 Spool Cap (Small) (1 pc.) 9 Cleaning Brush (1 pc.) 0 Extra Spool Pin (1 pc.) A Screwdriver (1 pc.) B Seam Ripper (1 pc.) C Darning Plate (1pc.) D Hard Case (1 pc.) (Model XR-46) Parts Code for Zigzag Presser Foot: X51953-051 Parts Code for Model XL-6562, XL-6452, XR46.
Users Manual - English
Page 81
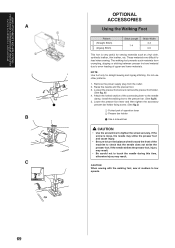
CAUTION When sewing with the walking foot, sew at medium to feed when sewing. These materials are difficult to low speeds. 69 A) 4. USING ATTACHMENTS AND ...See fig B) 5. NOTE: Use foot only for sewing materials such as vinyl cloth, synthetic leather, thin leather, etc. If the screw is very useful for straight sewing and zigzag stitching. Do not use other patterns....crumpling, slipping or sticking between presser foot and material due to even feeding of the machine to tighten the screw securely. Lower the presser foot lever and then tighten the accessory presser bar...
CAUTION When sewing with the walking foot, sew at medium to feed when sewing. These materials are difficult to low speeds. 69 A) 4. USING ATTACHMENTS AND ...See fig B) 5. NOTE: Use foot only for sewing materials such as vinyl cloth, synthetic leather, thin leather, etc. If the screw is very useful for straight sewing and zigzag stitching. Do not use other patterns....crumpling, slipping or sticking between presser foot and material due to even feeding of the machine to tighten the screw securely. Lower the presser foot lever and then tighten the accessory presser bar...
Users Manual - English
Page 83
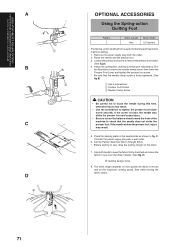
...needle and the presser foot. 3. Attach the quilting foot, making sure that part indicated by A in fig. If the needle strikes the presser foot, ... Use both hands to keep the fabric firmly stretched and move the fabric to sew, draw the quilting design on the fabric. 7. Place the darning plate on the machine's sewing speed. Connect the power supply plug into a wall outlet. 6. D) B...presser foot and cause injury. • Be sure to turn the balance wheel toward the front of the machine to remove the presser foot holder. (See fig.A) 4. Remove the power supply plug from the outlet....
...needle and the presser foot. 3. Attach the quilting foot, making sure that part indicated by A in fig. If the needle strikes the presser foot, ... Use both hands to keep the fabric firmly stretched and move the fabric to sew, draw the quilting design on the fabric. 7. Place the darning plate on the machine's sewing speed. Connect the power supply plug into a wall outlet. 6. D) B...presser foot and cause injury. • Be sure to turn the balance wheel toward the front of the machine to remove the presser foot holder. (See fig.A) 4. Remove the power supply plug from the outlet....
Users Manual - English
Page 98
... Threader 33 O Overedge Stitching 53 P Parallelogram Stitch 51 Patchwork 52 Pattern Indication Window 13 Pattern Selection Dial 13 Performance Check List 79 Presser Foot Lever 31 Principal parts 1 R Race 77 Rampart Stitch 49 Repacking the Machine 85 Reverse Sewing Lever 24 S Scallop Stitch 50 Sewing Ligh Light Bulb Replacement 75 Switch 7 Shell Tuck Stitch 47...
... Threader 33 O Overedge Stitching 53 P Parallelogram Stitch 51 Patchwork 52 Pattern Indication Window 13 Pattern Selection Dial 13 Performance Check List 79 Presser Foot Lever 31 Principal parts 1 R Race 77 Rampart Stitch 49 Repacking the Machine 85 Reverse Sewing Lever 24 S Scallop Stitch 50 Sewing Ligh Light Bulb Replacement 75 Switch 7 Shell Tuck Stitch 47...


