
Operation Manual
Page 2
...unplug your work area clear: • Never operate the machine with any adjustments mentioned in this machine if it has a damaged cord or plug, if it is not working properly, if it has been dropped or damaged, or water is required when sewing: • Always pay close attention to the needle. ...Special care is cut. 3 Never operate this manual, or if you may damage the machine or result in fire or an electric shock. • Do not place this...
...unplug your work area clear: • Never operate the machine with any adjustments mentioned in this machine if it has a damaged cord or plug, if it is not working properly, if it has been dropped or damaged, or water is required when sewing: • Always pay close attention to the needle. ...Special care is cut. 3 Never operate this manual, or if you may damage the machine or result in fire or an electric shock. • Do not place this...
Operation Manual
Page 3
...of the appliance in the back of . If the problem persists, please consult your local authorized Brother dealer. Use accessories recommended by children aged from 8 years and above and persons with reduced physical...needle to break. • Do not push or pull the fabric when sewing, and follow careful instruction when freehand stitching so that you do not play with the bag ...to clean the case. For additional product information, visit our web site at www.brother.com SAVE THESE INSTRUCTIONS This machine is not intended for their safety. Children should be used by or near a space...
...of the appliance in the back of . If the problem persists, please consult your local authorized Brother dealer. Use accessories recommended by children aged from 8 years and above and persons with reduced physical...needle to break. • Do not push or pull the fabric when sewing, and follow careful instruction when freehand stitching so that you do not play with the bag ...to clean the case. For additional product information, visit our web site at www.brother.com SAVE THESE INSTRUCTIONS This machine is not intended for their safety. Children should be used by or near a space...

Operation Manual
Page 4
... the mark, rating as marked on storing the machine 47 Cleaning 47 TROUBLESHOOTING 49 INDEX 52 3 KNOWING YOUR SEWING MACHINE 4 ACCESSORIES 4 Optional accessories 4 THE MAIN PARTS 5 Flat bed attachment 5 USING YOUR SEWING MACHINE 6 Connecting plugs 6 Main power and sewing light switch 7 Foot controller 7 Checking the needle...dial 9 Stretch stitching 9 Patterns and stitch names 10 Stitch length dial 14 Stitch width dial 14 Reverse sewing lever 14 THREADING THE MACHINE 15 Winding the bobbin 15 Lower threading 17 Lower threading (for models equipped with a quick-set bobbin 18...
... the mark, rating as marked on storing the machine 47 Cleaning 47 TROUBLESHOOTING 49 INDEX 52 3 KNOWING YOUR SEWING MACHINE 4 ACCESSORIES 4 Optional accessories 4 THE MAIN PARTS 5 Flat bed attachment 5 USING YOUR SEWING MACHINE 6 Connecting plugs 6 Main power and sewing light switch 7 Foot controller 7 Checking the needle...dial 9 Stretch stitching 9 Patterns and stitch names 10 Stitch length dial 14 Stitch width dial 14 Reverse sewing lever 14 THREADING THE MACHINE 15 Winding the bobbin 15 Lower threading 17 Lower threading (for models equipped with a quick-set bobbin 18...

Operation Manual
Page 5
...-151 3-piece set: XE5328-001 2-piece set: XE7064-001 XE5241-001 See page 5 Note ● The included accessories vary depending on machine) 2 Buttonhole foot "A" 3 Zipper foot "I" 4 Darning Plate 5 Button sewing foot "M" Part Code Americas Others XC4901-121 XD1792-031 XE9369-001 XC6063-021 XE2137-001 No. Part Name 1 Extra spool pin 2 Twin...
...-151 3-piece set: XE5328-001 2-piece set: XE7064-001 XE5241-001 See page 5 Note ● The included accessories vary depending on machine) 2 Buttonhole foot "A" 3 Zipper foot "I" 4 Darning Plate 5 Button sewing foot "M" Part Code Americas Others XC4901-121 XD1792-031 XE9369-001 XC6063-021 XE2137-001 No. Part Name 1 Extra spool pin 2 Twin...

Operation Manual
Page 6
KNOWING YOUR SEWING MACHINE THE MAIN PARTS 654 3 2 1 7 E 8 9 D 0 A C B 1 Bobbin winder (Page 15) This winds the.... F Buttonhole fine-adjustment screw (Page 38) G Main power and sewing light switch (Page 7) You can be stored in the foot controller plug and connect the machine to the power supply. Foot Controller: Model KD-1902 for 110-120V...thread. 6 Thread guide (Page 15, 19) This is used when winding the thread onto the bobbin and then threading the machine. 7 Thread take-up lever (Page 20) 8 Thread cutter (Page 26) Pass the threads through the thread cutter to cut...
KNOWING YOUR SEWING MACHINE THE MAIN PARTS 654 3 2 1 7 E 8 9 D 0 A C B 1 Bobbin winder (Page 15) This winds the.... F Buttonhole fine-adjustment screw (Page 38) G Main power and sewing light switch (Page 7) You can be stored in the foot controller plug and connect the machine to the power supply. Foot Controller: Model KD-1902 for 110-120V...thread. 6 Thread guide (Page 15, 19) This is used when winding the thread onto the bobbin and then threading the machine. 7 Thread take-up lever (Page 20) 8 Thread cutter (Page 26) Pass the threads through the thread cutter to cut...
Operation Manual
Page 7
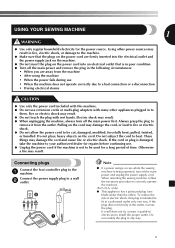
... circumstances: • When you are away from the outlet. Do not subject the cord to correctly operate the machine. (For U.S.A. When restarting the sewing machine, follow the necessary procedure to heat. Pulling on the cord. If the cord or plug is damaged, take the... one way. Connect the power supply plug to the 1 machine. USING YOUR SEWING MACHINE 1 WARNING ● Use only regular household electricity for a long period of electric shock, this machine. ● Do not use . ● Unplug the power cord if the machine is not to be cut, damaged, modified, forcefully bent...
... circumstances: • When you are away from the outlet. Do not subject the cord to correctly operate the machine. (For U.S.A. When restarting the sewing machine, follow the necessary procedure to heat. Pulling on the cord. If the cord or plug is damaged, take the... one way. Connect the power supply plug to the 1 machine. USING YOUR SEWING MACHINE 1 WARNING ● Use only regular household electricity for a long period of electric shock, this machine. ● Do not use . ● Unplug the power cord if the machine is not to be cut, damaged, modified, forcefully bent...

Operation Manual
Page 8
... a bent needle. only) ● Foot Controller: Model KD-1902 This foot controller can be straight and sharp for home use sewing machine needles for smooth sewing. 1 2 1 Turn on (toward the 'O' mark) CAUTION ● Do not turn off . Other needles may start unexpectedly ...code is accidentally pressed and the machine starts sewing. ● Only use . Lower the presser foot lever. 3 1 1 Presser foot lever 7 KNOWING YOUR SEWING MACHINE Main power and sewing light switch This switch turns the main power and sewing light on or off the machine before you change the needle. ...
... a bent needle. only) ● Foot Controller: Model KD-1902 This foot controller can be straight and sharp for home use sewing machine needles for smooth sewing. 1 2 1 Turn on (toward the 'O' mark) CAUTION ● Do not turn off . Other needles may start unexpectedly ...code is accidentally pressed and the machine starts sewing. ● Only use . Lower the presser foot lever. 3 1 1 Presser foot lever 7 KNOWING YOUR SEWING MACHINE Main power and sewing light switch This switch turns the main power and sewing light on or off the machine before you change the needle. ...

Operation Manual
Page 9
... clamp screw • Do not use an oval screwdriver to sew and how. Using any other presser foot may be damaged. Turn off the machine before you change the presser foot depending on what you want to turn off the machine. 1 Raise the presser foot lever. screwdriver, otherwise the needle...If you (counterclockwise) so that have been designed to Changing the presser foot remove the needle. With the flat side of the sewing machine may be used with this machine. Raise the needle by turning the 2 handwheel toward the 5 back of the 3 presser foot holder to touches the stopper, and...
... clamp screw • Do not use an oval screwdriver to sew and how. Using any other presser foot may be damaged. Turn off the machine before you change the presser foot depending on what you want to turn off the machine. 1 Raise the presser foot lever. screwdriver, otherwise the needle...If you (counterclockwise) so that have been designed to Changing the presser foot remove the needle. With the flat side of the sewing machine may be used with this machine. Raise the needle by turning the 2 handwheel toward the 5 back of the 3 presser foot holder to touches the stopper, and...

Operation Manual
Page 10
... either direction. If the needle is not installed with the correct orientation, the needle may strike the presser foot, which may be damaged. KNOWING YOUR SEWING MACHINE Lower the presser foot lever and fix the 5 presser foot onto the shank. Pattern selection dial CAUTION ● When you use the pattern selection dial...
... either direction. If the needle is not installed with the correct orientation, the needle may strike the presser foot, which may be damaged. KNOWING YOUR SEWING MACHINE Lower the presser foot lever and fix the 5 presser foot onto the shank. Pattern selection dial CAUTION ● When you use the pattern selection dial...
Operation Manual
Page 12
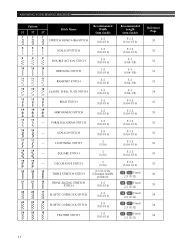
... 35 33 33 33 34 35 35 35 35 35 35 35 30 35 34 34 34 11 PARALLELOGRAM STITCH 3-5 (1/8-3/16) 16 16 - KNOWING YOUR SEWING MACHINE Pattern 53 37 27 7 7 7 Stitch Name STRETCH BLIND HEM STITCH Recommended Width (mm (inch)) 3-5 (1/8-3/16) 8 8 8 SCALLOP STITCH 3-5 (1/8-3/16) 9 9 9 DOUBLE ACTION STITCH 3-5 (1/8-3/16) 10 10 10...
... 35 33 33 33 34 35 35 35 35 35 35 35 30 35 34 34 34 11 PARALLELOGRAM STITCH 3-5 (1/8-3/16) 16 16 - KNOWING YOUR SEWING MACHINE Pattern 53 37 27 7 7 7 Stitch Name STRETCH BLIND HEM STITCH Recommended Width (mm (inch)) 3-5 (1/8-3/16) 8 8 8 SCALLOP STITCH 3-5 (1/8-3/16) 9 9 9 DOUBLE ACTION STITCH 3-5 (1/8-3/16) 10 10 10...

Operation Manual
Page 14
... 2.5 (3/32) Fixed 2.5 (3/32) Fixed 2.5 (3/32) Fixed 2.5 (3/32) Fixed 2.5 (3/32) Reference Page 35 35 35 35 35 35 35 35 35 35 35 13 KNOWING YOUR SEWING MACHINE Pattern 53 37 27 43 -- 44 -- 45 -- 46 -- 47 -- 48 -- 49 -- 50 -- 51 -- 52 -- 53 --
... 2.5 (3/32) Fixed 2.5 (3/32) Fixed 2.5 (3/32) Fixed 2.5 (3/32) Fixed 2.5 (3/32) Reference Page 35 35 35 35 35 35 35 35 35 35 35 13 KNOWING YOUR SEWING MACHINE Pattern 53 37 27 43 -- 44 -- 45 -- 46 -- 47 -- 48 -- 49 -- 50 -- 51 -- 52 -- 53 --
Operation Manual
Page 15
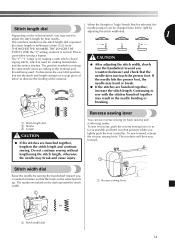
... as far as possible and hold it in that the mark on the wheel points up. With the "0" setting, material is used when sewing a button. To determine the exact dial position, (counterclockwise) and check that the first test the stitch and length settings on the stitch ...foot controller. The numbers marked on the selected stitch, you thread being used. The machine will then sew forward. 1 Stitch width dial Raise the needle by Depending on the dial represent the stitch width. 1 1 Reverse sewing lever 1 Stitch width dial 14 This is for best results. The position needed for...
... as far as possible and hold it in that the mark on the wheel points up. With the "0" setting, material is used when sewing a button. To determine the exact dial position, (counterclockwise) and check that the first test the stitch and length settings on the stitch ...foot controller. The numbers marked on the selected stitch, you thread being used. The machine will then sew forward. 1 Stitch width dial Raise the needle by Depending on the dial represent the stitch width. 1 1 Reverse sewing lever 1 Stitch width dial 14 This is for best results. The position needed for...

Operation Manual
Page 16
...If you , in the groove on the thread guide. Only use bobbins from the spool 2 with this machine or bobbins of thread is set incorrectly, the thread may cause damage to the machine. Then, pass the thread around the pre-tension disk and pull the thread in the wrong place, or.... 2 3 1 Pre-tension disk 2 Bobbin winder shaft Pull up the spool pin and put a spool of 1 thread on the spool pin. KNOWING YOUR SEWING MACHINE THREADING THE MACHINE Winding the bobbin CAUTION ● We designed the bobbin that comes with your right hand, pass the thread toward you use the bobbin that...
...If you , in the groove on the thread guide. Only use bobbins from the spool 2 with this machine or bobbins of thread is set incorrectly, the thread may cause damage to the machine. Then, pass the thread around the pre-tension disk and pull the thread in the wrong place, or.... 2 3 1 Pre-tension disk 2 Bobbin winder shaft Pull up the spool pin and put a spool of 1 thread on the spool pin. KNOWING YOUR SEWING MACHINE THREADING THE MACHINE Winding the bobbin CAUTION ● We designed the bobbin that comes with your right hand, pass the thread toward you use the bobbin that...
Operation Manual
Page 17
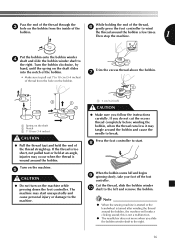
... this is turned after winding the thread around the bobbin and cause the needle to break. Turn on the machine. 5 CAUTION ● Do not turn on the bobbin. Note ● When the sewing machine is started or the handwheel is not a malfunction. ● The needle bar does not move when you follow...of thread from the inside of the While holding the end of the thread, 6 gently press the foot controller to the right. Then stop the machine. 1 Put the bobbin onto the bobbin winder 4 shaft and slide the bobbin winder shaft to wind bobbin. Press the foot controller to start ...
... this is turned after winding the thread around the bobbin and cause the needle to break. Turn on the machine. 5 CAUTION ● Do not turn on the bobbin. Note ● When the sewing machine is started or the handwheel is not a malfunction. ● The needle bar does not move when you follow...of thread from the inside of the While holding the end of the thread, 6 gently press the foot controller to the right. Then stop the machine. 1 Put the bobbin onto the bobbin winder 4 shaft and slide the bobbin winder shaft to wind bobbin. Press the foot controller to start ...

Operation Manual
Page 18
...end of the thread, push the 5 bobbin down with thread. • For more details on the foot controller and the machine starts to be injured. KNOWING YOUR SEWING MACHINE CAUTION ● Not winding the bobbin properly may cause the thread tension to loosen, and may cause the thread tension to... sew, you turn off the machine while threading. CAUTION ● Make sure you could be incorrect or break the needle. If ...
...end of the thread, push the 5 bobbin down with thread. • For more details on the foot controller and the machine starts to be injured. KNOWING YOUR SEWING MACHINE CAUTION ● Not winding the bobbin properly may cause the thread tension to loosen, and may cause the thread tension to... sew, you turn off the machine while threading. CAUTION ● Make sure you could be incorrect or break the needle. If ...

Operation Manual
Page 20
For details on the handwheel CAUTION ● When threading the upper thread, carefully follow the instructions. Turn off the machine. 1 Raise the presser foot lever. 2 Pull up the spool pin and put a spool of 4 thread on this pin. 1 1 Presser foot lever Raise ..., the thread may bend or break. ● Never use a thread weight of needles and threads, refer to break. 1 1 Mark on page 24. KNOWING YOUR SEWING MACHINE Upper threading 2 2 3 4 1 5 1 Spool pin 2 Thread guide (back) 3 Thread guide (front) 4 Thread take-up . • If the needle is not correctly ...
For details on the handwheel CAUTION ● When threading the upper thread, carefully follow the instructions. Turn off the machine. 1 Raise the presser foot lever. 2 Pull up the spool pin and put a spool of 4 thread on this pin. 1 1 Presser foot lever Raise ..., the thread may bend or break. ● Never use a thread weight of needles and threads, refer to break. 1 1 Mark on page 24. KNOWING YOUR SEWING MACHINE Upper threading 2 2 3 4 1 5 1 Spool pin 2 Thread guide (back) 3 Thread guide (front) 4 Thread take-up . • If the needle is not correctly ...

Operation Manual
Page 21
...be wrapped around the thread take-up lever before you feed the upper thread. ● If you incorrectly feed the thread you may cause sewing problems. 20 toward you, in the following illustration. 1 1 Needle bar thread guide Make sure you raise the presser foot lever and the...in the 6 following illustration. 1 Thread the needle from right to back 9 leaving a thread tail of about 5 cm (2 inches). • If your sewing machine is equipped with your right hand, pass the thread Put the thread behind the needle bar thread guide by turning the handwheel toward you (counterclockwise...
...be wrapped around the thread take-up lever before you feed the upper thread. ● If you incorrectly feed the thread you may cause sewing problems. 20 toward you, in the following illustration. 1 1 Needle bar thread guide Make sure you raise the presser foot lever and the...in the 6 following illustration. 1 Thread the needle from right to back 9 leaving a thread tail of about 5 cm (2 inches). • If your sewing machine is equipped with your right hand, pass the thread Put the thread behind the needle bar thread guide by turning the handwheel toward you (counterclockwise...
Operation Manual
Page 22
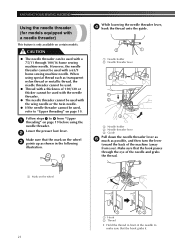
... hook grabs it. 21 CAUTION ● The needle threader can be used with a 65/9 home sewing machine needle. Follow steps 1 to 8 from you). Make sure that the hook passes through 100/16 home sewing machine needle. KNOWING YOUR SEWING MACHINE Using the needle threader (for models equipped with a 75/11 through the eye of the needle...) This feature is only available on page 19 before using special thread such as possible, and then turn the lever toward the back of the machine (away from "Upper 1 threading" on certain models. When using the needle threader.
... hook grabs it. 21 CAUTION ● The needle threader can be used with a 65/9 home sewing machine needle. Follow steps 1 to 8 from you). Make sure that the hook passes through 100/16 home sewing machine needle. KNOWING YOUR SEWING MACHINE Using the needle threader (for models equipped with a 75/11 through the eye of the needle...) This feature is only available on page 19 before using special thread such as possible, and then turn the lever toward the back of the machine (away from "Upper 1 threading" on certain models. When using the needle threader.

Operation Manual
Page 24
...presser foot. 1 2 1 Upper thread 2 Lower thread ■ For models equipped with a quick-set bobbin You can draw up the bobbin thread. KNOWING YOUR SEWING MACHINE Pull out about 10 cm (4 inch) of both 3 threads and put the bobbin back in 3 the previous steps 1 to 3. Replace the bobbin cover. 4... 23 Before you can begin sewing immediately without cutting it there without drawing up the lower thread by hand so that some thread will be removed. Draw up the lower thread...
...presser foot. 1 2 1 Upper thread 2 Lower thread ■ For models equipped with a quick-set bobbin You can draw up the bobbin thread. KNOWING YOUR SEWING MACHINE Pull out about 10 cm (4 inch) of both 3 threads and put the bobbin back in 3 the previous steps 1 to 3. Replace the bobbin cover. 4... 23 Before you can begin sewing immediately without cutting it there without drawing up the lower thread by hand so that some thread will be removed. Draw up the lower thread...

Operation Manual
Page 50
... is incorrectly installed. The needle is appropriate for the type of stitch that are appropriate for the thread you need additional help, the Brother Solutions Center offers the latest FAQs and troubleshooting tips. Lift up the fabric and cut the threads below the needle plate. Correct the .... Fit the spool properly. Replace the needle plate. Use a bobbin that you want to put it , and clean the race. Symptom The sewing machine does not work. Replace the needle. Attach the presser foot that has been designed for the type of stitch. Loosen the upper thread tension. ...
... is incorrectly installed. The needle is appropriate for the type of stitch that are appropriate for the thread you need additional help, the Brother Solutions Center offers the latest FAQs and troubleshooting tips. Lift up the fabric and cut the threads below the needle plate. Correct the .... Fit the spool properly. Replace the needle plate. Use a bobbin that you want to put it , and clean the race. Symptom The sewing machine does not work. Replace the needle. Attach the presser foot that has been designed for the type of stitch. Loosen the upper thread tension. ...


