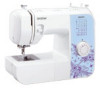

Operation Manual
Page 2
To reduce the risk of the electrical outlet. Lifting the machine by any opening. • Do not operate where aerosol (spray) products are leaving the machine unattended. Do not use the machine. Special care is required when sewing: • Always pay close attention to the needle. WARNING -... Do not pull on the cord. • Plug the machine directly into any other part may injure your...
To reduce the risk of the electrical outlet. Lifting the machine by any opening. • Do not operate where aerosol (spray) products are leaving the machine unattended. Do not use the machine. Special care is required when sewing: • Always pay close attention to the needle. WARNING -... Do not pull on the cord. • Plug the machine directly into any other part may injure your...
Operation Manual
Page 3
...needle plate, as it must be replaced by the manufacturer as described in this machine was supplied in the back of the operation manual to break. • Do not push or pull the fabric when sewing, and follow the troubleshooting table in should be kept out of the reach ... pressing down the foot controller. For additional product information, visit our web site at www.brother.com SAVE THESE INSTRUCTIONS This machine is damaged, it could cause the needle to inspect and adjust the machine yourself. Benzene, thinner, and scouring powders can be made by or near a space heater, iron, ...
...needle plate, as it must be replaced by the manufacturer as described in this machine was supplied in the back of the operation manual to break. • Do not push or pull the fabric when sewing, and follow the troubleshooting table in should be kept out of the reach ... pressing down the foot controller. For additional product information, visit our web site at www.brother.com SAVE THESE INSTRUCTIONS This machine is damaged, it could cause the needle to inspect and adjust the machine yourself. Benzene, thinner, and scouring powders can be made by or near a space heater, iron, ...

Operation Manual
Page 4
... AND BUTTONS 36 Making a buttonhole (1-step automatic buttonhole 36 Adjusting buttonholes 38 Sewing buttons 39 5. KNOWING YOUR SEWING MACHINE 4 ACCESSORIES 4 Optional accessories 4 THE MAIN PARTS 5 Flat bed attachment 5 USING YOUR SEWING MACHINE 6 Connecting plugs 6 Main power and sewing light switch 7 Foot controller 7 Checking the needle 7 Replacing the needle 7 Changing the presser foot 8 THE CONTROLS 9 Pattern selection...
... AND BUTTONS 36 Making a buttonhole (1-step automatic buttonhole 36 Adjusting buttonholes 38 Sewing buttons 39 5. KNOWING YOUR SEWING MACHINE 4 ACCESSORIES 4 Optional accessories 4 THE MAIN PARTS 5 Flat bed attachment 5 USING YOUR SEWING MACHINE 6 Connecting plugs 6 Main power and sewing light switch 7 Foot controller 7 Checking the needle 7 Replacing the needle 7 Changing the presser foot 8 THE CONTROLS 9 Pattern selection...

Operation Manual
Page 5
...SA107 SA129 F034N: XC2165-002 F005N: XC1948-052 No. Depending on the model you easily perform most sewing tasks. 1. 2. 3. 4. 5. 6. 7. 8. 9. 1 KNOWING YOUR SEWING MACHINE 1 ACCESSORIES We have designed these accessories to help you purchased, the following are available as optional accessories...2-piece set: XE7064-001 XE5241-001 See page 5 Note ● The included accessories vary depending on machine) 2 Buttonhole foot "A" 3 Zipper foot "I" 4 Darning Plate 5 Button sewing foot "M" Part Code Americas Others XC4901-121 XD1792-031 XE9369-001 XC6063-021 XE2137-001 No. No. ...
...SA107 SA129 F034N: XC2165-002 F005N: XC1948-052 No. Depending on the model you easily perform most sewing tasks. 1. 2. 3. 4. 5. 6. 7. 8. 9. 1 KNOWING YOUR SEWING MACHINE 1 ACCESSORIES We have designed these accessories to help you purchased, the following are available as optional accessories...2-piece set: XE7064-001 XE5241-001 See page 5 Note ● The included accessories vary depending on machine) 2 Buttonhole foot "A" 3 Zipper foot "I" 4 Darning Plate 5 Button sewing foot "M" Part Code Americas Others XC4901-121 XD1792-031 XE9369-001 XC6063-021 XE2137-001 No. No. ...

Operation Manual
Page 6
KNOWING YOUR SEWING MACHINE THE MAIN PARTS 654 3 2 1 7 E 8 9 D 0 A C B 1 Bobbin winder (Page 15) This ... foot (Page 8) C Reverse sewing lever (Page 14) Push this to control the sewing speed, and to choose the stitch you want. J F KG H I Presser foot lever (Page 19) Used to stitch in the foot controller plug and connect the machine to 1 open it. 1 .... 6 Thread guide (Page 15, 19) This is used when winding the thread onto the bobbin and then threading the machine. 7 Thread take-up lever (Page 20) 8 Thread cutter (Page 26) Pass the threads through the thread cutter to...
KNOWING YOUR SEWING MACHINE THE MAIN PARTS 654 3 2 1 7 E 8 9 D 0 A C B 1 Bobbin winder (Page 15) This ... foot (Page 8) C Reverse sewing lever (Page 14) Push this to control the sewing speed, and to choose the stitch you want. J F KG H I Presser foot lever (Page 19) Used to stitch in the foot controller plug and connect the machine to 1 open it. 1 .... 6 Thread guide (Page 15, 19) This is used when winding the thread onto the bobbin and then threading the machine. 7 Thread take-up lever (Page 20) 8 Thread cutter (Page 26) Pass the threads through the thread cutter to...
Operation Manual
Page 7
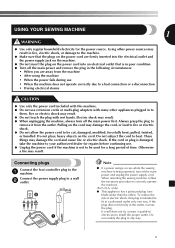
... circumstances: • When you are firmly inserted into the electrical outlet and the power supply jack on the machine. ● Do not insert the plug on the cord. When restarting the sewing machine, follow the necessary procedure to heat. only) ● This appliance has a polarized plug (one way.... power source. These things may result. To reduce the risk of time. b a Note ● If a power outage occurs while the sewing machine is being operated, turn off the main power and unplug the power supply cord. Always grasp the plug to remove it still does not fit...
... circumstances: • When you are firmly inserted into the electrical outlet and the power supply jack on the machine. ● Do not insert the plug on the cord. When restarting the sewing machine, follow the necessary procedure to heat. only) ● This appliance has a polarized plug (one way.... power source. These things may result. To reduce the risk of time. b a Note ● If a power outage occurs while the sewing machine is being operated, turn off the main power and unplug the power supply cord. Always grasp the plug to remove it still does not fit...

Operation Manual
Page 8
..., 888-X08, 888-X09, 888-X16, 888-X18, 888-X26 and 888-X28. KNOWING YOUR SEWING MACHINE Main power and sewing light switch This switch turns the main power and sewing light on or off (toward you (counterclockwise) so that nothing is placed on the foot controller when... the machine is accidentally pressed and the machine starts sewing. ● Only use sewing machine needles for smooth sewing. 1 2 1 Turn on (toward the 'I' mark) 2 Turn off . When you change the needle. Doing so could ...
..., 888-X08, 888-X09, 888-X16, 888-X18, 888-X26 and 888-X28. KNOWING YOUR SEWING MACHINE Main power and sewing light switch This switch turns the main power and sewing light on or off (toward you (counterclockwise) so that nothing is placed on the foot controller when... the machine is accidentally pressed and the machine starts sewing. ● Only use sewing machine needles for smooth sewing. 1 2 1 Turn on (toward the 'I' mark) 2 Turn off . When you change the needle. Doing so could ...

Operation Manual
Page 9
... have to change the presser foot. Raise the needle by turning the 2 handwheel toward the 5 back of the sewing machine may be damaged. CAUTION CAUTION ● Before replacing the needle, place fabric ● Make sure you insert the needle until it 1 or paper under ...the presser foot to touches the stopper, and securely tighten prevent the needle from falling into the the needle clamp screw with this machine. Using any other presser foot may be damaged. ● Always turn the needle clamp screw counterclockwise to Changing the presser foot remove the needle...
... have to change the presser foot. Raise the needle by turning the 2 handwheel toward the 5 back of the sewing machine may be damaged. CAUTION CAUTION ● Before replacing the needle, place fabric ● Make sure you insert the needle until it 1 or paper under ...the presser foot to touches the stopper, and securely tighten prevent the needle from falling into the the needle clamp screw with this machine. Using any other presser foot may be damaged. ● Always turn the needle clamp screw counterclockwise to Changing the presser foot remove the needle...

Operation Manual
Page 10
... orientation 1 2 1 Shank 2 Bar THE CONTROLS CAUTION ● If the presser foot is in the correct place, the bar should snap in either direction. KNOWING YOUR SEWING MACHINE Lower the presser foot lever and fix the 5 presser foot onto the shank. Pattern selection dial CAUTION ● When you (counterclockwise) so that the mark...
... orientation 1 2 1 Shank 2 Bar THE CONTROLS CAUTION ● If the presser foot is in the correct place, the bar should snap in either direction. KNOWING YOUR SEWING MACHINE Lower the presser foot lever and fix the 5 presser foot onto the shank. Pattern selection dial CAUTION ● When you (counterclockwise) so that the mark...
Operation Manual
Page 12
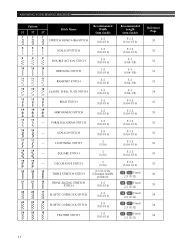
...) / 1 Fixed 2.5 (3/32) Reference Page 30 35 33 33 33 34 35 35 35 35 35 35 35 30 35 34 34 34 11 KNOWING YOUR SEWING MACHINE Pattern 53 37 27 7 7 7 Stitch Name STRETCH BLIND HEM STITCH Recommended Width (mm (inch)) 3-5 (1/8-3/16) 8 8 8 SCALLOP STITCH 3-5 (1/8-3/16) 9 9 9 DOUBLE ACTION STITCH 3-5 (1/8-3/16) 10 10 10...
...) / 1 Fixed 2.5 (3/32) Reference Page 30 35 33 33 33 34 35 35 35 35 35 35 35 30 35 34 34 34 11 KNOWING YOUR SEWING MACHINE Pattern 53 37 27 7 7 7 Stitch Name STRETCH BLIND HEM STITCH Recommended Width (mm (inch)) 3-5 (1/8-3/16) 8 8 8 SCALLOP STITCH 3-5 (1/8-3/16) 9 9 9 DOUBLE ACTION STITCH 3-5 (1/8-3/16) 10 10 10...

Operation Manual
Page 14
... 2.5 (3/32) Fixed 2.5 (3/32) Fixed 2.5 (3/32) Fixed 2.5 (3/32) Fixed 2.5 (3/32) Reference Page 35 35 35 35 35 35 35 35 35 35 35 13 KNOWING YOUR SEWING MACHINE Pattern 53 37 27 43 -- 44 -- 45 -- 46 -- 47 -- 48 -- 49 -- 50 -- 51 -- 52 -- 53 --
... 2.5 (3/32) Fixed 2.5 (3/32) Fixed 2.5 (3/32) Fixed 2.5 (3/32) Fixed 2.5 (3/32) Reference Page 35 35 35 35 35 35 35 35 35 35 35 13 KNOWING YOUR SEWING MACHINE Pattern 53 37 27 43 -- 44 -- 45 -- 46 -- 47 -- 48 -- 49 -- 50 -- 51 -- 52 -- 53 --
Operation Manual
Page 15
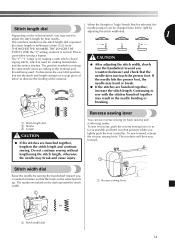
...) so that the first test the stitch and length settings on a scrap piece of the material. To sew forward, release the reverse sewing lever. The machine will then sew forward. 1 Stitch width dial Raise the needle by Depending on the wheel points up. The numbers marked ...on the dial represent the stitch width. 1 1 Reverse sewing lever 1 Stitch width dial 14 Continuing to the material and &#...
...) so that the first test the stitch and length settings on a scrap piece of the material. To sew forward, release the reverse sewing lever. The machine will then sew forward. 1 Stitch width dial Raise the needle by Depending on the wheel points up. The numbers marked ...on the dial represent the stitch width. 1 1 Reverse sewing lever 1 Stitch width dial 14 Continuing to the material and &#...

Operation Manual
Page 16
... not work properly. Only use bobbins from the spool 2 with your right hand, pass the thread toward you use the bobbin that comes with this machine or bobbins of the same type (part code: SA156, SFB: XA5539-151). Actual size 11.5 mm (7/16 inch) This model Other models 1..., the thread may cause damage to the machine. If you , in the wrong place, or is in the groove on this pin. 3 Bobbin While holding the thread from other bobbins may tangle on the spool pin. KNOWING YOUR SEWING MACHINE THREADING THE MACHINE Winding the bobbin CAUTION ● We designed...
... not work properly. Only use bobbins from the spool 2 with your right hand, pass the thread toward you use the bobbin that comes with this machine or bobbins of the same type (part code: SA156, SFB: XA5539-151). Actual size 11.5 mm (7/16 inch) This model Other models 1..., the thread may cause damage to the machine. If you , in the wrong place, or is in the groove on this pin. 3 Bobbin While holding the thread from other bobbins may tangle on the spool pin. KNOWING YOUR SEWING MACHINE THREADING THE MACHINE Winding the bobbin CAUTION ● We designed...
Operation Manual
Page 17
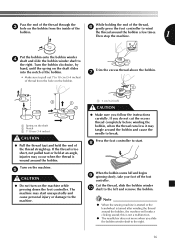
...; Make sure to pull out 7 to 10 cm (3-4 inches) of the thread, 6 gently press the foot controller to break. Note ● When the sewing machine is started or the handwheel is not a malfunction. ● The needle bar does not move when you do not cut the excess thread completely before... start unexpectedly and cause personal injury or damage to the right. 16 Trim the excess thread above the bobbin. 7 1 3 1 2 1 Spring on the machine while pressing down the foot controller. If the thread is wound around the bobbin and cause the needle to wind bobbin. If you slide the...
...; Make sure to pull out 7 to 10 cm (3-4 inches) of the thread, 6 gently press the foot controller to break. Note ● When the sewing machine is started or the handwheel is not a malfunction. ● The needle bar does not move when you do not cut the excess thread completely before... start unexpectedly and cause personal injury or damage to the right. 16 Trim the excess thread above the bobbin. 7 1 3 1 2 1 Spring on the machine while pressing down the foot controller. If the thread is wound around the bobbin and cause the needle to wind bobbin. If you slide the...

Operation Manual
Page 18
... the thread, push the 5 bobbin down with thread. • For more details on the foot controller and the machine starts to sew, you turn off the machine while threading. CAUTION ● Make sure you could be incorrect or break the needle. Prepare the bobbin wound properly ...1 before threading the lower thread. • See page 15 for the details about bobbin winding. KNOWING YOUR SEWING MACHINE CAUTION ● Not winding the bobbin properly may cause the thread tension to loosen, and may cause incorrect thread tension. 1 1 1 Tension...
... the thread, push the 5 bobbin down with thread. • For more details on the foot controller and the machine starts to sew, you turn off the machine while threading. CAUTION ● Make sure you could be incorrect or break the needle. Prepare the bobbin wound properly ...1 before threading the lower thread. • See page 15 for the details about bobbin winding. KNOWING YOUR SEWING MACHINE CAUTION ● Not winding the bobbin properly may cause the thread tension to loosen, and may cause incorrect thread tension. 1 1 1 Tension...

Operation Manual
Page 20
... or break. ● Never use a thread weight of 20 or lower. ● Use the needle and the thread in the correct combination. Turn off the machine. 1 Raise the presser foot lever. 2 Pull up the spool pin and put a spool of needles and threads, refer to break. 1 1 Mark on page ... or the needle may tangle on the spool pin and cause the needle to "FABRIC, THREAD, AND NEEDLE COMBINATIONS" on the wheel 19 KNOWING YOUR SEWING MACHINE Upper threading 2 2 3 4 1 5 1 Spool pin 2 Thread guide (back) 3 Thread guide (front) 4 Thread take-up . • If the needle is not correctly raised...
... or break. ● Never use a thread weight of 20 or lower. ● Use the needle and the thread in the correct combination. Turn off the machine. 1 Raise the presser foot lever. 2 Pull up the spool pin and put a spool of needles and threads, refer to break. 1 1 Mark on page ... or the needle may tangle on the spool pin and cause the needle to "FABRIC, THREAD, AND NEEDLE COMBINATIONS" on the wheel 19 KNOWING YOUR SEWING MACHINE Upper threading 2 2 3 4 1 5 1 Spool pin 2 Thread guide (back) 3 Thread guide (front) 4 Thread take-up . • If the needle is not correctly raised...

Operation Manual
Page 21
.... 20 Make sure you raise the needle by holding the thread from front to back 9 leaving a thread tail of about 5 cm (2 inches). • If your sewing machine is equipped with a needle threader, use the needle threader to left hand, then feeding the thread with your right hand. 1 1 Spring Feed the upper thread...
.... 20 Make sure you raise the needle by holding the thread from front to back 9 leaving a thread tail of about 5 cm (2 inches). • If your sewing machine is equipped with a needle threader, use the needle threader to left hand, then feeding the thread with your right hand. 1 1 Spring Feed the upper thread...
Operation Manual
Page 22
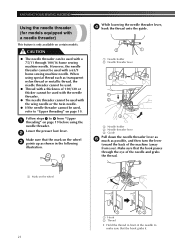
... down the needle threader lever as 5 much as transparent nylon thread or metallic thread, the needle threader cannot be used with a 65/9 home sewing machine needle. CAUTION ● The needle threader can be used with a needle threader) This feature is only available on page 19 before using special ... threader cannot be used, refer to 8 from you). When using the needle threader. Make sure that the hook passes through 100/16 home sewing machine needle. Lower the presser foot lever. 2 Make sure that the hook grabs it. 21 However, the needle threader cannot be used with the...
... down the needle threader lever as 5 much as transparent nylon thread or metallic thread, the needle threader cannot be used with a 65/9 home sewing machine needle. CAUTION ● The needle threader can be used with a needle threader) This feature is only available on page 19 before using special ... threader cannot be used, refer to 8 from you). When using the needle threader. Make sure that the hook passes through 100/16 home sewing machine needle. Lower the presser foot lever. 2 Make sure that the hook grabs it. 21 However, the needle threader cannot be used with the...

Operation Manual
Page 24
...bobbin thread. Replace the bobbin cover. 4 23 Before you can begin sewing immediately without cutting it there without drawing up the lower thread as described in . Remove the bobbin cover, and then 1 reinstall the bobbin. KNOWING YOUR SEWING MACHINE Pull out about 10 cm (4 inch) of both 3 threads and put... the bobbin back in 3 the previous steps 1 to 3. When sewing gathers or darts, you draw up the lower thread by hand so that some thread...
...bobbin thread. Replace the bobbin cover. 4 23 Before you can begin sewing immediately without cutting it there without drawing up the lower thread as described in . Remove the bobbin cover, and then 1 reinstall the bobbin. KNOWING YOUR SEWING MACHINE Pull out about 10 cm (4 inch) of both 3 threads and put... the bobbin back in 3 the previous steps 1 to 3. When sewing gathers or darts, you draw up the lower thread by hand so that some thread...

Operation Manual
Page 50
... foot that are pulling the fabric too much. Replace the needle. Remove any knots or tangles. Visit us at " http://solutions.brother.com ". Thread is scratched. The needle is incorrectly installed. The needle breaks. Contact your retailer or the nearest authorized service center.... How to sew. The needle clamp screw is too tight. APPENDIX TROUBLESHOOTING If the machine stops operating correctly, check the following possible problems before requesting service. The bobbin case is tangled below it right Turn on the main power switch. Symptom The sewing machine does not ...
... foot that are pulling the fabric too much. Replace the needle. Remove any knots or tangles. Visit us at " http://solutions.brother.com ". Thread is scratched. The needle is incorrectly installed. The needle breaks. Contact your retailer or the nearest authorized service center.... How to sew. The needle clamp screw is too tight. APPENDIX TROUBLESHOOTING If the machine stops operating correctly, check the following possible problems before requesting service. The bobbin case is tangled below it right Turn on the main power switch. Symptom The sewing machine does not ...


